2000 TOYOTA LAND CRUISER power steering
[x] Cancel search: power steeringPage 3 of 235
L/C 100_U3
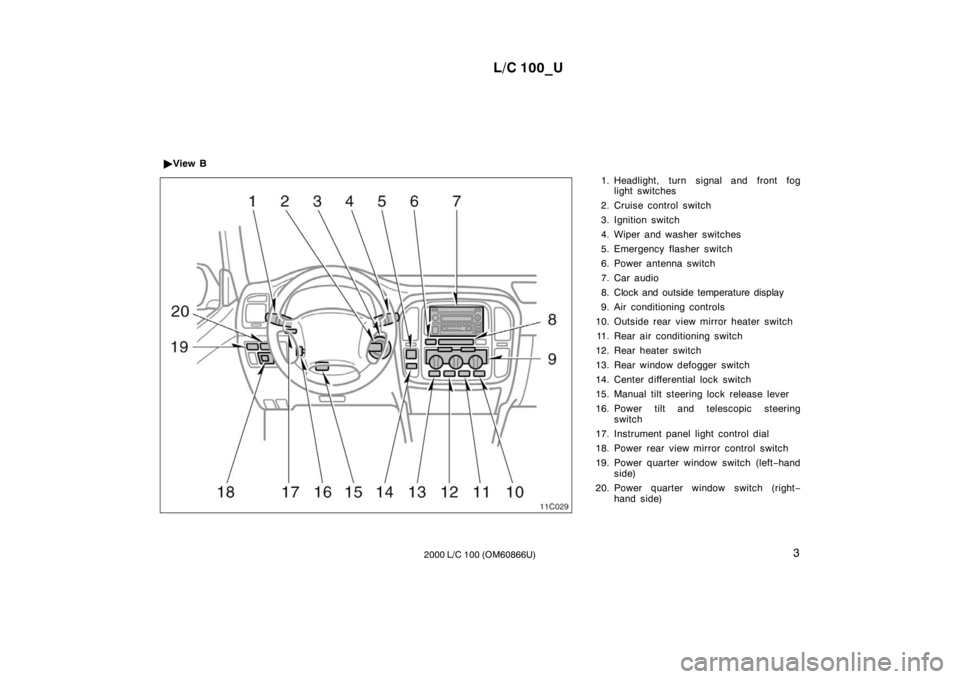
2000 L/C 100 (OM60866U) 1. Headlight, turn signal and front fog
light switches
2. Cruise control switch
3. Ignition switch
4. Wiper and washer switches
5. Emergency flasher switch
6. Power antenna switch
7. Car audio
8. Clock and outside temperature display
9. Air conditioning controls
10. Outside rear view mirror heater switch 11. Rear air conditioning switch
12. Rear heater switch
13. Rear window defogger switch
14. Center differential lock switch
15. Manual tilt steering lock release lever
16. Power tilt and telescopic steering switch
17. Instrument panel light control dial
18. Power rear view mirror control switch
19. Power quarter window switch (left −hand
side)
20. Power quarter window switch (right −
hand side)
�
View B
Page 9 of 235

L/C 100_U31
2000 L/C 100 (OM60866U) OPERATION OF INSTRUMENTS AND
CONTROLS
Seats, Seat belts, Steering wheel and Mirrors
Seats32
. . . . . . . . . . . . . . . . . . . . . . . . . . . . . . . . . . . . . . . . . . . . . . . . . . . . . .
Front seats32
. . . . . . . . . . . . . . . . . . . . . . . . . . . . . . . . . . . . . . . . . . . . . . . . .
Armrests 34
. . . . . . . . . . . . . . . . . . . . . . . . . . . . . . . . . . . . . . . . . . . . . . . . . . . .
Rear seat34
. . . . . . . . . . . . . . . . . . . . . . . . . . . . . . . . . . . . . . . . . . . . . . . . . . .
Head restraints43
. . . . . . . . . . . . . . . . . . . . . . . . . . . . . . . . . . . . . . . . . . . . . .
Seat heaters44
. . . . . . . . . . . . . . . . . . . . . . . . . . . . . . . . . . . . . . . . . . . . . . . .
Seat belts45
. . . . . . . . . . . . . . . . . . . . . . . . . . . . . . . . . . . . . . . . . . . . . . . . . . .
SRS driver and front passenger airbags54
. . . . . . . . . . . . . . . . . . . . . . . .
Child restraint61
. . . . . . . . . . . . . . . . . . . . . . . . . . . . . . . . . . . . . . . . . . . . . . .
Manual tilt steering wheel77
. . . . . . . . . . . . . . . . . . . . . . . . . . . . . . . . . . . . .
Power tilt and telescopic steering wheel77
. . . . . . . . . . . . . . . . . . . . . . . .
Outside rear view mirrors78
. . . . . . . . . . . . . . . . . . . . . . . . . . . . . . . . . . . . .
Anti −glare inside rear view mirror80
. . . . . . . . . . . . . . . . . . . . . . . . . . . . . .
Sun visors80
. . . . . . . . . . . . . . . . . . . . . . . . . . . . . . . . . . . . . . . . . . . . . . . . . . SECTION
1− 3
Page 32 of 235
L/C 100_U
54 2000 L/C 100 (OM60866U)
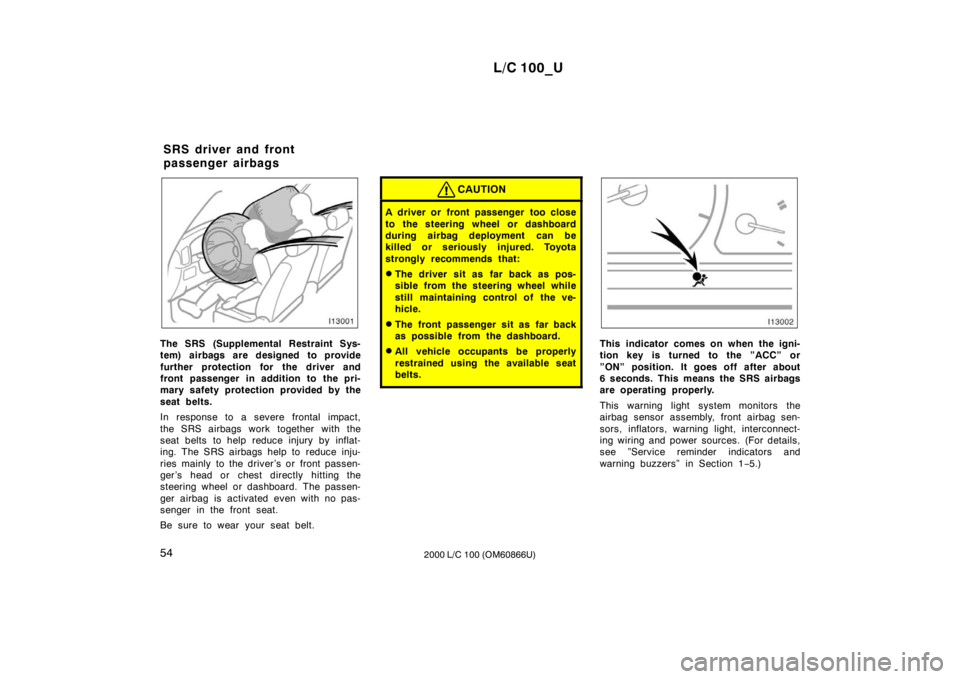
The SRS (Supplemental Restraint Sys-
tem) airbags are designed to provide
further protection for the driver and
front passenger in addition to the pri-
mary safety protection provided by the
seat belts.
In response to a severe frontal impact,
the SRS airbags work together with the
seat belts to help reduce injury by inflat-
ing. The SRS airbags help to reduce inju-
ries mainly to the driver’s or front passen-
ger ’s head or chest directly hitting the
steering wheel or dashboard. The passen-
ger airbag is activated even with no pas-
senger in the front seat.
Be sure to wear your seat belt.
CAUTION
A driver or front passenger too close
to the steering wheel or dashboard
during airbag deployment can be
killed or seriously injured. Toyota
strongly recommends that: �The driver sit as far back as pos-
sible from the steering wheel while
still maintaining control of the ve-
hicle.
� The front passenger sit as far back
as possible from the dashboard.
� All vehicle occupants be properly
restrained using the available seat
belts.
This indicator comes on when the igni-
tion key is turned to the ”ACC” or
”ON” position. It goes off after about
6 seconds. This means the SRS airbags
are operating properly.
This warning light system monitors the
airbag sensor assembly, front airbag sen-
sors, inflators, warning light, interconnect-
ing wiring and power sources. (For details,
see ”Service reminder indicators and
warning buzzers” in Section 1 −5.)
SRS driver and front
passenger airbags
Page 55 of 235
L/C 100_U77
2000 L/C 100 (OM60866U)
Manual tilt steering wheel
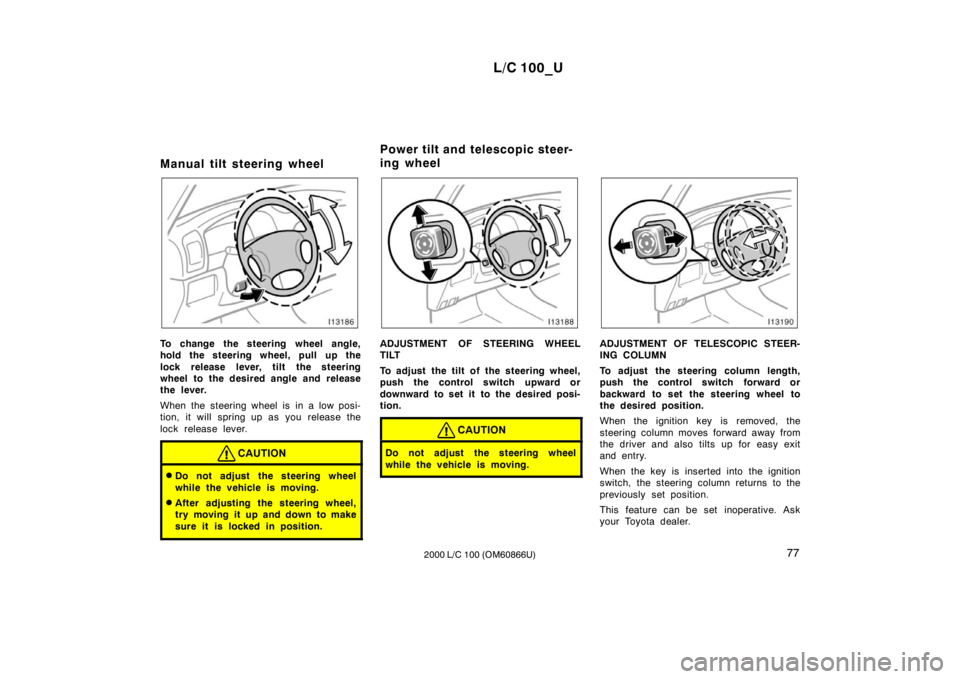
To change the steering wheel angle,
hold the steering wheel, pull up the
lock release lever, tilt the steering
wheel to the desired angle and release
the lever.
When the steering wheel is in a low posi-
tion, it will spring up as you release the
lock release lever.
CAUTION
�
Do not adjust the steering wheel
while the vehicle is moving.
� After adjusting the steering wheel,
try moving it up and down to make
sure it is locked in position.
ADJUSTMENT OF STEERING WHEEL
TILT
To adjust the tilt of the steering wheel,
push the control switch upward or
downward to set it to the desired posi-
tion.
CAUTION
Do not adjust the steering wheel
while the vehicle is moving.
ADJUSTMENT OF TELESCOPIC STEER-
ING COLUMN
To adjust the steering column length,
push the control switch forward or
backward to set the steering wheel to
the desired position.
When the ignition key is removed, the
steering column moves forward away from
the driver and also tilts up for easy exit
and entry.
When the key is inserted into the ignition
switch, the steering column returns to the
previously set position.
This feature can be set inoperative. Ask
your Toyota dealer.
Power tilt and telescopic steer-
ing wheel
Page 148 of 235
L/C 100_U
170 2000 L/C 100 (OM60866U)
There may be the case that the brake
system warning light stays on for a
bout
60 seconds after the engine is started. It
is normal if the light goes out after a
while.
Depressing the brake pedal repeatedly
may turn on the brake system warning
light and buzzer. It is normal if the light
goes out and the buzzer stops sounding
after a few seconds.
You may hear a small sound in the engine
compartment after the engine is started or
the brake pedal is depressed repeatedly.
This is a pump pulsating sound of the
brake system, and it is not a malfunction.
CAUTION
� Do not pump the brake pedal if the
engine stalls. Each push on the
pedal uses up your brake fluid
pressure reserve.
� Even if the power assist is com-
pletely lost, the brakes will still
work. But you will have to push the
pedal hard, much harder than nor-
mal. And your braking distance will
be longer.
ANTI −LOCK BRAKE SYSTEM
(with “ABS” warning light)
The anti −lock brake system is designed
to help prevent lock −up of the wheels
during a sudden braking or braking on
slippery road surfaces. This assists in
providing stability and steering perfor-
mance of the vehicle under these cir-
cumstances.
Effective way to press the ”ABS” brake
pedal: When the anti −lock brake system
function is in action, just hold the brake
pedal down more firmly. Especially in a
panic stop, you need to keep it de-
pressed more firmly, and do not pump
the brake. Pumping the brake pedal
makes the stopping distance longer.
The anti −lock brake system becomes op-
erative after the vehicle has accelerated
to a speed in excess of approximately 10
km/h (6 mph). It stops operating when the
vehicle decelerates to a speed below
approximately 5 km/h (3 mph).
Depressing the brake pedal on slippery
road surfaces such as on the manhole
cover, the steel plate under the construc-
tion, joints in the bridge, etc. on a rainy
day tends to activate the anti −lock brake
system. You may hear a click or motor sound in
the engine compartment for a few seconds
when the engine is started or just after
the vehicle is started. This means that the
anti
−lock brake system is in the self
check mode, and does not indicate a mal-
function.
When the anti −lock brake system is ac-
tivated, the following conditions may
occur, however, do not indicate a mal-
function of the system:
� You may hear the anti −lock brake sys-
tem operating and feel the brake pedal
pulsating and the vibrations of the body
and steering wheel. You may also hear
the motor sound in the engine compart-
ment even after the vehicle is stopped.
� At the end of the anti −lock brake sys-
tem activation, the brake pedal may
move a little forward.
Page 187 of 235
L/C 100_U223
2000 L/C 100 (OM60866U)
Brake fluid level
Make sure the brake fluid level is correct.
See Section 7
−2 for additional information.
Engine oil level
Check the level on the dipstick with the
engine turned off and the vehicle parked
on a level spot. See Section 7 −2 for addi-
tional information.
Power steering fluid level
Check the level through the reservoir. The
level should be in the ”HOT” or ”COLD”
range depending on the fluid temperature.
See Section 7 −2 for additional information.
Exhaust system
If you notice any change in the sound of
the exhaust or smell exhaust fumes, have
the cause located and corrected immedi-
ately. (See engine exhaust cautions in
Section 2.) Be on the alert for changes in perfor-
mance, sounds, and visual tip
−offs that
indicate service is needed. Some impor-
tant clues are as follows:
� Engine missing, stumbling, or pinging
� Appreciable loss of power
� Strange engine noises
� A fluid leak under the vehicle (however,
water dripping from the air conditioning
after use is normal.)
� Change in exhaust sound (This may
indicate a dangerous carbon monoxide
leak. Drive with the windows open and
have the exhaust system checked im-
mediately.)
� Flat −looking tire; excessive tire squeal
when cornering; uneven tire wear
� Vehicle pulls to one side when driving
straight on a level road
� Strange noises related to suspension
movement
� Loss of brake effectiveness; spongy
feeling brake pedal; pedal almost
touches floor; vehicle pulls to one side
when braking
� Engine coolant temperature continually
higher than normal �
Engine continually runs hot; oil pres-
sure gauge stays low
If you notice any of these clues, take your
vehicle to your Toyota dealer as soon as
possible. It probably needs adjustment or
repair.
CAUTION
Do not continue driving with the ve-
hicle unchecked. It could result in se-
rious vehicle damage and possibly
personal injury.
Does your vehicle need
repairing?
Page 190 of 235
L/C 100_U
226 2000 L/C 100 (OM60866U)
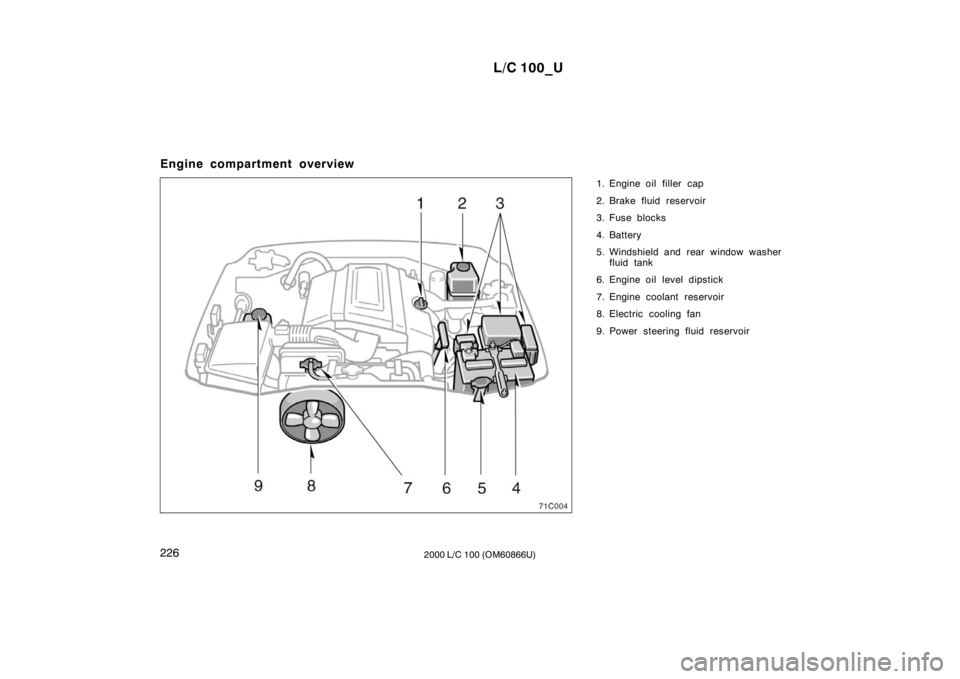
Engine compartment overview
1. Engine oil filler cap
2. Brake fluid reservoir
3. Fuse blocks
4. Battery
5. Windshield and rear window washerfluid tank
6. Engine oil level dipstick
7. Engine coolant reservoir
8. Electric cooling fan
9. Power steering fluid reservoir
Page 192 of 235
L/C 100_U
228 2000 L/C 100 (OM60866U)
If you perform maintenance by yourself,
be sure to follow the correct procedure
given in this section.
You should be aware that improper or in-
complete servicing may result in operating
problems.
Performing do
−it−yourself maintenance
during the warranty period may affect your
warranty coverage. Read the separate
Toyota Warranty statement for details and
suggestions.
This part gives instructions only for those
items that are relatively easy for an owner
to perform. As explained in section 6,
there are still a number of items that must
be done by a qualified technician with
special tools.
For information on tools and parts for do −
it −yourself maintenance, see ”Parts and
tools”.
Utmost care should be taken when work-
ing on your vehicle to prevent accidental
injury. Here are a few precautions that
you should be especially careful to ob-
serve:
CAUTION
� When the engine is running, keep
hands, clothing, and tools away
from the moving fan and engine
drive belts. (Removing rings,
watches, and ties is advisable.)
� Right after driving, the engine
compartment—the engine, radiator,
exhaust manifold, power steering
fluid reservoir and spark plug
boots, etc.—will be hot. So be care-
ful not to touch them. Oil, fluids
and spark plugs may also be hot.
� If the engine is hot, do not remove
the radiator cap or loosen the drain
plugs to prevent burning yourself.
� Do not smoke, cause sparks or al-
low open flames around fuel or the
battery. Their fumes are flammable.
� Be extremely cautious when work-
ing on the battery. It contains poi-
sonous and corrosive sulfuric acid.
� Do not get under your vehicle with
just the body jack supporting it. Al-
ways use automotive jack stands or
other solid supports.
�Be sure that the ignition is off if
you work near the electric cooling
fan or radiator grille. With the igni-
tion on, the electric cooling fan will
automatically start to run if the air
conditioning is on.
� Use eye protection whenever you
work on or under your vehicle
where you may be exposed to flying
or falling material, fluid spray, etc.
� Used engine oil contains potentially
harmful contaminants which may
cause skin disorders such as in-
flammation or skin cancer, so care
should be taken to avoid prolonged
and repeated contact with it. To re-
move used engine oil from your
skin, wash thoroughly with soap
and water.
� Do not leave used oil within the
reach of children.
� Dispose of used oil and filter only
in a safe and acceptable manner.
Do not dispose of used oil and fil-
ter in household trash, in sewers or
onto the ground. Call your dealer or
a service station for information
concerning recycling or disposal.
Do −it −yourself service
precautions