Page 610 of 4770
Tube Type
ANTI±RUST TREATMENT
When replacing body panels, always apply body sealer, anti±rust agent or undercoat according to the re-
quirements of your country.
HINT: For further details, see the description given in Section AR of this manual.
BODY SEALER
Apply body sealer to the
required areas.ANTI±RUST AGENT (WAX)
Cartridge Type
Apply anti±rust agent to
following sections.
�Inside of the hems of the
doors and hood.
�Around the hinges of the
doors and hood.
�Inside of the welded parts
with boxed cross±section.
UNDERCOAT
Apply undercoat to the underbody and
wheel housings.
Spray Gun Undercoating
(Oil base)Undercoating
(Water base)
INTRODUCTIONIN-13
Page 694 of 4770
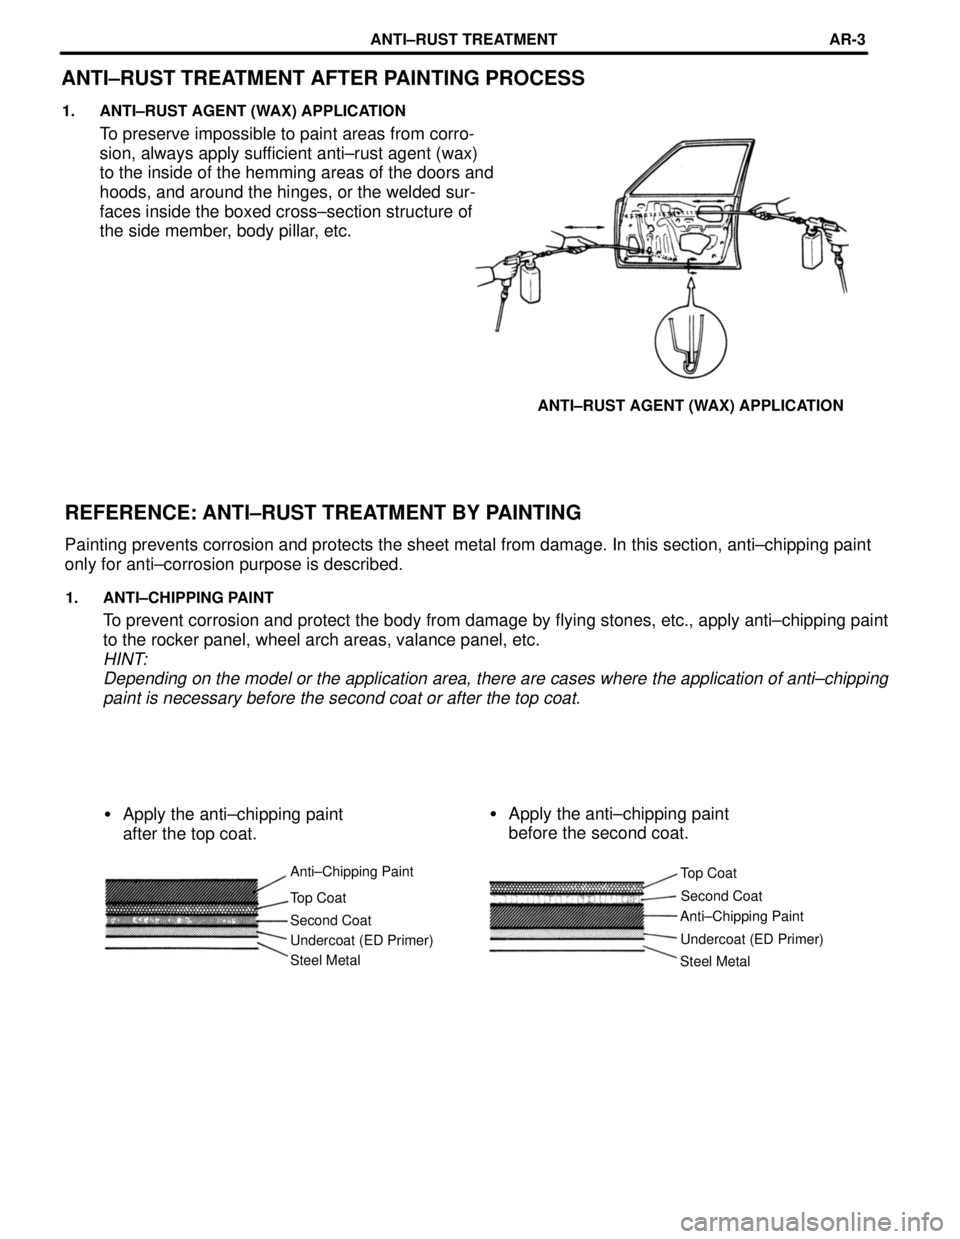
Steel MetalUndercoat (ED Primer) Anti±Chipping PaintSecond Coat
Steel Metal Undercoat (ED Primer) Second Coat Top Coat
ANTI±RUST TREATMENT AFTER PAINTING PROCESS
1. ANTI±RUST AGENT (WAX) APPLICATION
To preserve impossible to paint areas from corro-
sion, always apply sufficient anti±rust agent (wax)
to the inside of the hemming areas of the doors and
hoods, and around the hinges, or the welded sur-
faces inside the boxed cross±section structure of
the side member, body pillar, etc.
ANTI±RUST AGENT (WAX) APPLICATION
REFERENCE: ANTI±RUST TREATMENT BY PAINTING
Painting prevents corrosion and protects the sheet metal from damage. In this section, anti±chipping paint
only for anti±corrosion purpose is described.
1. ANTI±CHIPPING PAINT
To prevent corrosion and protect the body from damage by flying stones, etc., apply anti±chipping paint
to the rocker panel, wheel arch areas, valance panel, etc.
HINT:
Depending on the model or the application area, there are cases where the application of anti±chipping
paint is necessary before the second coat or after the top coat.
�Apply the anti±chipping paint
before the second coat. �Apply the anti±chipping paint
after the top coat.
Anti±Chipping Paint
Top Coat
ANTI±RUST TREATMENTAR-3
Page 700 of 4770
BODY PANEL ANTI±RUST AGENT (WAX) APPLICATION AREAS
HINT:
1. Whenever adjusting the doors and hoods, apply anti±rust agent (wax) around the hinges.
2. Even if partially repairing a part, apply anti±rust agent (wax) over the entire application area of the part.
3. Wipe off the anti±rust agent immediately with a rag soaked in a grease, wax and silicone remover, if
accidently applied to other areas.
Luggage Compartment Door
Hood Hinge
Fuel Filler Opening
Rid Hinge
Hood
Door
Front Door Hinge
Floor Door Hinge
ANTI±RUST TREATMENTAR-9
Page 705 of 4770

1,312
(51.65)E±eF±f
1,484
(58.43)1,494
(58.82)G±gVehicle Dimensions Left e Right
1,496
(58.90)H±h
1,134
(44.65)I±i
1,238
(48.74)J±jK±k
1,492
(58.74)E±f
or
e±F
1,577
(62.09)1, 632
(64.25)E±h
or
e±H
1,454
(57.24)E±j
or
e±J
1,856
(69.13)F±j
or
f±JF±k
or
f±K
1,695
(66.73)H±i
or
h±I
1,626
(64.02)J±k
or
j±K
1,568
(61.73)
HINT: For symbols, capital letters indicate right side of vehicle,
small letters indicate left side of vehicle (Seen from rear).
(Three±Dimensional Distance)
mm (in.)
Hole dia.
13 (0.51)
13 (0.51) Name
Rocker panel assembly mark
Roof side rail assembly mark
Center body pillar assembly mark
Center body pillar assembly mark
Rear door hinge installation hole ± upper
Rear door hinge installation hole ± front Symbol
H, h
I, i
J, j
K, k
L, l
M, m Hole dia.
10 (0.39) nut
10 (0.39) nut Name
Roof panel / Front body pillar assembly mark
Cowl top panel / Front body pillar assembly mark
Front door hinge installation nut±rear
Front door hinge installation nut±rear
Front body pillar assembly mark
Front body pillar assembly mark
Rocker panel assembly mark Symbol
A, a
B, b
C, c
D, d
E, e
F, f
G, g
BODY OPENING AREAS (Side View: Front)
BODY DIMENSIONSDI-4
Page 918 of 4770
'99camry U
152
CAUTION
�To reduce the chance of injury in
case of an accident or a sudden
stop, always keep the garage door
opener box closed while driving.
�Keep the remained spacers away
from children.
The miscellaneous box and garage door
opener box (stored in the glove box)
are interchangeable.
Removing the coverÐ
Half open the cover. Pinch each hinge and
pull it out of its pivot one by one as
shown above.
Do not remove the cover forcibly.Installing the coverÐ
Align the hinges to the pivots, and press
each hinge with a thumb until you hear a
click.
Make sure that the cover opens and
closes smoothly.
Page 1970 of 4770
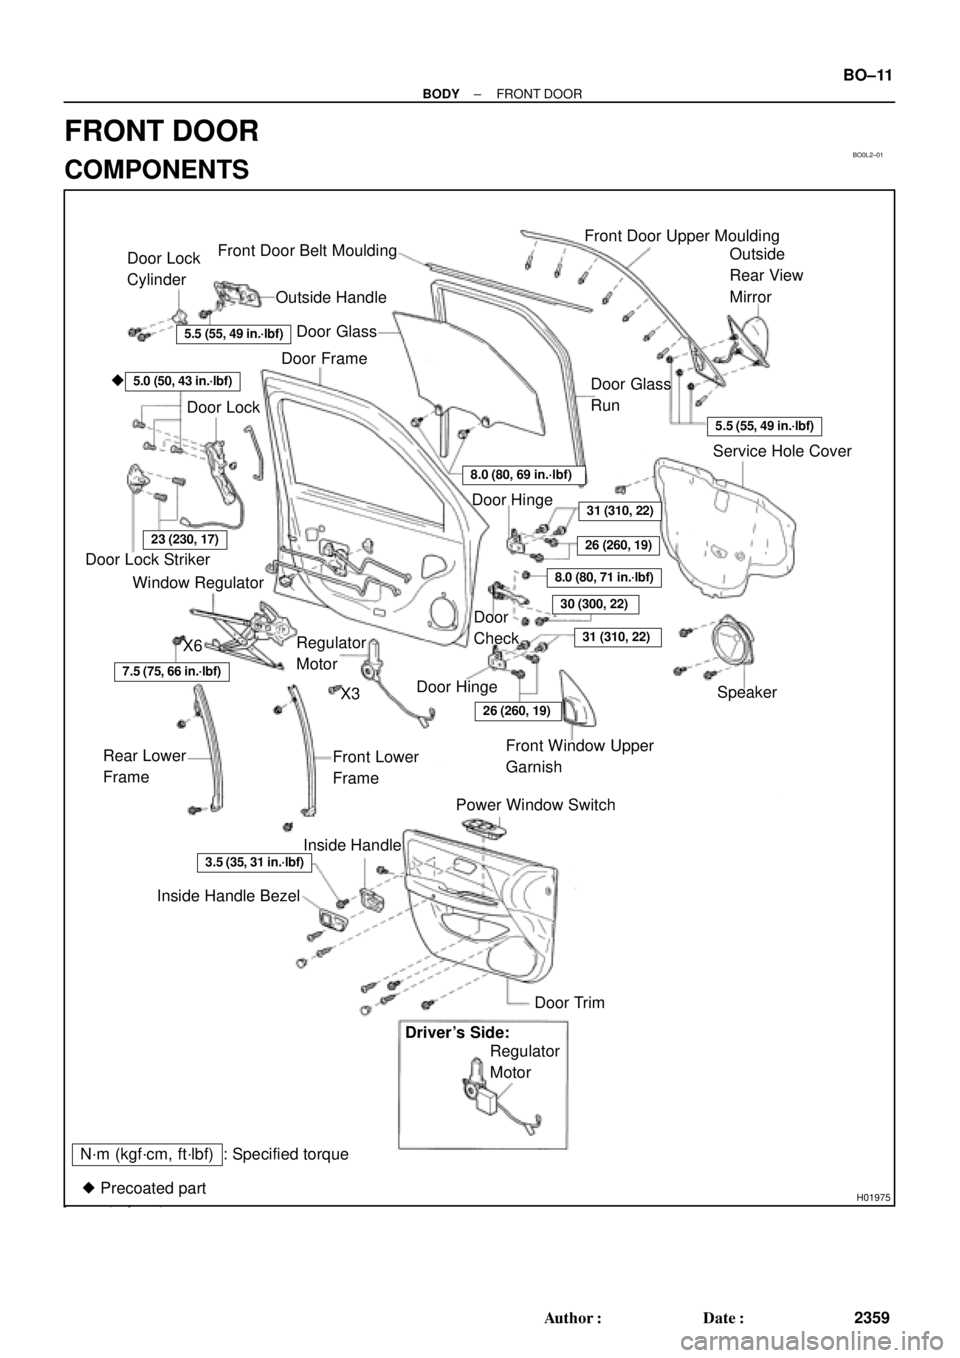
BO0L2±01
H01975
Door Lock
Cylinder
Outside Handle Front Door Belt Moulding
Door Glass
Door FrameFront Door Upper Moulding
Outside
Rear View
Mirror
Door Glass
Run
5.5 (55, 49 in.´lbf)
5.5 (55, 49 in.´lbf)
5.0 (50, 43 in.´lbf)�
Door Lock
23 (230, 17)
Window Regulator
8.0 (80, 69 in.´lbf)
Door Hinge
X6
7.5 (75, 66 in.´lbf)
Regulator
Motor
X3
31 (310, 22)
26 (260, 19)
8.0 (80, 71 in.´lbf)
30 (300, 22)
31 (310, 22)
Door
Check
Door Hinge
26 (260, 19)
Speaker
Power Window Switch Rear Lower
FrameFront Lower
FrameFront Window Upper
Garnish
Inside Handle Bezel
3.5 (35, 31 in.´lbf)
Driver's Side:
Regulator
Motor
Ptdt
N´m (kgf´cm, ft´lbf) : Specified torqueInside Handle
Door Trim
� Precoated part Door Lock StrikerService Hole Cover
± BODYFRONT DOOR
BO±11
2359 Author�: Date�:
FRONT DOOR
COMPONENTS
Page 1974 of 4770
BO0L4±01
N20966SST
N20967
BO2556
± BODYFRONT DOOR
BO±15
2363 Author�: Date�:
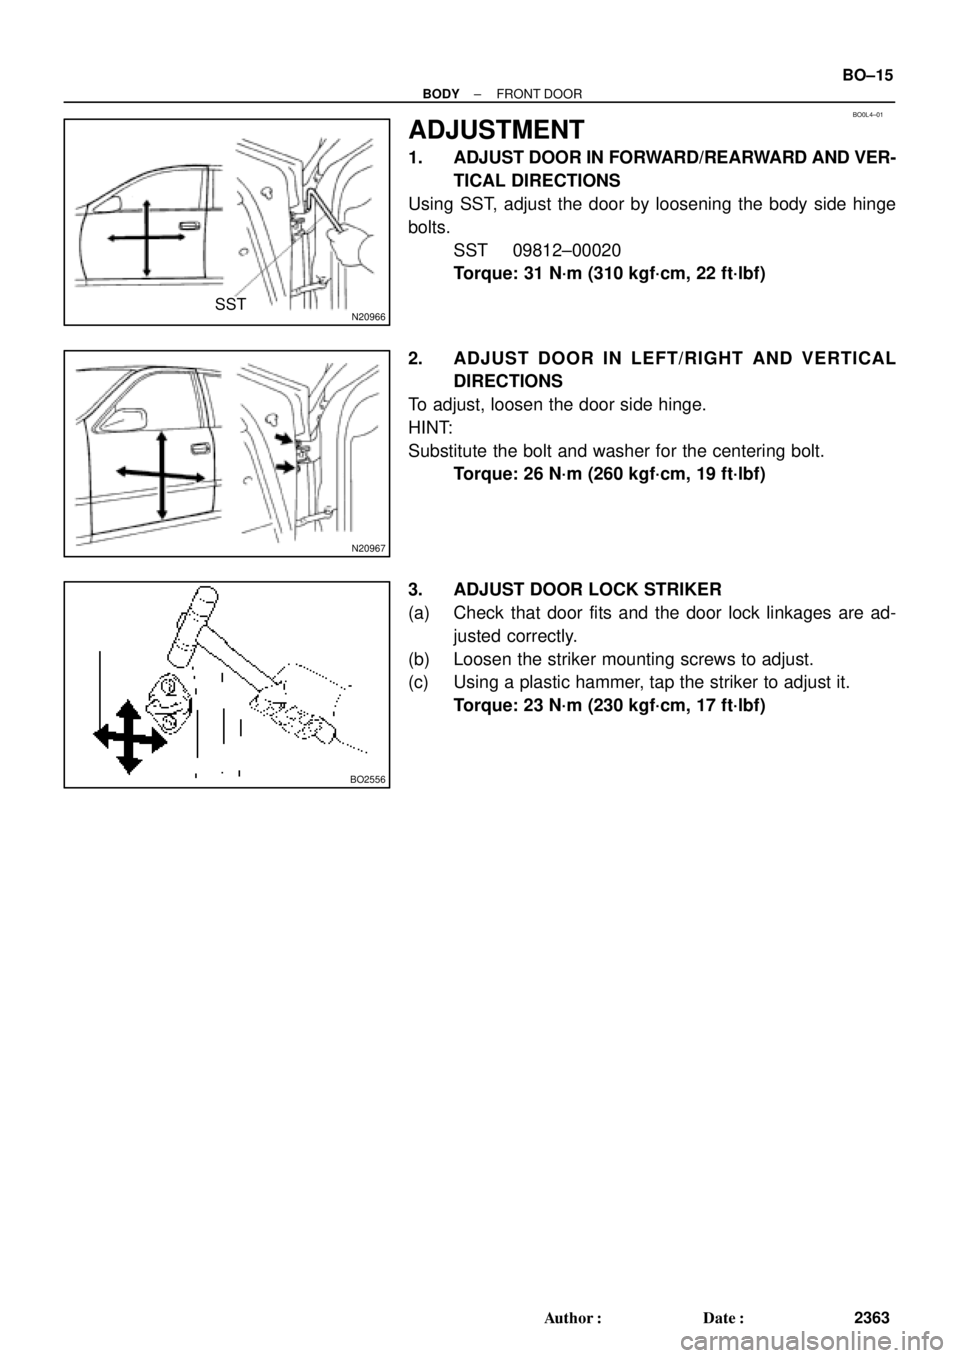
ADJUSTMENT
1. ADJUST DOOR IN FORWARD/REARWARD AND VER-
TICAL DIRECTIONS
Using SST, adjust the door by loosening the body side hinge
bolts.
SST 09812±00020
Torque: 31 N´m (310 kgf´cm, 22 ft´lbf)
2. ADJUST DOOR IN LEFT/RIGHT AND VERTICAL
DIRECTIONS
To adjust, loosen the door side hinge.
HINT:
Substitute the bolt and washer for the centering bolt.
Torque: 26 N´m (260 kgf´cm, 19 ft´lbf)
3. ADJUST DOOR LOCK STRIKER
(a) Check that door fits and the door lock linkages are ad-
justed correctly.
(b) Loosen the striker mounting screws to adjust.
(c) Using a plastic hammer, tap the striker to adjust it.
Torque: 23 N´m (230 kgf´cm, 17 ft´lbf)
Page 1976 of 4770
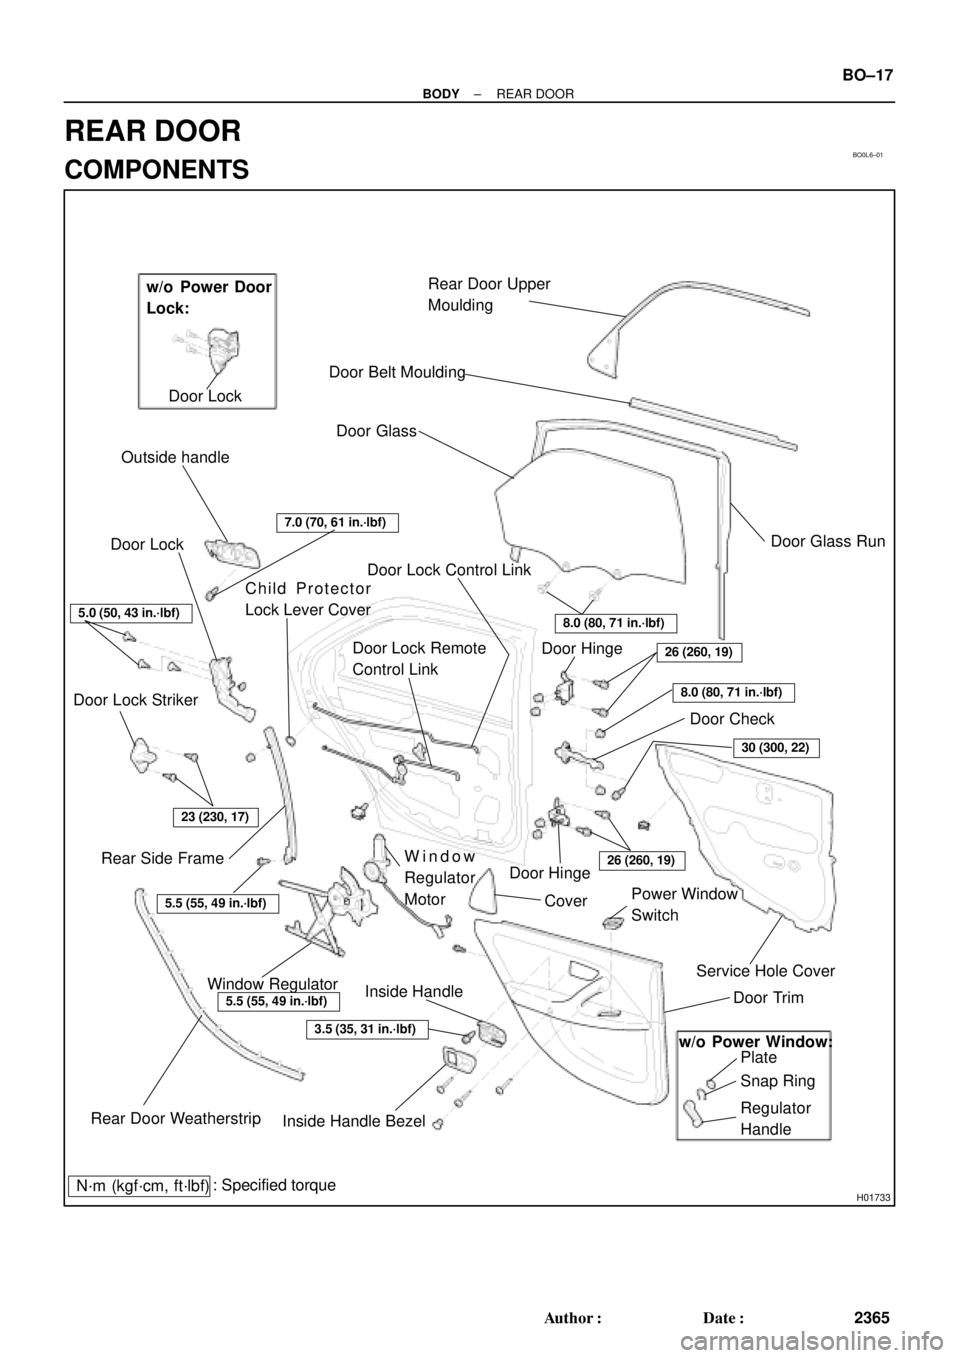
BO0L6±01
H01733
Door LockRear Door Upper
Moulding
Door Belt Moulding
Door Glass
Outside handle
Door Glass Run
Door Lock
Door Lock Striker
Rear Side Frame
Rear Door WeatherstripWindow Regulator
Inside Handle BezelInside HandleWindow
Regulator
Motor Child Protector
Lock Lever Cover
Snap Ring
Regulator
Handle Plate Door Trim Service Hole Cover Power Window
Switch Cover Door HingeDoor Hinge
Door Check w/o Power Door
Lock:
w/o Power Window:
: Specified torque
N´m (kgf´cm, ft´lbf)
3.5 (35, 31 in.´lbf)
5.5 (55, 49 in.´lbf)
5.5 (55, 49 in.´lbf)
23 (230, 17)
7.0 (70, 61 in.´lbf)
Door Lock Control Link
Door Lock Remote
Control Link
5.0 (50, 43 in.´lbf)
8.0 (80, 71 in.´lbf)
26 (260, 19)
8.0 (80, 71 in.´lbf)
30 (300, 22)
26 (260, 19)
± BODYREAR DOOR
BO±17
2365 Author�: Date�:
REAR DOOR
COMPONENTS