Page 87 of 447
AUTOMATIC TRANSMISSION (4 A/T) 7B-45
DTC P0725 (DTC NO.35) ENGINE SPEED INPUT CIRCUIT MALFUNCTION
1. ECM 3. TCM coupler (viewed from harness side)
2. TCM 4. ECM coupler (viewed from harness side)
DTC DETECTING CONDITION
Inputted engine rev. signal too low or too high.
Step Action Yes No
1 Check DTC of “ENGINE DIAGNOSIS” referring
to Section 6.
Is there DTC related to engine speed sensor?Inspect and repair refer-
ring to DTC flow table of
“ENGINE DIAGNOSIS” in
Section 6.Go to Step 2.
2 1) Turn ignition switch OFF and disconnect
ECM or TCM couplers.
2) Measure resistance between terminal “G02-
16” and “C43-5” of disconnected harness
side coupler.
Is it about 0 Ω
?Go to Step 3.“BRN” wire open.
3 Measure resistance between terminal “C43-5”
of disconnected harness side coupler and body
ground.
Is it infinity?Go to Step 4.“BRN” wire shorted to
ground
Page 93 of 447

AUTOMATIC TRANSMISSION (4 A/T) 7B-51
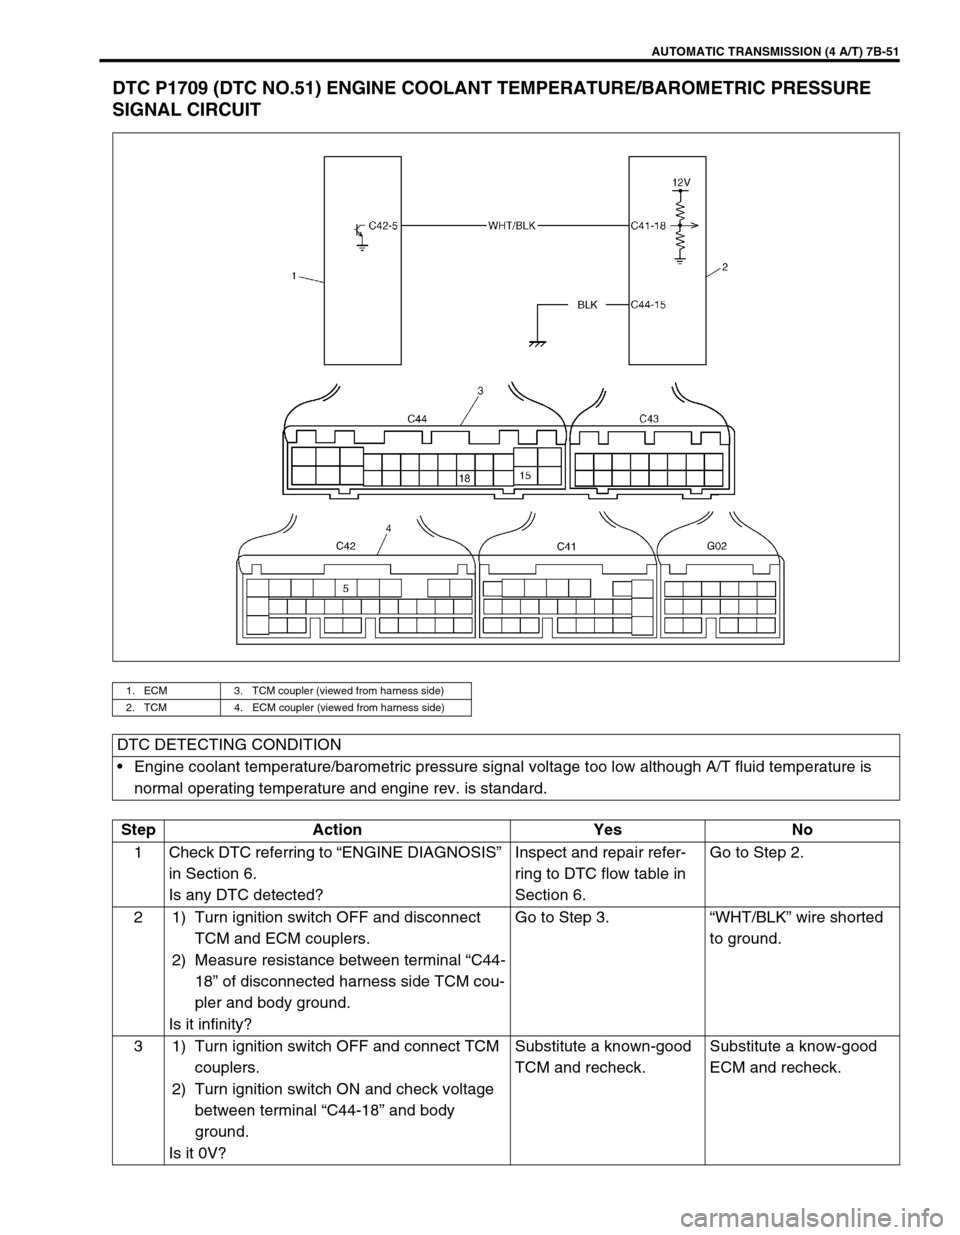
DTC P1709 (DTC NO.51) ENGINE COOLANT TEMPERATURE/BAROMETRIC PRESSURE
SIGNAL CIRCUIT
1. ECM 3. TCM coupler (viewed from harness side)
2. TCM 4. ECM coupler (viewed from harness side)
DTC DETECTING CONDITION
Engine coolant temperature/barometric pressure signal voltage too low although A/T fluid temperature is
normal operating temperature and engine rev. is standard.
Step Action Yes No
1 Check DTC referring to “ENGINE DIAGNOSIS”
in Section 6.
Is any DTC detected?Inspect and repair refer-
ring to DTC flow table in
Section 6.Go to Step 2.
2 1) Turn ignition switch OFF and disconnect
TCM and ECM couplers.
2) Measure resistance between terminal “C44-
18” of disconnected harness side TCM cou-
pler and body ground.
Is it infinity?Go to Step 3.“WHT/BLK” wire shorted
to ground.
3 1) Turn ignition switch OFF and connect TCM
couplers.
2) Turn ignition switch ON and check voltage
between terminal “C44-18” and body
ground.
Is it 0V?Substitute a known-good
TCM and recheck.Substitute a know-good
ECM and recheck.
Page 98 of 447
7B-56 AUTOMATIC TRANSMISSION (4 A/T)
FLUID LEVEL AT ROOM TEMPERATURE
INSPECTION
The fluid level check at room temperature performed after repair
or fluid change before test driving is just preparation for level
check of normal operation temperature. The checking procedure
itself is the same as that described previously. If the fluid level is
between FULL COLD and LOW COLD, proceed to test drive. And
when the fluid temperature has reached the normal operating
temperature, check fluid again and adjust it as necessary.
FLUID CHANGE
1) Lift up vehicle.
2) When engine has cooled down, remove drain plug (1) from
oil pan and drain A/T fluid.
3) Install drain plug.
Tightening torque
A/T fluid drain plug (a) : 23 N·m (2.3 kg-m, 16.5 lb-ft)
1. Dipstick
2.“FULL HOT” mark
3.“LOW HOT” mark
4.“FULL COLD” mark
5.“LOW COLD” mark
Page 111 of 447
AUTOMATIC TRANSMISSION (4 A/T) 7B-69
TRANSMISSION CONTROL MODULE (TCM)
REMOVAL
1) Disconnect negative cable at battery.
2) If the vehicle is equipped with air bag system, disable air bag
system. Refer to “DISABLING AIR BAG SYSTEM” in Sec-
tion 10B.
3) Disconnect couplers from TCM (1) and ECM (2).
4) Loosen bolt and nuts and remove TCM (1) together with
ECM (2) from vehicle.
INSTALLATION
Reverse removal procedure noting the following.
Connect ECM and TCM couplers securely.
If the vehicle is equipped with air bag system, be sure to
enable air bag system after TCM and ECM are back in
place. Refer to “ENABLING AIR BAG SYSTEM” in Section
10B. CAUTION:
TCM and ECM consist of highly precise parts, so when
handling it (or them), be careful not to expose to exces-
sive shock.
NOTE:
When replacing TCM with used one, all learned contents
which are stored in TCM memory should be erased refer-
ring to “LEARNING CONTROL INITIALIZATION” in this
section.
Page 112 of 447

7B-70 AUTOMATIC TRANSMISSION (4 A/T)
LEARNING CONTROL INITIALIZATION
When one or more operations such as shown below are per-
formed, all learned contents which are stored in TCM memory
should be erased after the operations.
Replacing transmission with new or used one.
Repairing transmission partially by replacing any brake com-
ponent parts with new and/or used brake disc(s), plate(s)
and/or flange.
Repairing transmission partially by replacing any clutch com-
ponent parts with new and/or used clutch disc(s), plate(s)
and/or flange.
Replacing TCM with used one.
1) Turn ignition switch ON, leaving engine OFF.
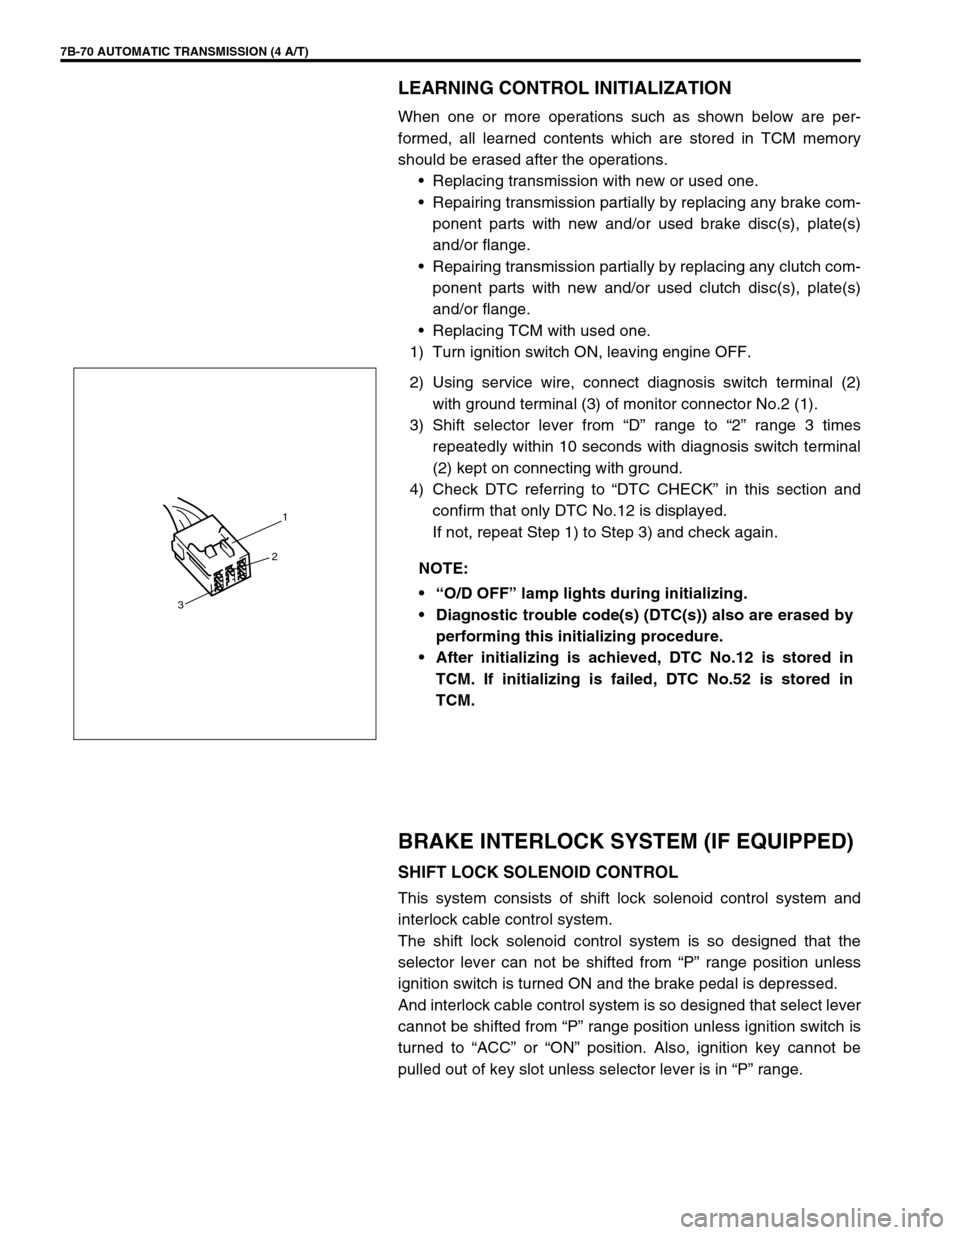
2) Using service wire, connect diagnosis switch terminal (2)
with ground terminal (3) of monitor connector No.2 (1).
3) Shift selector lever from “D” range to “2” range 3 times
repeatedly within 10 seconds with diagnosis switch terminal
(2) kept on connecting with ground.
4) Check DTC referring to “DTC CHECK” in this section and
confirm that only DTC No.12 is displayed.
If not, repeat Step 1) to Step 3) and check again.
BRAKE INTERLOCK SYSTEM (IF EQUIPPED)
SHIFT LOCK SOLENOID CONTROL
This system consists of shift lock solenoid control system and
interlock cable control system.
The shift lock solenoid control system is so designed that the
selector lever can not be shifted from “P” range position unless
ignition switch is turned ON and the brake pedal is depressed.
And interlock cable control system is so designed that select lever
cannot be shifted from “P” range position unless ignition switch is
turned to “ACC” or “ON” position. Also, ignition key cannot be
pulled out of key slot unless selector lever is in “P” range. NOTE:
“O/D OFF” lamp lights during initializing.
Diagnostic trouble code(s) (DTC(s)) also are erased by
performing this initializing procedure.
After initializing is achieved, DTC No.12 is stored in
TCM. If initializing is failed, DTC No.52 is stored in
TCM.
1
2
3
Page 115 of 447
AUTOMATIC TRANSMISSION (4 A/T) 7B-73
REMOVAL
1) Disconnect negative cable at battery and disable air bag sys-
tem, referring to “DISABLING AIR BAG SYSTEMS” in Sec-
tion 10B (if equipped).
2) Remove steering column hole cover and steering column
cover.
3) Remove steering column mounting bolts and nuts.
4) Remove interlock cable screw (1) located at ignition switch
and disconnect interlock cable (2) from key cylinder arm (3)
with ignition switch turned to “ACC” position.
5) Remove center console.
6) Remove cable end (1) from key interlock cam (2) and its
bracket (3).
7) Remove interlock cable (4).
INSTALLATION
1) Install interlock cable (1) to pedal brackets (2) by clamp as
shown in figure.
2) With ignition key at “ACC” position, connect cable end (1) to
key cylinder arm (2) and tighten cable screw (3) securely.
Page 116 of 447
7B-74 AUTOMATIC TRANSMISSION (4 A/T)
3) If selector lever is in “P” range, shift selector lever to other
than “P” range with releasing shift lock referring to “SHIFT
LOCK SOLENOID MANUAL RELEASE” in this section.
4) Install cable end (1) and cable casing cap (2) to key interlock
cam (3) and its bracket (4), then install cable (5) to selector
pad (6).
5) With selector lever set at “P” position, turn ignition key to
“ACC” position and then check for following conditions.
With knob button released, ignition key can be turned from
“ACC” position to “LOCK” position.
With knob button pressed, ignition key cannot be turned from
“ACC” position to “LOCK” position.
6) Install steering column referring to Section 3C.
7) Install steering column hole cover.
8) Install center console.
9) Connect negative cable at battery and enable air bag sys-
tem, referring to “ENABLING AIR BAG SYSTEM” in Section
10B (if equipped).
Page 117 of 447
AUTOMATIC TRANSMISSION (4 A/T) 7B-75
TRANSMISSION UNIT REPAIR OVERHAUL
NOTE:
When transmission is replaced, or when clutch or brake disc, plate and/or flange is changed to new
and/or used one, all learned contents which are stored in TCM memory should be erased referring to
“LEARNING CONTROL INITIALIZATION” in this section.
1. Torque converter 9. Counter drive gear 17. 1st & 2nd brake (B1) assembly
2. Torque converter housing 10. Reverse brake (B2) piston assembly 18. Planetary gear assembly
3. Oil pump assembly 11. A/T oil pan 19. O/D brake (B0) assembly
4. Front clutch (C2) assembly 12. Oil strainer 20. Planetary sun gear No.1 assembly
5. Rear Clutch (C1) assembly 13. Valve body assembly 21. Direct clutch (C0) assembly
6. Reverse brake (B2) assembly 14. Transmission case 22. O/D brake (B0) piston and rear cover assembly
7. Intermediate shaft 15. Counter driven gear assembly
8. Follow shaft 16. 1st & 2nd brake (B1) piston assembly