2000 SUZUKI SWIFT instrument panel
[x] Cancel search: instrument panelPage 67 of 447
![SUZUKI SWIFT 2000 1.G Transmission Service Workshop Manual AUTOMATIC TRANSMISSION (4 A/T) 7B-25
[INTERMITTENT TROUBLES] and [NOTES ON SYSTEM CIR-
CUIT INSPECTION]
Refer to Section 0A.
DTC CHECK
[Check DTC with SUZUKI scan tool]
1) Turn ignition switch OFF.
2) SUZUKI SWIFT 2000 1.G Transmission Service Workshop Manual AUTOMATIC TRANSMISSION (4 A/T) 7B-25
[INTERMITTENT TROUBLES] and [NOTES ON SYSTEM CIR-
CUIT INSPECTION]
Refer to Section 0A.
DTC CHECK
[Check DTC with SUZUKI scan tool]
1) Turn ignition switch OFF.
2)](/manual-img/20/7605/w960_7605-66.png)
AUTOMATIC TRANSMISSION (4 A/T) 7B-25
[INTERMITTENT TROUBLES] and [NOTES ON SYSTEM CIR-
CUIT INSPECTION]
Refer to Section 0A.
DTC CHECK
[Check DTC with SUZUKI scan tool]
1) Turn ignition switch OFF.
2) After setting cartridge, connect SUZUKI scan tool to data link
connector (DLC) (1) located on underside of instrument
panel at driver’s seat side.
Special tool
(A) : 09931-76011 (SUZUKI scan tool)
(B) : Mass storage cartridge
(C) : 09931-76030 (16/14 pin DLC cable)
3) Turn ignition switch ON.
4) Read DTC according to instructions displayed on SUZUKI
scan tool and print it or write it down. Refer to SUZUKI scan
tool operator’s manual for further details.
5) After completing the check, turn ignition switch OFF and dis-
connect SUZUKI scan tool from data link connector (DLC)
(1).
[Check DTC without SUZUKI scan tool]
1) Turn ignition switch ON and make sure that O/D OFF lamp is
OFF in combination meter (O/D off switch OFF).
2) Turn ignition switch OFF.
3) Pull out clip (3) and remove glove box (2) from instrument
panel (1).
Page 69 of 447
![SUZUKI SWIFT 2000 1.G Transmission Service Workshop Manual AUTOMATIC TRANSMISSION (4 A/T) 7B-27
DTC CLEARANCE
[Clear DTC with SUZUKI scan tool]
1) Turn ignition switch OFF.
2) After setting cartridge to scan tool, connect it to data link
connector (DLC) (1) l SUZUKI SWIFT 2000 1.G Transmission Service Workshop Manual AUTOMATIC TRANSMISSION (4 A/T) 7B-27
DTC CLEARANCE
[Clear DTC with SUZUKI scan tool]
1) Turn ignition switch OFF.
2) After setting cartridge to scan tool, connect it to data link
connector (DLC) (1) l](/manual-img/20/7605/w960_7605-68.png)
AUTOMATIC TRANSMISSION (4 A/T) 7B-27
DTC CLEARANCE
[Clear DTC with SUZUKI scan tool]
1) Turn ignition switch OFF.
2) After setting cartridge to scan tool, connect it to data link
connector (DLC) (1) located on underside of instrument
panel at driver’s seat side.
Special tool
(A) : 09931-76011 (SUZUKI scan tool)
(B) : Mass storage cartridge
(C) : 09931-76030 (16/14 pin DLC cable)
3) Turn ignition switch ON.
4) Erase DTC according to instructions displayed on scan tool.
Refer to SUZUKI scan tool operator’s manual for further
details.
5) After completing the clearance, turn ignition switch OFF and
disconnect scan tool from data link connector (DLC) (1).
[Clear DTC without SUZUKI scan tool]
1) Turn ignition switch ON.
2) Using service wire, ground diagnosis switch terminal (2) of
monitor connector No.2 (1) five times within 10 seconds.
3) Perform “DTC check” and confirm that only DTC12 (normal
DTC) is displayed. If not, repeat step 1) and 2) and check
again.
3. Ground terminal
1
2
3
Page 275 of 447

BODY ELECTRICAL SYSTEM 8-31
CODE REGISTRATION PROCEDURE
1) Confirm that IG switch is OFF position.
2) Remove DOOR LOCK fuse and install it again.
3) Press the button on the transmitter one time toward the
receiver within 30 seconds.
4) If two transmitters are registered, repeat step 1) to 3) with
other transmitter.
POWER DOOR MIRROR CONTROL SYSTEM
(IF EQUIPPED)
MIRROR SWITCH
INSPECTION
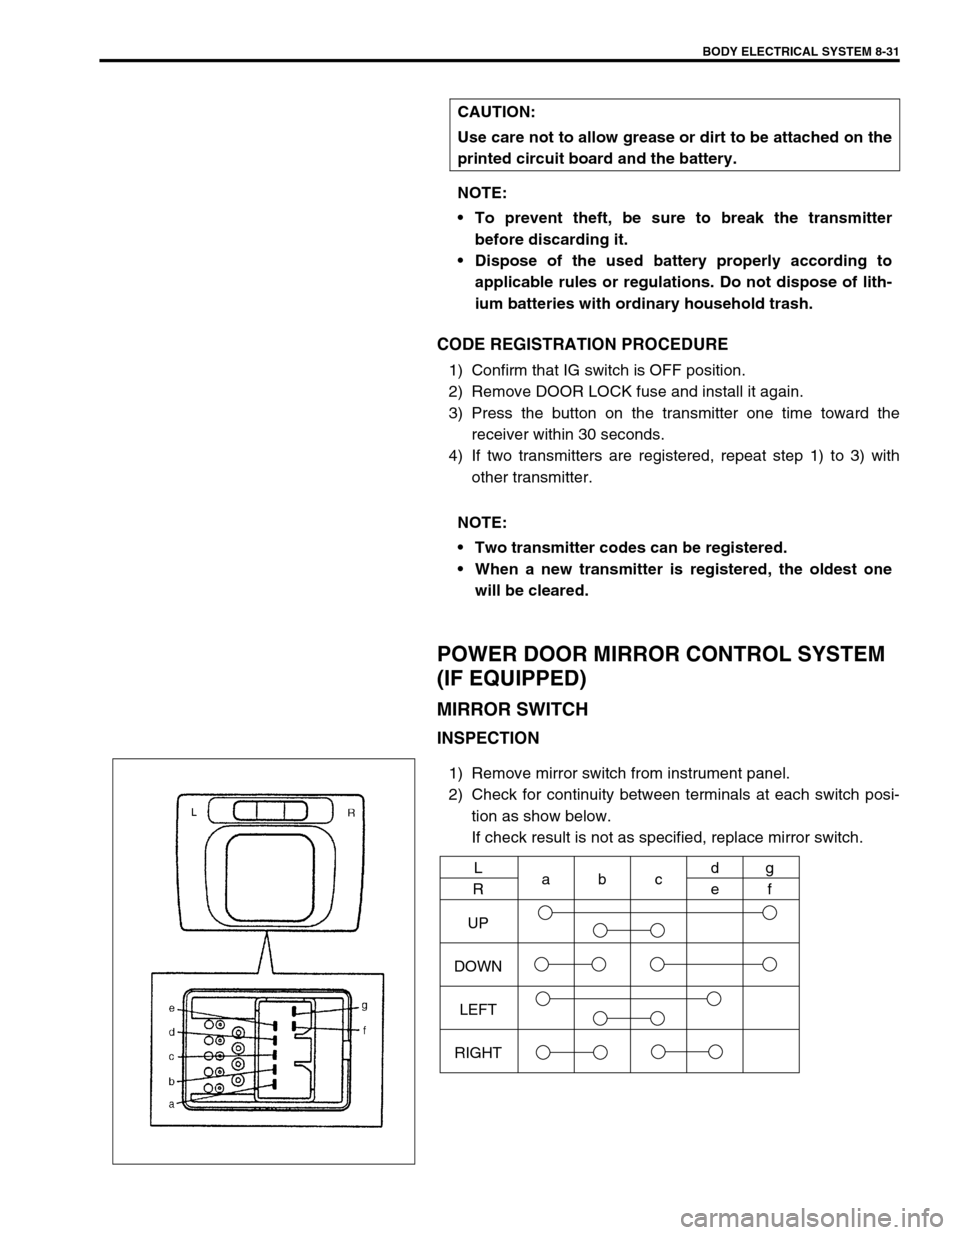
1) Remove mirror switch from instrument panel.
2) Check for continuity between terminals at each switch posi-
tion as show below.
If check result is not as specified, replace mirror switch. CAUTION:
Use care not to allow grease or dirt to be attached on the
printed circuit board and the battery.
NOTE:
To prevent theft, be sure to break the transmitter
before discarding it.
Dispose of the used battery properly according to
applicable rules or regulations. Do not dispose of lith-
ium batteries with ordinary household trash.
NOTE:
Two transmitter codes can be registered.
When a new transmitter is registered, the oldest one
will be cleared.
UP
DOWN
LEFT
RIGHTL
Rabcd
eg
f
Page 285 of 447

IMMOBILIZER CONTROL SYSTEM 8G-7
DIAGNOSTIC TROUBLE CODE (DTC) CHECK
(IMMOBILIZER CONTROL MODULE)
1) Turn ignition switch OFF.
2) After setting cartridge to Suzuki scan tool, connect it to data
link connector (DLC) (1) located on underside of instrument
panel at driver’s seat side.
Special tool
(A) : 09931-76011 (Suzuki scan tool)
(B) : Mass storage cartridge
(C) : 09931-76030 (16/14 pin DLC cable)
3) Turn ignition switch ON.
4) Read DTC stored in immobilizer control module according to
instructions displayed on Suzuki scan tool and print it or
write it down. Refer to Suzuki scan tool operator's manual for
further details.
If communication between Suzuki scan tool and immobilizer
control module is not possible, go to “Diagnostic Flow Table
C”.
5) After completing the check, turn ignition switch OFF and dis-
connect Suzuki scan tool from data link connector (DLC). NOTE:
When reading DTC stored in immobilizer control module
using Suzuki scan tool, select “BCM” from the applica-
tions menu and “IMMOBILIZER” from the select system
menu displayed on Suzuki scan tool.
1
(C)(A)
(B)
Page 286 of 447

8G-8 IMMOBILIZER CONTROL SYSTEM
DIAGNOSTIC TROUBLE CODE (DTC) CHECK
(ECM)
1) Turn ignition switch OFF.
2) After setting cartridge to Suzuki scan tool, connect it to data
link connector (DLC) (1) located on underside of instrument
panel at driver’s seat side.
Special tool
(A) : 09931-76011 (Suzuki scan tool)
(B) : Mass storage cartridge
(C) : 09931-76030 (16/14 pin DLC cable)
3) Turn ignition switch ON.
4) Read DTC stored in ECM according to instructions displayed
on Suzuki scan tool and print it or write it down. Refer to
Suzuki scan tool operator’s manual for further details.
If communication between Suzuki scan tool and ECM is not
possible, check if Suzuki scan tool is communicable by con-
necting it to ECM in another vehicle. If communication is
possible in this case, Suzuki scan tool is in good condition.
Then check data link connector and serial data line (circuit)
in the vehicle with which communication was not possible.
5) After completing the check, turn ignition switch OFF and dis-
connect Suzuki scan tool from data link connector (DLC). NOTE:
When reading DTC stored in ECM using Suzuki scan
tool, select “ECM” from the applications menu and
“SUZUKI mode” from the communication mode menu
displayed on Suzuki scan tool.
If ECM detects a trouble in both engine and emission
control system and immobilizer control system, Suzuki
scan tool indicates trouble codes of both systems
using Suzuki mode of ECM application.
1
(C)(A)
(B)
Page 300 of 447

8G-22 IMMOBILIZER CONTROL SYSTEM
Do not turn ON ignition switch with a radio antenna placed
near Immobilizer Control Module. Or the system may detect
abnormal condition and prevent engine from starting.
IMMOBILIZER CONTROL MODULE
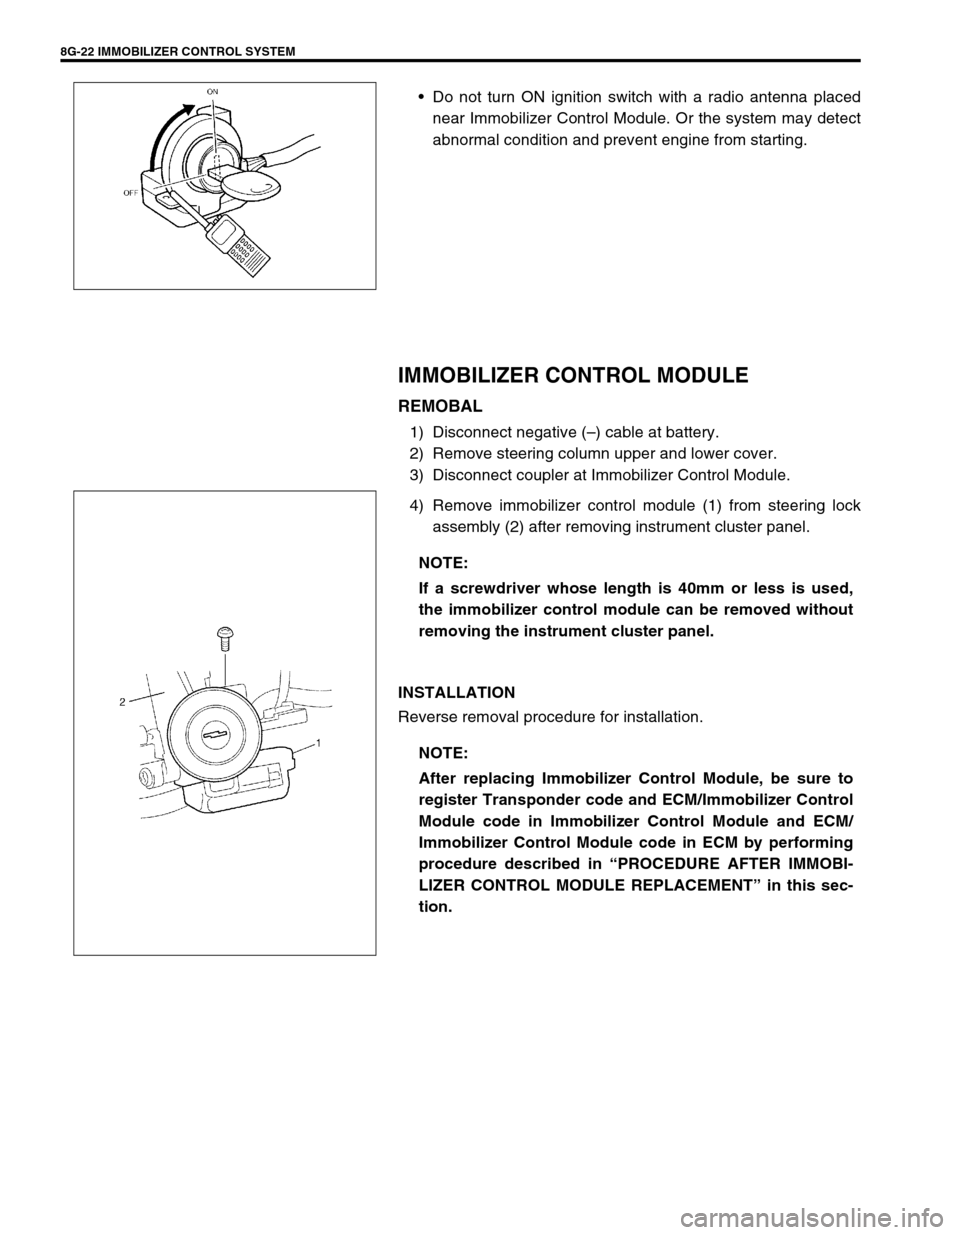
REMOBAL
1) Disconnect negative (–) cable at battery.
2) Remove steering column upper and lower cover.
3) Disconnect coupler at Immobilizer Control Module.
4) Remove immobilizer control module (1) from steering lock
assembly (2) after removing instrument cluster panel.
INSTALLATION
Reverse removal procedure for installation.
NOTE:
If a screwdriver whose length is 40mm or less is used,
the immobilizer control module can be removed without
removing the instrument cluster panel.
NOTE:
After replacing Immobilizer Control Module, be sure to
register Transponder code and ECM/Immobilizer Control
Module code in Immobilizer Control Module and ECM/
Immobilizer Control Module code in ECM by performing
procedure described in “PROCEDURE AFTER IMMOBI-
LIZER CONTROL MODULE REPLACEMENT” in this sec-
tion.
Page 301 of 447

IMMOBILIZER CONTROL SYSTEM 8G-23
HOW TO REGISTER IGNITION KEY
Register the ignition key with a built-in transponder in Immobilizer
Control Module by using the following procedure.
1) Prepare SUZUKI scan tool and cartridge for immobilizer con-
trol system.
2) With ignition switch OFF, connect SUZUKI scan tool to data
link connector (DLC) (1) located on underside of instrument
panel at driver’s seat side.
(A) : 09931-76011 (SUZUKI scan tool)
(B) : Immobilizer cartridge
(C) : 09931-76030 (16/14 pin DLC cable)
3) Prepare ignition key with a built-in transponder (1). And then
turn ignition switch ON by using it.
4) Number of Transponder codes for ignition key with a built-in
transponder that can be registered in Immobilizer Control
Module is limited to 4. If needed, clear all Transponder
codes for ignition key with a built-in transponder that have
been registered in Immobilizer Control Module by executing
the “CLR. TRANS COD (CLEAR TP CODE)” command in
the SELECT MODE menu by using SUZUKI scan tool. CAUTION:
When registering the ignition key including a transpon-
der into the immobilizer control module by using Suzuki
scan tool, confirm that the knob color of the ignition key
to be registered for the vehicle is dark gray. The ignition
key with wrong knob color cannot be registered.
NOTE:
For operation procedure of SUZUKI scan tool, refer to
SUZUKI scan tool operator’s manual.
1
(C)(A)
(B)
NOTE:
When “CLR. TRANS COD (CLEAR TP CODE)” command
is executed with the immobilizer indicator lamp ON, it
remains ON even after execution of that command is
over. It will start flashing when the ignition switch is
turned OFF once and then turned ON after some sec-
onds.
Page 305 of 447

BODY SERVICE 9-1
6F1
6F2
6G
6H
6K
7A
7A1
7B1
7C1
7D
7E
7F
8A
8B
8C
8D
8E
9
10
10A
10B
SECTION 9
BODY SERVICE
CONTENTS
GLASS, WINDOWS AND MIRRORS ................. 9-2
FRONT DOOR GLASS ................................... 9-2
FRONT DOOR WINDOW REGULATOR ........ 9-6
DOOR MIRROR .......................................... 9-7
REAR DOOR GLASS (IF EQUIPPED) ....... 9-8
REAR DOOR WINDOW REGULATOR ........ 9-11
WINDOW SHIELD ........................................ 9-12
QUARTER WINDOW .................................... 9-17
BACK DOOR GLASS .................................... 9-18
BODY STRUCTURE......................................... 9-19
FRONT DOOR ASSEMBLY .......................... 9-19
REAR DOOR ASSEMBLY ............................ 9-22
BACK DOOR ASSEMBLY ............................ 9-23
HOOD ........................................................... 9-25
FRONT FENDER .......................................... 9-26
FRONT BUMPER AND REAR BUMPER...... 9-27
ROOF RAIL (IF EQUIPPED) ......................... 9-28
BODY DIMENSIONS .................................... 9-29
ENGINE ROOM ........................................ 9-29
BACK DOOR ............................................. 9-30
SIDE BODY ............................................... 9-31UNDER BODY .......................................... 9-34
PANEL CLEARANCE ................................... 9-36
INSTRUMENTATION AND DRIVER
INFORMATION................................................. 9-38
INSTRUMENT PANEL .................................. 9-38
SEATS .............................................................. 9-40
FRONT SEAT ............................................... 9-40
REAR SEAT.................................................. 9-41
SECURITY AND LOCKS ................................. 9-42
FRONT DOOR LOCK ASSEMBLY............... 9-42
REAR DOOR LOCK ASSEMBLY (IF
EQUIPPED) .................................................. 9-44
BACK DOOR LOCK ASSEMBLY ................. 9-45
KEY CODING ............................................... 9-46
KEY USAGE AND IDENTIFICATION ....... 9-46
IGNITION SWITCH LOCK CYLINDER ..... 9-47
EXTERIOR AND INTERIOR TRIM ................... 9-47
FLOOR CARPET .......................................... 9-47
HEAD LINING ............................................... 9-48
PAINT AND COATINGS .................................. 9-50 WARNING:
For vehicles equipped with Supplemental Restraint (Air Bag) System:
Service on and around the air bag system components or wiring must be performed only by an
authorized SUZUKI dealer. Refer to “Air Bag System Components and Wiring Location View” under
“General Description” in air bag system section in order to confirm whether you are performing ser-
vice on or near the air bag system components or wiring. Please observe all WARNINGS and “Ser-
vice Precautions” under “On-Vehicle Service” in air bag system section before performing service
on or around the air bag system components or wiring. Failure to follow WARNINGS could result in
unintentional activation of the system or could render the system inoperative. Either of these two
conditions may result in severe injury.
Technical service work must be started at least 90 seconds after the ignition switch is turned to the
“LOCK” position and the negative cable is disconnected from the battery. Otherwise, the system
may be activated by reserve energy in the Sensing and Diagnostic Module (SDM).
When body servicing, if shock may be applied to air bag system component parts, remove those
parts beforehand. (Refer to Section 10B.)
NOTE:
Fasteners are important attaching parts in that they could affect the performance of vital components
and systems, and / or could result in major repair expense. They must be replaced with one of the
same part number of with an equivalent part if replacement becomes necessary.
Do not use a replacement part of lesser quality or substitute a design. Torque values must be used as
specified during reassembly to assure proper retention of these parts.