Page 40 of 557
0B-10 MAINTENANCE AND LUBRICATION
IGNITION SYSTEM
ITEM 2-1
Spark Plugs Replacement
Replace spark plugs with new ones referring to SECTION 6F or
6F1.
ITEM 2-2
Distributor Cap and Rotor Inspection (if equipped)
�Check distributor cap and rubber caps for cracks.
�Clean dusty and stained parts using a dry, soft cloth.
�Check center electrode and terminals for wear.
�Check rotor for cracks and its electrode for wear.
Repair or replace any component which is found to be in malcondi-
tion.
FUEL SYSTEM
ITEM 3-1
Air Cleaner Filter Inspection
1) Take out air cleaner filter as follows.
For 1.0 liter engine:
i) Remove air cleaner upper case after removing case nut and
clamps.
ii) Remove air cleaner filter.
For 1.3 liter engine:
i) Disconnect air cleaner outlet hose from case after loosening
its clamp and removing bolt (1) shown in figure.
ii) Remove air cleaner case cap (3) from case by unhooking its
clamps (2), then take out air cleaner filter.
Page 291 of 557

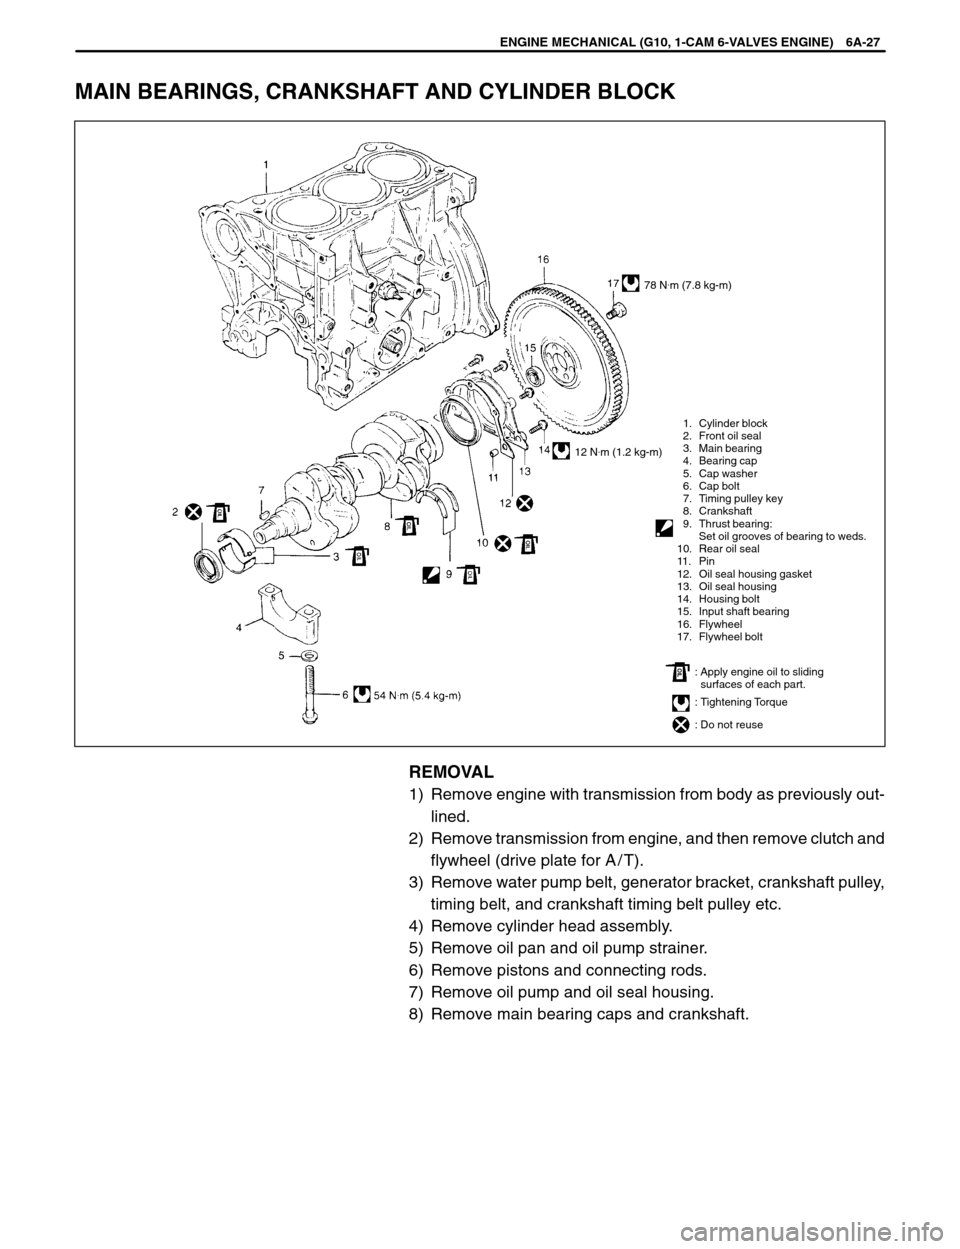
1. Cylinder block
2. Front oil seal
3. Main bearing
4. Bearing cap
5. Cap washer
6. Cap bolt
7. Timing pulley key
8. Crankshaft
9. Thrust bearing:
Set oil grooves of bearing to weds.
10. Rear oil seal
11. Pin
12. Oil seal housing gasket
13. Oil seal housing
14. Housing bolt
15. Input shaft bearing
16. Flywheel
17. Flywheel bolt
: Tightening Torque
: Do not reuse
: Apply engine oil to sliding
: surfaces of each part.
78 N.m (7.8 kg-m)
12 N
.m (1.2 kg-m)
ENGINE MECHANICAL (G10, 1-CAM 6-VALVES ENGINE) 6A-27
MAIN BEARINGS, CRANKSHAFT AND CYLINDER BLOCK
REMOVAL
1) Remove engine with transmission from body as previously out-
lined.
2) Remove transmission from engine, and then remove clutch and
flywheel (drive plate for A / T).
3) Remove water pump belt, generator bracket, crankshaft pulley,
timing belt, and crankshaft timing belt pulley etc.
4) Remove cylinder head assembly.
5) Remove oil pan and oil pump strainer.
6) Remove pistons and connecting rods.
7) Remove oil pump and oil seal housing.
8) Remove main bearing caps and crankshaft.
Page 292 of 557

2. Upper half of bearing
(a)
6A-28 ENGINE MECHANICAL (G10, 1-CAM 6-VALVES ENGINE)
INSTALLATION
NOTE:
�All parts to be installed must be perfectly clean.
�Be sure to oil crankshaft journals, journal bearings, thrust
bearings, crankpins, connecting rod bearings, pistons, pis-
ton rings and cylinder bores.
�Journal bearings, bearing caps, connecting rods, rod bear-
ings, rod bearing caps, pistons and piston rings are in com-
bination sets. Do not disturb combination and try to see that
each part goes back to where it came from, when installing.
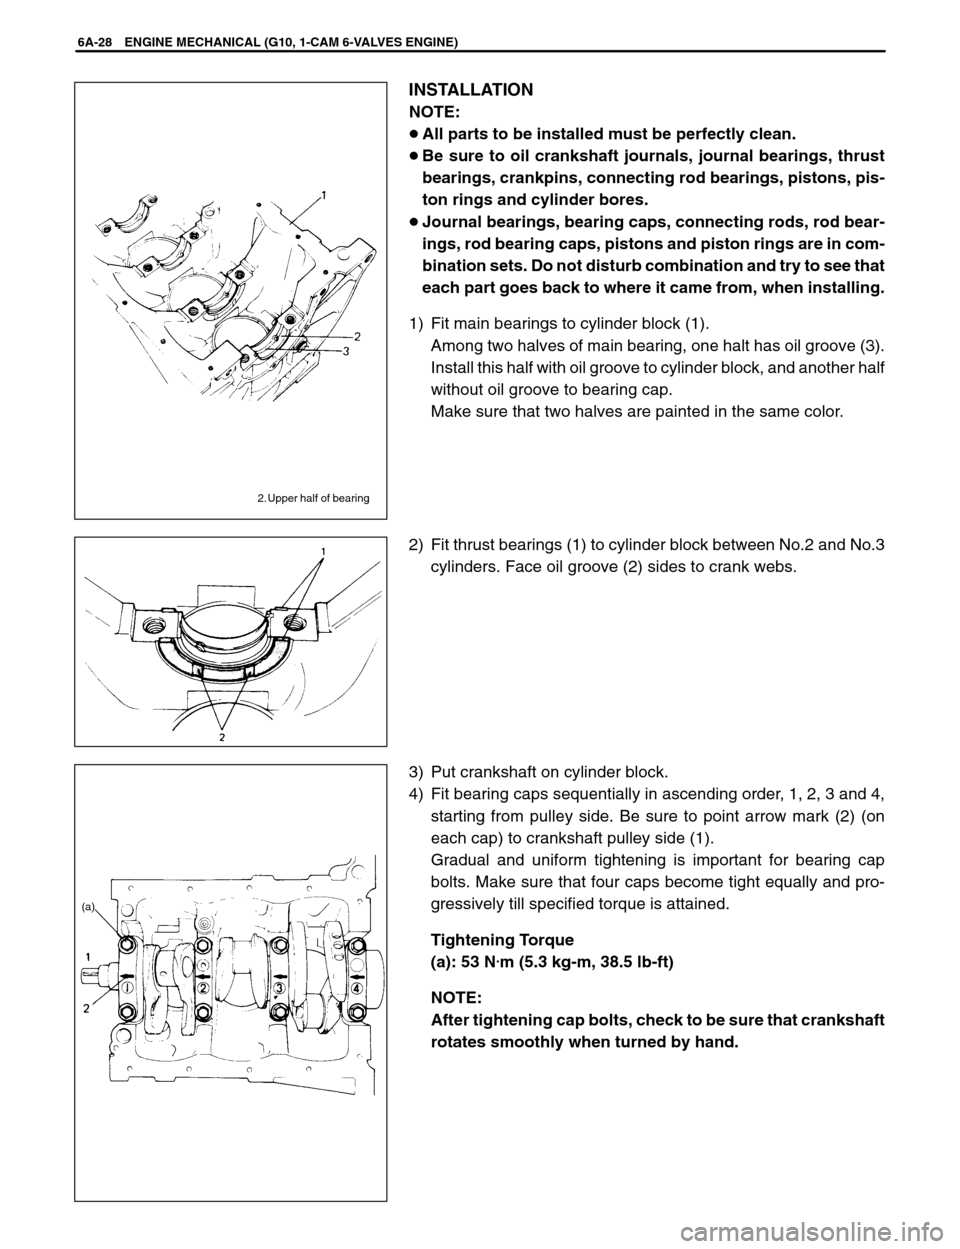
1) Fit main bearings to cylinder block (1).
Among two halves of main bearing, one halt has oil groove (3).
Install this half with oil groove to cylinder block, and another half
without oil groove to bearing cap.
Make sure that two halves are painted in the same color.
2) Fit thrust bearings (1) to cylinder block between No.2 and No.3
cylinders. Face oil groove (2) sides to crank webs.
3) Put crankshaft on cylinder block.
4) Fit bearing caps sequentially in ascending order, 1, 2, 3 and 4,
starting from pulley side. Be sure to point arrow mark (2) (on
each cap) to crankshaft pulley side (1).
Gradual and uniform tightening is important for bearing cap
bolts. Make sure that four caps become tight equally and pro-
gressively till specified torque is attained.
Tightening Torque
(a): 53 N
.m (5.3 kg-m, 38.5 lb-ft)
NOTE:
After tightening cap bolts, check to be sure that crankshaft
rotates smoothly when turned by hand.
Page 366 of 557

1. Gaging plastic
ENGINE MECHANICAL (G13B, 1-CAM 16-VALVES ENGINE) 6A1-71
Main Bearings
General information
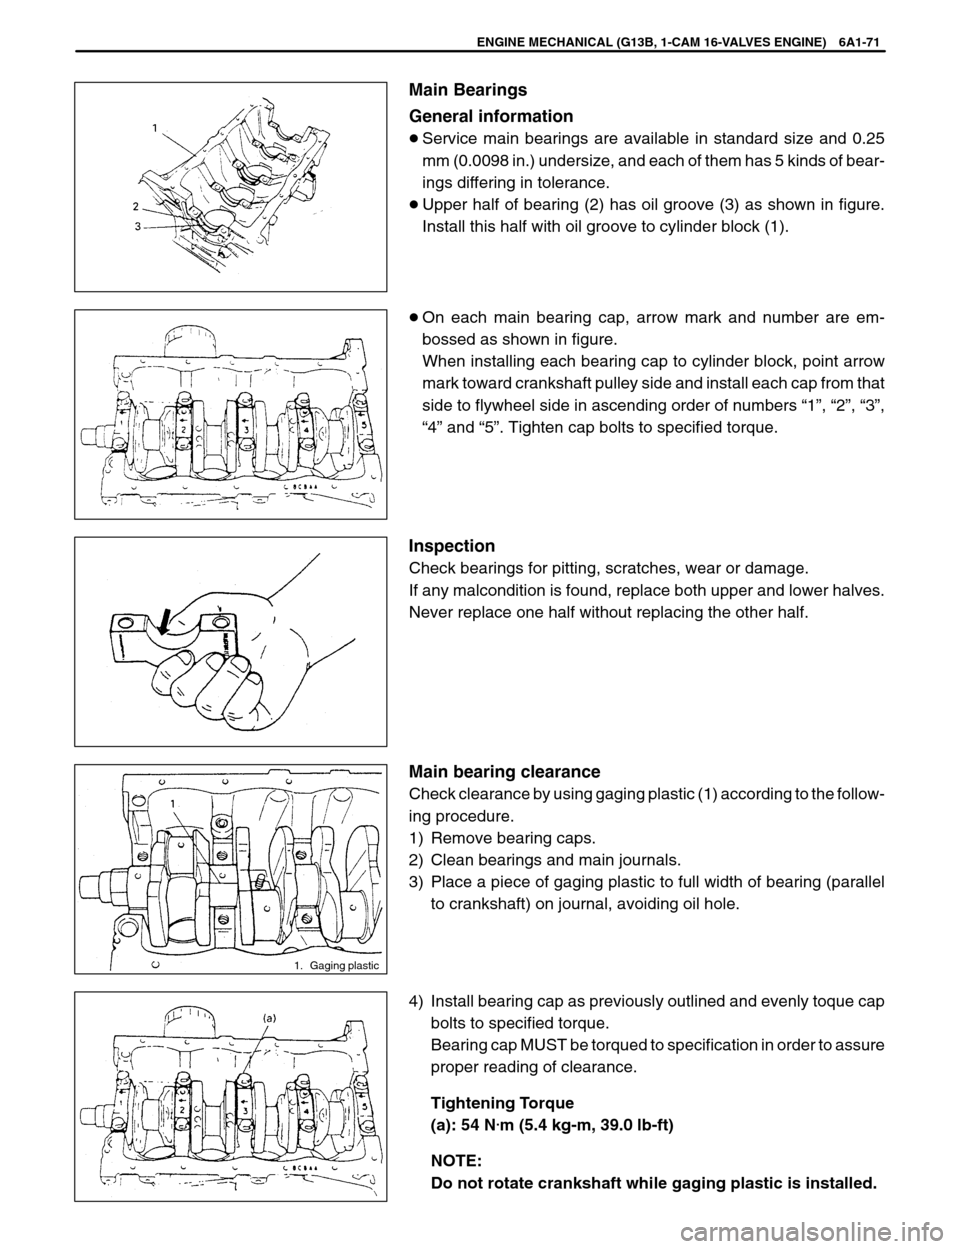
�Service main bearings are available in standard size and 0.25
mm (0.0098 in.) undersize, and each of them has 5 kinds of bear-
ings differing in tolerance.
�Upper half of bearing (2) has oil groove (3) as shown in figure.
Install this half with oil groove to cylinder block (1).
�On each main bearing cap, arrow mark and number are em-
bossed as shown in figure.
When installing each bearing cap to cylinder block, point arrow
mark toward crankshaft pulley side and install each cap from that
side to flywheel side in ascending order of numbers “1”, “2”, “3”,
“4” and “5”. Tighten cap bolts to specified torque.
Inspection
Check bearings for pitting, scratches, wear or damage.
If any malcondition is found, replace both upper and lower halves.
Never replace one half without replacing the other half.
Main bearing clearance
Check clearance by using gaging plastic (1) according to the follow-
ing procedure.
1) Remove bearing caps.
2) Clean bearings and main journals.
3) Place a piece of gaging plastic to full width of bearing (parallel
to crankshaft) on journal, avoiding oil hole.
4) Install bearing cap as previously outlined and evenly toque cap
bolts to specified torque.
Bearing cap MUST be torqued to specification in order to assure
proper reading of clearance.
Tightening Torque
(a): 54 N
.m (5.4 kg-m, 39.0 lb-ft)
NOTE:
Do not rotate crankshaft while gaging plastic is installed.
Page 367 of 557

6A1-72 ENGINE MECHANICAL (G13B, 1-CAM 16-VALVES ENGINE)
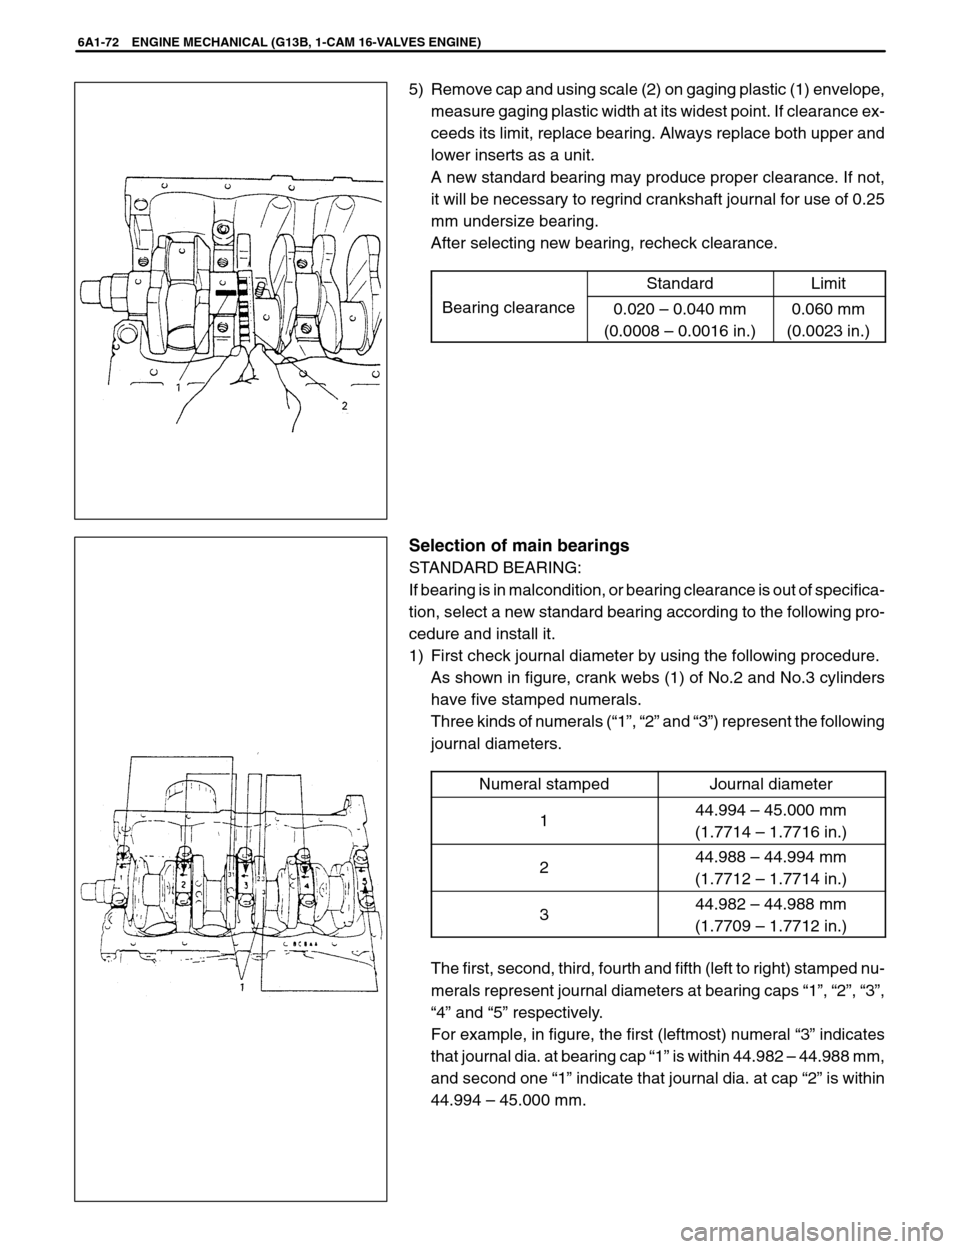
5) Remove cap and using scale (2) on gaging plastic (1) envelope,
measure gaging plastic width at its widest point. If clearance ex-
ceeds its limit, replace bearing. Always replace both upper and
lower inserts as a unit.
A new standard bearing may produce proper clearance. If not,
it will be necessary to regrind crankshaft journal for use of 0.25
mm undersize bearing.
After selecting new bearing, recheck clearance.
StandardLimit
Bearing clearance0.020 – 0.040 mm
(0.0008 – 0.0016 in.)0.060 mm
(0.0023 in.)
Selection of main bearings
STANDARD BEARING:
If bearing is in malcondition, or bearing clearance is out of specifica-
tion, select a new standard bearing according to the following pro-
cedure and install it.
1) First check journal diameter by using the following procedure.
As shown in figure, crank webs (1) of No.2 and No.3 cylinders
have five stamped numerals.
Three kinds of numerals (“1”, “2” and “3”) represent the following
journal diameters.
Numeral stamped
Journal diameter
144.994 – 45.000 mm
(1.7714 – 1.7716 in.)
244.988 – 44.994 mm
(1.7712 – 1.7714 in.)
344.982 – 44.988 mm
(1.7709 – 1.7712 in.)
The first, second, third, fourth and fifth (left to right) stamped nu-
merals represent journal diameters at bearing caps “1”, “2”, “3”,
“4” and “5” respectively.
For example, in figure, the first (leftmost) numeral “3” indicates
that journal dia. at bearing cap “1” is within 44.982 – 44.988 mm,
and second one “1” indicate that journal dia. at cap “2” is within
44.994 – 45.000 mm.
Page 372 of 557

ENGINE MECHANICAL (G13B, 1-CAM 16-VALVES ENGINE) 6A1-77
5) Rebore and hone cylinder to calculated dimension.
NOTE:
Before reboring, install all main bearing caps in place and
tighten to specification to avoid distortion of bearing bores.
6) Measure piston clearance after honing.
INSTALLATION
NOTE:
�All parts to be installed must be perfectly clean.
�Be sure to oil crankshaft journals, journal bearings, thrust
bearings, crankpins, connecting rod bearings, pistons, pis-
ton rings and cylinder bores.
�Journal bearings, bearing caps, connecting rods, rod bear-
ings, rod bearing caps, pistons and piston rings are in com-
bination sets. Do not disturb such combination and make
sure that each part goes back to where it came from, when
installing.
1) Install main bearings to cylinder block.
One of two halves of main bearing (2), has an oil groove (3).
Install it to cylinder block (1), and the other half without oil groove
to bearing cap.
Make sure that two halves are painted in the same color.
2) Install thrust bearings (1) to cylinder block between No.2 and
No.3 cylinders. Face oil groove (2) sides to crank webs.