Page 356 of 557

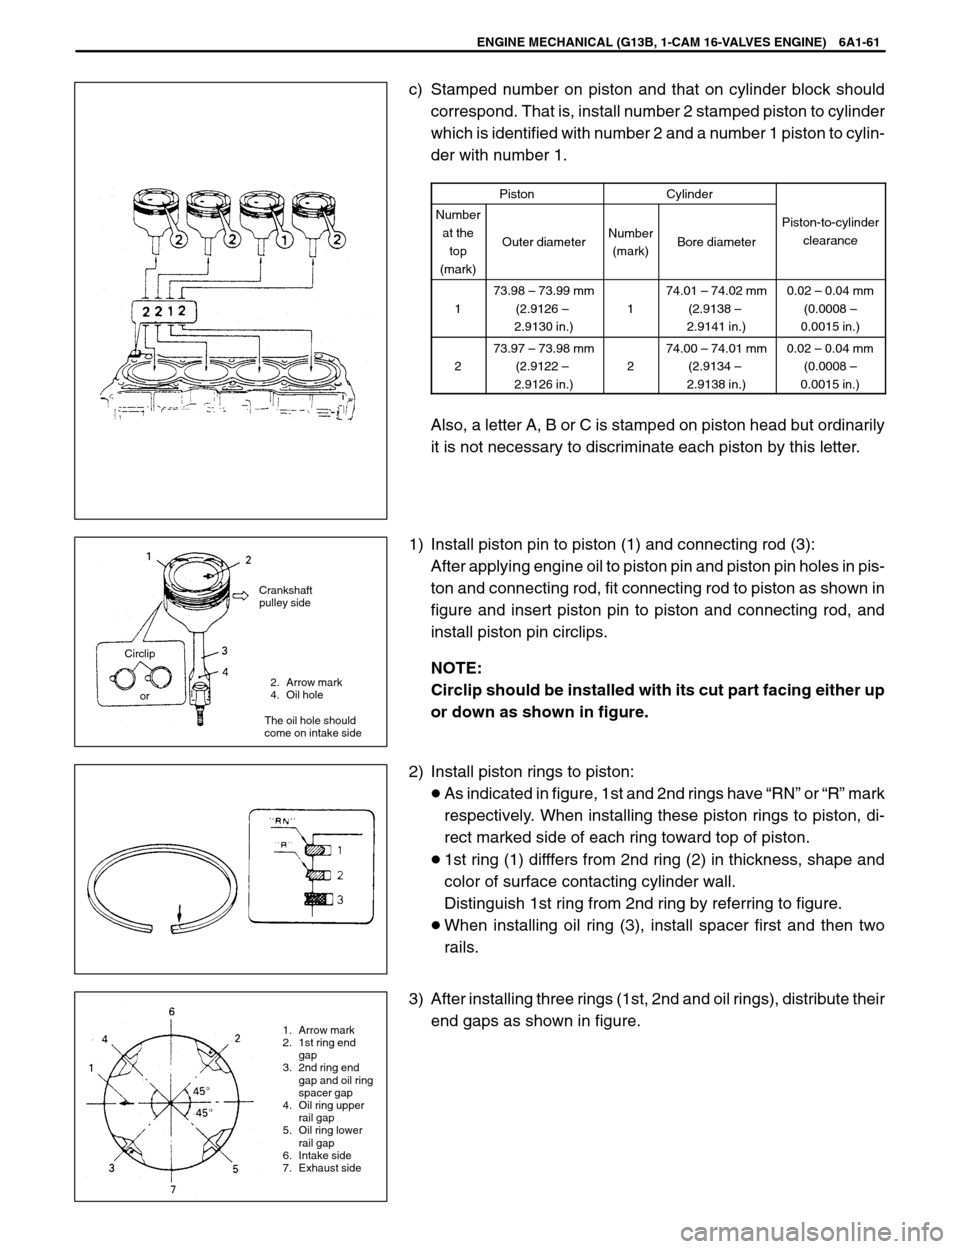
2. Arrow mark
4. Oil hole
The oil hole should
come on intake side
1. Arrow mark
2. 1st ring end
gap
3. 2nd ring end
gap and oil ring
spacer gap
4. Oil ring upper
rail gap
5. Oil ring lower
rail gap
6. Intake side
7. Exhaust side Crankshaft
pulley side
Circlip
or
ENGINE MECHANICAL (G13B, 1-CAM 16-VALVES ENGINE) 6A1-61
c) Stamped number on piston and that on cylinder block should
correspond. That is, install number 2 stamped piston to cylinder
which is identified with number 2 and a number 1 piston to cylin-
der with number 1.
PistonCylinder
Number
at the
top
(mark)
Outer diameterNumber
(mark)Bore diameter
Piston-to-cylinder
clearance
1
73.98 – 73.99 mm
(2.9126 –
2.9130 in.)
1
74.01 – 74.02 mm
(2.9138 –
2.9141 in.)0.02 – 0.04 mm
(0.0008 –
0.0015 in.)
2
73.97 – 73.98 mm
(2.9122 –
2.9126 in.)
2
74.00 – 74.01 mm
(2.9134 –
2.9138 in.)0.02 – 0.04 mm
(0.0008 –
0.0015 in.)
Also, a letter A, B or C is stamped on piston head but ordinarily
it is not necessary to discriminate each piston by this letter.
1) Install piston pin to piston (1) and connecting rod (3):
After applying engine oil to piston pin and piston pin holes in pis-
ton and connecting rod, fit connecting rod to piston as shown in
figure and insert piston pin to piston and connecting rod, and
install piston pin circlips.
NOTE:
Circlip should be installed with its cut part facing either up
or down as shown in figure.
2) Install piston rings to piston:
�As indicated in figure, 1st and 2nd rings have “RN” or “R” mark
respectively. When installing these piston rings to piston, di-
rect marked side of each ring toward top of piston.
�1st ring (1) difffers from 2nd ring (2) in thickness, shape and
color of surface contacting cylinder wall.
Distinguish 1st ring from 2nd ring by referring to figure.
�When installing oil ring (3), install spacer first and then two
rails.
3) After installing three rings (1st, 2nd and oil rings), distribute their
end gaps as shown in figure.
Page 357 of 557

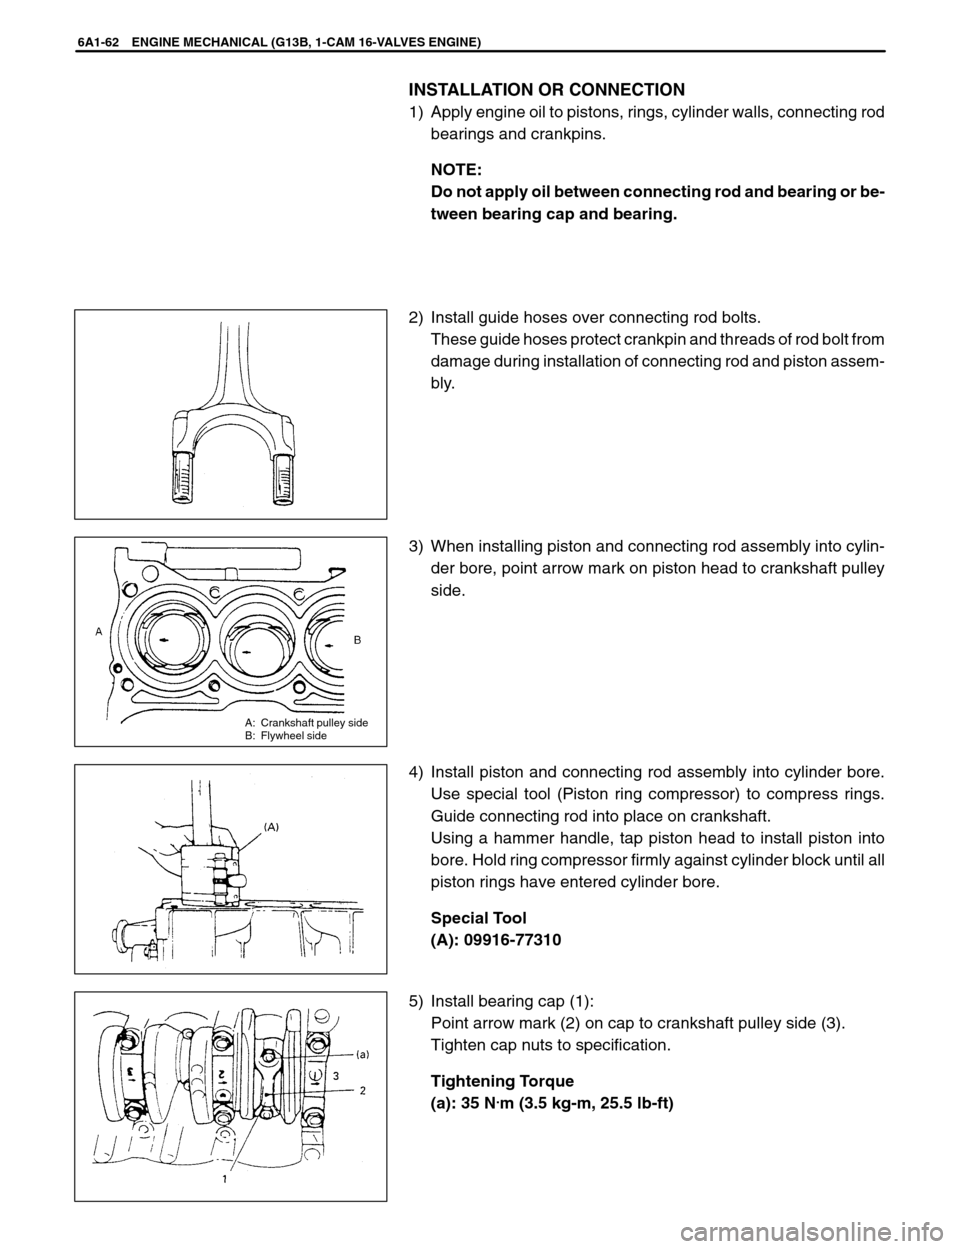
A: Crankshaft pulley side
B: Flywheel side
6A1-62 ENGINE MECHANICAL (G13B, 1-CAM 16-VALVES ENGINE)
INSTALLATION OR CONNECTION
1) Apply engine oil to pistons, rings, cylinder walls, connecting rod
bearings and crankpins.
NOTE:
Do not apply oil between connecting rod and bearing or be-
tween bearing cap and bearing.
2) Install guide hoses over connecting rod bolts.
These guide hoses protect crankpin and threads of rod bolt from
damage during installation of connecting rod and piston assem-
bly.
3) When installing piston and connecting rod assembly into cylin-
der bore, point arrow mark on piston head to crankshaft pulley
side.
4) Install piston and connecting rod assembly into cylinder bore.
Use special tool (Piston ring compressor) to compress rings.
Guide connecting rod into place on crankshaft.
Using a hammer handle, tap piston head to install piston into
bore. Hold ring compressor firmly against cylinder block until all
piston rings have entered cylinder bore.
Special Tool
(A): 09916-77310
5) Install bearing cap (1):
Point arrow mark (2) on cap to crankshaft pulley side (3).
Tighten cap nuts to specification.
Tightening Torque
(a): 35 N
.m (3.5 kg-m, 25.5 lb-ft)
Page 372 of 557

ENGINE MECHANICAL (G13B, 1-CAM 16-VALVES ENGINE) 6A1-77
5) Rebore and hone cylinder to calculated dimension.
NOTE:
Before reboring, install all main bearing caps in place and
tighten to specification to avoid distortion of bearing bores.
6) Measure piston clearance after honing.
INSTALLATION
NOTE:
�All parts to be installed must be perfectly clean.
�Be sure to oil crankshaft journals, journal bearings, thrust
bearings, crankpins, connecting rod bearings, pistons, pis-
ton rings and cylinder bores.
�Journal bearings, bearing caps, connecting rods, rod bear-
ings, rod bearing caps, pistons and piston rings are in com-
bination sets. Do not disturb such combination and make
sure that each part goes back to where it came from, when
installing.
1) Install main bearings to cylinder block.
One of two halves of main bearing (2), has an oil groove (3).
Install it to cylinder block (1), and the other half without oil groove
to bearing cap.
Make sure that two halves are painted in the same color.
2) Install thrust bearings (1) to cylinder block between No.2 and
No.3 cylinders. Face oil groove (2) sides to crank webs.
Page:
< prev 1-8 9-16 17-24