Page 248 of 801

YH4
GRAND
VITARA
3. Container 1. Plug cap
2. Vinyl tube
1. Bearing retainer
(e)
(f)
(g)
REAR SUSPENSION 3E-21
16) Apply sealant to mating surface of bearing retainer with brake
back plate.
NOTE:
Make sure to remove old sealant before applying it anew.
ªBº: Sealant 99000-31110
17) Install rear axle shaft to rear axle housing and tighten bearing
retainer nuts to specified torque.
NOTE:
When installing rear axle shaft, be careful not to cause
damage to oil seal lip in axle housing.
Tightening Torque
(e): 23 N
.m (2.3 kg-m, 17.0 lb-ft)
18) For vehicle with ABS, tighten wheel speed sensor bolt to speci-
fied torque.
Tightening Torque
(f): 21 N
.m (2.1 kg-m, 15.5 lb-ft)
19) Connect brake pipes to wheel cylinders (right & left) and tighten
brake pipe flare nuts to specified torque.
Tightening Torque
(g): 16 N
.m (1.6 kg-m, 11.5 lb-ft)
20) Install brake drum (right & left). For details, refer to SECTION
5C ªBRAKE DRUM INSTALLATIONº.
21) Refill differential gear housing with new specified gear oil. Re-
fer to ªON-VEHICLE SERVICEº in SECTION 7F for refill.
22) Fill reservoir with brake fluid and bleed brake system.(For
bleeding operation, see SECTION 5.)
Page 250 of 801

YH4
GRAND
VITARA
REAR SUSPENSION 3E-23
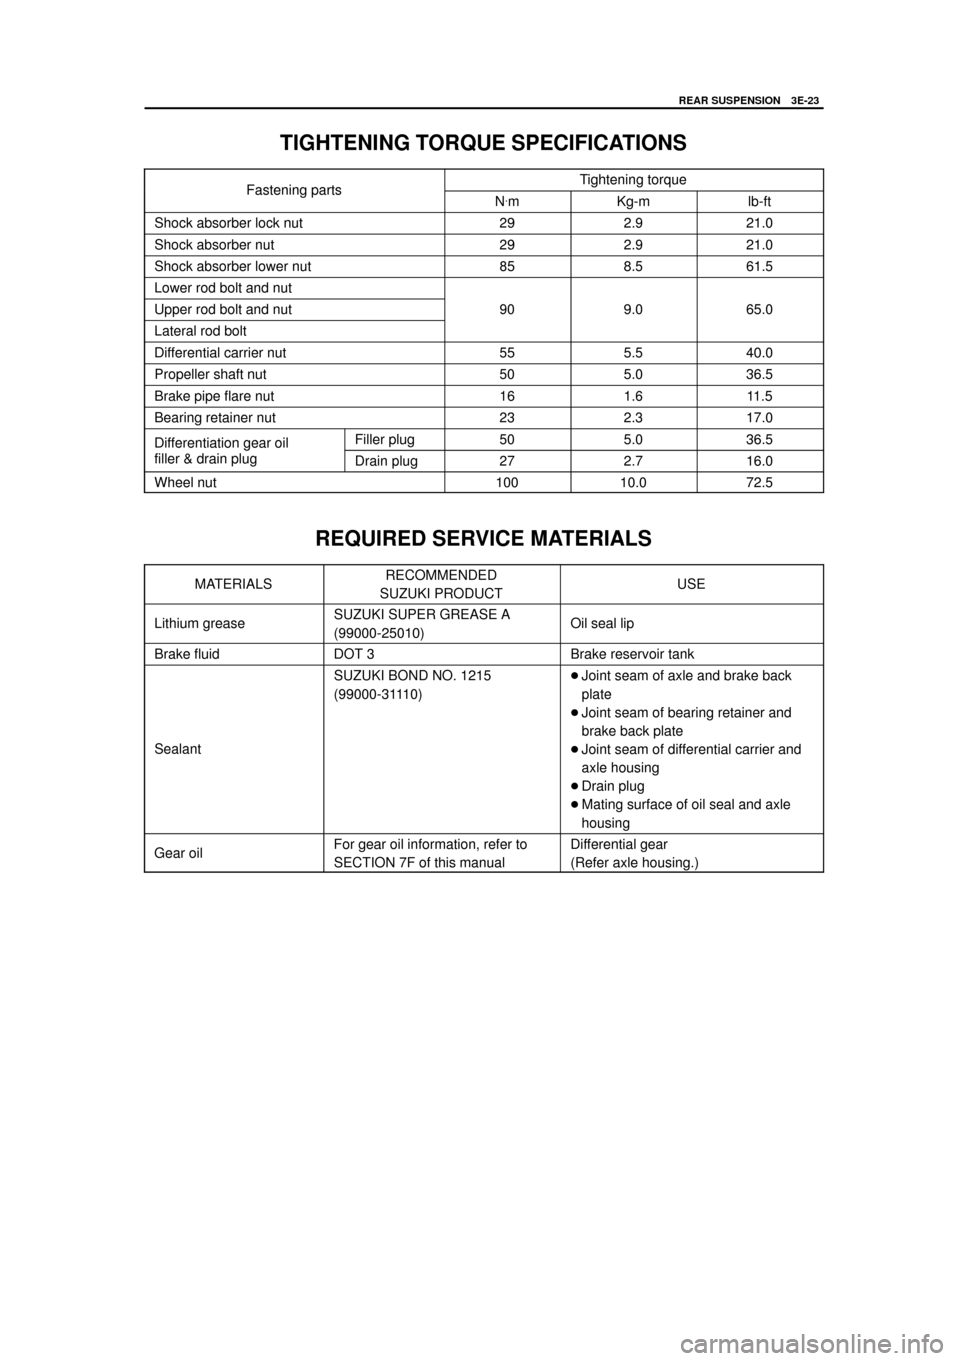
TIGHTENING TORQUE SPECIFICATIONS
FasteningpartsTightening torqueFastening artsN.mKg-mlb-ft
Shock absorber lock nut292.921.0
Shock absorber nut292.921.0
Shock absorber lower nut858.561.5
Lower rod bolt and nut
Upper rod bolt and nut909.065.0
Lateral rod bolt
Differential carrier nut555.540.0
Propeller shaft nut505.036.5
Brake pipe flare nut161.611.5
Bearing retainer nut232.317.0
Differentiation gear oilFiller plug505.036.5g
filler & drain plugDrain plug272.716.0
Wheel nut10010.072.5
REQUIRED SERVICE MATERIALS
MATERIALSRECOMMENDED
SUZUKI PRODUCTUSE
Lithium greaseSUZUKI SUPER GREASE A
(99000-25010)Oil seal lip
Brake fluidDOT 3Brake reservoir tank
Sealant
SUZUKI BOND NO. 1215
(99000-31110)�Joint seam of axle and brake back
plate
�Joint seam of bearing retainer and
brake back plate
�Joint seam of differential carrier and
axle housing
�Drain plug
�Mating surface of oil seal and axle
housing
Gear oilFor gear oil information, refer to
SECTION 7F of this manualDifferential gear
(Refer axle housing.)
Page 251 of 801
YH4
GRAND
VITARA
3E-24 REAR SUSPENSION
09924-74510
Bush remover handle09926-88310
Oil seal installer09942-15510
Sliding hammer09943-35512
Brake drum remover
09913-75510
Oil seal installer
SPECIAL TOOLS
Page 260 of 801

YH4
GRAND
VITARA
4A2
1. Drive shaft oil seal
2. Double off set joint (DOJ)
3. Joint circlip
4. DOJ boot
5. Ball joint boot
6. Ball joint assembly (RH side)
7. Drive shaft assembly (LH side)
8. Left drive shaft
9. Drive shaft bearing circlip
10. Drive shaft bearing
FRONT DRIVE SHAFT / SHAFT BEARING, OIL SEAL 4A2-1
SECTION 4A2
FRONT DRIVE SHAFT/SHAFT BEARING,
OIL SEAL
CONTENTS
GENERAL DESCRIPTION4A2- 1 . . . . . . . . . . . . . . . . . . . . . . . . . . . . . . . . . . . . . . . . . . . . . . . . . . . . . . . . . . . . . . . . . .
DIAGNOSIS4A2- 2 . . . . . . . . . . . . . . . . . . . . . . . . . . . . . . . . . . . . . . . . . . . . . . . . . . . . . . . . . . . . . . . . . . . . . . . . . . . . . . .
Diagnosis Table4A2- 2 . . . . . . . . . . . . . . . . . . . . . . . . . . . . . . . . . . . . . . . . . . . . . . . . . . . . . . . . . . . . . . . . . . . . . . . . . .
Drive Shaft Boot And Joint Check 4A2- 2. . . . . . . . . . . . . . . . . . . . . . . . . . . . . . . . . . . . . . . . . . . . . . . . . . . . . . . . . . .
ON-VEHICLE SERVICE4A2- 3 . . . . . . . . . . . . . . . . . . . . . . . . . . . . . . . . . . . . . . . . . . . . . . . . . . . . . . . . . . . . . . . . . . . .
Drive Shaft4A2- 3 . . . . . . . . . . . . . . . . . . . . . . . . . . . . . . . . . . . . . . . . . . . . . . . . . . . . . . . . . . . . . . . . . . . . . . . . . . . . . .
Shaft Bearing / Oil Seal4A2- 9 . . . . . . . . . . . . . . . . . . . . . . . . . . . . . . . . . . . . . . . . . . . . . . . . . . . . . . . . . . . . . . . . . . . .
TIGHTENING TORQUE SPECIFICATIONS4A2-11 . . . . . . . . . . . . . . . . . . . . . . . . . . . . . . . . . . . . . . . . . . . . . . . . . . . .
REQUIRED SERVICE MATERIALS4A2-11 . . . . . . . . . . . . . . . . . . . . . . . . . . . . . . . . . . . . . . . . . . . . . . . . . . . . . . . . . .
SPECIAL TOOLS4A2-11 . . . . . . . . . . . . . . . . . . . . . . . . . . . . . . . . . . . . . . . . . . . . . . . . . . . . . . . . . . . . . . . . . . . . . . . . . .
GENERAL DESCRIPTION
The drive shaft joint is a constant velocity joint (C.V. joint) which slides in the axial direction. The joint is composed
of an outer race, cage, inner race and balls. In the turning direction, the joint rotates in the same way as a ball bear-
ing. The balls lock rotation completely and transmit drive. In addition this vehicle is also characterized by a function
that the shaft can slide through the balls in the grooves of the outer race in the extension / contraction direction of
the drive shaft.
Page 261 of 801

YH4
GRAND
VITARA
4A2-2 FRONT DRIVE SHAFT / SHAFT BEARING, OIL SEAL
DIAGNOSIS
DIAGNOSIS TABLE
ConditionPossible CauseCorrection
When starting:
Abnormal Noise�Loose wheel nuts.
�Loose drive shaft flange bolts.
�Broken or otherwise damaged wheel
bearing.Tighten wheel nuts.
Tighten drive shaft flange bolts.
Replace or change.
When making turns:
Abnormal Noise�Grease leakage from drive shaft joint
boot.
�Worn or broken drive shaft joint.Replace joint boot and apply grease.
Replace drive shaft joint.
When running:
Abnormal Noise�Broken drive shaft joint.
�Poorly lubricated or worn drive
shaft joint.
�Loose drive shaft flange bolts.
�Deformed drive shaft oil seal.Replace drive shaft joint.
Lubricate or replace joint.
Tighten drive shaft flange bolts.
Replace.
Vibration�Worn drive shaft joint.
�Deformed drive shaft oil seal.
�Deformed drive shaft.Replace drive shaft joint.
Replace.
Replace.
DRIVE SHAFT BOOT AND JOINT CHECK
Check drive shaft boot for tear. If even a small tear is noted, replace
with new one.
Check drive shaft joint for wear, breakage and other damage and
replace if any defect exists.
Page 262 of 801
YH4
GRAND
VITARA
1. Oil filler / level plug
2. Front drain plug
1. Circlip
2. Washer
1. Drive shaft flange
bolts and nuts
1. Oil seal
FRONT DRIVE SHAFT / SHAFT BEARING, OIL SEAL 4A2-3
ON-VEHICLE SERVICE
DRIVE SHAFT
REMOVAL (LEFT SIDE)
1) Hoist vehicle and remove wheel.
2) Remove axle shaft drive flange.
3) Remove drive shaft circlip and front spindle thrust washer.
4) Remove drive shaft flange bolts and nuts.
5) Remove drive shaft assembly to differential side as shown in left
figure.
CAUTION:
To prevent breakage of boots (wheel side and differential
side), be careful not to bring them into contact with other
parts when removing drive shaft assembly.
6) Remove drive shaft thrust washer (vehicle with G16 or J20 en-
gine) from drive shaft and remove drive shaft oil seal as shown
in figure.
CAUTION:
Be careful not to cause damage to drive shaft joint.
Page 263 of 801

YH4
GRAND
VITARA
1. Oil filler / level plug
2. Front drain plug
1. Circlip
2. Washer
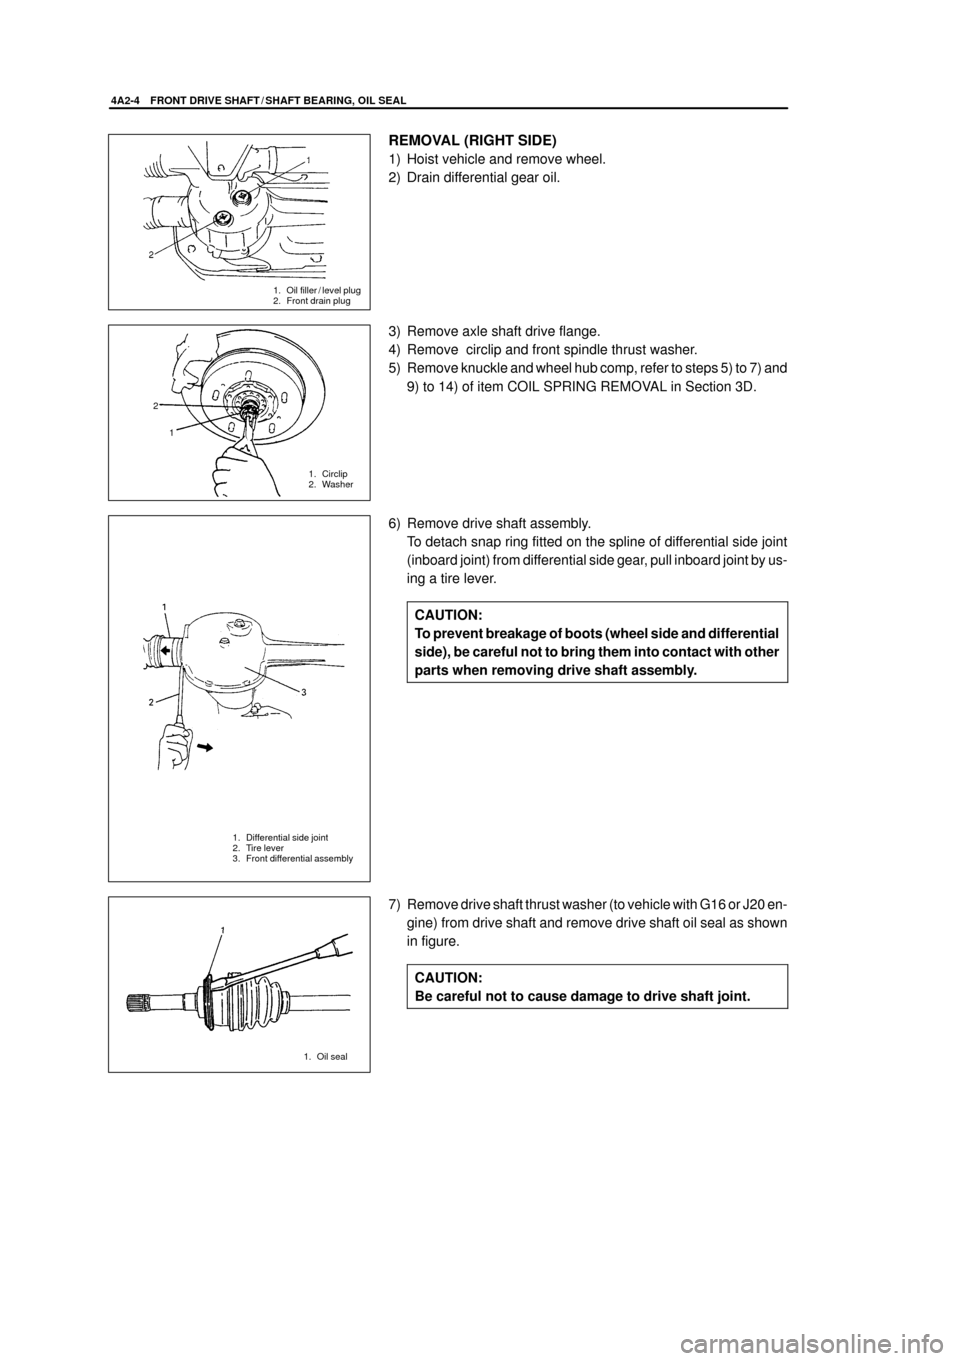
1. Differential side joint
2. Tire lever
3. Front differential assembly
1. Oil seal 2
1
4A2-4 FRONT DRIVE SHAFT / SHAFT BEARING, OIL SEAL
REMOVAL (RIGHT SIDE)
1) Hoist vehicle and remove wheel.
2) Drain differential gear oil.
3) Remove axle shaft drive flange.
4) Remove circlip and front spindle thrust washer.
5) Remove knuckle and wheel hub comp, refer to steps 5) to 7) and
9) to 14) of item COIL SPRING REMOVAL in Section 3D.
6) Remove drive shaft assembly.
To detach snap ring fitted on the spline of differential side joint
(inboard joint) from differential side gear, pull inboard joint by us-
ing a tire lever.
CAUTION:
To prevent breakage of boots (wheel side and differential
side), be careful not to bring them into contact with other
parts when removing drive shaft assembly.
7) Remove drive shaft thrust washer (to vehicle with G16 or J20 en-
gine) from drive shaft and remove drive shaft oil seal as shown
in figure.
CAUTION:
Be careful not to cause damage to drive shaft joint.
Page 264 of 801

YH4
GRAND
VITARA
1. Boot
2. Snap ring
1. Circlip
2 Snap ring plier
3. Cage
FRONT DRIVE SHAFT / SHAFT BEARING, OIL SEAL 4A2-5
DISASSEMBLY
1) Remove boot band of differential side joint.
2) Slide boot toward the center of shaft and remove snap ring from
outer race, then take shaft out of outer race.
3) Remove circlip and then cage.
4) Remove inside and outside boots from shaft.
CAUTION:
�Do not disassemble wheel side joint (outboard joint). If
any malcondition is found in joint, replace it as assem-
bly.
�Do not disassemble ball joint of differential side joint.
If any malcondition is found in ball joint, replace differ-
ential side joint assembly.
INSPECTION
�Check boots for breakage or deterioration. Replace them as nec-
essary.
�Check circlip, snap ring and boot bands for breakage or deforma-
tion. Replace as necessary.
CLEANING
�Wash disassembled parts (except boots) in degreaser. After
washing, dry parts completely by blowing air.
�Clean boots with cloth. DO NOT wash boots in degreaser, such
as gasoline or kerosene, etc.
Washing in degreaser causes deterioration of boot.