Page 6 of 376
iv
Table of Contents (cont'd)
Maintenance Schedule Service and Appearance Care
Section
7
Section
6
Scheduled Maintenance
Owner Checks and Services
Periodic Maintenance InspectionsRecommended Fluids and Lubricants
Maintenance Records
Fuel
Checking Fluids and Lubricants
GM Oil Life System™
Engine Air Cleaner/Filter
Brakes
Bulb ReplacementWindshield Wiper Blade Replacement
Tires and Wheels
Appearance Care
Electrical System/Fuses and Circuit Breakers
Capacities and Specifications
Normal Maintenance Replacement Parts
Page 231 of 376
4-40 When You Are Ready to Leave After
Parking on a Hill
1. Apply your regular brakes and hold the pedal down
while you:
�Start your engine;
�Shift into a gear; and
�Release the parking brake.
2. Let up on the brake pedal.
3. Drive slowly until the trailer is clear of the chocks.
4. Stop and have someone pick up and store the chocks.
Maintenance When Trailer Towing
Your vehicle will need service more often when you're
pulling a trailer. See the Maintenance Schedule for more
on this. Things that are especially important in trailer
operation are automatic transaxle fluid (don't overfill),
engine oil, drive belts, cooling system and brake system.
Each of these is covered in this manual, and the Index
will help you find them quickly. If you're trailering, it's
a good idea to review this information before you start
your trip.
Check periodically to see that all hitch nuts and bolts
are tight.
Engine Cooling When Trailer Towing
Your cooling system may temporarily overheat during
severe operating conditions. See ªEngine Overheatingº
in the Index.
Page 287 of 376
6-20
Engine Air Cleaner/Filter
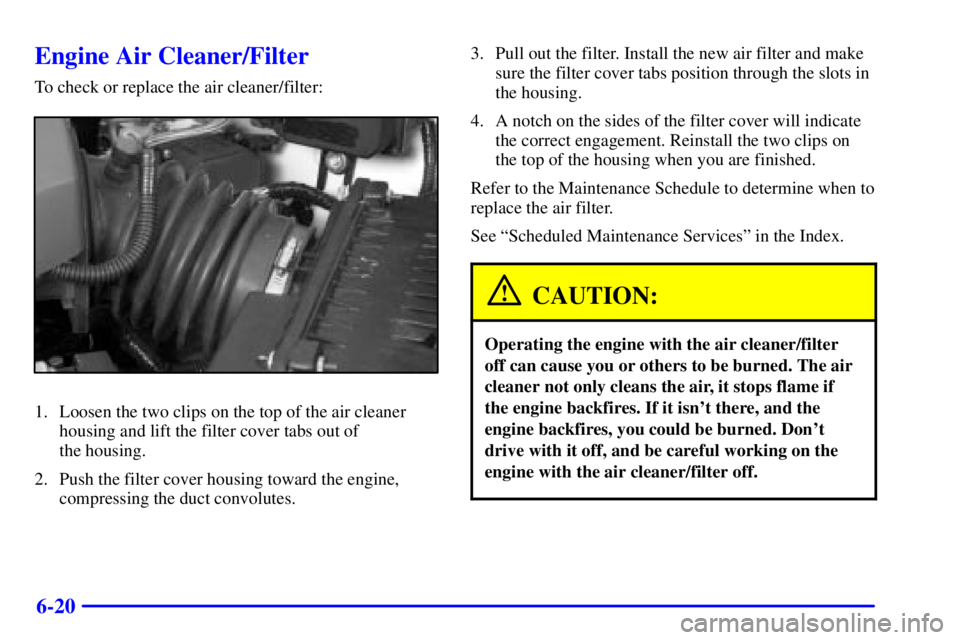
To check or replace the air cleaner/filter:
1. Loosen the two clips on the top of the air cleaner
housing and lift the filter cover tabs out of
the housing.
2. Push the filter cover housing toward the engine,
compressing the duct convolutes.3. Pull out the filter. Install the new air filter and make
sure the filter cover tabs position through the slots in
the housing.
4. A notch on the sides of the filter cover will indicate
the correct engagement. Reinstall the two clips on
the top of the housing when you are finished.
Refer to the Maintenance Schedule to determine when to
replace the air filter.
See ªScheduled Maintenance Servicesº in the Index.
CAUTION:
Operating the engine with the air cleaner/filter
off can cause you or others to be burned. The air
cleaner not only cleans the air, it stops flame if
the engine backfires. If it isn't there, and the
engine backfires, you could be burned. Don't
drive with it off, and be careful working on the
engine with the air cleaner/filter off.
Page 289 of 376
6-22
Automatic Transaxle Fluid
When to Check and Change
A good time to check your automatic transaxle fluid
level is when the engine oil is changed.
Change both the fluid and filter every 50,000 miles
(83 000 km) if the vehicle is mainly driven under one or
more of these conditions:
�In heavy city traffic where the outside temperature
regularly reaches 90�F (32�C) or higher.
�In hilly or mountainous terrain.
�When doing frequent trailer towing.
�Uses such as found in taxi, police or delivery service.
If you do not use your vehicle under any of these
conditions, change the fluid and filter at
100,000 miles (166 000 km).
See ªScheduled Maintenance Servicesº in the Index.
How to Check
Because this operation can be a little difficult,
you may choose to have this done at the dealership
service department.
If you do it yourself, be sure to follow all the
instructions here, or you could get a false reading on
the dipstick.
NOTICE:
Too much or too little fluid can damage your
transaxle. Too much can mean that some of the
fluid could come out and fall on hot engine parts
or exhaust system parts, starting a fire. Be sure to
get an accurate reading if you check your
transaxle fluid.
Page 292 of 376
6-25
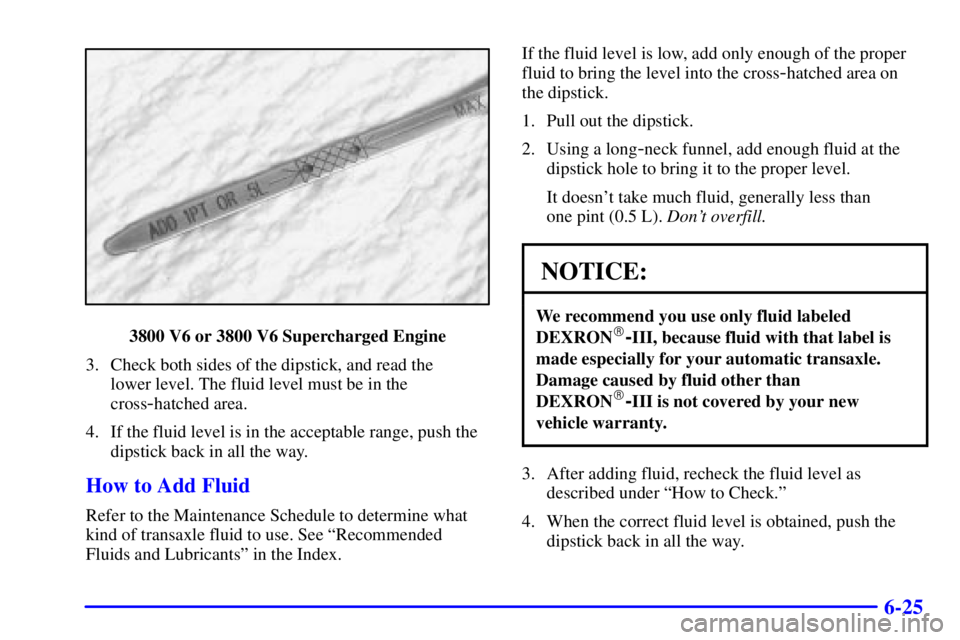
3800 V6 or 3800 V6 Supercharged Engine
3. Check both sides of the dipstick, and read the
lower level. The fluid level must be in the
cross
-hatched area.
4. If the fluid level is in the acceptable range, push the
dipstick back in all the way.
How to Add Fluid
Refer to the Maintenance Schedule to determine what
kind of transaxle fluid to use. See ªRecommended
Fluids and Lubricantsº in the Index.If the fluid level is low, add only enough of the proper
fluid to bring the level into the cross
-hatched area on
the dipstick.
1. Pull out the dipstick.
2. Using a long
-neck funnel, add enough fluid at the
dipstick hole to bring it to the proper level.
It doesn't take much fluid, generally less than
one pint (0.5 L). Don't overfill.
NOTICE:
We recommend you use only fluid labeled
DEXRON�-III, because fluid with that label is
made especially for your automatic transaxle.
Damage caused by fluid other than
DEXRON
�-III is not covered by your new
vehicle warranty.
3. After adding fluid, recheck the fluid level as
described under ªHow to Check.º
4. When the correct fluid level is obtained, push the
dipstick back in all the way.
Page 300 of 376
6-33
When your brake fluid falls to a low level, your brake
warning light will come on. See ªBrake System Warning
Lightº in the Index.
What to Add
When you do need brake fluid, use only DOT
-3 brake
fluid. Use new brake fluid from a sealed container only.
Refer to ªRecommended Fluids and Lubricantsº in the
Maintenance Schedule.
Always clean the brake fluid reservoir cap and the area
around the cap before removing it. This will help keep
dirt from entering the reservoir.
CAUTION:
With the wrong kind of fluid in your brake
system, your brakes may not work well, or they
may not even work at all. This could cause a
crash. Always use the proper brake fluid.
NOTICE:
�Using the wrong fluid can badly damage
brake system parts. For example, just a few
drops of mineral
-based oil, such as engine
oil, in your brake system can damage brake
system parts so badly that they'll have to be
replaced. Don't let someone put in the
wrong kind of fluid.
�If you spill brake fluid on your vehicle's
painted surfaces, the paint finish can be
damaged. Be careful not to spill brake fluid
on your vehicle. If you do, wash it off
immediately. See ªAppearance Careº
in the Index.
Page 314 of 376

6-47 Tire Inspection and Rotation
Tires should be rotated every 6,000 to 8,000 miles
(10 000 to 13 000 km). Any time you notice unusual
wear, rotate your tires as soon as possible and check
wheel alignment. Also check for damaged tires or
wheels. See ªWhen It's Time for New Tiresº and
ªWheel Replacementº later in this section for
more information.
The purpose of regular rotation is to achieve more
uniform wear for all tires on the vehicle. The first
rotation is the most important. See ªScheduled
Maintenance Servicesº in the Index for scheduled
rotation intervals.
When rotating your tires, always use the correct rotation
pattern shown here.Don't include the compact spare tire in your
tire rotation.
After the tires have been rotated, adjust the front and
rear inflation pressures as shown on the Tire
-Loading
Information label. Make certain that all wheel nuts are
properly tightened. See ªWheel Nut Torqueº in
the Index.
CAUTION:
Rust or dirt on a wheel, or on the parts to which
it is fastened, can make wheel nuts become loose
after a time. The wheel could come off and cause
an accident. When you change a wheel, remove
any rust or dirt from places where the wheel
attaches to the vehicle. In an emergency, you can
use a cloth or a paper towel to do this; but be
sure to use a scraper or wire brush later,
if you need to, to get all the rust or dirt off.
(See ªChanging a Flat Tireº in the Index.)
Page 338 of 376
7-
7-1
Section 7 Maintenance Schedule
This section covers the maintenance required for your vehicle. Your vehicle needs these services to retain its safety,
dependability and emission control performance.
7
-2 Introduction
7
-3 How This Section is Organized
7
-4 Part A: Scheduled Maintenance Services
7
-5 Scheduled Maintenance7
-15 Part B: Owner Checks and Services
7
-19 Part C: Periodic Maintenance Inspections
7
-21 Part D: Recommended Fluids and Lubricants
7
-23 Part E: Maintenance Record