2000 NISSAN SENTRA check engine light
[x] Cancel search: check engine lightPage 127 of 240
PRECAUTIONS ON CRUISE
CONTROL
cIf the cruise control system malfunctions,
it cancels automatically. The SET light in
the instrument panel then blinks to warn
the driver.
cIf the SET light in the instrument panel
blinks, turn the CRUISE ONzOFF switch
off and have the system checked by your
NISSAN dealer.
cThe SET light in the instrument panel
may blink when the CRUISE ONzOFF
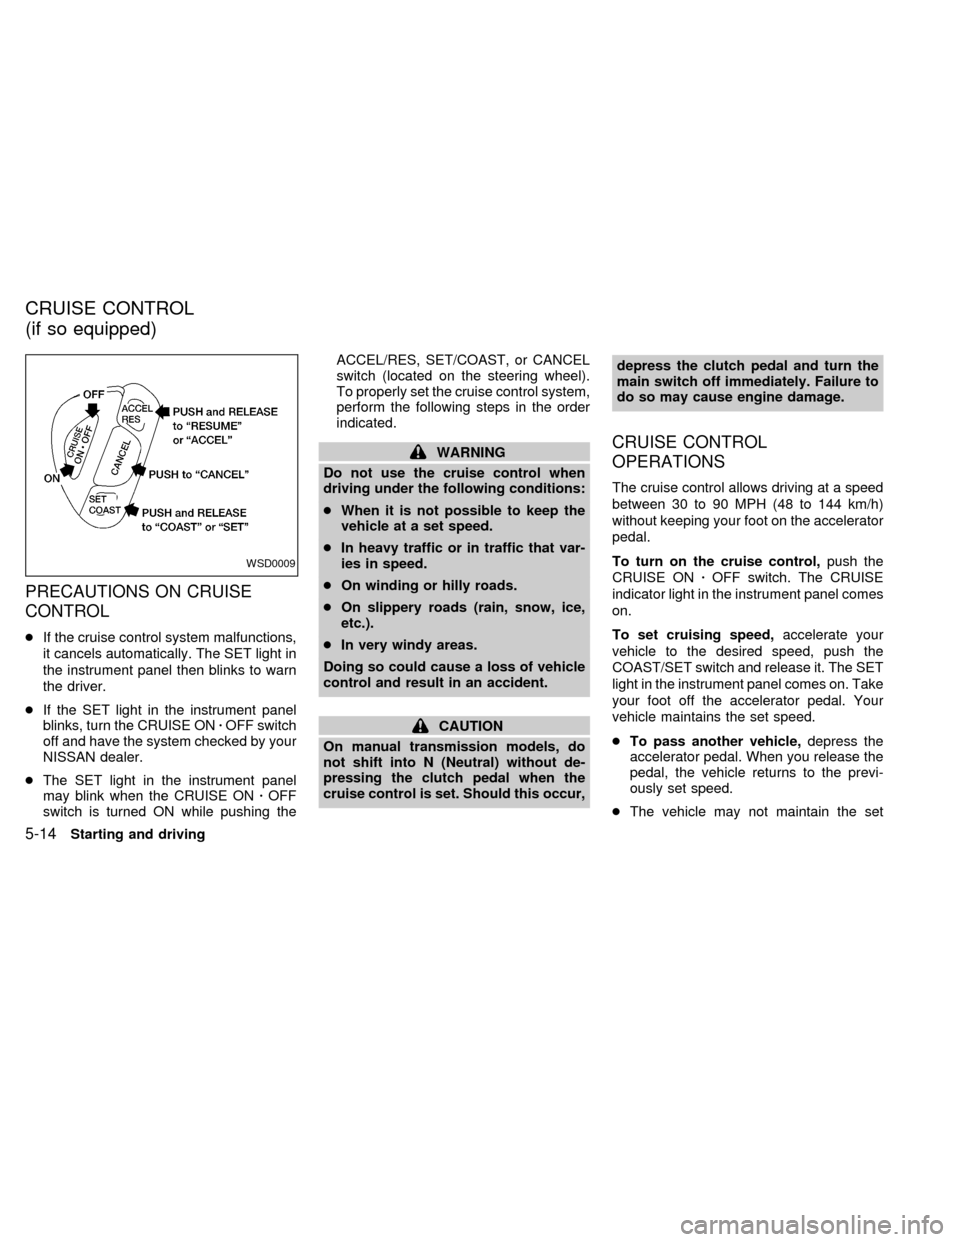
switch is turned ON while pushing theACCEL/RES, SET/COAST, or CANCEL
switch (located on the steering wheel).
To properly set the cruise control system,
perform the following steps in the order
indicated.
WARNING
Do not use the cruise control when
driving under the following conditions:
cWhen it is not possible to keep the
vehicle at a set speed.
cIn heavy traffic or in traffic that var-
ies in speed.
cOn winding or hilly roads.
cOn slippery roads (rain, snow, ice,
etc.).
cIn very windy areas.
Doing so could cause a loss of vehicle
control and result in an accident.
CAUTION
On manual transmission models, do
not shift into N (Neutral) without de-
pressing the clutch pedal when the
cruise control is set. Should this occur,depress the clutch pedal and turn the
main switch off immediately. Failure to
do so may cause engine damage.
CRUISE CONTROL
OPERATIONS
The cruise control allows driving at a speed
between 30 to 90 MPH (48 to 144 km/h)
without keeping your foot on the accelerator
pedal.
To turn on the cruise control,push the
CRUISE ONzOFF switch. The CRUISE
indicator light in the instrument panel comes
on.
To set cruising speed,accelerate your
vehicle to the desired speed, push the
COAST/SET switch and release it. The SET
light in the instrument panel comes on. Take
your foot off the accelerator pedal. Your
vehicle maintains the set speed.
cTo pass another vehicle,depress the
accelerator pedal. When you release the
pedal, the vehicle returns to the previ-
ously set speed.
cThe vehicle may not maintain the set
WSD0009
CRUISE CONTROL
(if so equipped)
5-14Starting and driving
ZX
Page 133 of 240
erates normally, but without anti-lock assis-
tance.
If the light comes on during the self-test or
while driving, take the vehicle to an autho-
rized NISSAN dealer for repair.
WARNING
c
The anti-lock brake system is a so-
phisticated device, but it cannot pre-
vent accidents resulting from care-
less or dangerous driving tech-
niques. It can help maintain vehicle
control during braking on slippery
surfaces, but remember that the stop-
ping distance on slippery surfaces
will be longer than on normal sur-
faces, even with the anti-lock brake
system. Stopping distances may also
be longer on rough, gravel or snow
covered roads, or if you are using tire
chains. Always maintain a safe dis-
tance from the vehicle in front of you.
Ultimately, the responsibility for
safety of self and others rests in the
hands of the driver.
Tire type and condition of tires may
also affect braking effectiveness.cWhen replacing tires, install the
specified tire size on all four wheels.
c
When installing a spare tire, make
sure it is the proper size and type as
specified on the tire placard. For tire
placard location information, refer to
``Tire placard'' in the ``Technical and
consumer information'' section of
this manual.
cFor additional information, refer to
``Wheels and tires'' in the ``Do-it-
yourself'' section of this manual.
FREEING A FROZEN DOOR
LOCK
To prevent a door lock from freezing, apply
de-icer or glycerin through the key hole. If
the lock becomes frozen, heat the key be-
fore inserting it in the key hole.
ANTI-FREEZE
In the winter when it is anticipated that the
temperature will drop below 32ÉF (0ÉC),
check the anti-freeze (ethylene glycol base)
to assure proper winter protection. For de-
tails, see ``Engine cooling system'' in the
``Do-it-yourself'' section of this manual.
BATTERY
If the battery is not fully charged during
extremely cold weather conditions, the bat-
tery fluid may freeze and damage the bat-
tery. To maintain maximum efficiency, the
battery should be checked regularly. For
details, see ``Battery'' in the ``Do-it-yourself''
section of this manual.
DRAINING OF COOLANT
If the vehicle is to be left outside without
anti-freeze, drain the cooling system by
opening the drain valves located under the
COLD WEATHER DRIVING
5-20Starting and driving
ZX
Page 157 of 240

8 Do-it-yourself
Maintenance precautions .......................................8-2
Engine compartment check locations -
QG engine .............................................................8-4
Engine compartment check locations -
SR engine ..............................................................8-5
Engine cooling system ...........................................8-6
Checking engine coolant level ...............................8-6
Changing engine coolant .......................................8-8
Engine oil ...............................................................8-9
Checking engine oil level .......................................8-9
Changing engine oil .............................................8-10
Changing engine oil filter .....................................8-12
Automatic transmission fluid ................................8-13
Temperature conditions for checking ...................8-14
Power steering fluid..............................................8-15
Brake fluid ............................................................8-15
Clutch fluid............................................................8-16
Window washer fluid ............................................8-16
Battery ..................................................................8-17
Jump starting ........................................................8-18
Drive belts ............................................................8-19
Spark plug ............................................................8-20Replacing spark plugs ..........................................8-20
Air cleaner ............................................................8-21
Windshield wiper blades ......................................8-22
Cleaning ...............................................................8-22
Replacing .............................................................8-22
Parking brake and brake pedal ............................8-23
Checking park brake ............................................8-23
Checking brake pedal ..........................................8-23
Brake booster .......................................................8-24
Clutch pedal .........................................................8-25
Checking clutch pedal ..........................................8-25
Fuses ....................................................................8-25
Engine compartment ............................................8-25
Passenger compartment ......................................8-27
Multi-remote controller battery replacement ........8-28
Lights ....................................................................8-29
Headlights ............................................................8-29
Fog lights (if so equipped) ...................................8-32
Exterior and interior lights ....................................8-33
Wheels and tires ..................................................8-36
Tire pressure ........................................................8-36
Types of tires........................................................8-37
ZX
Page 169 of 240
CHANGING ENGINE OIL FILTER
1. Park the vehicle on a level surface and
apply the parking brake.
2. Turn the engine off.
3. Place a large drain pan under the oil
filter.
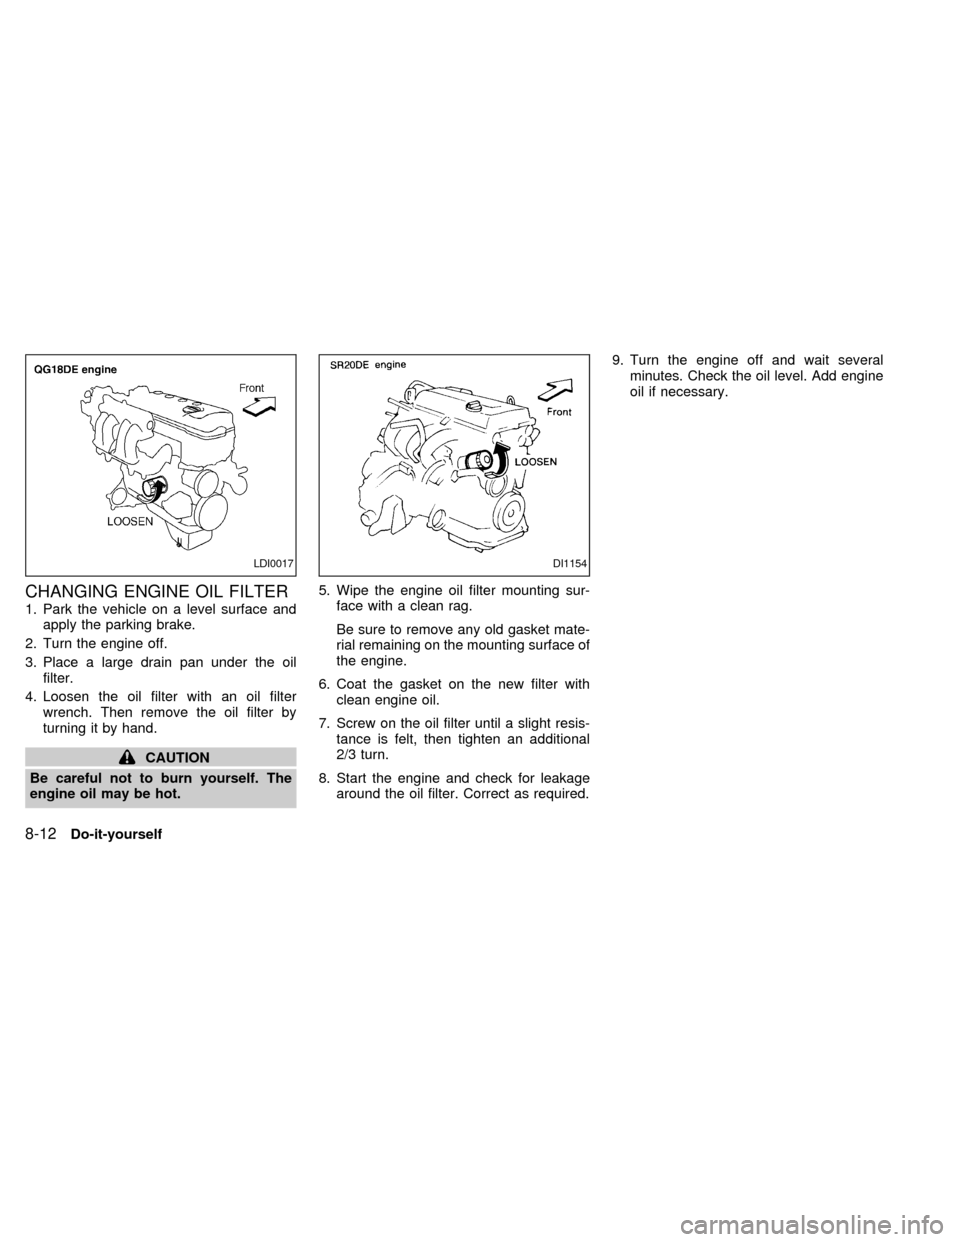
4. Loosen the oil filter with an oil filter
wrench. Then remove the oil filter by
turning it by hand.
CAUTION
Be careful not to burn yourself. The
engine oil may be hot.5. Wipe the engine oil filter mounting sur-
face with a clean rag.
Be sure to remove any old gasket mate-
rial remaining on the mounting surface of
the engine.
6. Coat the gasket on the new filter with
clean engine oil.
7. Screw on the oil filter until a slight resis-
tance is felt, then tighten an additional
2/3 turn.
8. Start the engine and check for leakage
around the oil filter. Correct as required.9. Turn the engine off and wait several
minutes. Check the oil level. Add engine
oil if necessary.
LDI0017DI1154
8-12Do-it-yourself
ZX
Page 181 of 240
If the brake pedal goes down farther than
normal, it may be due to a lack of adjust-
ment of the rear drum brakes. To adjust,
apply the parking brake several times.
WARNING
See an authorized NISSAN dealer for a
brake system check if the brake pedal
height does not return to normal.
Brake pad wear indicators
The disc brake pads on your vehicle have
an audible wear indicator. When a brake
pad requires replacement, it makes a high
pitched scraping or screeching sound when
the vehicle is in motion whether or not the
brake pedal is depressed. Have the brakes
checked as soon as possible if the wear
indicator sound is heard.
Under some driving or climate conditions,
occasional brake squeak, squeal or other
noise may be heard. Occasional brake
noise during light to moderate stops is nor-
mal and does not affect the function or
performance of the brake system.
The rear drum brakes (if so equipped) do
not have audible wear indicators. Shouldyou ever hear an unusually loud noise from
the rear drum brakes, have them inspected
as soon as possible by an authorized NIS-
SAN dealer.
Proper brake inspection intervals should
be followed.For more information regard-
ing brake inspections, see the appropriate
maintenance schedule information in the
``Maintenance'' section of this manual.
BRAKE BOOSTER
Check the brake booster function as fol-
lows:
1. With the engine off, press and release
the brake pedal several times. When
brake pedal movement (distance of
travel) remains the same from one pedal
application to the next, continue on to the
next step.
2. While depressing the brake pedal, start
the engine. The pedal height should drop
a little.
3. With the brake pedal depressed, stop the
engine. Keeping the pedal depressed for
about 30 seconds, the pedal height
should not change.
4. Run the engine for one minute withoutdepressing the brake pedal, then turn it
off. Depress the brake pedal several
times. The pedal travel distance will de-
crease gradually with each depression
as the vacuum is released from the
booster.
If the brakes do not operate properly, see an
authorized NISSAN dealer.
8-24Do-it-yourself
ZX
Page 182 of 240
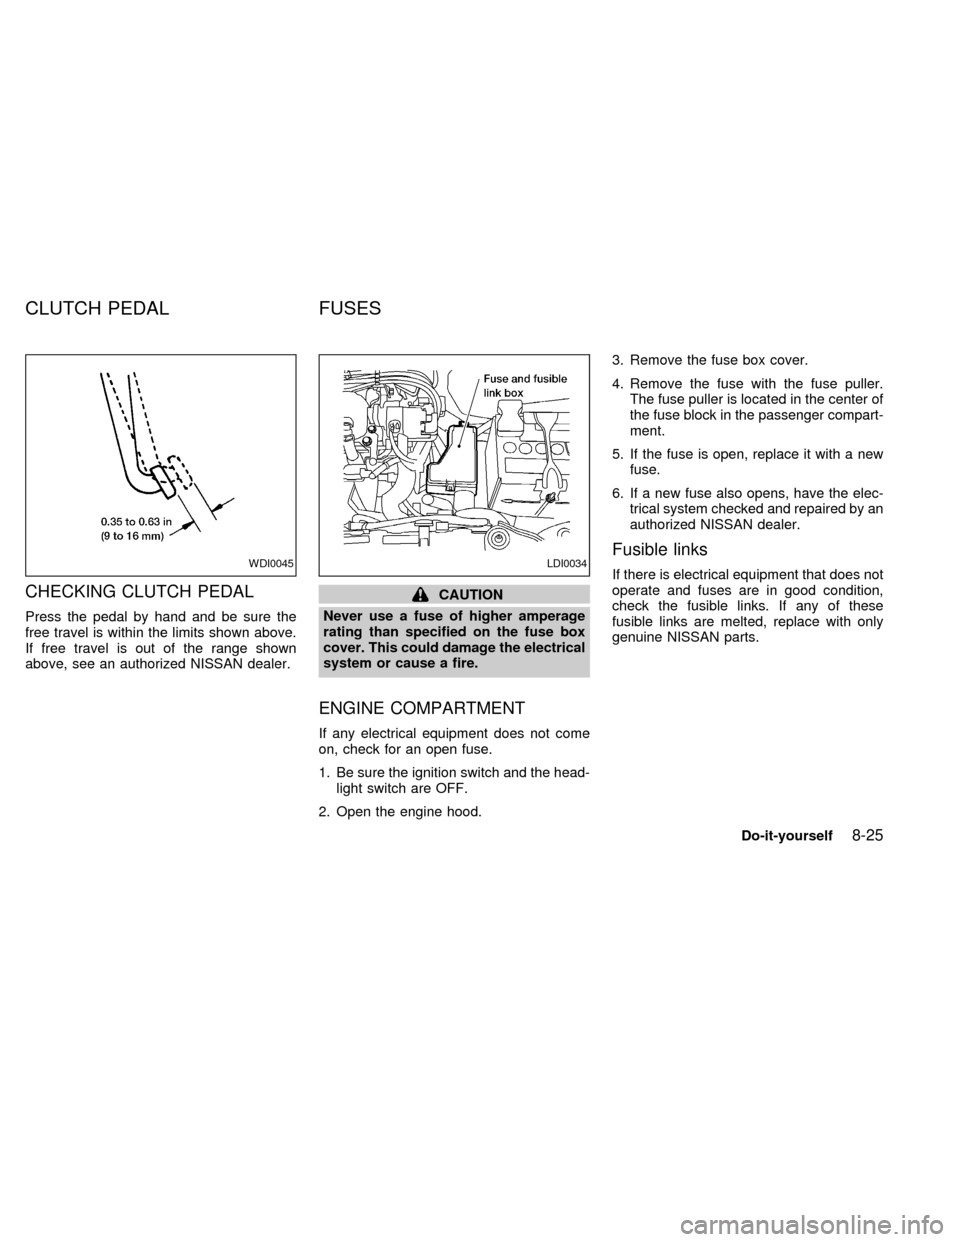
CHECKING CLUTCH PEDAL
Press the pedal by hand and be sure the
free travel is within the limits shown above.
If free travel is out of the range shown
above, see an authorized NISSAN dealer.
CAUTION
Never use a fuse of higher amperage
rating than specified on the fuse box
cover. This could damage the electrical
system or cause a fire.
ENGINE COMPARTMENT
If any electrical equipment does not come
on, check for an open fuse.
1. Be sure the ignition switch and the head-
light switch are OFF.
2. Open the engine hood.3. Remove the fuse box cover.
4. Remove the fuse with the fuse puller.
The fuse puller is located in the center of
the fuse block in the passenger compart-
ment.
5. If the fuse is open, replace it with a new
fuse.
6. If a new fuse also opens, have the elec-
trical system checked and repaired by an
authorized NISSAN dealer.
Fusible links
If there is electrical equipment that does not
operate and fuses are in good condition,
check the fusible links. If any of these
fusible links are melted, replace with only
genuine NISSAN parts.WDI0045LDI0034
CLUTCH PEDAL FUSES
Do-it-yourself8-25
ZX
Page 202 of 240

fied pressure if necessary. Check carefully
for damage, cuts or excessive wear.
Wheel nuts* ÐWhen checking the tires,
make sure no wheel nuts are missing, and
check for any loose wheel nuts. Tighten if
necessary.
Tire rotation* ÐTires should be rotated
every 7,500 miles (12,000 km).
Wheel alignment and balance ÐIf the
vehicle should pull to either side while driv-
ing on a straight and level road, or if you
detect uneven or abnormal tire wear, there
may be a need for a wheel alignment.
If the steering wheel or seat vibrates at
normal highway speeds, wheel balancing
may be needed.
Windshield wiper blades* ÐCheck for
cracks or wear if they do not wipe properly.
Doors and engine hood ÐCheck that all
doors and the hood operate properly. Also
ensure that all latches lock securely. Lubri-
cate hinges, latches, rollers and links if
necessary. Make sure the secondary latch
keeps the hood from opening when the
primary latch is released.
When driving in areas that use road salt orother corrosive materials, check lubrication
frequently.
Lights* ÐMake sure the headlamps, stop-
lights, tail lights, turn signal lights, and other
lights are all operating properly and installed
securely. Also check headlamp aim.
INTERIOR MAINTENANCE
The maintenance items listed here should
be checked on a regular basis, such as
when performing periodic maintenance,
cleaning the vehicle, etc.
Additional information on the following
items with an ``*'' is found in the ``Do-it-
yourself'' section of this manual.
Warning lights and chimes ÐMake sure
all warning lights and chimes are operating
properly.
Windshield wiper and washer* ÐCheck
that the wipers and washer operate properly
and that the wipers do not streak.
Windshield defroster ÐCheck that the air
comes out of the defroster outlets properly
and in sufficient quantity when operating the
heater or air conditioner.
Steering wheel ÐCheck for changes inthe steering conditions, such as excessive
freeplay, hard steering or strange noises.
Seats ÐCheck seat position controls such
as seat adjusters, seatback recliner, etc. to
ensure they operate smoothly and all
latches lock securely in every position.
Check that the head restraints move up and
down smoothly and the locks hold securely
in all latched positions.
Seat belts ÐCheck that all parts of the seat
belt system (For example buckles, anchors,
adjusters and retractors) operate properly
and smoothly, and are installed securely.
Check the belt webbing for cuts, fraying,
wear or damage.
Accelerator pedal ÐCheck the pedal for
smooth operation and make sure the pedal
does not catch or require uneven effort.
Keep the floor mat away from the pedal.
Clutch pedal* ÐMake sure the pedal
operates smoothly and check that it has the
proper free travel.
Brakes ÐCheck that the brakes do not pull
the vehicle to one side when applied.
Brake pedal and booster* ÐCheck the
pedal for smooth operation and make sure it
Maintenance
9-3
ZX
Page 213 of 240
![NISSAN SENTRA 2000 B15 / 5.G Owners Manual of at least 87 AKI (Anti-Knock Index). How-
ever, you may use unleaded gasoline with
an octane rating as low as 85 AKI (Anti-
Knock Index) in high altitude areas (over
4,000 ft [1,219 m]) such as: Col NISSAN SENTRA 2000 B15 / 5.G Owners Manual of at least 87 AKI (Anti-Knock Index). How-
ever, you may use unleaded gasoline with
an octane rating as low as 85 AKI (Anti-
Knock Index) in high altitude areas (over
4,000 ft [1,219 m]) such as: Col](/manual-img/5/642/w960_642-212.png)
of at least 87 AKI (Anti-Knock Index). How-
ever, you may use unleaded gasoline with
an octane rating as low as 85 AKI (Anti-
Knock Index) in high altitude areas (over
4,000 ft [1,219 m]) such as: Colorado, Mon-
tana, New Mexico, Utah, Wyoming, north-
eastern Nevada, southern Idaho, western
South Dakota, western Nebraska, and the
part of Texas which is directly south of New
Mexico.
Using unleaded gasoline with an octane
rating lower than stated above can cause
persistent, heavy ``spark knock.'' (``Spark
knock'' is a metallic rapping noise.) If
severe, this can lead to engine damage. If
you detect a persistent heavy spark
knock even when using gasoline of the
stated octane rating, or if you hear steady
spark knock while holding a steady
speed on level roads, have an authorized
NISSAN dealer correct the condition.
Failure to correct the condition is misuse
of the vehicle, for which NISSAN is not
responsible.
Incorrect ignition timing may result in spark
knock, after-run and/or overheating, which
may cause excessive fuel consumption or
engine damage. If any of the above symp-toms are encountered, have your vehicle
checked at an authorized NISSAN dealer or
other competent service facility.
However, now and then you may notice
light spark knock for a short time while
accelerating or driving up hills. This is
not a cause for concern, because you
get the greatest fuel benefit when there
is light spark knock for a short time
under heavy engine load.
10-4Technical and consumer information
ZX