2000 NISSAN SENTRA brake light
[x] Cancel search: brake lightPage 50 of 240
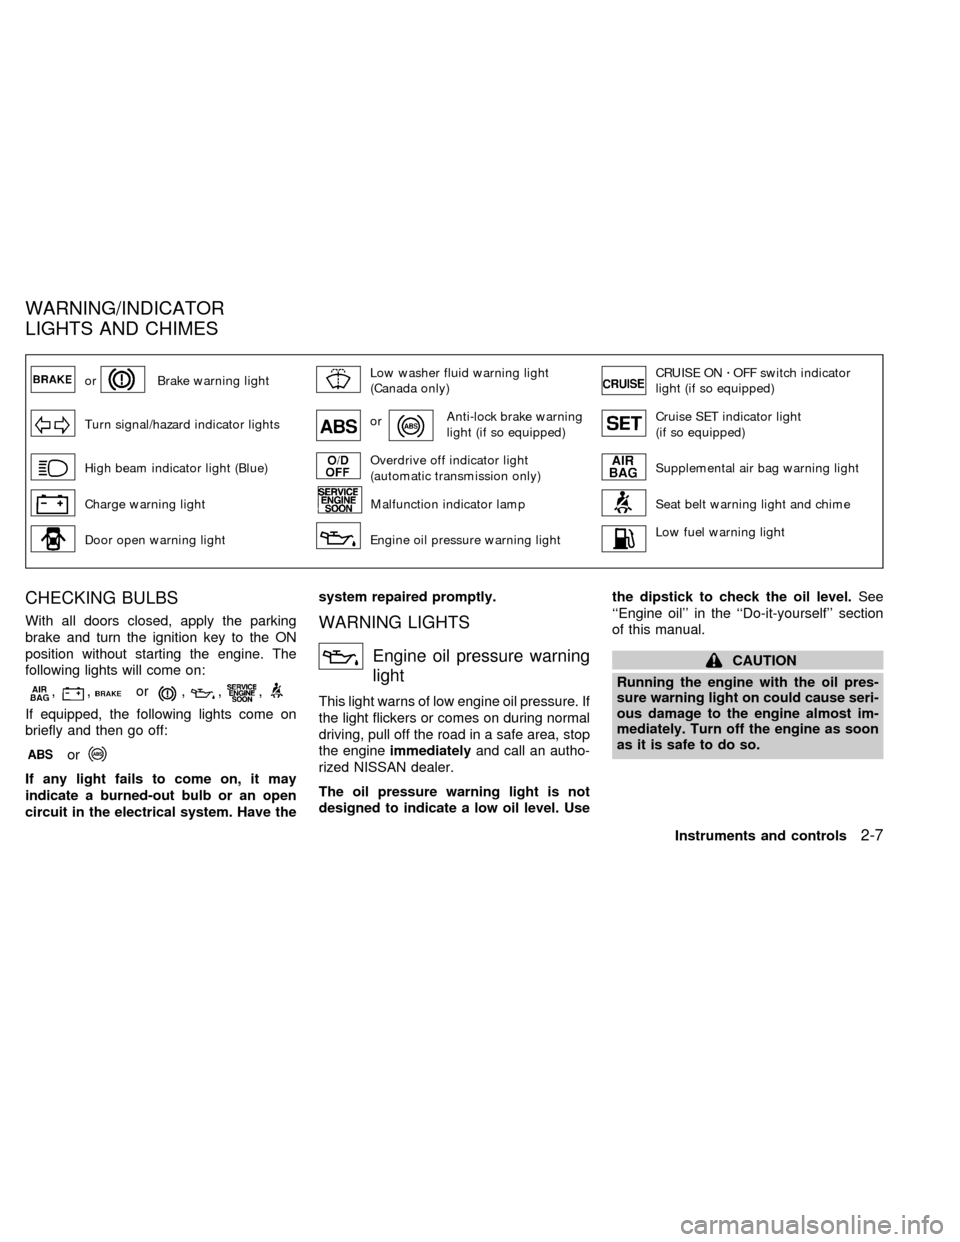
orBrake warning lightLow washer fluid warning light
(Canada only)CRUISE ONzOFF switch indicator
light (if so equipped)
Turn signal/hazard indicator lightsorAnti-lock brake warning
light (if so equipped)Cruise SET indicator light
(if so equipped)
High beam indicator light (Blue)Overdrive off indicator light
(automatic transmission only)Supplemental air bag warning light
Charge warning lightMalfunction indicator lampSeat belt warning light and chime
Door open warning lightEngine oil pressure warning lightLow fuel warning light
CHECKING BULBS
With all doors closed, apply the parking
brake and turn the ignition key to the ON
position without starting the engine. The
following lights will come on:
,,or,,,
If equipped, the following lights come on
briefly and then go off:
or
If any light fails to come on, it may
indicate a burned-out bulb or an open
circuit in the electrical system. Have thesystem repaired promptly.
WARNING LIGHTS
Engine oil pressure warning
light
This light warns of low engine oil pressure. If
the light flickers or comes on during normal
driving, pull off the road in a safe area, stop
the engineimmediatelyand call an autho-
rized NISSAN dealer.
The oil pressure warning light is not
designed to indicate a low oil level. Usethe dipstick to check the oil level.See
``Engine oil'' in the ``Do-it-yourself'' section
of this manual.
CAUTION
Running the engine with the oil pres-
sure warning light on could cause seri-
ous damage to the engine almost im-
mediately. Turn off the engine as soon
as it is safe to do so.
WARNING/INDICATOR
LIGHTS AND CHIMES
Instruments and controls2-7
ZX
Page 51 of 240
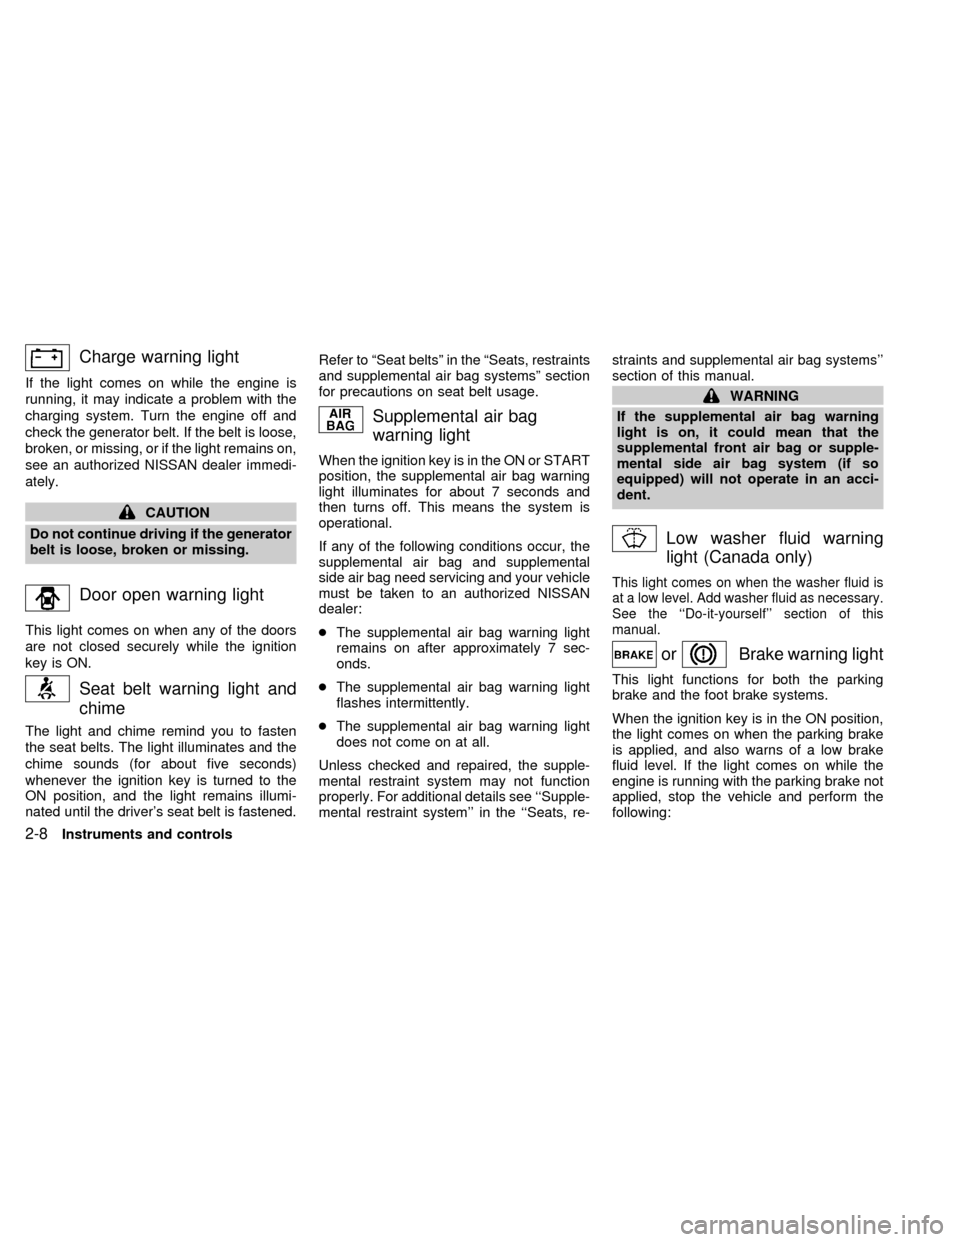
Charge warning light
If the light comes on while the engine is
running, it may indicate a problem with the
charging system. Turn the engine off and
check the generator belt. If the belt is loose,
broken, or missing, or if the light remains on,
see an authorized NISSAN dealer immedi-
ately.
CAUTION
Do not continue driving if the generator
belt is loose, broken or missing.
Door open warning light
This light comes on when any of the doors
are not closed securely while the ignition
key is ON.
Seat belt warning light and
chime
The light and chime remind you to fasten
the seat belts. The light illuminates and the
chime sounds (for about five seconds)
whenever the ignition key is turned to the
ON position, and the light remains illumi-
nated until the driver's seat belt is fastened.Refer to ªSeat beltsº in the ªSeats, restraints
and supplemental air bag systemsº section
for precautions on seat belt usage.
Supplemental air bag
warning light
When the ignition key is in the ON or START
position, the supplemental air bag warning
light illuminates for about 7 seconds and
then turns off. This means the system is
operational.
If any of the following conditions occur, the
supplemental air bag and supplemental
side air bag need servicing and your vehicle
must be taken to an authorized NISSAN
dealer:
cThe supplemental air bag warning light
remains on after approximately 7 sec-
onds.
cThe supplemental air bag warning light
flashes intermittently.
cThe supplemental air bag warning light
does not come on at all.
Unless checked and repaired, the supple-
mental restraint system may not function
properly. For additional details see ``Supple-
mental restraint system'' in the ``Seats, re-straints and supplemental air bag systems''
section of this manual.
WARNING
If the supplemental air bag warning
light is on, it could mean that the
supplemental front air bag or supple-
mental side air bag system (if so
equipped) will not operate in an acci-
dent.
Low washer fluid warning
light (Canada only)
This light comes on when the washer fluid is
at a low level. Add washer fluid as necessary.
See the ``Do-it-yourself'' section of this
manual.
orBrake warning light
This light functions for both the parking
brake and the foot brake systems.
When the ignition key is in the ON position,
the light comes on when the parking brake
is applied, and also warns of a low brake
fluid level. If the light comes on while the
engine is running with the parking brake not
applied, stop the vehicle and perform the
following:
2-8Instruments and controls
ZX
Page 52 of 240
1.Check the brake fluid level. Add brake fluid
as necessary. See ``Brake fluid'' in the
``Do-it-yourself'' section of this manual.
2. If the brake fluid level is correct, have the
warning system checked by an autho-
rized NISSAN dealer.
WARNING
cIf the level is below the MINIMUM or
MIN mark on the brake fluid reser-
voir, do not drive until the brake
system has been checked at an au-
thorized NISSAN dealer.
cYour brake system may not be work-
ing properly if the warning light is
on. Driving could be dangerous. If
you judge it to be safe, drive care-
fully to the nearest service station
for repairs. Otherwise, have your ve-
hicle towed.
cPressing the brake pedal with the
engine stopped and/or a low brake
fluid level may increase your stop-
ping distance and braking will re-
quire greater pedal effort as well as
pedal travel.
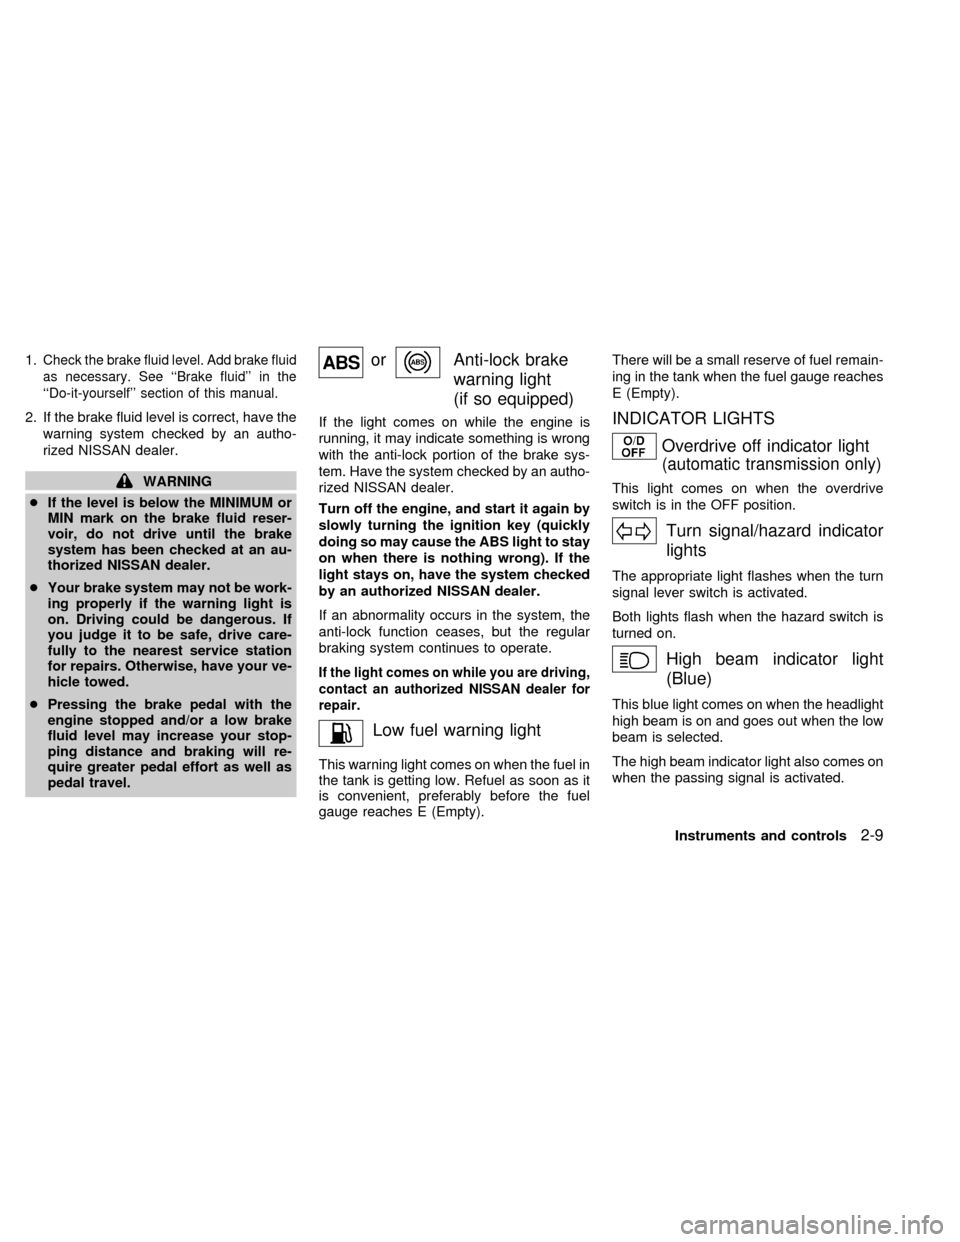
orAnti-lock brake
warning light
(if so equipped)
If the light comes on while the engine is
running, it may indicate something is wrong
with the anti-lock portion of the brake sys-
tem. Have the system checked by an autho-
rized NISSAN dealer.
Turn off the engine, and start it again by
slowly turning the ignition key (quickly
doing so may cause the ABS light to stay
on when there is nothing wrong). If the
light stays on, have the system checked
by an authorized NISSAN dealer.
If an abnormality occurs in the system, the
anti-lock function ceases, but the regular
braking system continues to operate.
If the light comes on while you are driving,
contact an authorized NISSAN dealer for
repair.
Low fuel warning light
This warning light comes on when the fuel in
the tank is getting low. Refuel as soon as it
is convenient, preferably before the fuel
gauge reaches E (Empty).There will be a small reserve of fuel remain-
ing in the tank when the fuel gauge reaches
E (Empty).
INDICATOR LIGHTS
Overdrive off indicator light
(automatic transmission only)
This light comes on when the overdrive
switch is in the OFF position.
Turn signal/hazard indicator
lights
The appropriate light flashes when the turn
signal lever switch is activated.
Both lights flash when the hazard switch is
turned on.
High beam indicator light
(Blue)
This blue light comes on when the headlight
high beam is on and goes out when the low
beam is selected.
The high beam indicator light also comes on
when the passing signal is activated.
Instruments and controls
2-9
ZX
Page 54 of 240

CHIMES
Key reminder chime
A chime sounds if the driver's side door is
opened while the key is left in the ignition
switch. Remove the key and take it with you
when leaving the vehicle.
Light reminder chime
With the ignition switch in the OFF position,
a chime sounds when the driver's side door
is opened if the headlights or parking lights
are on.
Turn the headlight control switch off before
leaving the vehicle.
Brake pad wear warning
The disc brake pads have an audible wear
warning. When a brake pad requires re-
placement, it makes a high pitched scraping
sound when the vehicle is in motion,
whether or not the brake pedal is de-
pressed. Have the brakes checked as soon
as possible if the warning sound is heard.Your vehicle has two types of security sys-
tems:
cNissan Vehicle Immobilizer System±
NVIS (if so equipped)
cTheft warning (if so equipped)
NISSAN VEHICLE IMMOBILIZER
SYSTEM (NVIS) (if so equipped)
The Nissan Vehicle Immobilizer System
(NVIS) will not allow the engine to start
without the use of a registered NVIS key.
If the engine fails to start using a registered
NVIS key (for example, when interference iscaused by another NVIS key, an automated
toll road device or automated payment de-
vice on the key ring), restart the engine
using the following procedures:
1. Leave the ignition switch in the ON posi-
tion for approximately 5 seconds.
2. Turn the ignition switch to the OFF or
LOCK position, and wait approximately 5
seconds.
3. Repeat step 1 and 2.
4. Restart the engine while holding the de-
vice (which may have caused the inter-
ference) separate from the registered
NVIS key.
If the no start condition re-occurs, Nissan
recommends placing the registered NVIS
key on a separate key ring to avoid interfer-
ence from other devices.
Statement related to section 15 of FCC
rules for Nissan Vehicle Immobilizer
System (CONT ASSY - IMMOBILIZER,
ANT ASSY - IMMOBILIZER)
This device complies with part 15 of the
FCC Rules and RSS-210 of Industry
Canada. Operation is subject to the fol-
lowing two conditions;
IC0005
SECURITY SYSTEMS
Instruments and controls2-11
ZX
Page 60 of 240
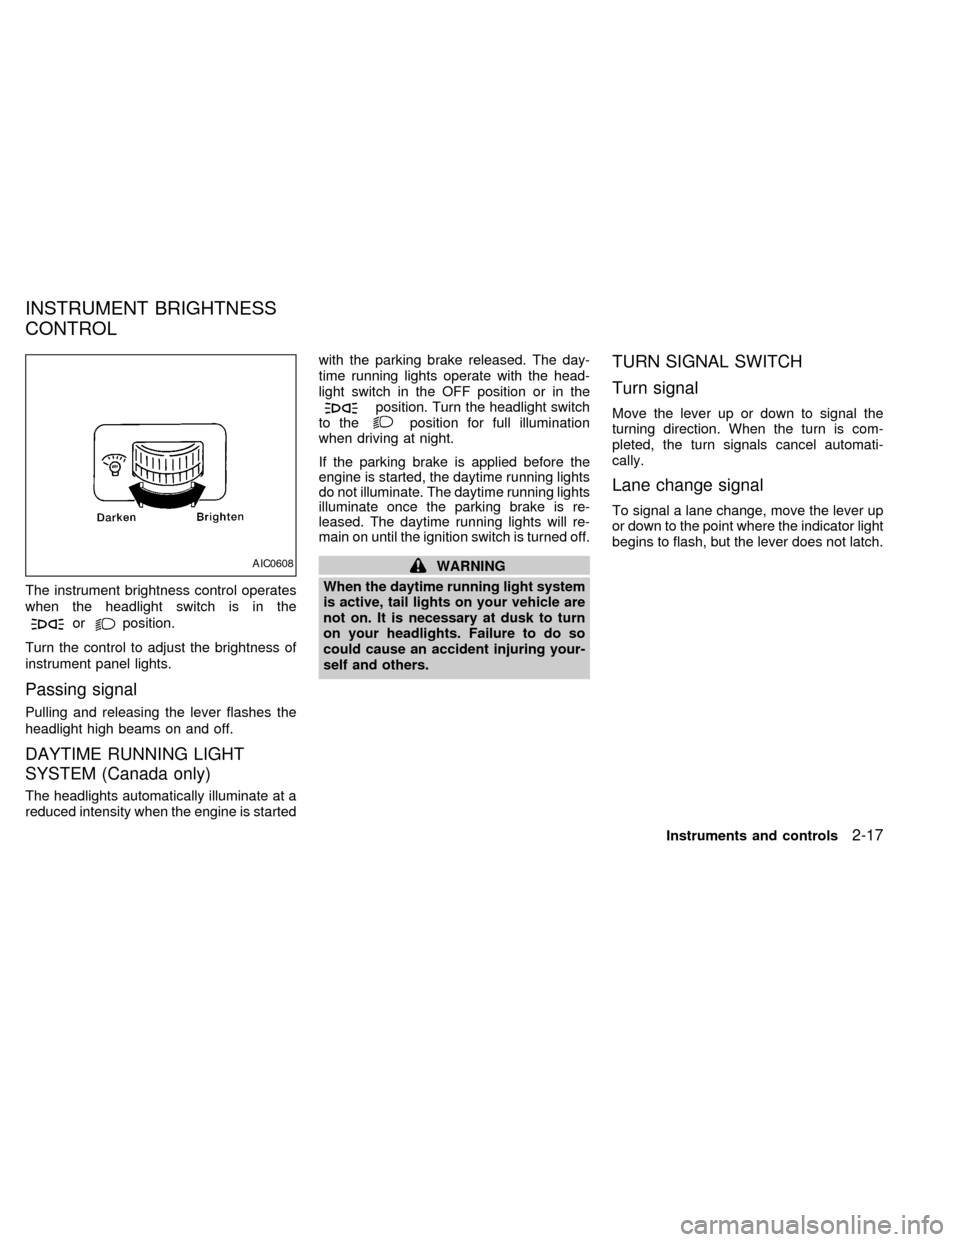
The instrument brightness control operates
when the headlight switch is in the
orposition.
Turn the control to adjust the brightness of
instrument panel lights.
Passing signal
Pulling and releasing the lever flashes the
headlight high beams on and off.
DAYTIME RUNNING LIGHT
SYSTEM (Canada only)
The headlights automatically illuminate at a
reduced intensity when the engine is startedwith the parking brake released. The day-
time running lights operate with the head-
light switch in the OFF position or in the
position. Turn the headlight switch
to theposition for full illumination
when driving at night.
If the parking brake is applied before the
engine is started, the daytime running lights
do not illuminate. The daytime running lights
illuminate once the parking brake is re-
leased. The daytime running lights will re-
main on until the ignition switch is turned off.
WARNING
When the daytime running light system
is active, tail lights on your vehicle are
not on. It is necessary at dusk to turn
on your headlights. Failure to do so
could cause an accident injuring your-
self and others.
TURN SIGNAL SWITCH
Turn signal
Move the lever up or down to signal the
turning direction. When the turn is com-
pleted, the turn signals cancel automati-
cally.
Lane change signal
To signal a lane change, move the lever up
or down to the point where the indicator light
begins to flash, but the lever does not latch.
AIC0608
INSTRUMENT BRIGHTNESS
CONTROL
Instruments and controls2-17
ZX
Page 117 of 240

the influence of alcohol. Every year thou-
sands of people are injured or killed in
alcohol-related accidents. Although the lo-
cal laws vary on what is considered to be
legally intoxicated, the fact is that alcohol
affects all people differently and most
people underestimate the effects of alcohol.
Remember, drinking and driving don't mix!
And that is true for drugs, too (over-the-
counter, prescription, and illegal drugs). Do
not drive if your ability to operate your
vehicle is impaired by alcohol, drugs, or
some other physical condition.
AUTOMATIC TRANSMISSION
On automatic transmission models the igni-
tion lock is designed so the key cannot be
turned to LOCK and removed until the shift
selector lever is moved to the P (Park)
position.
When removing the key from the ignition,
make sure the shift selector lever is in the P
(Park) position.
When the key cannot be turned to the LOCK
position, proceed as follows to remove the
key.1) Move the shift selector lever into the P
(Park) position.
2) Turn the ignition key slightly toward the
ON position.
3) Turn the key to the LOCK position.
4) Remove the key.
The shift lever is designed so it cannot be
moved out of P (Park) and into any of the
other gear positions if the ignition key is
turned to OFF or if the key is removed from
the switch.
The shift selector lever can be moved if
the ignition switch is in the ON position
and the foot brake pedal is depressed.
There is an OFF position between the
LOCK and ACC positions. The OFF posi-
tion is indicated by a ``1'' on the key
cylinder. When the ignition is in OFF, the
steering wheel is not locked.
WSD0004
IGNITION SWITCH
5-4Starting and driving
ZX
Page 123 of 240

Selector lock release
If the battery is discharged, the shift selector
lever may not be moved from the P (Park)
position even with the brake pedal de-
pressed and the shift selector lever button
pushed.
To move the shift selector lever, release the
shift lock and push shift selector lever but-
ton. The shift selector lever can be moved to
N (Neutral). However, the steering wheel
will be locked unless the ignition switch is
turned to the ON position.
To release the shift lock, follow the following
procedure:
1. Turn the ignition key to the lock position
and remove the key
2. Apply the parking brake.
3. Remove the shift lock cover.
4. Insert a small screwdriver in the shift lock
slot, and push down.
5. Push the shift selector lever button and
move the shift selector lever to N (Neu-
tral) position while holding down the shift
lock.
If there is any problem moving the shiftselector lever out of P (Park), take your
vehicle to an authorized NISSAN dealership
as soon as possible.
Accelerator downshift
in D position
For rapid passing or hill climbing while driv-
ing, fully depress the accelerator pedal to
the floor. This shifts the transmission down
into third gear, second gear or first gear,
depending on vehicle speed.
Overdrive Switch
ON: With the engine running and the shift
selector lever in the D (Drive) posi-
tion, the transmission upshifts into
OVERDRIVE as vehicle speed in-
creases.
OVERDRIVE does not engage until the
engine has reached operating tempera-
ture.
OFF: For driving up and down long slopes
where engine braking is necessary
push the OVERDRIVE switch once.
The O/D OFF indicator light in the
WSD0007
5-10Starting and driving
ZX
Page 124 of 240
instrument panel comes on at this
time.
When cruising at a low speed or
climbing a gentle slope, you may feel
uncomfortable shift shocks as the
transmission shifts between third gear
and overdrive repeatedly. In this case,
depress the OVERDRIVE switch to
turn the OVERDRIVE off. The O/D
OFF indicator light in the instrument
panel comes on at this time.
When driving conditions change, depress
the overdrive switch to turn the OVER-
DRIVE on.
Remember not to drive at high speeds for
extended periods of time with the OVER-
DRIVE off. This reduces fuel economy.
MANUAL TRANSMISSION
WARNING
cDo not downshift abruptly on slip-
pery roads. This may cause a loss of
control.
cDo not over-rev the engine when
shifting to a lower gear. This may
cause a loss of control or engine
damage.
CAUTION
cDo not rest your foot on the clutch
pedal while driving. This may cause
clutch damage.
cStop your vehicle completely before
shifting into R (Reverse).
cWhen the vehicle is stopped with the
engine running (for example, at a
stop light), shift to N (Neutral) and
release the clutch pedal with the foot
brake applied.
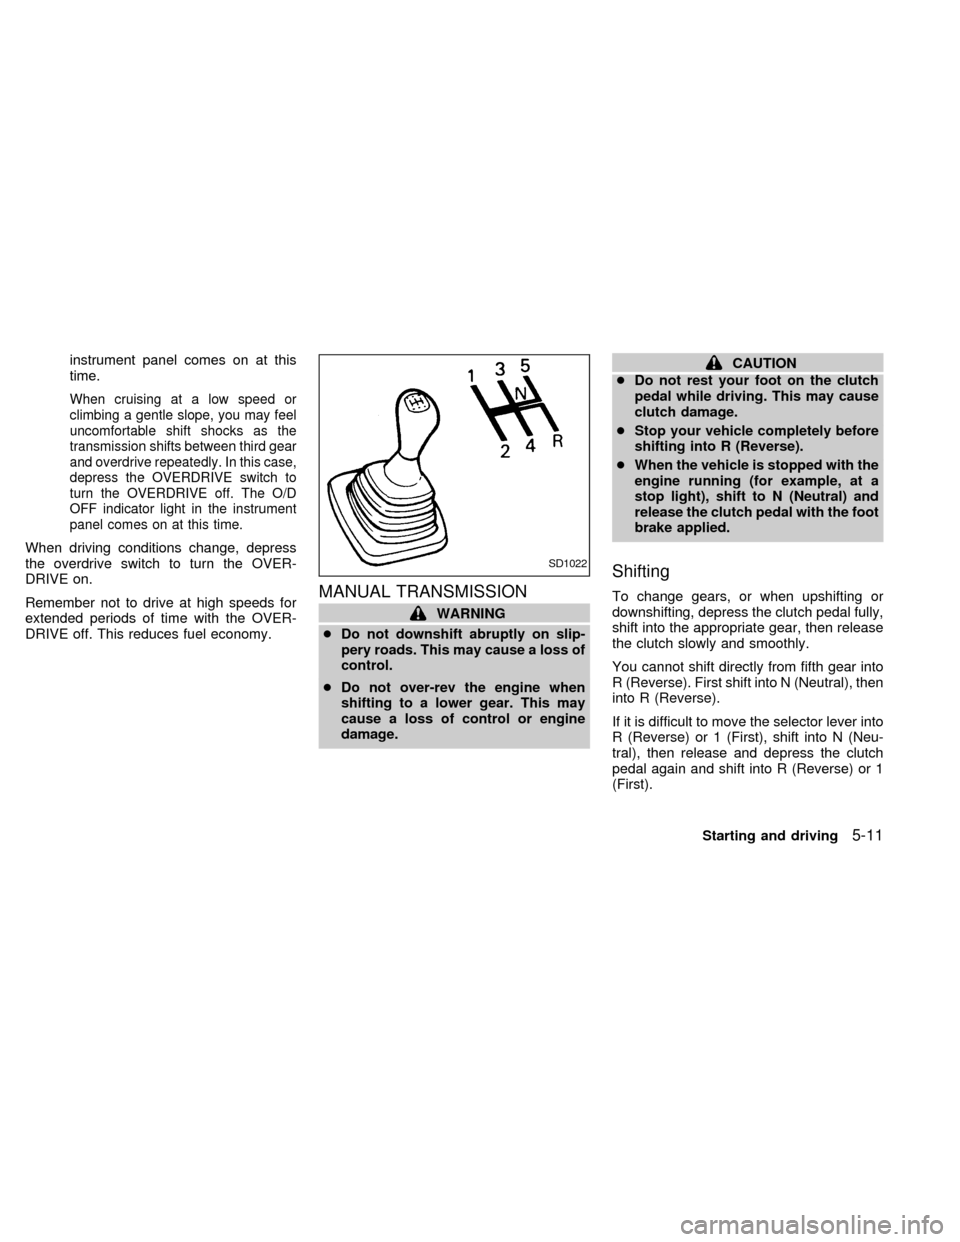
Shifting
To change gears, or when upshifting or
downshifting, depress the clutch pedal fully,
shift into the appropriate gear, then release
the clutch slowly and smoothly.
You cannot shift directly from fifth gear into
R (Reverse). First shift into N (Neutral), then
into R (Reverse).
If it is difficult to move the selector lever into
R (Reverse) or 1 (First), shift into N (Neu-
tral), then release and depress the clutch
pedal again and shift into R (Reverse) or 1
(First).
SD1022
Starting and driving5-11
ZX