2000 NISSAN SENTRA gas type
[x] Cancel search: gas typePage 83 of 240
OPENER OPERATION
WARNING
cDo not drive with the trunk lid open.
This could allow dangerous exhaust
gases to be drawn into the vehicle.
See ``Exhaust gas'' in the ``Starting
and driving'' section of this manual.
cClosely supervise children when
they are around cars to prevent them
from playing and becoming locked
in the trunk where they could be
seriously injured. Keep the carlocked, with the trunk closed, when
not in use, and prevent children's
access to car keys.
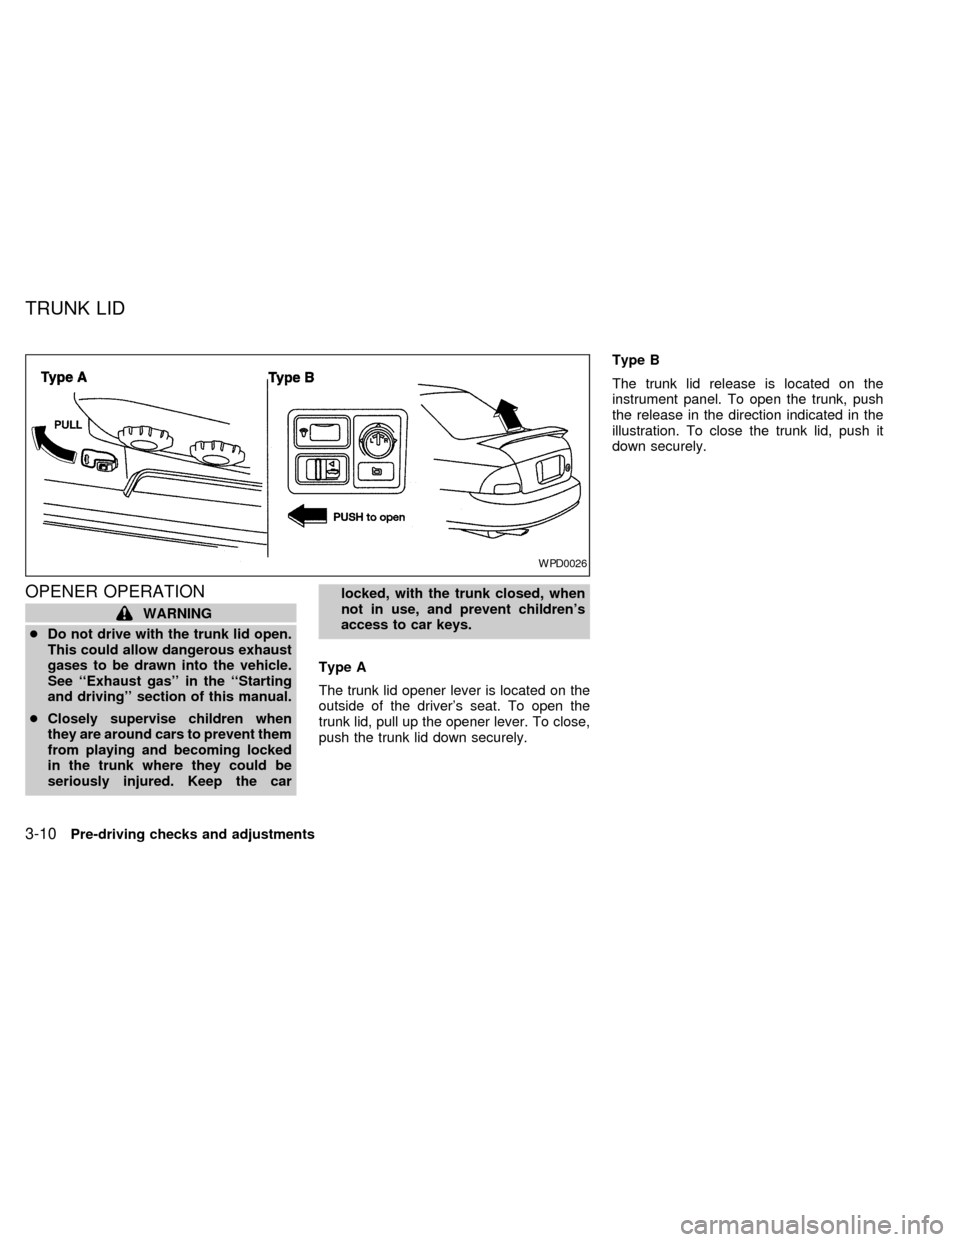
Type A
The trunk lid opener lever is located on the
outside of the driver's seat. To open the
trunk lid, pull up the opener lever. To close,
push the trunk lid down securely.Type B
The trunk lid release is located on the
instrument panel. To open the trunk, push
the release in the direction indicated in the
illustration. To close the trunk lid, push it
down securely.
WPD0026
TRUNK LID
3-10Pre-driving checks and adjustments
ZX
Page 86 of 240
WARNING
cGasoline is extremely flammable and
highly explosive under certain con-
ditions. You could be burned or se-
riously injured if it is misused or
mishandled. Always stop the engine
and do not smoke or allow open
flames or sparks near the vehicle
when refueling.
cFuel may be under pressure. Turn
the cap one-half turn and wait for
any ``hissing'' sound to stop to pre-
vent fuel from spraying out and pos-
sibly causing personal injury. Then
remove the cap.
cDo not attempt to top off the fuel
tank after the fuel pump nozzle shuts
off automatically. Continued refuel-
ing may cause fuel overflow, result-
ing in fuel spray and possibly fire.
cUse only an original equipment type
fuel filler cap as a replacement. It has
a built-in safety valve needed for
proper operation of the fuel system
and emission control system. An in-
correct cap can result in a serious
malfunction and possible injury.cNever pour fuel into the throttle body
to attempt to start your vehicle.
CAUTION
cIf fuel is spilled on the vehicle body,
flush it away with water to avoid
paint damage.
cTighten until the fuel filler cap clicks.
Failure to tighten the fuel filler cap
properly may cause the
mal-
function indicator lamp (MIL) to illu-
minate. If the
lamp illuminates
because the fuel filler cap is loose or
missing, tighten or install the cap
and continue to drive the vehicle.
The
lamp should turn off after a
few driving trips. If thelamp
does not turn off after a few driving
trips, have the vehicle inspected by
an authorized NISSAN dealer.
cFor additional information, see the
``Malfunction indicator lamp (MIL)''
in the ``Instruments and controls''
section earlier in this manual.
TILT OPERATION
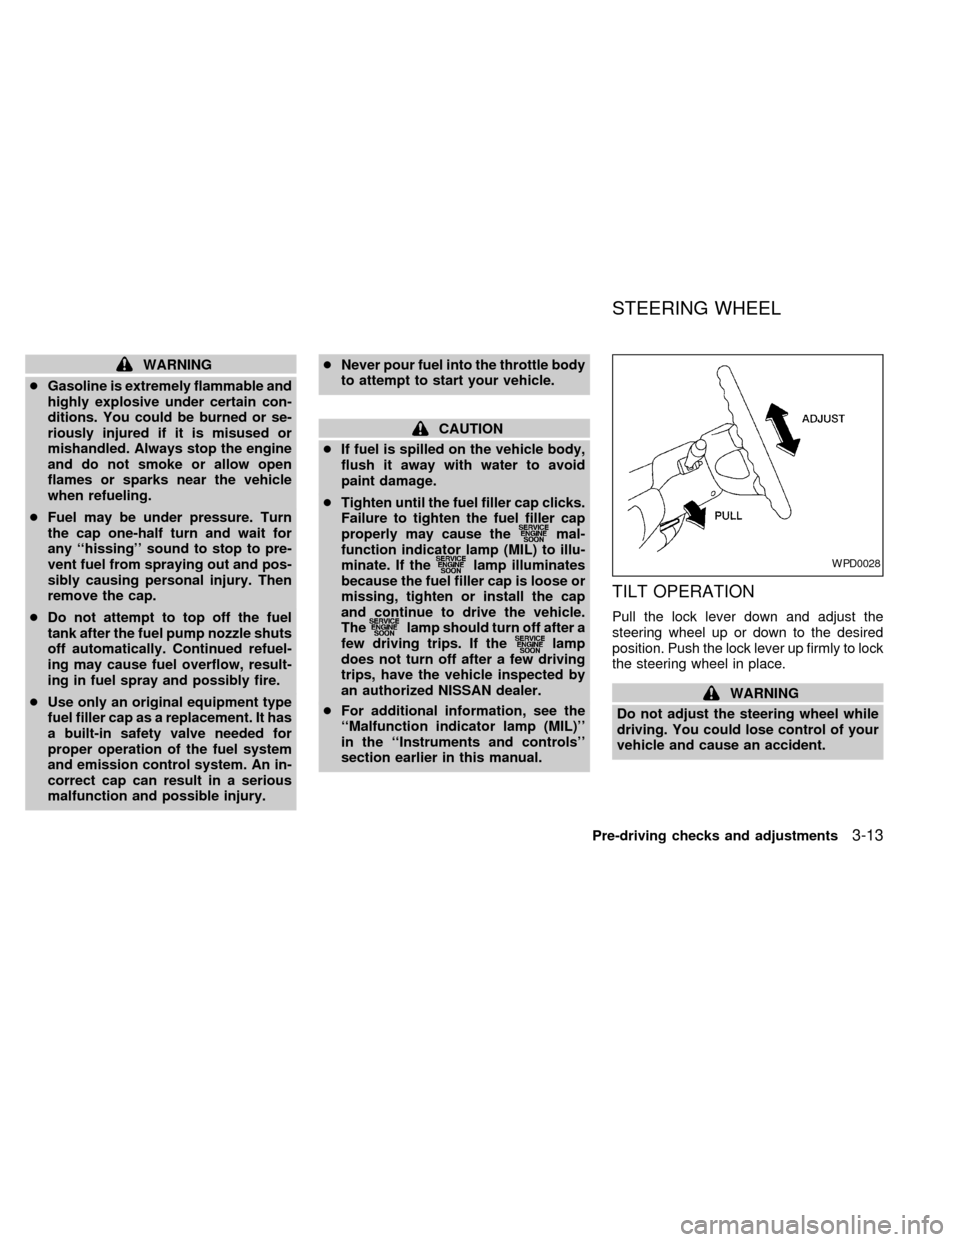
Pull the lock lever down and adjust the
steering wheel up or down to the desired
position. Push the lock lever up firmly to lock
the steering wheel in place.
WARNING
Do not adjust the steering wheel while
driving. You could lose control of your
vehicle and cause an accident.
WPD0028
STEERING WHEEL
Pre-driving checks and adjustments3-13
ZX
Page 186 of 240
HEADLIGHTS
The headlight is a semi-sealed beam type
which uses a replaceable headlight (halo-
gen) bulb. A bulb can be replaced from
inside the engine compartment without re-
moving the headlight assembly.
CAUTION
cHigh pressure halogen gas is sealed
inside the halogen bulb. The bulb
may break if the glass envelope is
scratched or the bulb is dropped.
cWhen handling the bulb, do not
touch the glass envelope.
cDO NOT TOUCH THE BULB
cUse the same number and wattage
as originally installed:
Wattage 65/55
Bulb no. 9007 (HB5)
cDo not leave the bulb out of the
headlight reflector for a long period
of time as dust, moisture, and smoke
may enter the headlight body and
affect the performance of the head-
light.
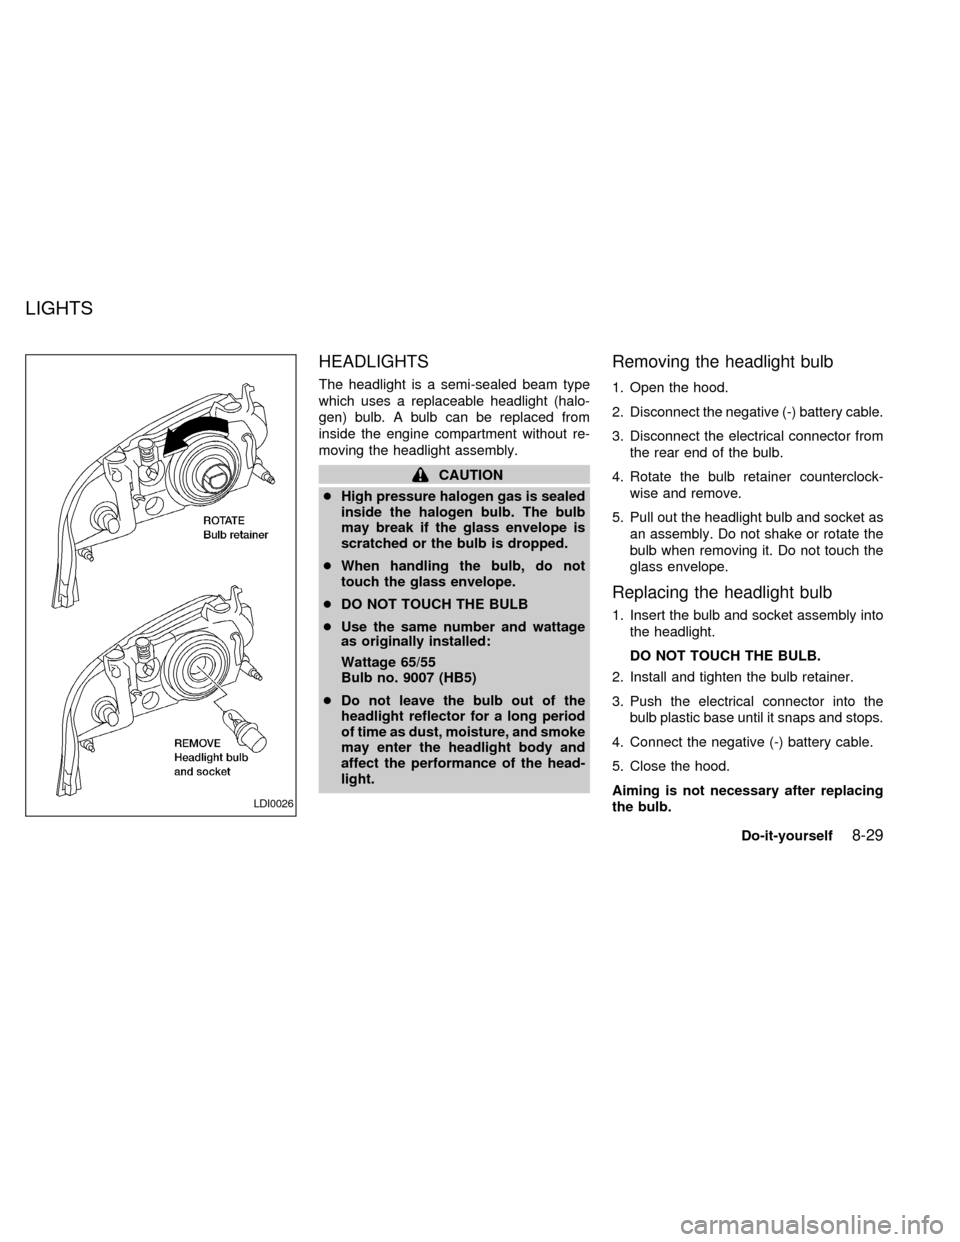
Removing the headlight bulb
1. Open the hood.
2. Disconnect the negative (-) battery cable.
3. Disconnect the electrical connector from
the rear end of the bulb.
4. Rotate the bulb retainer counterclock-
wise and remove.
5. Pull out the headlight bulb and socket as
an assembly. Do not shake or rotate the
bulb when removing it. Do not touch the
glass envelope.
Replacing the headlight bulb
1. Insert the bulb and socket assembly into
the headlight.
DO NOT TOUCH THE BULB.
2. Install and tighten the bulb retainer.
3. Push the electrical connector into the
bulb plastic base until it snaps and stops.
4. Connect the negative (-) battery cable.
5. Close the hood.
Aiming is not necessary after replacing
the bulb.
LDI0026
LIGHTS
Do-it-yourself8-29
ZX
Page 211 of 240
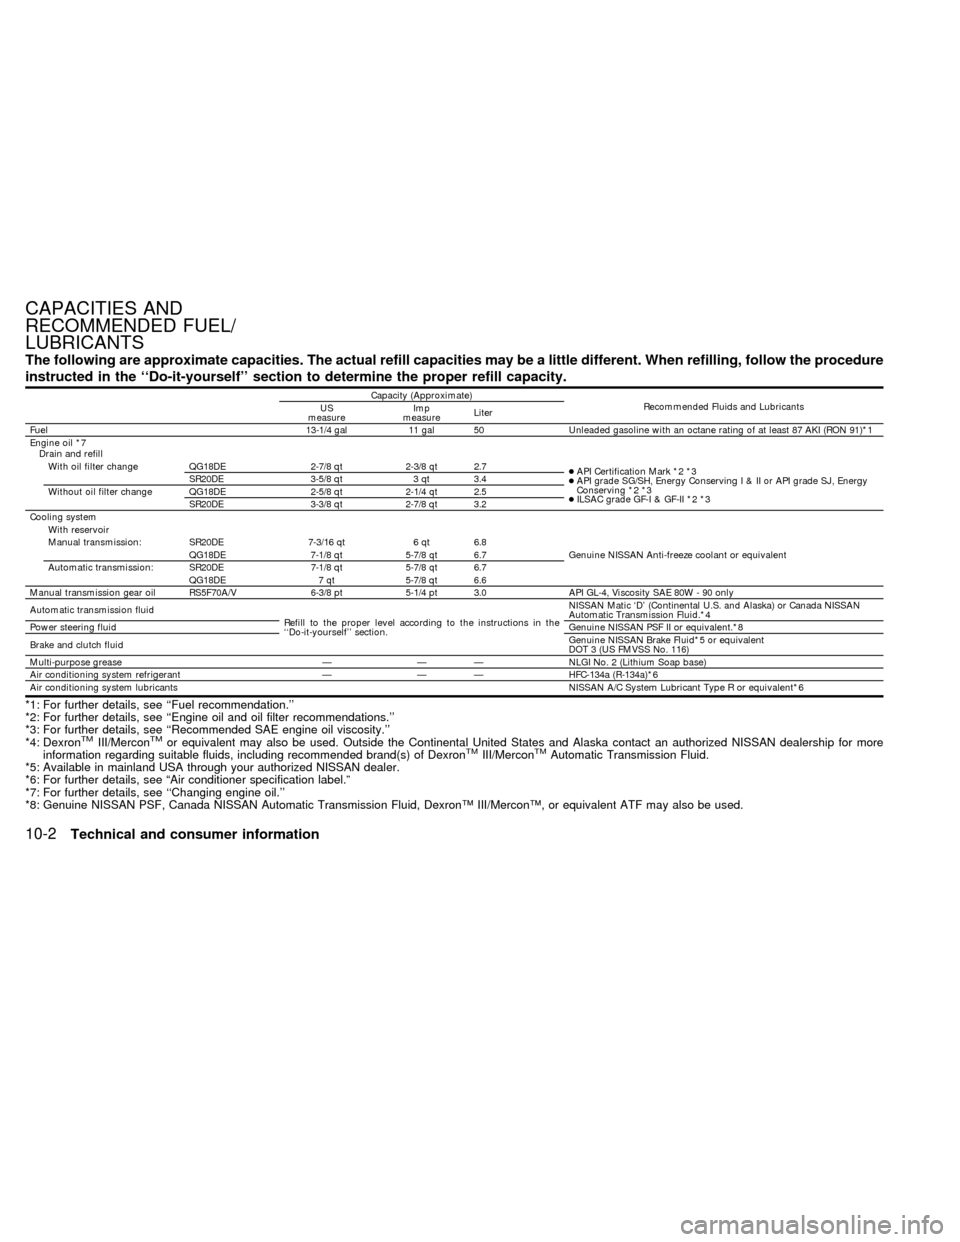
The following are approximate capacities. The actual refill capacities may be a little different. When refilling, follow the procedure
instructed in the ``Do-it-yourself'' section to determine the proper refill capacity.
Capacity (Approximate)
Recommended Fluids and Lubricants
US
measureImp
measureLiter
Fuel 13-1/4 gal 11 gal 50 Unleaded gasoline with an octane rating of at least 87 AKI (RON 91)*1
Engine oil *7
Drain and refill
With oil filter change QG18DE 2-7/8 qt 2-3/8 qt 2.7
cAPI Certification Mark *2 *3
cAPI grade SG/SH, Energy ConservingI&IIorAPIgrade SJ, Energy
Conserving *2 *3
cILSAC grade GF-I & GF-II *2 *3 SR20DE 3-5/8 qt 3 qt 3.4
Without oil filter change QG18DE 2-5/8 qt 2-1/4 qt 2.5
SR20DE 3-3/8 qt 2-7/8 qt 3.2
Cooling system
With reservoir
Genuine NISSAN Anti-freeze coolant or equivalent Manual transmission: SR20DE 7-3/16 qt 6 qt 6.8
QG18DE 7-1/8 qt 5-7/8 qt 6.7
Automatic transmission: SR20DE 7-1/8 qt 5-7/8 qt 6.7
QG18DE 7 qt 5-7/8 qt 6.6
Manual transmission gear oil RS5F70A/V 6-3/8 pt 5-1/4 pt 3.0 API GL-4, Viscosity SAE 80W - 90 only
Automatic transmission fluid
Refill to the proper level according to the instructions in the
``Do-it-yourself'' section.NISSAN Matic `D' (Continental U.S. and Alaska) or Canada NISSAN
Automatic Transmission Fluid.*4
Power steering fluidGenuine NISSAN PSF II or equivalent.*8
Brake and clutch fluidGenuine NISSAN Brake Fluid*5 or equivalent
DOT 3 (US FMVSS No. 116)
Multi-purpose grease Ð Ð Ð NLGI No. 2 (Lithium Soap base)
Air conditioning system refrigerant Ð Ð Ð HFC-134a (R-134a)*6
Air conditioning system lubricantsNISSAN A/C System Lubricant Type R or equivalent*6
*1: For further details, see ``Fuel recommendation.''
*2: For further details, see ``Engine oil and oil filter recommendations.''
*3: For further details, see ``Recommended SAE engine oil viscosity.''
*4: Dexron
TMIII/MerconTMor equivalent may also be used. Outside the Continental United States and Alaska contact an authorized NISSAN dealership for more
information regarding suitable fluids, including recommended brand(s) of DexronTMIII/MerconTMAutomatic Transmission Fluid.
*5: Available in mainland USA through your authorized NISSAN dealer.
*6: For further details, see ªAir conditioner specification label.º
*7: For further details, see ``Changing engine oil.''
*8: Genuine NISSAN PSF, Canada NISSAN Automatic Transmission Fluid, DexronŸ III/MerconŸ, or equivalent ATF may also be used.
CAPACITIES AND
RECOMMENDED FUEL/
LUBRICANTS
10-2Technical and consumer information
ZX
Page 217 of 240
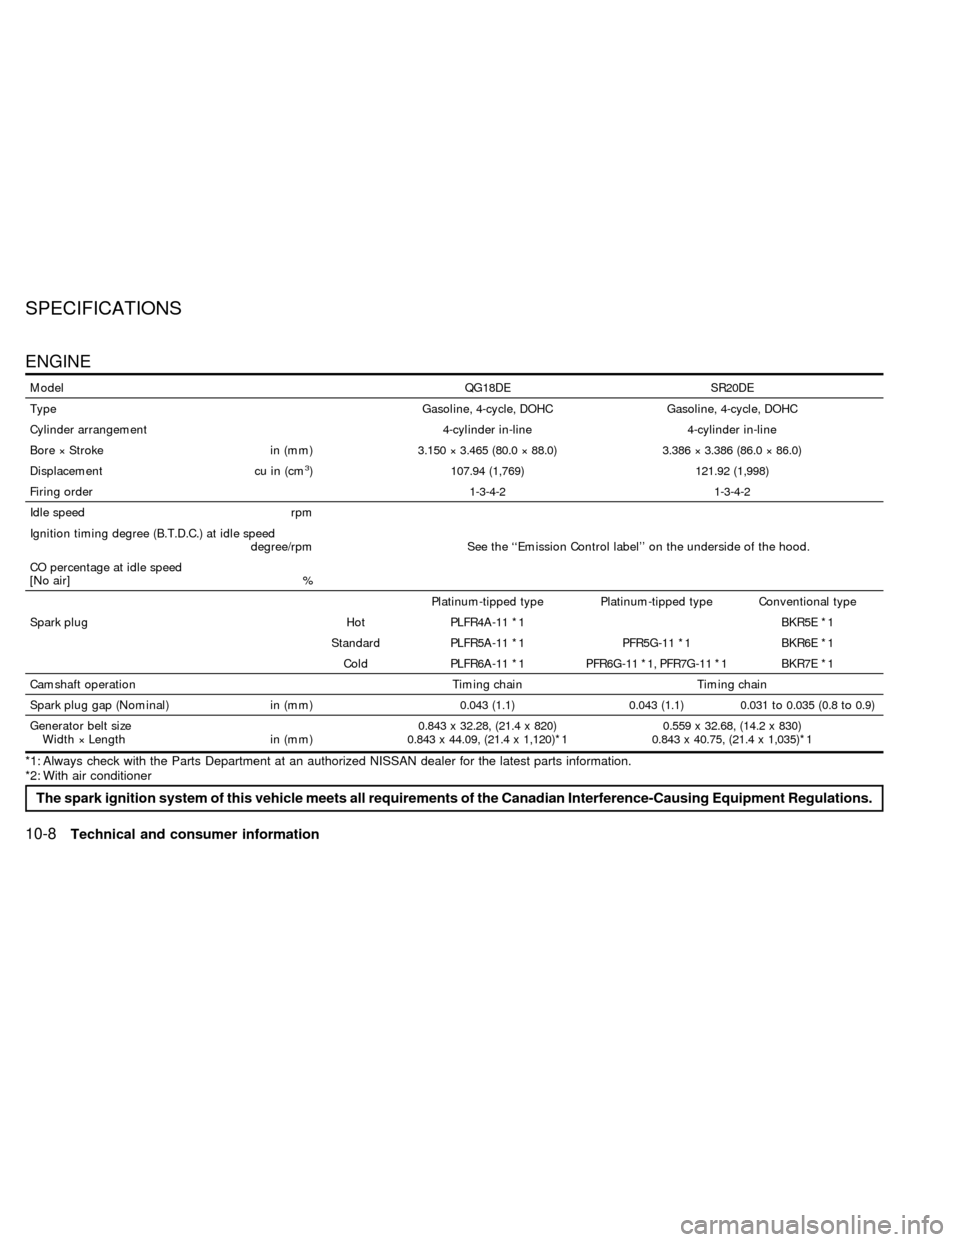
ENGINE
ModelQG18DE SR20DE
Type Gasoline, 4-cycle, DOHC Gasoline, 4-cycle, DOHC
Cylinder arrangement 4-cylinder in-line 4-cylinder in-line
Bore ý Stroke in (mm) 3.150 ý 3.465 (80.0 ý 88.0) 3.386 ý 3.386 (86.0 ý 86.0)
Displacement cu in (cm
3) 107.94 (1,769) 121.92 (1,998)
Firing order1-3-4-2 1-3-4-2
Idle speed rpm
See the ``Emission Control label'' on the underside of the hood. Ignition timing degree (B.T.D.C.) at idle speed
degree/rpm
CO percentage at idle speed
[No air] %
Platinum-tipped type Platinum-tipped type Conventional type
Spark plug Hot PLFR4A-11 *1 BKR5E *1
Standard PLFR5A-11 *1 PFR5G-11 *1 BKR6E *1
Cold PLFR6A-11 *1 PFR6G-11 *1, PFR7G-11 *1 BKR7E *1
Camshaft operation Timing chain Timing chain
Spark plug gap (Nominal) in (mm) 0.043 (1.1) 0.043 (1.1) 0.031 to 0.035 (0.8 to 0.9)
Generator belt size
Width ý Length in (mm)0.843 x 32.28, (21.4 x 820)
0.843 x 44.09, (21.4 x 1,120)*10.559 x 32.68, (14.2 x 830)
0.843 x 40.75, (21.4 x 1,035)*1
*1: Always check with the Parts Department at an authorized NISSAN dealer for the latest parts information.
*2: With air conditioner
The spark ignition system of this vehicle meets all requirements of the Canadian Interference-Causing Equipment Regulations.
SPECIFICATIONS
10-8Technical and consumer information
ZX