2000 MITSUBISHI MONTERO ESP
[x] Cancel search: ESPPage 33 of 1839

GENERAL -Precautions Before Service00-32
Other precautions:
DAvoid prolonged and repeated contact with oils,
particularly used engine oils.
DWear protective clothing, including impervious gloves
where practicable.
DAvoid contaminating clothes, particularly underpants, with
oil.
DDo not put oily rags in pockets, the use of overalls without
pockets will avoid this.
DDo not wear heavily soiled clothing and oil-impregnated
foot-wear. Overalls must be cleaned regularly and kept
separately from personal clothing.
DWhere there is a risk of eye contact, eye protection should
be worn, for example, chemical goggles or face shields;
in addition an eye wash facility should be provided.
DObtain First Aid treatment immediately for open cuts and
wounds.
DWash regularly with soap and water to ensure all oil is
removed, especially before meals (skin cleansers and
nail brushes will help). After cleaning, the application of
preparations containing lanolin to replace the natural skin
oils is advised.
DDo not use petrol, kerosine, diesel fuel, gas oil, thinners
or solvents for cleaning skin.
DUse barrier creams, applying them before each work
period, to help the removal of oil from the skin after work.
DIf skin disorders develop, obtain medical advice without
delay.
www.WorkshopManuals.co.uk
Purchased from www.WorkshopManuals.co.uk
Page 203 of 1839

ENGINE LUBRICATION -General Information12-2
GENERAL INFORMATION
The lubrication method is a fully force-fed, full-flow
filtration type.An oil cooler with high cooling performance and
which is built into the crankcase has been adopted.
<4M4>
Items6G74D54M4
Oil pump typeTrochoid typeExternal gear typeExternal gear type
Drive methodCrankshaftCrankshaft gearCrankshaft gear
ENGINE OILS
Health Warning
Prolonged and repeated contact with mineral oil
will result in the removal of natural fats from the
skin, leading to dryness, irritation and dermatitis.
In addition, used engine oil contains potentiallyharmful contaminants which may cause skin cancer.
Adequate means of skin protection and washing
facilities must be provided.
Recommended Precautions
The most effective precaution is to adapt working
practices which prevent, as far as practicable, the
risk of skin contact with mineral oils, for example
by using enclosed systems for handling used engine
oil and by degreasing components, where
practicable, before handling them.
Other precautions:
DAvoid prolonged and repeated contact with oils,
particularly used engine oils.
DWear protective clothing, including impervious
gloves where practicable.
DAvoid contaminating clothes, particularly
underpants, with oil.
DDo not put oily rags in pockets, the use of
overalls without pockets will avoid this.
DDo not wear heavily soiled clothing and
oil-impregnated foot-wear. Overalls must be
cleaned regularly and kept separate from
personal clothing.DWhere there is a risk of eye contact, eye
protection should be worn, for example,
chemical goggles or face shields; in addition
an eye wash facility should be provided.
DObtain First Aid treatment immediately for open
cuts and wounds.
DWash regularly with soap and water to ensure
all oil is removed, especially before meals (skin
cleansers and nail brushes will help). After
cleaning, the application of preparations
containing lanolin to replace the natural skin
oils is advised.
DDo not use petrol, kerosine, diesel fuel, gas
oil, thinners or solvents for cleaning skin.
DUse barrier creams, applying them before each
work period, to help the removal of oil from
the skin after work.
DIf skin disorders develop, obtain medical advice
without delay.
www.WorkshopManuals.co.uk
Purchased from www.WorkshopManuals.co.uk
Page 217 of 1839

GDI -General Information13A-3
GENERAL INFORMATION
The Gasoline Direct Injection System consists
of sensors which detect the engine conditions,
the engine-ECU
which controls the system based on
signals from these sensors, and actuators
which operate under the control of the
engine-ECU
carries out activities such as fuel injection
control, idle speed control and ignition timing
control. In addition, the engine-ECU
engine-A/T-ECU is equipped with several
diagnosis modes which simplify troubleshooting
when a problem develops.
FUEL INJECTION CONTROL
The injector drive times and injector timing are
controlled so that the optimum air/fuel mixture
is supplied to the engine to correspond to the
continually-changing engine operation condi-
tions.
A single injector for each cylinder is mounted
at the cylinder head. The fuel is sent under
pressure from the fuel tank to the fuel pressure
regulator (low pressure) by the fuel pump (low
pressure). The pressure is regulated by the
fuel pressure regulator (low pressure) and the
fuel regulated is then sent to the fuel pump
(high pressure). The fuel under increased
pressure generated by the fuel pump (high
pressure) is then regulated by the fuel pressure
regulator (high pressure) and is then distributed
to each of the injectors via the delivery pipes.Fuel injection is normally carried out once for
each cylinder for every two rotations of the
crankshaft. The firing order is 1-2-3-4-5-6. This
is called sequential fuel injection.
When the engine is cold or under a severe
load, the “open-loop” control keeps the air/fuel
ratio at a richer than usual level to maintain
driveability. When the engine is under low or
medium loads, the air/fuel ratio becomes leaner
to reduce fuel consumption. When the engine
is running at medium or high loads after having
warmed up, the “closed-loop” control uses the
signal from the oxygen sensor to keep the
air/fuel ratio at the optimum theoretical level.
THROTTLE VALVE OPENING ANGLE CONTROL
This system controls throttle valve opening
angle electronically. The engine-ECU
or engine-A/T-ECU determines how
deeply the accelerator pedal is depressed by
means of the accelerator position sensor (APS).
Then the engine-ECU
throttle valve opening angle to the throttle valve
controller. The throttle valve control servo
operates the throttle valve so that it reaches
the target opening angle.
IDLE SPEED CONTROL
This system maintains engine idle speed at
a predetermined condition by controlling the
air flow that passes through the throttle valve
according to engine idling condition and engine
loads at idling.
The engine-ECU
operates the throttle valve control servoso that engine speed is maintained within a
map value. The map value is predetermined
according to engine coolant temperature and
air-conditioning load.
IGNITION TIMING CONTROL
The power transistor located in the ignition
primary circuit turns ON and OFF to control
the primary current flow to the ignition coil. This
controls the ignition timing in order to provide
the optimum ignition timing with respect to the
engine operating conditions. The ignition timingis determined by the engine-ECU
engine-A/T-ECU from the engine speed,
intake air volume, engine coolant temperature,
atmospheric pressure and injection timing
(intake stroke or compression stroke).
www.WorkshopManuals.co.uk
Purchased from www.WorkshopManuals.co.uk
Page 218 of 1839

GDI -General Information13A-4
SELF-DIAGNOSIS FUNCTION
DWhen an abnormality is detected in one
of the sensors or actuators related to
emission control, the engine warning lamp
(check engine lamp) illuminates or flashes
as a warning to the driver.
DWhen an abnormality is detected in one
of the sensors or actuators, a diagnosis
code corresponding to the abnormality is
output.
DThe engine-ECU records the engine
operating condition when the diagnosis
code is set. This data is called “freezeframe” data.
This data can be read by using the MUT-II,
and can then be used in simulation tests
for troubleshooting.
DThe RAM data inside the engine-ECU
related to the sensors and actuators can
be read by means of the MUT-II. In addition,
the actuators can be force-driven under
certain circumstances.
OTHER CONTROL FUNCTIONS
1. Fuel Pump Control
Turns the fuel pump relay ON so that current
is supplied to the fuel pump while the engine
is cranking or running.
2. A/C Relay Control
Turns the compressor clutch of the A/C
ON and OFF.3. Purge Control Solenoid Valve Control
Refer to GROUP 17.
4. EGR Control Servo Control
Refer to GROUP 17.
GENERAL SPECIFICATIONS
ItemsSpecifications
Throttle bodyThrottle bore mm65
Throttle position sensorVariable resistor type
Throttle valve control servoBrushless DC-motor type
Engine-ECUIdentification model No.E2T79271
E2T79272
Engine-Identification model No.E2T76277
A/T-ECU
E2T76278
www.WorkshopManuals.co.uk
Purchased from www.WorkshopManuals.co.uk
Page 244 of 1839

GDI -Troubleshooting
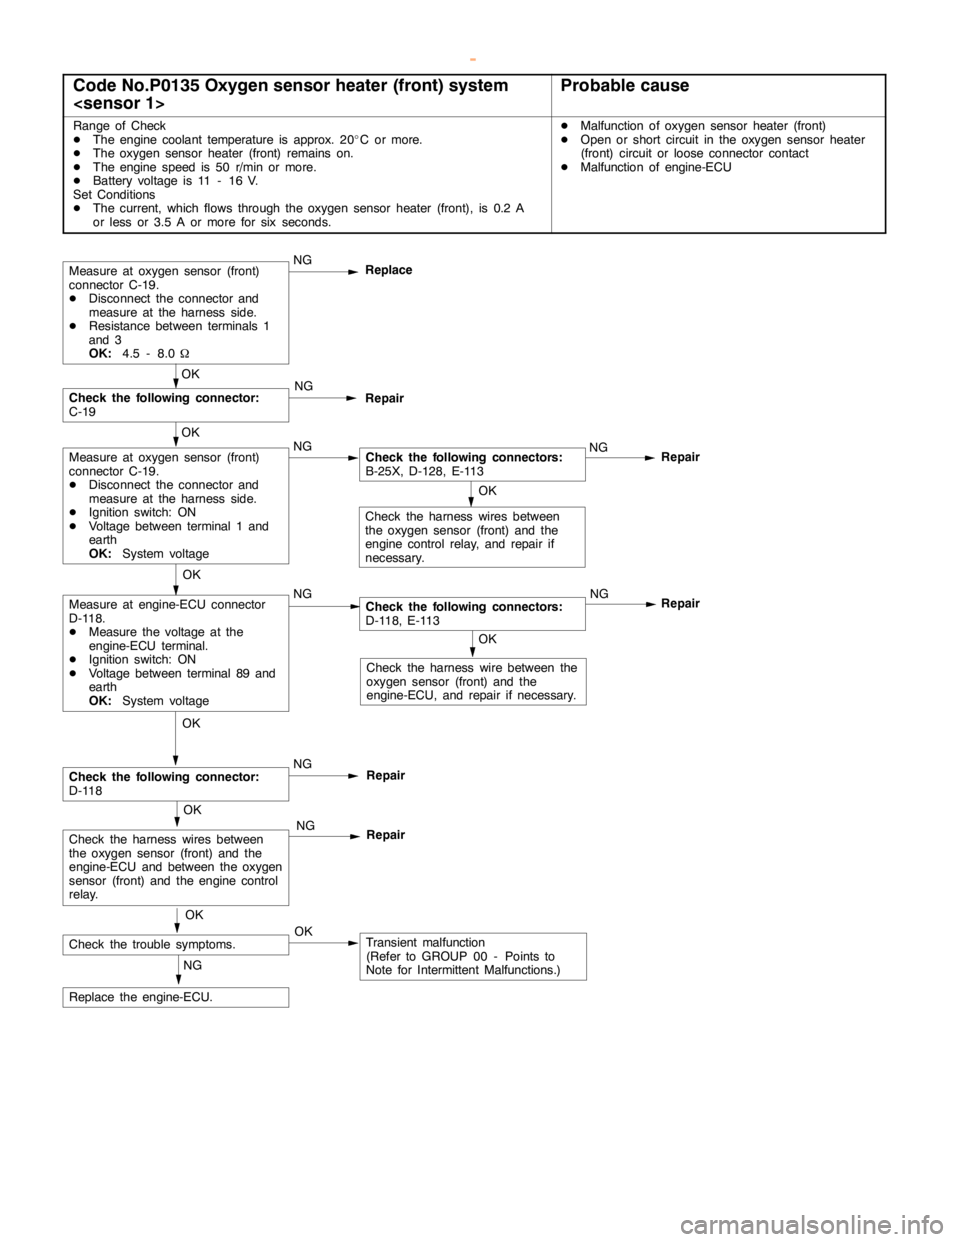
Code No.P0135 Oxygen sensor heater (front) system
Range of Check
DThe engine coolant temperature is approx. 20_C or more.
DThe oxygen sensor heater (front) remains on.
DThe enginespeed is 50 r/min or more.
DBattery voltage is 11 - 16 V.
Set Conditions
DThe current, which flows through the oxygen sensor heater (front), is 0.2 A
or less or 3.5 A or more for six seconds.DMalfunction of oxygen sensor heater (front)
DOpen or short circuit in the oxygen sensor heater
(front) circuit or loose connector contact
DMalfunction of engine-ECU
OK
Check the harness wire between the
oxygen sensor (front) and the
engine-ECU, and repair if necessary.
Repair
OK
Measure at engine-ECU connector
D-118.
DMeasure the voltage at the
engine-ECU terminal.
DIgnition switch: ON
DVoltage between terminal 89 and
earth
OK:
System voltageNGCheck the following connectors:
D-118, E-113NG
OK
Check the harness wires between
the oxygen sensor (front) and the
engine controlrelay, and repair if
necessary.
Measure at oxygen sensor (front)
connector C-19.
DDisconnect the connector and
measure at the harness side.
DResistance between terminals 1
and 3
OK:
4.5 - 8.0WNG
Replace
Repair
OK
Measure at oxygen sensor (front)
connector C-19.
DDisconnect the connector and
measure at the harness side.
DIgnition switch: ON
DVoltage between terminal 1 and
earth
OK:
System voltageNGCheck the following connectors:
B-25X, D-128, E-113NG
OK
Check the following connector:
C-19NG
Repair
OK
Check the trouble symptoms.OKTransient malfunction
(Refer to GROUP 00 - Points to
Note for Intermittent Malfunctions.) NG
Replace the engine-ECU.
OK
Check the following connector:
D-118NG
Repair
OK
Check the harness wires between
the oxygen sensor (front) and the
engine-ECU and between the oxygen
sensor (front) and theengine control
relay.NG
Repair
www.WorkshopManuals.co.uk
Purchased from www.WorkshopManuals.co.uk
Page 247 of 1839

GDI -Troubleshooting
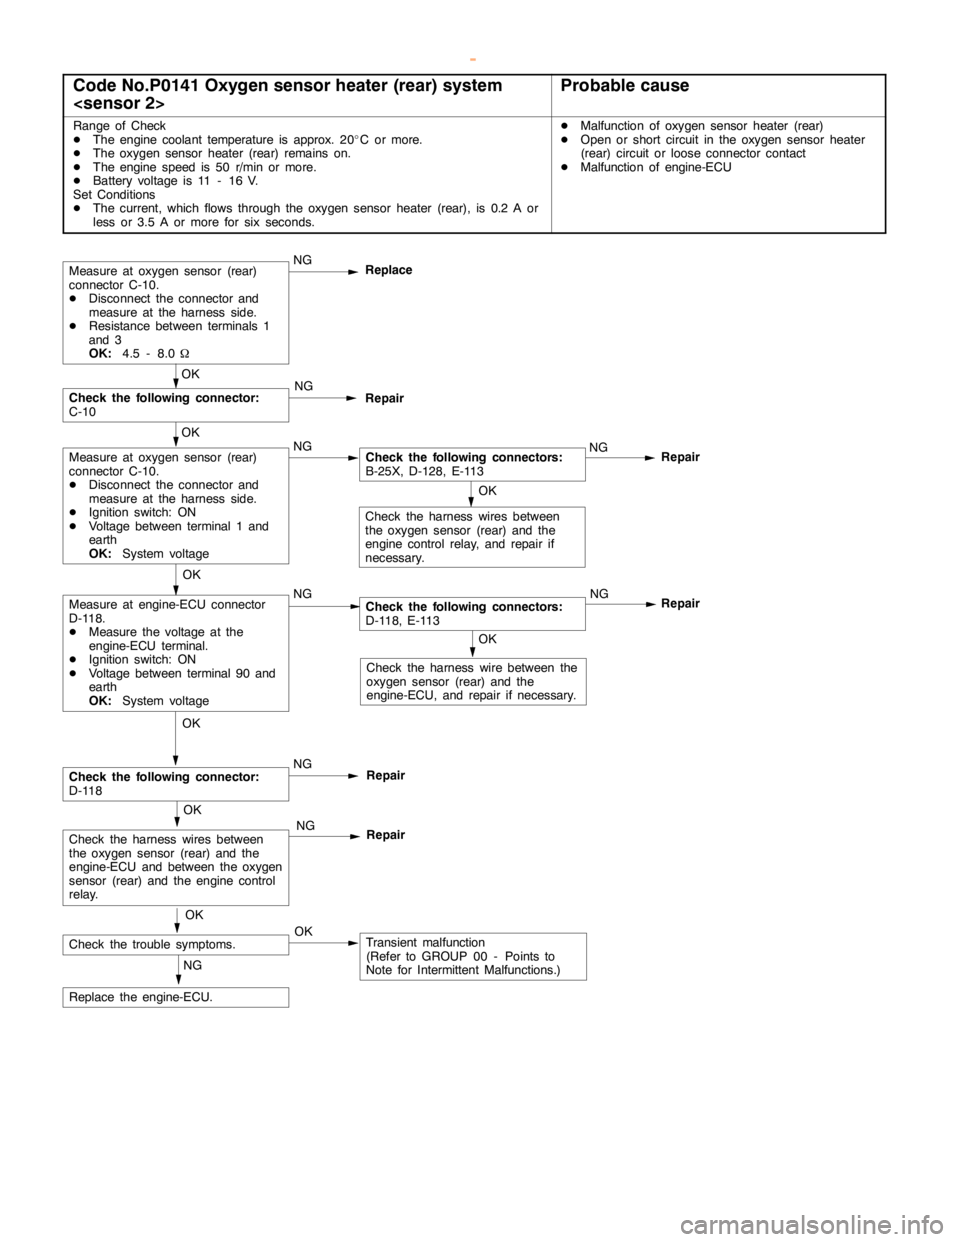
Code No.P0141 Oxygen sensor heater (rear) system
Range of Check
DThe engine coolant temperature is approx. 20_C or more.
DThe oxygen sensor heater (rear) remains on.
DThe enginespeed is 50 r/min or more.
DBattery voltage is 11 - 16 V.
Set Conditions
DThe current, which flows through the oxygen sensor heater (rear), is 0.2 A or
less or 3.5 A or more for six seconds.DMalfunction of oxygen sensor heater (rear)
DOpen or short circuit in the oxygen sensor heater
(rear) circuit or loose connector contact
DMalfunction of engine-ECU
OK
Check the harness wire between the
oxygen sensor (rear) and the
engine-ECU, and repair if necessary.
Repair
OK
Measure at engine-ECU connector
D-118.
DMeasure the voltage at the
engine-ECU terminal.
DIgnition switch: ON
DVoltage between terminal 90 and
earth
OK:
System voltageNGCheck the following connectors:
D-118, E-113NG
OK
Check the harness wires between
the oxygen sensor (rear) and the
engine controlrelay, and repair if
necessary.
Measure at oxygen sensor (rear)
connector C-10.
DDisconnect the connector and
measure at the harness side.
DResistance between terminals 1
and 3
OK:
4.5 - 8.0WNG
Replace
Repair
OK
Measure at oxygen sensor (rear)
connector C-10.
DDisconnect the connector and
measure at the harness side.
DIgnition switch: ON
DVoltage between terminal 1 and
earth
OK:
System voltageNGCheck the following connectors:
B-25X, D-128, E-113NG
OK
Check the following connector:
C-10NG
Repair
OK
Check the trouble symptoms.OKTransient malfunction
(Refer to GROUP 00 - Points to
Note for Intermittent Malfunctions.) NG
Replace the engine-ECU.
OK
Check the following connector:
D-118NG
Repair
OK
Check the harness wires between
the oxygen sensor (rear) and the
engine-ECU and between the oxygen
sensor (rear) and theengine control
relay.NG
Repair
www.WorkshopManuals.co.uk
Purchased from www.WorkshopManuals.co.uk
Page 252 of 1839

GDI -Troubleshooting
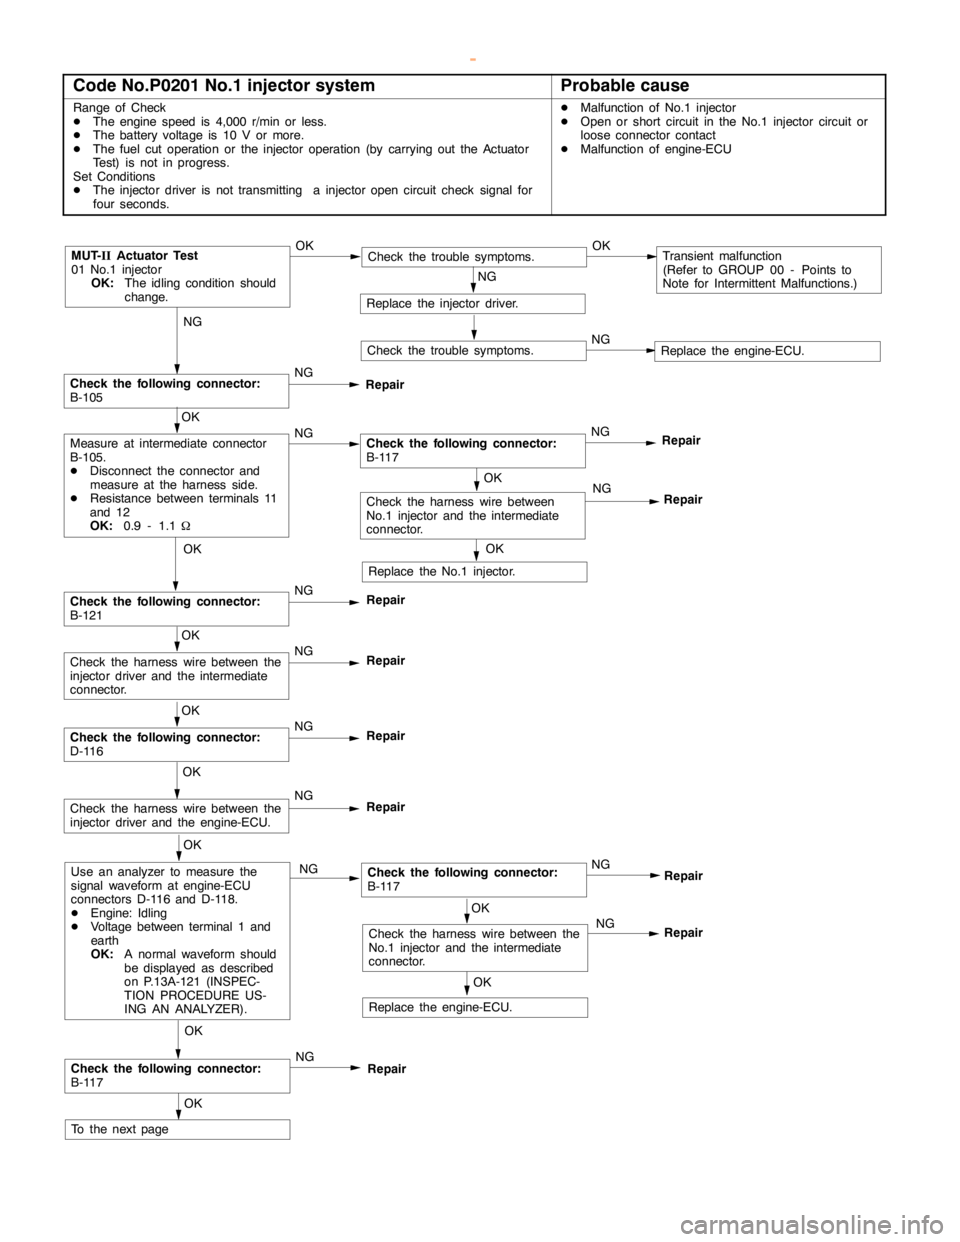
Code No.P0201 No.1 injector systemProbable cause
Range of Check
DThe enginespeed is 4,000 r/min or less.
DThe battery voltage is 10 V or more.
DThe fuel cut operation or the injector operation (by carrying out the Actuator
Test) is not in progress.
Set Conditions
DThe injector driver is not transmitting a injectoropencircuit check signal for
four seconds.DMalfunction of No.1 injector
DOpen or short circuit in the No.1 injector circuit or
loose connector contact
DMalfunction of engine-ECU
NG
Check the following connector:
B-105NG
Repair
OK
NG
Repair
MUT-
IIActuator Test
01 No.1 injector
OK:
The idling condition should
change.OKCheck the trouble symptoms.OKTransient malfunction
(Refer to GROUP 00 - Points to
Note for Intermittent Malfunctions.)
NG
Replace the injector driver.
Check the trouble symptoms.NGReplace the engine-ECU.
OK
Measure at intermediate connector
B-105.
DDisconnect the connector and
measure at the harness side.
DResistance between terminals 11
and 12
OK:
0.9 - 1.1WNGCheck the following connector:
B-117NG
Repair
OK
Replace the No.1 injector.
OK
Check the following connector:
B-121NG
Repair
OK
Check the harness wire between the
injector driver and the intermediate
connector.NG
Repair
OK
Check the following connector:
D-116NG
Repair
OK
Check the harness wire between the
injector driver and the engine-ECU.NG
Repair
OK
Use an analyzer to measure the
signal waveform at engine-ECU
connectors D-116 and D-118.
DEngine: Idling
DVoltage between terminal 1 and
earth
OK:
A normal waveform should
be displayed as described
on P.13A-121 (INSPEC-
TION PROCEDURE US-
ING AN ANALYZER).NGCheck the following connector:
B-117
OK
Check the following connector:
B-117NG
Repair
OK
To the nextpageNG
OK
OK
Check the harness wire between the
No.1 injector and the intermediate
connector.NG
Replace the engine-ECU.
Repair
Repair
Check the harness wire between
No.1 injector and the intermediate
connector.
www.WorkshopManuals.co.uk
Purchased from www.WorkshopManuals.co.uk
Page 254 of 1839

GDI -Troubleshooting
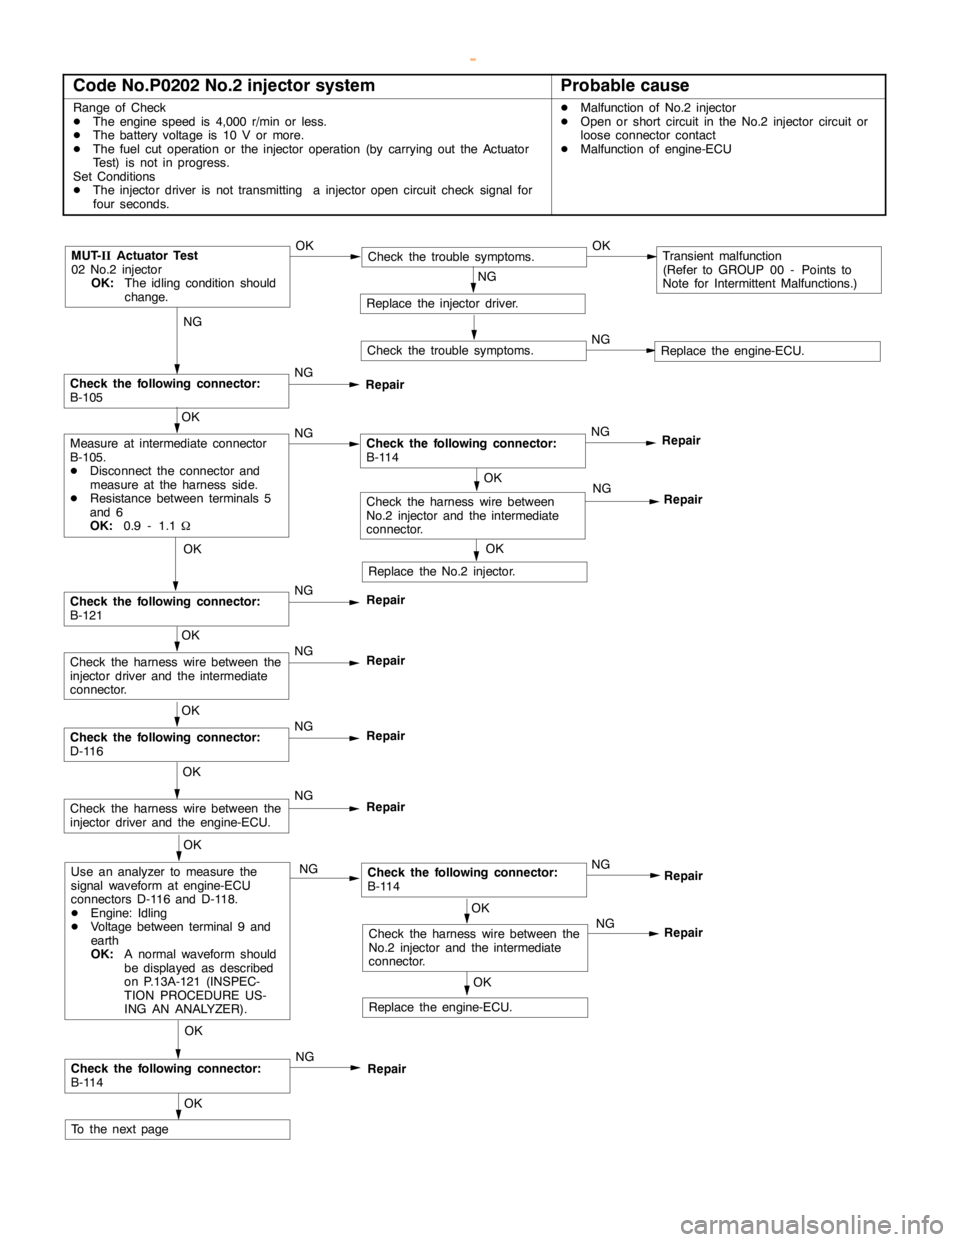
Code No.P0202 No.2 injector systemProbable cause
Range of Check
DThe enginespeed is 4,000 r/min or less.
DThe battery voltage is 10 V or more.
DThe fuel cut operation or the injector operation (by carrying out the Actuator
Test) is not in progress.
Set Conditions
DThe injector driver is not transmitting a injectoropencircuit check signal for
four seconds.DMalfunction of No.2 injector
DOpen or short circuit in the No.2 injector circuit or
loose connector contact
DMalfunction of engine-ECU
NG
Check the following connector:
B-105NG
Repair
OK
NG
Repair
MUT-
IIActuator Test
02 No.2 injector
OK:
The idling condition should
change.OKCheck the trouble symptoms.OKTransient malfunction
(Refer to GROUP 00 - Points to
Note for Intermittent Malfunctions.)
NG
Replace the injector driver.
Check the trouble symptoms.NGReplace the engine-ECU.
OK
Measure at intermediate connector
B-105.
DDisconnect the connector and
measure at the harness side.
DResistance between terminals 5
and 6
OK:
0.9 - 1.1WNGCheck the following connector:
B-114NG
Repair
OK
Replace the No.2 injector.
OK
Check the following connector:
B-121NG
Repair
OK
Check the harness wire between the
injector driver and the intermediate
connector.NG
Repair
OK
Check the following connector:
D-116NG
Repair
OK
Check the harness wire between the
injector driver and the engine-ECU.NG
Repair
OK
Use an analyzer to measure the
signal waveform at engine-ECU
connectors D-116 and D-118.
DEngine: Idling
DVoltage between terminal 9 and
earth
OK:
A normal waveform should
be displayed as described
on P.13A-121 (INSPEC-
TION PROCEDURE US-
ING AN ANALYZER).NGCheck the following connector:
B-114
OK
Check the following connector:
B-114NG
Repair
OK
To the nextpageNG
OK
OK
Check the harness wire between the
No.2 injector and the intermediate
connector.NG
Replace the engine-ECU.
Repair
Repair
Check the harness wire between
No.2 injector and the intermediate
connector.
www.WorkshopManuals.co.uk
Purchased from www.WorkshopManuals.co.uk