2000 MERCEDES-BENZ SL500 steering
[x] Cancel search: steeringPage 149 of 297
145 Soft top
Technical
data Instruments
and controlsOperationDrivingInstrument
cluster displayPractical hints Car care Index Raising soft top1. Engage parking brake
2. Turn key in steering lock to position 2.
3. Fold down sun visors.
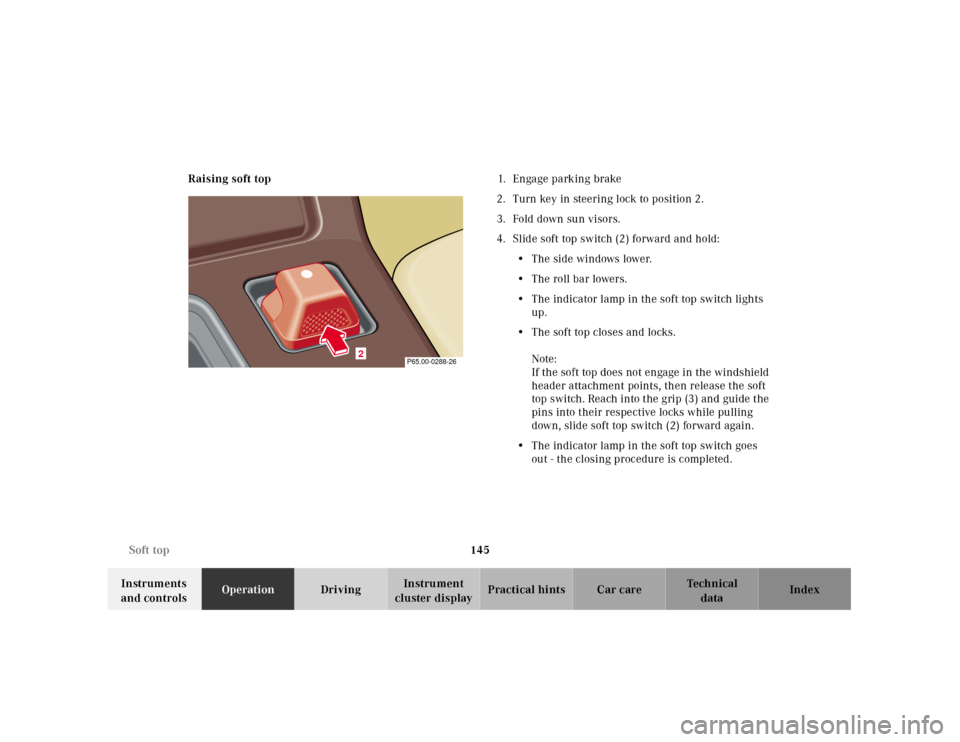
4. Slide soft top switch (2) forward and hold:
• The side windows lower.
•The roll bar lowers.
• The indicator lamp in the soft top switch lights
up.
• The soft top closes and locks.
Note:
If the soft top does not engage in the windshield
header attachment points, then release the soft
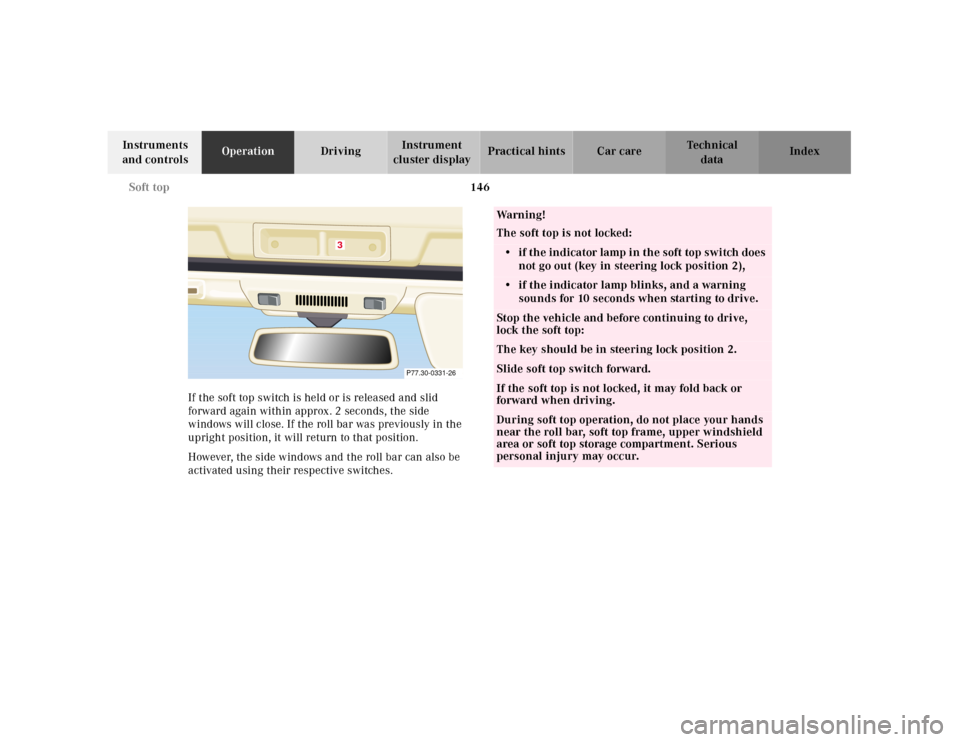
top switch. Reach into the grip (3) and guide the
pins into their respective locks while pulling
down, slide soft top switch (2) forward again.
• The indicator lamp in the soft top switch goes
out - the closing procedure is completed.
2
P65.00-0288-26
Page 150 of 297
146 Soft top
Technical
data Instruments
and controlsOperationDrivingInstrument
cluster displayPractical hints Car care Index
If the soft top switch is held or is released and slid
forward again within approx. 2 seconds, the side
windows will close. If the roll bar was previously in the
upright position, it will return to that position.
However, the side windows and the roll bar can also be
activated using their respective switches.
3
P77.30-0331-26
Wa r n i n g !
The soft top is not locked:• if the indicator lamp in the soft top switch does
not go out (key in steering lock position 2),• if the indicator lamp blinks, and a warning
sounds for 10 seconds when starting to drive.Stop the vehicle and before continuing to drive,
lock the soft top:The key should be in steering lock position 2.Slide soft top switch forward.If the soft top is not locked, it may fold back or
forward when driving.During soft top operation, do not place your hands
near the roll bar, soft top frame, upper windshield
area or soft top storage compartment. Serious
personal injury may occur.
Page 151 of 297
147 Soft top
Technical
data Instruments
and controlsOperationDrivingInstrument
cluster displayPractical hints Car care Index For safety reasons, the soft top cannot be unlocked
while driving.
However, if the soft top is not completely locked, it can
be locked while driving by pushing the soft/hardtop
switch forward.
If the indicator lamp in the soft top switch blinks while
activating the switch,
• the battery voltage may be insufficient - start engine
and let run while activating switch,
• the system may be overloaded (for example after
lowering or raising the soft top approx.
5 consecutive times) - after approx. 2 minutes the
soft top switch may be activated again,
• and the power supply was interrupted (battery
disconnected or empty), the soft top cannot be fully
raised or lowered.
To raise the soft top, for safety reasons, first remove key
from steering lock. Lower soft top by hand into
compartment, and resynchronize the power windows.
See page 116.
To lower the soft top, first resynchronize the power
windows. See page 116.If t he indicator la mp continues to bl ink, l ock th e sof t top
manually. See page 253.
Have the system checked at your authorized Mercedes-
Benz Center as soon as possible.
Note:
If the roll bar was raised automatically, the process of
raising or lowering the soft top will take somewhat
longer, as the roll bar must first be lowered.
Whenever possible, park vehicle in the shade as
continuous exposure to sun rays can prematurely
deteriorate the soft top material.
Permanent creases in the plastic window, caused by
storage of the soft top in the storage compartment,
cannot be avoided.
The soft top may become moldy if it is kept in the
storage compartment for an extended period.
Therefore, we recommend raising and airing it
thoroughly with the side windows open (do not expose
it to the sun) at regular intervals during the wet and
cold seasons.
Page 156 of 297
152 Contents – Driving
Technical
data Instruments
and controlsOperationDrivingInstrument
cluster displayPractical hints Car care Index
DrivingControl and operation of radio
transmitters ............................... 153
Radio, telephone and
two-way radio .............................. 153
The first 1 000 miles
(1 500 km) ................................. 154
Maintenance ................................... 154
Tele Aid ........................................... 155
Catalytic converter ........................ 163
Emission control ............................ 164
Steering lock ................................... 165
Starting and turning off
the engine .................................. 167
Before starting ............................ 167
Starting ........................................ 167
Turning off .................................. 167
Automatic transmission ............... 168
Driving ......................................... 168
Accelerator Position ................... 169
Selector lever positions ............. 169
Maneuvering ............................... 172
Stopping ....................................... 172Program mode
selector switch ........................... 173
Emergency Operation ................174
Parking brake ................................ 175
Driving instructions ....................... 176
Drive sensibly - Save fuel .......... 176
Drinking and driving ................. 176
Pedals ........................................... 176
Power assistance ........................ 177
Brakes .......................................... 177
Driving off ................................... 178
Parking ........................................ 178
Tires ............................................. 179
Aquaplaning ................................180
Tire traction .................................180
Tire speed rating ........................181
Snow chains ................................ 181
Ve h i c l e s w i t h s p o r t
package ........................................181
Winter driving
instructions .................................182
Winter driving .............................183
Block heater .................................183
Deep water ...................................184Traveling abroad ........................ 184
Cruise control ................................. 185
Brake assist system (BAS) ............ 188
Antilock brake system (ABS) ....... 190
ABS control ................................. 191
Electronic Stability Program
(ESP) ........................................... 192
Synchronizing ESP .................... 193
ESP Control Switch .................... 194
Level control system ...................... 196
Level control switch
positions ...................................... 196
Normal Level ............................... 197
Wheel Change Switch ............... 198
Adaptive Damping System
(ADS) ........................................... 199
Adaptive damping system
adjustment .................................. 199
What you should know at the gas
station .........................................200
Fuel supply ..................................200
Fuel ...............................................200
Check regularly and before
a long trip ...................................202
Page 159 of 297
155 Tele Aid
Technical
data Instruments
and controlsOperationDrivingInstrument
cluster displayPractical hints Car care Index Tele Aid
Important!
The initial activation of the Tele Aid system may only be
performed by completing the subscriber agreement and
placing an acquaintance call using the “SOS” button.
Failure to complete either of these steps will result in a
system that is not activated.
If you have any questions regarding activation, please
call the Response Center at 1-800-756-9018 (in the USA)
or 1-888-923-8367 (in Canada).
(Telematic Alarm Identification on Demand)
The Tele Aid system consists of three types of response;
automatic and manual emergency, roadside assistance
and information.
The Tele Aid system is always operational, providing
that the vehicle’s battery is charged and properly
connected. To activate, press the “SOS” button, the
Roadside Assistance button or the Information
button¡, depending on the type of response
required.System self-check
Initially, after turning the key in steering lock to
position 2, malfunctions are detected and indicated (the
indicator lamps in the “SOS” button, the Roadside
Assistance button and the Information
button¡ stay on longer than 5 seconds or do not
come on).
If a malfunction is indicated as outlined above, have the
system checked at the nearest Mercedes-Benz Center as
soon as possible.
Important!
Always make sure that the indicator lamp in the
“SOS” button remains illuminated for approx. 5 seconds
during the system self-check after turning key in
steering lock to position 2.
Emergency calls
An emergency call is initiated automatically following
an accident in which the Emergency Tensioning
Retractors (ETR’s) or airbags deploy. An emergency call
can also be initiated manually by opening the cover next
to the interior rear view mirror labeled “SOS”, then
Page 162 of 297
158 Tele Aid
Technical
data Instruments
and controlsOperationDrivingInstrument
cluster displayPractical hints Car care Index
Roadside Assistance button
Located below the center armrest cover is the Roadside
Assistance button. Pressing and holding the
button (for longer than 2 seconds), will initiate a call to
a Mercedes-Benz Roadside Assistance dispatcher. The
button will flash while the call is in progress. The
Tele Aid system will transmit data generating the
vehicle identification number, model, color and location
(subject to availability of cellular and GPS signals).A voice connection between the Roadside Assistance
dispatcher and the occupants of the vehicle will be
established. The nature of the need for assistance can
then be described. Sign and Drive services (jump start, a
few gallons of fuel or the replacement of a flat tire with
the vehicle spare tire) are available.
If the vehicle requires more than Sign and Drive
services, the Mercedes-Benz Roadside assistance
dispatcher will either dispatch a qualified
Mercedes-Benz technician or arrange to tow your
vehicle to the nearest Mercedes-Benz Center.
For other than Sign and Drive services, labor and / or
towing charges may apply. Refer to the Roadside
Assistance manual for more information.
Notes:
The indicator lamp in the Roadside Assistance
button remains illuminated in red for approx.
5 seconds during the system self-check after turning
key in steering lock to position 2 (together with the
“SOS” button and the Information button¡).
See system self-check on page 155 when the indicator
lamp does not light up in red or stays on longer than
approximately 5 seconds.
Wa r n i n g !
If you feel at any way in jeopardy when in the
vehicle (e.g. smoke or fire in the vehicle, vehicle in
a dangerous road location), please do not wait for
voice contact after you have pressed the emergency
button. Carefully leave the vehicle and move to a
safe location. The Response Center will
automatically contact local emergency officials
with the vehicle’s approximate location if they
receive an “SOS” signal and cannot make voice
contact with the vehicle occupants.
Page 163 of 297
159 Tele Aid
Technical
data Instruments
and controlsOperationDrivingInstrument
cluster displayPractical hints Car care Index Information button ¡
Located below the center armrest cover is the
Information button¡. Pressing and holding the
button (for longer than 2 seconds), will initiate a call to
t h e C l i e n t A s s ista n c e C e nt e r. T h e b u t to n w il l f l a sh w h i l e
the call is in progress. The Tele Aid system will transmit
data generating the vehicle identification number,
model, color and location (subject to availability of
cellular and GPS signals).
A voice connection between the Client Assistance
Center representative and the occupants of the vehicle
will be established. Information regarding the operation
of your vehicle, the nearest Mercedes-Benz Center or
Mercedes-Benz USA products and services is available
to you.
If you have chosen the Route Guidance Service (an
optional service available at additional cost in the USA
only), your communication will be transferred to our
Response Center, who will provide the appropriate
information.
For more details concerning this optional service,
please contact the Response Center at 1-800-756-9018.Notes:
The indicator lamp in the Information button¡
rem ains illuminated in red for approx . 5 seconds du ring
the system self-check after turning key in steering lock
to position 2 (together with the “SOS” button and the
Roadside Assistance button).
See system self-check on page 155 when the indicator
lamp does not light up in red or stays on longer than
approximately 5 seconds.
Important!
If the indicator lamps do not illuminate or remain
illuminated (in red) at any time, the Tele Aid system has
detected a fault or the service is not currently active,
and may not initiate a call. Visit your Mercedes-Benz
Center and have the system checked or contact the
Response Center at 1-800-756-9018 (in the USA) or
1-888-923-8367 (in Canada) as soon as possible.
Page 165 of 297
161 Tele Aid
Technical
data Instruments
and controlsOperationDrivingInstrument
cluster displayPractical hints Car care Index Remote door unlock
In t he c ase you have your vehicle locked unintentionally
(e.g. key inside vehicle), and the reserve key is not
handy, contact the Mercedes-Benz Response Center at
1-800-756-9018 (in the USA) or 1-888-923-8367 (in
Canada). You will be asked to provide your password
which you provided when you completed the subscriber
agreement.
Then return to your vehicle and press trunk lock for a
minimum of 20 seconds.
The Response Center will then unlock your vehicle with
the remote door unlocking feature.
Note:
The remote door unlock feature is available if the
relevant cellular phone network and GPS signals are
available.Vehicle location / stolen vehicle tracking services
Should you wish to locate your vehicle, contact the
Mercedes-Benz Response Center at 1-800-756-9018 (in
the USA) or 1-888-923-8367 (in Canada). You will be
asked to provide your password which you provided
when you completed the subscriber agreement.
In the event your vehicle was stolen, report the incident
to th e police wh o will issu e a nu mbered incident report.
Pass this number on to the Mercedes-Benz Response
Center.
The Response Center will then attempt to covertly
contact the vehicle’s Tele Aid system. The key in the
steering lock must be in position 1 or 2 and the cellular
and GPS signals must be available. The Response Center
will contact you at the phone number(s) provided in the
agreement once the vehicle is located. The Response
Center will attempt to contact the vehicle until located,
up to a maximu m of 14 days or until t he vehicle location
incident report is cancelled by you.