2000 MERCEDES-BENZ SL500 check engine
[x] Cancel search: check enginePage 7 of 297

4 Contents
Ve h i c l e s w i t h s p o r t
package ........................................ 181
Winter driving
instructions ................................. 182
Winter driving ............................ 183
Block heater ................................ 183
Deep water .................................. 184
Traveling abroad ........................ 184
Cruise control ................................. 185
Brake assist system (BAS) ............ 188
Antilock brake system (ABS) ....... 190
ABS control ................................. 191
Electronic Stability Program
(ESP) ........................................... 192
Synchronizing ESP .................... 193
ESP Control Switch .................... 194
Level control system ...................... 196
Level control switch
positions ...................................... 196
Normal Level ............................... 197
Wheel Change Switch ............... 198
Adaptive Damping System
(ADS) ........................................... 199Adaptive damping system
adjustment ...................................199
What you should know at the gas
station ......................................... 200
Fuel supply ................................. 200
Fuel .............................................. 200
Check regularly and before
a long trip .................................. 202
Instrument cluster displayMalfunction and indicator
lamps in the instrument
cluster ......................................... 204
On-board diagnostic system
Check engine malfunction
indicator lamp ............................ 204
Brake warning lamp .................. 204
Brake pad wear
indicator lamp ............................ 205
Seat belt warning lamp ............. 206
Supplemental restraint
system (SRS) indicator lamp .... 206
Fuel reserve and fuel cap
placement warning ................... 207Electronic stability program
(ESP) - warning lamp .................207
BAS-/ESP malfunction
indicator lamp .............................207
ABS malfunction
indicator lamp .............................208
Low engine coolant
level warning lamp ....................209
Low windshield and headlamp
washer system fluid level
warning lamp .............................. 210
Low engine oil level
warning lamp .............................. 210
Charge indicator lamp ............... 211
Exterior lamp failure
indicator lamp ............................. 211
Roll bar warning lamp ............... 212
ADS indicator lamp .................... 212
High beam indicator lamp ........ 213
Additional function
indicator lamps
(in the odometer display) .......... 213
Malfunction and indicator
lamp (in the dashboard) .......... 213
Page 8 of 297

5 ContentsPassenger airbag
indicator lamp ............................. 213
Practical hintsFirst aid kit ..................................... 215
Stowing things in the vehicle ...... 215
Vehicle tools .................................... 216
Vehicle jack ..................................... 217
Fuses ................................................ 218
Hood ................................................. 219
Automatic transmission
fluid level ...................................221
Checking engine oil level .............221
Coolant level ...................................223
Adding coolant ...............................224
Windshield and headlamp
washer fluid mixing ratio ........225
Wheels .............................................226
Tire replacement ............................226
Rotating wheels ..............................227
Spare wheel ....................................228
Changing wheels ...........................230
Tire inflation pressure ..................234
Battery .............................................236Battery Recycling ....................... 237
Jump starting ................................. 238
Towing the vehicle ........................ 240
Exterior lamps ............................... 242
Headlamp assembly
(Halogen) .................................... 243
Taillamp assemblies .................. 249
Changing batteries in
the remote control .................... 251
Synchronizing ............................ 252
Raising soft top manually ............ 253
Replacing wiper blade insert ...... 257
Manual release of
fuel filler flap ............................ 259
Trunk lamp ..................................... 259
Vehicle careCleaning and care
of the vehicle ............................. 261
Power washer ............................. 262
Tar stains .................................... 262
Paintwork, Painted Body
Components ................................ 262
Engine cleaning ......................... 263Vehicle washing .........................263
Ornamental moldings ................263
Headlamps, taillamps,
turn signal lenses ......................263
Window cleaning .......................264
Light alloy wheels ......................264
Instrument cluster .....................264
Steering wheel and
gear selector lever ......................264
Cup holder ...................................264
Seat belts .....................................265
Headliner, shelf behind
roll bars, and other hard
plastic trim items .......................265
Soft top .........................................265
Headliner .....................................266
Wind screen ................................266
Automatic antenna .....................266
Wiper blade .................................266
Headlamp cleaning system .......266
Leather upholstery .....................267
Plastic and rubber parts ............267
Illuminated door sill panels .....267
Page 38 of 297
34 Central locking system
Technical
data Instruments
and controlsOperationDrivingInstrument
cluster displayPractical hints Car care Index
Start lock-out
Important!
Removing the key from the steering lock activates the
start lock-out. The engine cannot be started.
Turning the key in the steering lock to position 2
deactivates the start lock-out.
Note:
In case the engine cannot be started (vehicle’s battery is
in order), and Á and î are shown in the
odometer display field, the system is not operational.
Contact an authorized Mercedes-Benz Center or call 1-
800-FOR-MERCedes (in the USA), or 1-800-387-0100 (in
Canada).General notes on the central locking system
• If the key in the steering lock is in position 2, the
vehicle cannot be locked or unlocked with the
remote control.
If the vehicle cannot be locked or unlocked:
• Aim transmitter eye at a receiver of either door
handle and press button‹ orŒ.
• Check the batteries of the remote control,
see page 251.
• Synchronize the central locking system,
see page 252.
Page 80 of 297

76 Instrument cluster
Technical
data Instruments
and controlsOperationDrivingInstrument
cluster displayPractical hints Car care Index
Indicator lamps in the instrument cluster
Fuel reserve and fuel cap placement
warning, see page 207
High beam, see page 86
Battery not being charged properly,
see page 211
Low windshield and headlamp washer
system fluid level see page 210
Coolant level low, see page 209
Engine oil level low, see page 210
Exterior lamp failure indicator lamp,
see page 211
Roll bar warning lamp, see page 212
ESP warning lamp. Adjust driving to road
condition, see page 207
ADS indicator lamp, see page 212BAS/ESP malfunction, see page 207
ABS malfunction, see page 208
Brake pads worn down, see page 205
Brake fluid low (except Canada)
Parking brake engaged, see page 204
Brake fluid low (Canada only)
Parking brake engaged, see page 204
SRS malfunction, see page 206
Fasten seat belt, see page 206
If the lamp comes on when the engine is
running, it indicates a malfunction of the
fuel management system or the emission
control system, or the fuel cap is not closed
tight. In all cases, we recommend that you
have the malfunction checked as soon as
possible, see page 204.
ABS
Page 86 of 297
82 Checking engine oil level indicator
Technical
data Instruments
and controlsOperationDrivingInstrument
cluster displayPractical hints Car care Index
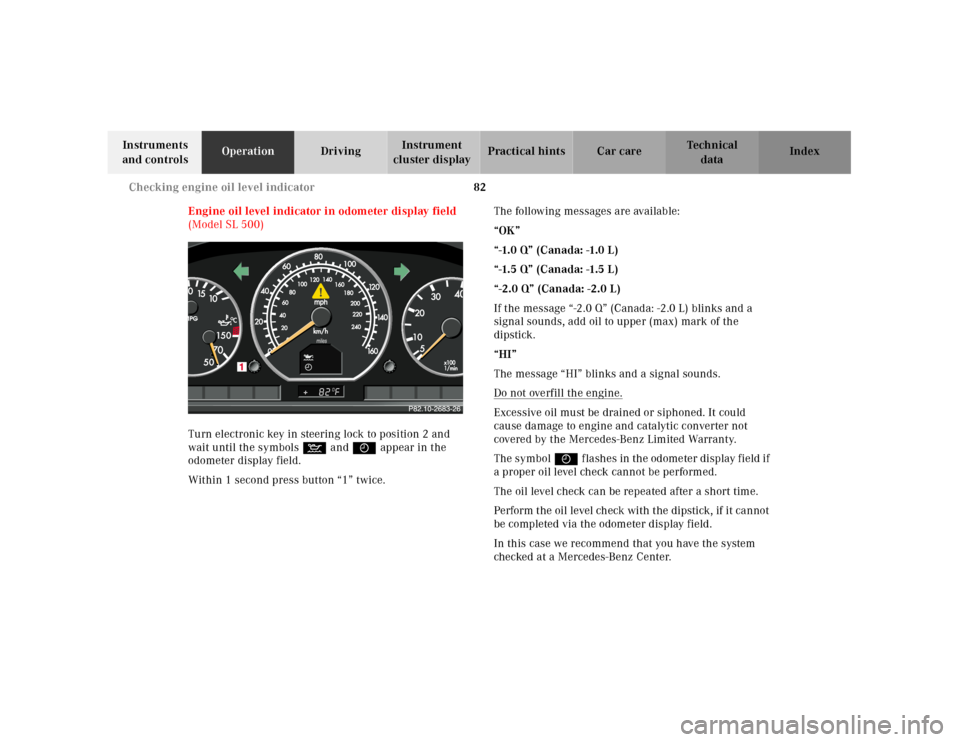
Engine oil level indicator in odometer display field
(Model SL 500)
Turn electronic key in steering lock to position 2 and
wait until the symbols : and I appear in the
odometer display field.
Within 1 second press button “1” twice.The following messages are available:
“OK”
“-1.0 Q” (Canada: -1.0 L)
“-1.5 Q” (Canada: -1.5 L)
“-2.0 Q” (Canada: -2.0 L)
If the message “-2.0 Q” (Canada: -2.0 L) blinks and a
signal sounds, add oil to upper (max) mark of the
dipstick.
“HI”
The message “HI” blinks and a signal sounds.
Do not overfill the engine.
Excessive oil must be drained or siphoned. It could
cause damage to engine and catalytic converter not
covered by the Mercedes-Benz Limited Warranty.
The symbol I f la sh es in th e od ome ter display f ield if
a proper oil level check cannot be performed.
The oil level check can be repeated after a short time.
Perform the oil level check with the dipstick, if it cannot
be completed via the odometer display field.
In this case we recommend that you have the system
checked at a Mercedes-Benz Center.
Page 87 of 297
83 Checking engine oil level indicator
Technical
data Instruments
and controlsOperationDrivingInstrument
cluster displayPractical hints Car care Index Notes:
If the symbols : and I are continuously
illuminated after pressing button (1) twice and there is
no change in the odometer display field or the low
engine oil level warning lamp comes on, a malfunction
has occurred to the system. Perform the engine oil level
check with the dipstick.
If no oil leaks are noted continue to drive to the nearest
Mercedes-Benz Center to have the system checked.
Observe the engine oil temperature gauge.
Fuel consumption gauge
While driving, instantaneous fuel consumption is
indicated in miles per gallon (mpg), or in Canada liters
per 100 kilometers (l/100 km).
With the engine switched off, the needle reads “0”.
Due to system design, minimum consumption is
indicated at idle speed.Engine oil temperature gauge
Normal operating engine oil temperatures are from
175 F (80 C) to 250 F (120 C).
During severe operating conditions and stop-and-go
traffic, the engine oil temperature may rise close to the
red marking.
The engine should not be operated with the engine oil
temperature in the red zone. Doing so may cause
serious engine damage which is not covered by the
Mercedes-Benz Limited Warranty.
When the engine oil temperature is close to the red
marking, relieve the load on the engine by decreasing
vehicle speed to lower engine oil temperature.
Once the engine oil temperature returns to the normal
temperature range, the engine oil level should be
checked. See page 82 or 221.
Engine oil consumption
Engine oil consumption checks should only be made
after the break-in period. During the break-in period,
higher oil consumption may be noticed and is normal.
Frequent driving at high engine speeds results in
increased consumption.
Page 146 of 297
142 Hardtop
Technical
data Instruments
and controlsOperationDrivingInstrument
cluster displayPractical hints Car care Index
Notes:
For safety reasons, the hardtop can only be unlocked
while the vehicle is standing still, and within
10 seconds after turning the key to steering lock
position 2 or beyond.
If the indicator lamp in the soft top switch blinks while
activating the switch, the battery voltage may be
insufficient - start engine to charge battery before
shutting engine off and attempting to unlock the roof
again.
If the indicator lamp continues to blink, remove the
hardtop (see page 137), and have the system checked at
your authorized Mercedes-Benz Center as soon as
possible.
Wa r n i n g !
The raising or lowering procedure of the soft top is
not completed if the indicator lamp in the soft top
switch:
• does not go out (with key in steering lock
position 2),
• blinks when starting to drive and an alarm
sounds.When safe to do so, immediately stop the vehicle
and lock the soft top:
• Turn key in steering lock to position 2,
• Slide soft/hardtop switch forward.Do not drive the car with the hardtop not locked, as
that could cause personal injury to you or your
passenger, or personal injury or property damage
to others.
Page 151 of 297
147 Soft top
Technical
data Instruments
and controlsOperationDrivingInstrument
cluster displayPractical hints Car care Index For safety reasons, the soft top cannot be unlocked
while driving.
However, if the soft top is not completely locked, it can
be locked while driving by pushing the soft/hardtop
switch forward.
If the indicator lamp in the soft top switch blinks while
activating the switch,
• the battery voltage may be insufficient - start engine
and let run while activating switch,
• the system may be overloaded (for example after
lowering or raising the soft top approx.
5 consecutive times) - after approx. 2 minutes the
soft top switch may be activated again,
• and the power supply was interrupted (battery
disconnected or empty), the soft top cannot be fully
raised or lowered.
To raise the soft top, for safety reasons, first remove key
from steering lock. Lower soft top by hand into
compartment, and resynchronize the power windows.
See page 116.
To lower the soft top, first resynchronize the power
windows. See page 116.If t he indicator la mp continues to bl ink, l ock th e sof t top
manually. See page 253.
Have the system checked at your authorized Mercedes-
Benz Center as soon as possible.
Note:
If the roll bar was raised automatically, the process of
raising or lowering the soft top will take somewhat
longer, as the roll bar must first be lowered.
Whenever possible, park vehicle in the shade as
continuous exposure to sun rays can prematurely
deteriorate the soft top material.
Permanent creases in the plastic window, caused by
storage of the soft top in the storage compartment,
cannot be avoided.
The soft top may become moldy if it is kept in the
storage compartment for an extended period.
Therefore, we recommend raising and airing it
thoroughly with the side windows open (do not expose
it to the sun) at regular intervals during the wet and
cold seasons.