2000 HONDA PASSPORT ignition
[x] Cancel search: ignitionPage 152 of 267

begin blinking rapidly to indicate
the system is active.
Deactivatin g th e Syste m
Unlocking the doors or the
tailgate with the key or the remote
transmitter turns off the system.
You can also turn the ignition
switch to the ACCESSORY
position.
Doing any of the above will also
reset an alarming system before
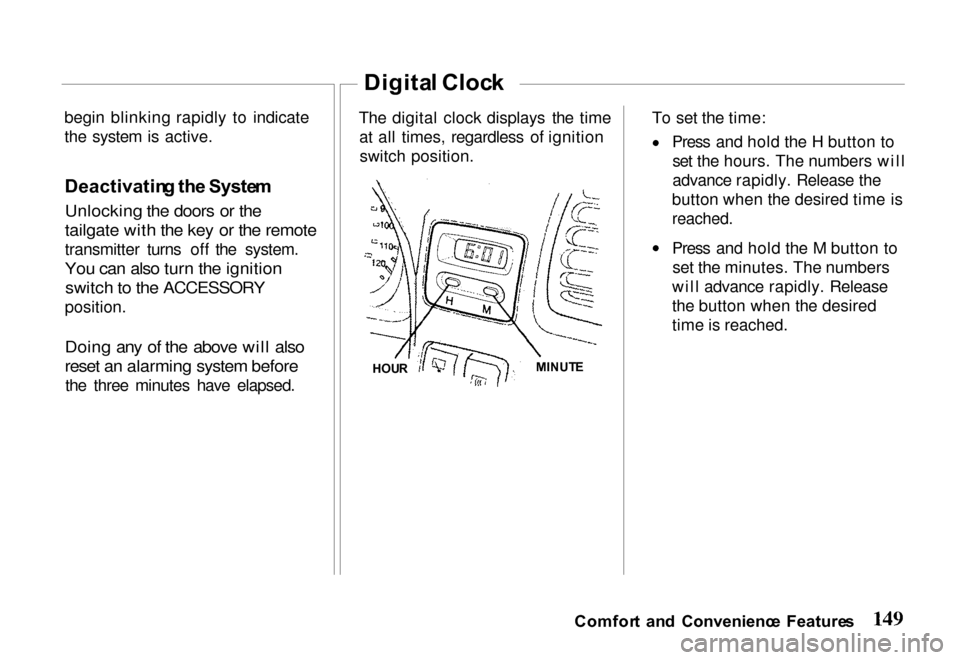
the three minutes have elapsed. The digital clock displays the time
at all times, regardless of ignitionswitch position. To set the time: Press and hold the H button to
set the hours. The numbers will
advance rapidly. Release the
button when the desired time is
reached.
Press and hold the M button to set the minutes. The numbers
will advance rapidly. Release
the button when the desired
time is reached.
Comfor t an d Convenienc e Feature s
Digita l Cloc k
HOU R MINUT
E
Page 156 of 267

switch is turned to the "ON"
or "START" position.
5. Check all gauges (including
the fuel gauge).
6. Release the parking brake
(and make sure the "BRAKE"
light turns off).
See related topics in this manual if
you find any problems.
Startin g th e Engin e
1. Apply the parking brake.
2. Manual Transmission: Press
the clutc
h pedal to the floor
and shift the transmission to
the Neutral position. Hold the
clutch pedal to the floor while
you are starting the engine. A starter safety switch keeps the
starter from operating if the
clutch pedal is not fully
depressed.
Automatic Transmission:
Place the shift lever in "P"
or "N" position ("P" is
preferred). A starter safety switch prevents the starter
from operating if the shift lever is in any drive position.
If it is necessary to restart the
engine with the vehicle
moving, place the shift lever in "N" (never in "P").
3. Do not touch the accelerator pedal. Start the engine byturning the ignition switch to
"START."
If the engine does not start in 10 seconds, wait 15 seconds to let
the starter cool down. Then crank
the engine at wide open throttle
for a maximum of 10 seconds. If
the engine still does not start, wait
another 15 seconds and repeat the
entire procedure. Do not crank the engine for more
than 10 seconds at a time. Wait 15
seconds before trying again.
4. Return the ignition switch to
the "ON" position as soon as
the engine starts.
5. Apply the regular brakes and shift into the proper gear.
Release the parking brake and
brake pedal and drive off.
In models with an automatic
transmission, you cannot shift
from "P" (Park) position to any other position unless the
brake pedal is applied.
Driving Tip s
Page 171 of 267

Three-Wa
y Catalyti c Converte r
The three-way catalytic converter is an emissions control device
added to the exhaust system to
reduce exhaust gas pollutants. The
converter contains a ceramic material coated with noble metal
catalysts. To prevent contamination
of the catalysts, unleaded gasoline must be used. Unleaded gasoline
also reduces combustion chamber
deposits and exhaust system
corrosion.
The three-way catalytic converter requires the use of unleaded
gasoline. Use of leaded gasolinewill cause the converter to lose its
effectiveness.
T o Hel p Preven t Damag e
1. Keep your engine properly maintained. Engine
malfunctions involving the electrical, electronic fuel
injection or ignition systems
may result in unusually high
converter and exhaust system
temperatures. Do not keep
driving your vehicle if you
detect engine misfire,
noticeable loss of performance, or other unusual operating
conditions. Have it serviced
promptly. A properly
maintained engine willminimize malfunctions that
could damage the converter. It
will also help provide good
emissions control and fuel economy. (See theMaintenance Schedule on page
200 for information on inspecting and maintaining the
engine, exhaust system and
other components.) 2. Do not push or tow your
vehicle to start it. This could
damage the converter.
3. Do not park your vehicle over high grass, dry leaves or othercombustible materials. The
catalytic converter gets very
hot and could set fire to these materials.
Drivin g Tip s
Page 183 of 267

Jum
p Startin g
Do not push or tow your vehicle to start it. Under some conditions
this may damage the three-way catalytic converter or other parts
of the vehicle.
If your vehicle has a discharged
battery, it can be started by using the battery in another vehicle; a
procedure called "jump starting." To jump start your vehicle:
1. Position the vehicle with the good (charged) battery so that
the jump-starting cables will
reach. Do not allow the vehiclesto touch. Check to see that the
bumpers do not touch.
2. Turn off all electric motors and accessories in both
vehicles. Turn off all lights
except hazard flashers and
lights needed to light up the
work area. Turn off theignition, apply the parking
brake firmly, and shift an automatic transmission to
"P" (Park) and a manual
transmission to "N" (Neutral)
in both vehicles.
3. Check fluid level of the battery before attempting to
charge or jump start. (Do not use an open flame to check,
and do not smoke.)CHARG ETEST
INDICATO R
BLUE
COLORLES S
If the battery is a sealed type
and if the fluid level is below
the lower level line on the side
of the battery, do not try to
jump start the vehicle or charge or test the battery. Do
not add fluid. Instead, install a new battery.
I n Cas e o f Emergenc y
A battery can explode if you
do not follow the correct
procedure, seriously injuring
anyone nearby.
Keep all sparks, open flames,
and smoking materials away
from the battery.
CHARGIN G
NECESSAR Y
LOWE
R
LEVE L
O K
UPPERLEVEL
Page 185 of 267

6. Start the engine of the vehicle
that has the discharged battery.
7. Remove the battery cables by reversing the above sequence
exactly. Start by removing thelast clamp first; that is,
remove the jumper cable from
the engine of the vehicle with
the discharged battery as the first step. Changin
g a Tir e
If you have a flat tire while driving, stop in a safe place to
change it. Stopping in traffic or on
the shoulder of a busy road is
dangerous. Drive slowly along the shoulder until you get to an exit or
an area to stop that is far away
from the traffic lanes. 1. Park on a level surface and set
the parking brake firmly. Turn
on the hazard warning flasher, and turn the ignition switch to
LOCK.
2. Set the automatic transmission in "Park" (the manual
transmission in "Reverse")
and transfer case in gear if it is a four-wheel drive vehicle.
3. Have your passengers get out
of th
e vehicle.
4. Remove the jacking tools (see page 184) and spare tire from
their stowage areas.
I n Cas e o f Emergenc y
The vehicle can easily roll off
the jack, seriously injuring
anyone underneath.
Follow the directions for
changing a tire exactly, and never get under the vehicle
when it is supported only by
the jack.
Page 192 of 267

Rear Wheels off the Ground
1. Transfer case in 2H (4WD model only).
2. Transmission in Neutral position.
3. Maximum speed 30 mph (50 km/h).
4. Maximum distance 50 miles (80 kilometers).
If you need to tow your vehicle by
this method, secure the steering
wheel to keep the front wheels
pointed straight ahead. Do not
rely on the steering column lock; it is not strong enough to hold the
front wheels straight while
towing. The ignition switch must
be in the OFF position.
Inoperativ
e Electrica l Device s
If you have electrical problems without extreme damage to any
electrical parts, check for burned out fuses, broken wires, poor
connections or poor grounding. Correct as necessary.
The fuse boxes are located under
the left hand side of theinstrument panel and in the right
hand side of the engine compartment. (See "Fuses" on
page 236.)
Replacing a fuse with one that has
a higher rating greatly increases
the chances of damaging the
electrical system. If you do not
have a replacement fuse with the
proper rating for the circuit,
install one with a lower rating.
In Cas e o f Emergenc y
NOTIC
E
Page 249 of 267

maintain them. This section
summarizes how the emissions
controls work. Scheduled
maintenance is on page 200.
Crankcas e Emission s
Contro l Syste m
Your vehicle has a Positive
Crankcase Ventilation System.
This keeps gasses that build up in the engine's crankcase from goinginto the atmosphere. The Positive
Crankcase Ventilation valve
routes them from the crankcase
back to the intake manifold. They are then drawn into the engine and
burned.
Evaporativ e Emission s
Contro l Syste m
As gasoline evaporates in the fuel
tank, an evaporative emission
control canister filled with charcoal adsorbs the vapor. It is stored in this canister while the
engine is off. After the engine is
started and warmed up, the vapor
is drawn into the engine and
burned during driving.
Exhaus t Emission s Control s
The exhaust emission controls include four systems: Fuel
Injection, Ignition Timing Control, Exhaust Gas
Recirculation, and Three-Way Catalytic Converter. These four
systems work together to control
the engine's combustion and
minimize the amount of HC, CO,
and NOx that comes out the
tailpipe. The exhaust emission
control systems are separate fromthe crankcase and evaporative
emission control systems. Fuel Injection System
The Fuel Injection System uses sequential multiport fuel injection.
It has three subsystems: Air
Intake, Engine Control, and Fuel
Control. The Engine Control Module (ECM) uses various
sensors to determine how much
air is going into the engine. It then
controls how much fuel to inject
under all operating conditions.
Ignition Timing Control System This system constantly adjusts theignition timing, reducing the amount
of HC, CO and NOx produced.
Owne r Assistanc e
Page 254 of 267

Inde
x
ABS. See Anti-Lock Brake
System
Accessories, Installation .... 169
ACCESSORY
(Ignition Key Position) ...... 97
Accessory Power Outlets ..... 113
Adding AutomaticTransmission Fluid .... 212
Brake Fluid ............ 215
Clutch Fluid ............ 219
Engine Oil ............ 208
Manual Transmission Fluid .... 211
Power Steering Fluid ..... 219
Radiator Coolant ........ 214
Windshield Washer Fluid ..
194
Adjustments
Head
Restraints .......... 12
Mirrors
Exterior ............ 101Interior ............. 101
Power. ............. 101
Seat-Backs .......... 11,
89
Reclining the Rear ...... 93
Seats, Front ......... 10,
89
Steering Wheel ..... 15,
111
Adults, Protecting ........... 10
Airbags (SRS) ............. 7
Serious Risk to Children .... 19
Air Cleaner Filter ......
166, 210
Air Conditioning
Maintenance ........... 217
Usage ................. 116
Air Filter. See Air Cleaner Filter
Air Outlets (Vents) ......... 120
Air Pressure, Tires ......... 235
Alcohol and Driving ........ 4
Alcohol in Gasoline ........ 196
Alternator Belt. See Drive Belts
Antifreeze ................ 213
Anti-Lock Brake System
Indicator Lights .......... 65
Operation .............. 155
Anti-Theft Steering Column Lock ..... 98
System .................
..... 148
Appearance Care. See Cleaning
Ashtray .................. 112
Assist Grip ..............
111
Audio System ............. 121