2000 HONDA PASSPORT change time
[x] Cancel search: change timePage 2 of 267
Owner's Identification
This Owner's Manual should be considereda permanent part of the car, and should
remain with the car when it i
s sold.
The information and specifications included in this publication were in affect at the time
of approval for printing. Honda Motor Co., Ltd. reserves the right, however, to
discontinue or change specifications or
design at any time without notice and
with out incurring any obligation whatsoever.
OWNER
ADDRESSSTREET
CITY STATE/PROVINCE ZIP CODE /POSTAL CODE
V. I. N.
DELIVERY DATE(Date sold to original retail purchaser)
DEALER NAME DEALER NO.
ADDRESSSTREET
CITY STATE/PROVINCE ZIP CODE/
POSTAL CODEOWNER'S SIGNATURE
DEALER'S SIGNATURE
Page 79 of 267
3
(Third ) — When operating your
vehicle on slippery roads, on a
long descending slope, or on a
road with many sharp curves, you
will want to use engine braking. At this time, put the shift lever into this range.
2 (Second ) — You may choose this
position when traveling down a
moderate grade where you want to slow down a little without using
the brake itself. Change back to the
"D" position to return to normal
driving. With the shift lever in "2," the vehicle will start in first gear
and automatically shift to second
gear.
L (First ) — This position may be
selected for maximum braking
down severe grades. Return the
selector lever to the "D" position
to resume normal driving. It is
possible to move the lever into first gear at any speed. However,
the transmission will not actually
shift to first gear until vehicle
speed is below 35 mph (Power
Mode) or 25 mph (Normal Mode).
When starting out in "L," the transmission will not upshift.
Startin g — Start the engine with
the lever in the "P" or "N"
position. It will not start in any other position. If it does, have
your vehicle checked by your
Honda dealer.
Always apply the foot brake
before shifting into any driving
position. This prevents the vehicle from creeping.
Do not press the accelerator pedal
while shifting from "P" or "N" to
any driving position. Shif
t Loc k — As a safety measure
for vehicles with an automatic
transmission, you cannot shift
from "P" (Park) position into any
other position unless the brake
pedal is depressed when the key switch is in the "ON" position or
the engine is running.
The shift lever may not move if
the pushbutton on the shift lever is
pressed before the brake pedal is
depressed. In this case, release the pushbutton, press the brake
pedal and try again.
If the shift lever won't move from
the "P" position even when theseinstructions are followed, perform
the following steps:
Instrument s an d Control s
Page 131 of 267

slot. The drive will pull it in the
rest of the way, and begin playing the first track. The light next to
the button will stay on as a
reminder that a CD is loaded in
that position.
Repeat this procedure to load CDsin the remaining positions in the
changer. The positions that
contain CDs will display a green
light next to their buttons. The CD
position that is currently loaded and ready to play will display an
orange light.
Playing CDs Press the CD button on the frontof the radio. The CD that is
currently loaded will begin
playing. The disc and track
numbers will be shown in the
radio display. When the system
reaches the end of that CD, it will load and play the next CD. To select a different disc, push the
appropriate button (1-6) on the
front of the CD changer. The light next to the button will flash as the
current CD is stored and the new
CD is loaded. The light will thenturn orange, and the CD will
begin playing from the first track.
You can also press the
TUNE/DISC button on the front of
the radio:
to select the
previous disc, or to select the
next disc.
To change tracks, press and
release either the button
(preset 4), or the button
(preset 6). Each time you press
the system will advance one
track. Pressing once will
return the system to the beginning
of the current track. Press it again
to select the previous track.To move rapidly within a track, press and hold the button
(preset 3) to move forward, or the
button (preset 1) to move
backward. Release the button
when the system reaches the point you want.
You can switch to the radio or
cassette player by pressing the
FM/AM or TAPE buttons on the
front of the radio. To switch back
to the CD changer, press the CD
button. The CD will begin playing
where it left off.
To eject a CD, select it with the
button on the front of the CD
changer (the light turns to orange), then press the EJECT
button.
Protectin g Compac t Disc s
For information on how to handle and protect compact discs, see
page 142.
Comfor t an d Convenienc e Feature s
Page 142 of 267
Repeat this procedure to load CDs
in the remaining positions in the
changer.
To load more than one CD in a single operation, press and hold
the LOAD button until you hear a
beep. Load the first CD as
described above. After the first CD loads, the light for the next
open position will begin blinking.
Insert the next CD part way into
the slot. Continue this procedure
until all six slots are loaded. If
you do not want to load CDs intoall six positions, press the LOAD
button again after the last CD hasloaded. That CD will begin
playing.
Playing CDs Press the DISC button to switch tothe CD changer. The CD that is
currently loaded will begin playing. The disc and track
numbers are shown in the display.
To select a different disc, press the TUNE/DISC button: to select
the next disc, or to select the
previous disc.
To change tracks, press and release the (preset 2) button to
advance one track at a time, or the (preset 1) button to return to
the beginning of the current track. Press again to select the
previous track.
To move rapidly within a track,
press and hold the button to
move forward, or the button
to move backward. Release the
button when the system reaches the point you want.
You can switch to the radio or the
cassette player by pressing the
FM, AM, or TAPE button. To switch back to the CD changer,
press the DISC button. The CD will begin playing where it left
off.
To remove a CD from the changer, select the CD with the
TUNE/DISC button, then press and release the EJECT button
next to the slot.
To remove all the CDs from the changer, press and hold the
EJECT button until you hear a
beep. The CDs will eject in order.
Soun d Retrieva l Syste m — The
Sound Retrieval System function
adds richness to the sound of the
CDs. To activate it, press the button. This turns on the first
level of sound expansion. Press the button a second time to take it
to the second level. Press the
button again to turn off the
feature.
Comfor t an d Convenienc e Feature s
Page 159 of 267

hazard. This is sometimes referred
to as "stomp and steer."
You will feel a pulsation in the
brake pedal when the ABS activates, and you may hear some
noise. This is normal, it is theABS rapidly pumping the brakes.
Activation varies with the amount
of traction your tires have. On dry
pavement, you will need to press on the brake pedal very hard
before you activate the ABS. However, you may feel the ABSactivate immediately if you are
trying to stop on snow or ice.
Important Safety Reminders AB S doe s no t reduc e th e tim e
o r distanc e it take s t o sto p th e
vehicle , it only helps with steering
control during braking. You
should always maintain a safe following distance from other
vehicles.
AB
S wil l no t preven t a ski d tha t
result s fro m changin g directio n
abruptly , such as trying to take a
corner too fast or making a sudden lane change. Always drive
at a safe, prudent speed for the
road and weather conditions.
AB S canno t preven t a los s o f
stability . Always steer moderately
when you are braking hard. Severe or sharp steering wheel
movement can still cause your
vehicle to veer into oncoming traffic or off the road.
A vehicl e wit h AB S ma y requir e
a longe r distanc e t o sto p o n
loose or uneven surfaces, such as
gravel or snow, than a vehicle
without anti-lock. Slow down and allow a greater distance between
vehicles under those conditions.
AB S Indicato r
The ABS is self-checking. You may feel a slight movement of the
brake pedal just after you start the engine. This is the ABS performing
a check. It also checks itself
whenever you use the brakes.
Drivin g Tip s
Page 166 of 267
We urge you not to install
oversize tires and wheels that
would change your vehicle's
ride height and possibly affect
handling and stability. It is best to replace all four tires at
the same time. If that is not
possible or necessary, then replace the two front tires or the two rear
tires as a pair. Replacing just one
tire can seriously affect your
vehicle's handling.
The ABS works by comparing the speed of the wheels. When
replacing tires, use the same size originally supplied with the
vehicle. Tire size and construction
can affect wheel speed and may
cause the system to work inconsistently.
If you ever need to replace a
wheel, make sure the
replacement's specifications
match the wheels that originally
came on your Honda. Replacement wheels are available
at your Honda dealer.
Wheel
s an d Tire s
Wheels:
16 x 7 JJ
Tires:
Standard on LX 2WD 225/75R16
Standard on all other models 245/70R16
See page 247 for information
about DOT Tire Quality Grading.
Driving Tip s
Installing improper tires on
your vehicle can affect handling and stability. This
can cause a crash in which
you can be seriously hurt or
killed.
Always use the size and type
of tires recommended in this
owner's manual.
Page 208 of 267

Sit in the driver's seat and
perform these checks:
1. With the engine stopped, depress the brake pedal severaltimes; the travel distance and
effective pedal stroke should
remain unchanged.
2. Start the engine with the brake pedal fully depressed.
The brake pedal should go downa little as the engine starts.
3. Depress the brake pedal, stop the engine and hold the pedal
depressed for about 30
seconds; the brake pedal
should remain in position
without rising or going down.
4. Restart the engine and run it for about a minute, then turn it
off and depress the brake
pedal firmly several times; the
brake pedal travel should decrease each time the brake
pedal is depressed.
If the brakes do not operate
normally, have them checked and
corrected by your Honda dealer.
Exhaus t syste m — Be alert to any
changes in the sound of the exhaust system or any smell of fumes.
These are signs the system may be leaking or overheating. Have the
system checked and/or repaired at
once if these conditions exist. (Also see "Carbon Monoxide Hazard" in
the "Driver and Passenger Safety"
section and "Three-Way Catalytic
Converter" in the "Driving Tips"
section.)
Windshiel d wiper s an d
washer s — Check the operation
and condition of the wiper blades.
Check the flow and aim of the
washer spray.
Defroster
s — Check performance
by moving the controls to the
defrost setting and noting the amount of air directed against the
windshield.
Rea r vie w mirror s an d su n
visor s — Check that the friction
joints hold the mirrors and sun visors firmly in place.
Hor n — Blow the horn now and
then to be sure it works.
La p an d shoulde r belt s — Check
the belt system, including
webbing, buckles, latch plates,
retractors, guide loops and anchors for proper operation and
damage.
Sea t adjuster s — When adjusting
a seat, be sure the seat adjusters
latch securely by pushing the seat
forward and backward.
Car e an d Maintenanc e
Page 212 of 267
Oi
l Viscosit y
Engine oil viscosity (thickness) has an effect on fuel economy. Lower
viscosity engine oils can provideincreased fuel economy; however,
higher temperature weather
conditions require higher viscosity
engine oils for satisfactory lubrication. To get the best fuel
economy with your vehicle, you should use a fuel-saving engine oil
of the proper viscosity. These oils
can be found in service stations and other retail stores. They are
identified by words such as
"Energy Saving," "Conserves
Gasoline," "Gas Saving,"
"Gasoline Saving," "Friction
Reducing," "Improved Gasoline Mileage" or "Fuel Saving."
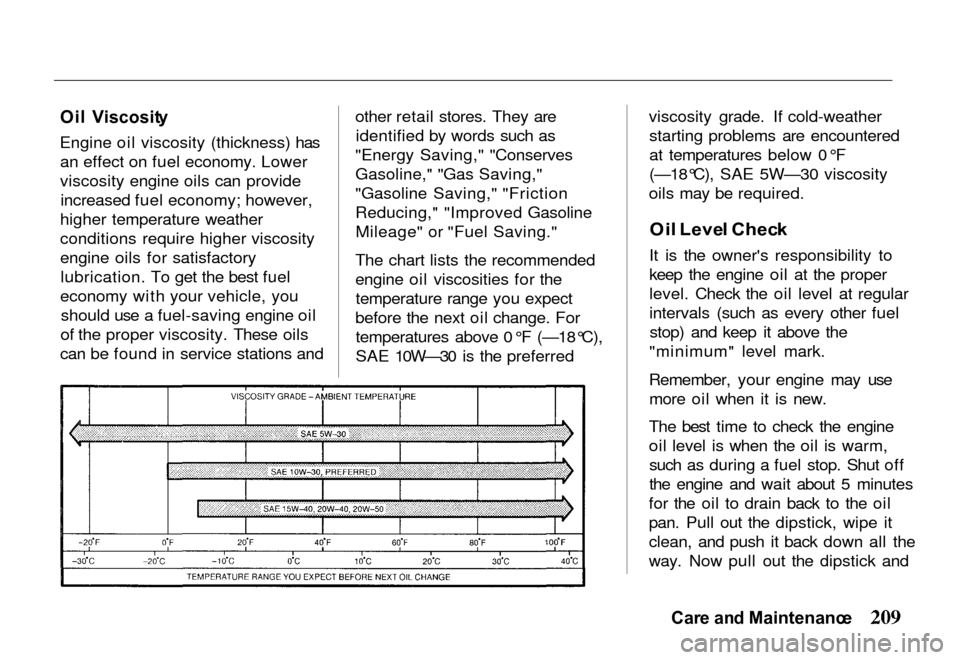
The chart lists the recommended
engine oil viscosities for the temperature range you expect
before the next oil change. For temperatures above 0°F (—18°C),
SAE 10W—30 is the preferred viscosity grade. If cold-weather
starting problems are encountered
at temperatures below 0°F
(—18°C), SAE 5W—30 viscosity
oils may be required.
Oi l Leve l Chec k
It is the owner's responsibility to
keep the engine oil at the proper
level. Check the oil level at regular
intervals (such as every other fuel stop) and keep it above the
"minimum" level mark.
Remember, your engine may use more oil when it is new.
The best time to check the engine
oil level is when the oil is warm, such as during a fuel stop. Shut off
the engine and wait about 5 minutes
for the oil to drain back to the oil
pan. Pull out the dipstick, wipe it
clean, and push it back down all the
way. Now pull out the dipstick and
Car e an d Maintenanc e