Page 42 of 267
All the lap/shoulder belts except
the driver's have an additional
locking mechanism that must beactivated to secure a child seat.(See pages 25 and 30 for
instructions on how to secure
child seats with this type of seat
belt.)
If the shoulder part of the belt is
pulled all the way out, the locking
mechanism will activate. The belt
will retract, but it will not allow a
passenger to move freely.
To deactivate the locking
mechanism, unlatch the buckle
and let the seat belt fully retract.
To refasten the belt, pull it out only as far as needed.
See page 13 for instructions on
how to wear the lap/shoulder belt
properly.
La
p Bel t
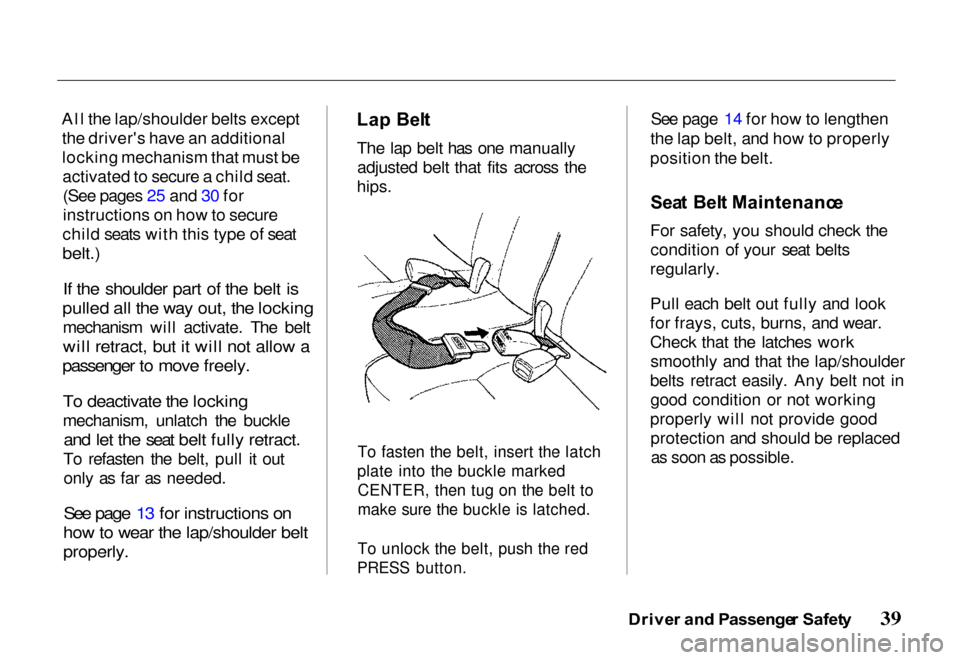
The lap belt has one manually adjusted belt that fits across the
hips.
To fasten the belt, insert the latch
plate into the buckle marked
CENTER, then tug on the belt to
make sure the buckle is latched.
To unlock the belt, push the red
PRESS button.
See page 14 for how to lengthen
the lap belt, and how to properly
position the belt.
Sea t Bel t Maintenanc e
For safety, you should check the condition of your seat belts
regularly.
Pull each belt out fully and look
for frays, cuts, burns, and wear.
Check that the latches work smoothly and that the lap/shoulder
belts retract easily. Any belt not in good condition or not working
properly will not provide good protection and should be replacedas soon as possible.
Drive r an d Passenge r Safet y
Page 82 of 267
Shifting the Transfer Control
Lever
4H 4L: Stop the vehicle. Place
the transmission leverin "N" (Neutral)
position. Then move the transfer controllever from 4H to 4L,
or 4L to 4H.
Move the transfer control lever
quickly and securely between
positions. Do not stop midway.
The transfer gear box can be
damaged if the control lever is not
firmly in gear. Some noise is
normal when shifting.
Always stop the vehicle before shifting between low and high range (4H 4L or 4L 4H).
If the 4WD indicator continues to
blink rapidly, it indicates that the system was shifted out of
sequence. Stop the vehicle, select 4WD with the 4WD-2WD switch,
shift the lever from 4L to 4H, then
select 2WD. Drive in a straight
line to reset the system. If the indicator continues to blink, see
your Honda dealer.
Do not use 4-wheel drive for
driving on dry pavement. This
causes noise and wear, and taking
tight turns can damage thetransfer case and driveshafts. It
also reduces fuel economy.
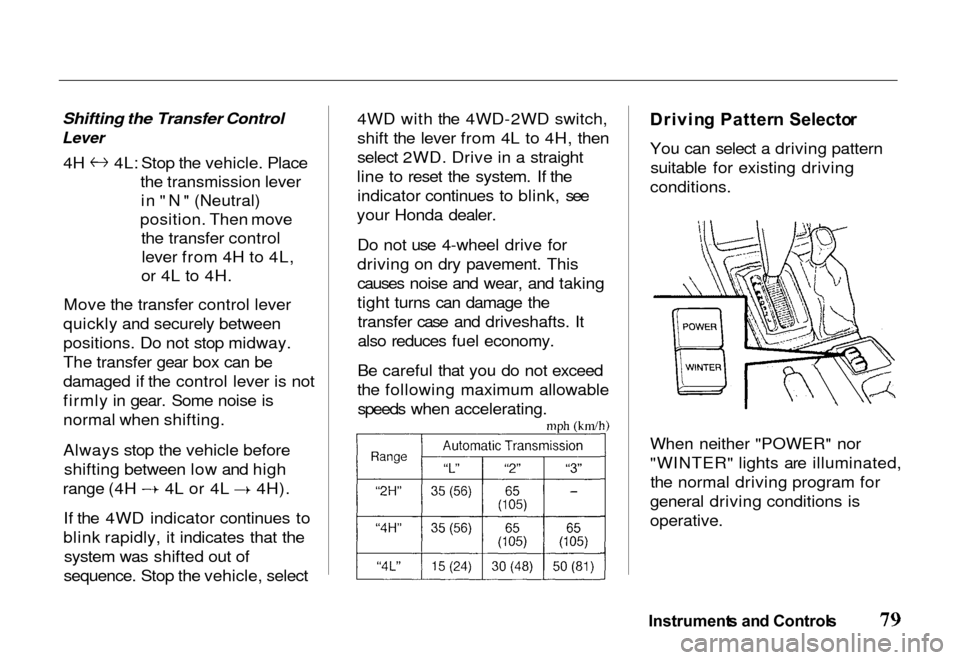
Be careful that you do not exceed
the following maximum allowable speeds when accelerating.
Drivin
g Patter n Selecto r
You can select a driving pattern suitable for existing driving
conditions.
When neither "POWER" nor
"WINTER" lights are illuminated, the normal driving program for
general driving conditions is
operative.
Instrument s an d Control s
Page 86 of 267
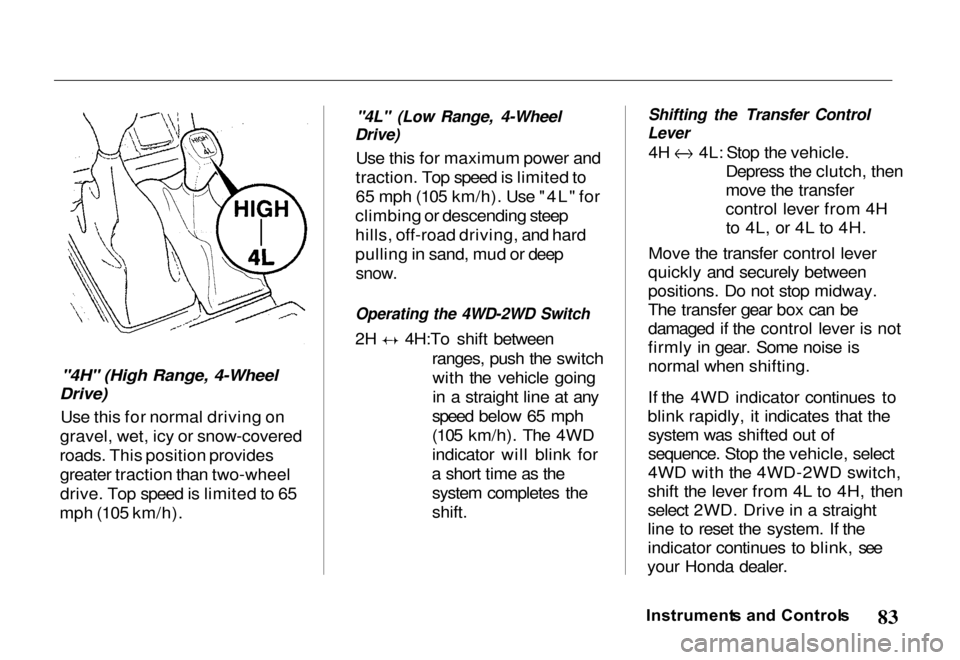
"4H" (High Range, 4-Wheel
Drive)
Use this for normal driving on
gravel, wet, icy or snow-covered
roads. This position provides greater traction than two-wheel
drive. Top speed is limited to 65
mph (105 km/h).
"4L" (Low Range, 4-Wheel
Drive)
Use this for maximum power and
traction. Top speed is limited to
65 mph (105 km/h). Use "4L" for
climbing or descending steep
hills, off-road driving, and hard
pulling in sand, mud or deep
snow.
Operating the 4WD-2WD Switch
2H 4H:To shift between
ranges, push the switchwith the vehicle going
in a straight line at any
speed below 65 mph
(105 km/h). The 4WD
indicator will blink for
a short time as the system completes the
shift.
Shifting the Transfer Control
Lever
4H 4L: Stop the vehicle.
Depress the clutch, then
move the transfer
control lever from 4Hto 4L, or 4L to 4H.
Move the transfer control lever
quickly and securely between
positions. Do not stop midway.
The transfer gear box can be
damaged if the control lever is not
firmly in gear. Some noise is
normal when shifting.
If the 4WD indicator continues to
blink rapidly, it indicates that the system was shifted out of
sequence. Stop the vehicle, select
4WD with the 4WD-2WD switch,
shift the lever from 4L to 4H, then
select 2WD. Drive in a straight
line to reset the system. If the
indicator continues to blink, see
your Honda dealer.
Instrument s an d Control s
Page 95 of 267
4. Unsnap the strap on the seat
bottom. Thread it through the
buckle on the seat-back and
pull it tight.
5. Insert the head restraints
between the seat-back and seat
cushion.
Make sure the head restraints are secured properly between the
seat-back and seat cushion. Never let passengers ride in the
cargo area or on top of the
folded-down seat. Carry
passengers in the rear only when
they are sitting on the locked,
upright seat and properly
restrained by seat belts.
Unfoldin g
1. To raise the seat-back, pull it up to the locked upright
position. Pull on the seat-back to verify both latches are
locked.
2. When latching the rear seat cushion to the floor, push thecushion with enough force to
lock it.
After this, confirm it is locked
by pulling the seat belt buckle
upward.
Seat s
Page 100 of 267
Key
s an d Ignitio n
Your Passport comes with two
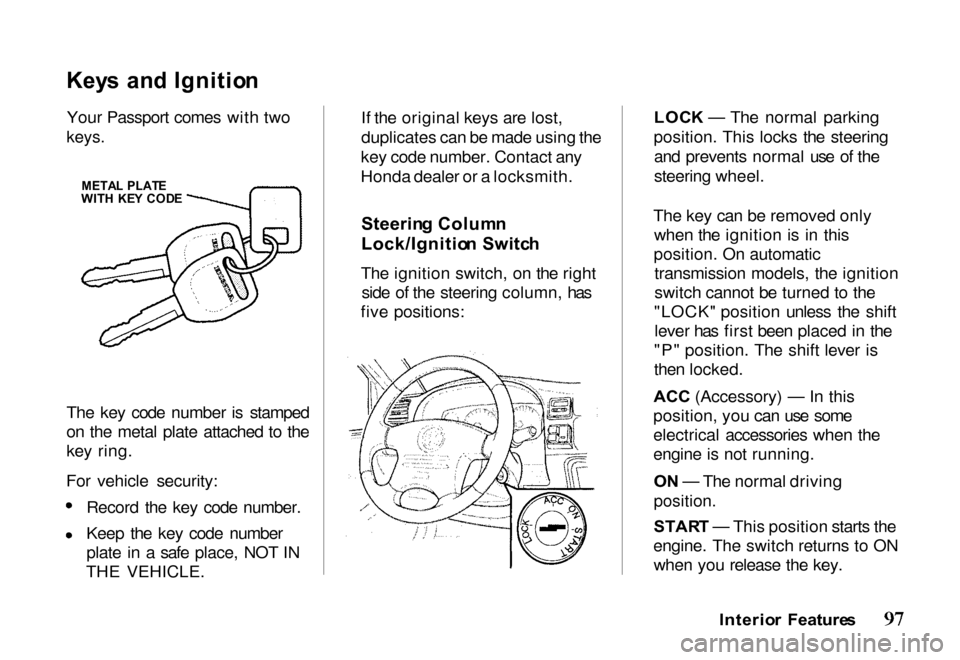
keys.
The key code number is stamped
on the metal plate attached to the
key ring.
For vehicle security: Record the key code number.
Keep the key code number
plate in a safe place, NOT IN
THE VEHICLE. If the original keys are lost,
duplicates can be made using the
key code number. Contact any
Honda dealer or a locksmith.
Steerin g Colum n
Lock/Ignitio n Switc h
The ignition switch, on the right side of the steering column, has
five positions: LOC
K — The normal parking
position. This locks the steering and prevents normal use of the
steering wheel.
The key can be removed only when the ignition is in this
position. On automatic transmission models, the ignition
switch cannot be turned to the
"LOCK" position unless the shift lever has first been placed in the
"P" position. The shift lever is
then locked.
ACC (Accessory) — In this
position, yo
u can use some
electrical accessories when the
engine is not running.
O N — The normal driving
position.
STAR T — This position starts the
engine. The switch returns to ON when you release the key.
Interior Feature s
META
L PLAT E
WIT H KE Y COD E
Page 109 of 267
3. Raise the hood, and hold it
open with the hood support
rod in the hole on the right
side of the hood.
T
o Clos e
1. Lift the hood slightly to remove tension from thesupport rod.
2. Place the support rod in its retaining clip and lower the
hood.
Make sure the hood is latched securely before beginning to
drive.
Luggag
e Ligh t
The cargo compartment light switch is built into the light
housing.
The switch has three positions: O N — Light turns on and remains
on regardless of tailgate opening.
DOO R — Light turns on when
the hatch glass is opened.
Interio r Feature s Interio
r Light s
O N
DOOR
OF F
Page 176 of 267
Carryin
g Item s in th e
Passenge r Compartmen t
Store or secure all items that
could be thrown around and
hurt someone during a crash. Be sure items placed on the
floor behind the front seats
cannot roll under the seats
and interfere with the driver's
ability to operate the pedals,
or with the proper operation
of the seats. Keep the glove box closed
while driving. If the lid is open,
a passenger could injure his
knees during a crash or sudden
stop.
Carryin
g Carg o in th e Carg o
Are a o r o n a Roo f Rac k Distribute cargo evenly on the
floor of the cargo area, placing
the heaviest items on the
bottom and as far forward as
possible.
If you fold down the back seat,
tie down items that could be
thrown about the vehicle
during a crash or sudden stop. If you carry large items that
prevent you from closing the hatch glass or rear door,
exhaust gas can enter the
passenger area. To avoid the
possibility of carbon monoxide
poisoning, follow the instructions on page 44. If you carry any items on a roof
rack, be sure the total weight of the rack and the items does not
exceed 200 Ib (90 kg).
Driving Tip s
Page 181 of 267
There are no provisions in your
vehicle to tap into its hydraulic
braking system. Any attempt toattach the trailer's brakes to your
vehicle's hydraulic braking system, no matter how successfulit may seem, will lower braking
effectiveness and create a
potential hazard.
Equipmen t Chec k
Before operating your vehicle,
check all safety equipment to
ensure safe operation. Be sure
your vehicle is properly serviced
to avoid mechanical failure.
Check that your vehicle remains
level when the loaded or unloadedtrailer is hitched. Do not drive if
the rear end of your vehicle is abnormally higher or lower.
Check for proper tongue weight,
overload, improper weight
distribution, worn suspension, or
other possible causes.
Make sure the trailer load is
properly positione
d and secured
so its does not shift around whil
e
driving.
Chec k
if your rearview mirrors
comply with federal, state and
local regulations. If not, confirm
the proper mirrors required for
towing and have them installed.
Perform an equipment check of
all braking, lighting and safety
equipment to ensure they are working properly.
Your safety depends on proper
operation and installation of
equipment. Never operate a
vehicle with faulty equipment.
Limite
d Sli p Differentia l
Standard on 4WD models
The limited slip differential is
designed to improve traction by limiting wheelspin. If one rear
wheel begins to spin on a slipperysurface, the limited slip
differential will automatically
transmit driving force to the other
rear wheel.
Drivin g Tip s