2000 HONDA PASSPORT ECU
[x] Cancel search: ECUPage 187 of 267
8. Turn the jack handle
clockwise with a slow, smooth
motion to raise the vehicle sothe inflated spare tire will
clear the surface.
9. Remove the wheel nuts and the wheel.
10. Install the wheel and replace the whee
l nuts with the
cone-shaped end toward the
wheel, then hand-tighten each
nut. The wheel must be seated on the hub.
11.
Lower the vehicle by turning
the jac
k handle counter-
clockwise, then fully tighten the wheel nuts in a crisscrosssequence by turning the
wrench clockwise. Have the
wheel nut torque checked at
the nearest automotive service
facility.
87 lb-ft ( 118 N.m)
12.
Stow the jacking tools and flat
tire i
n their proper locations.
Too
l Location s
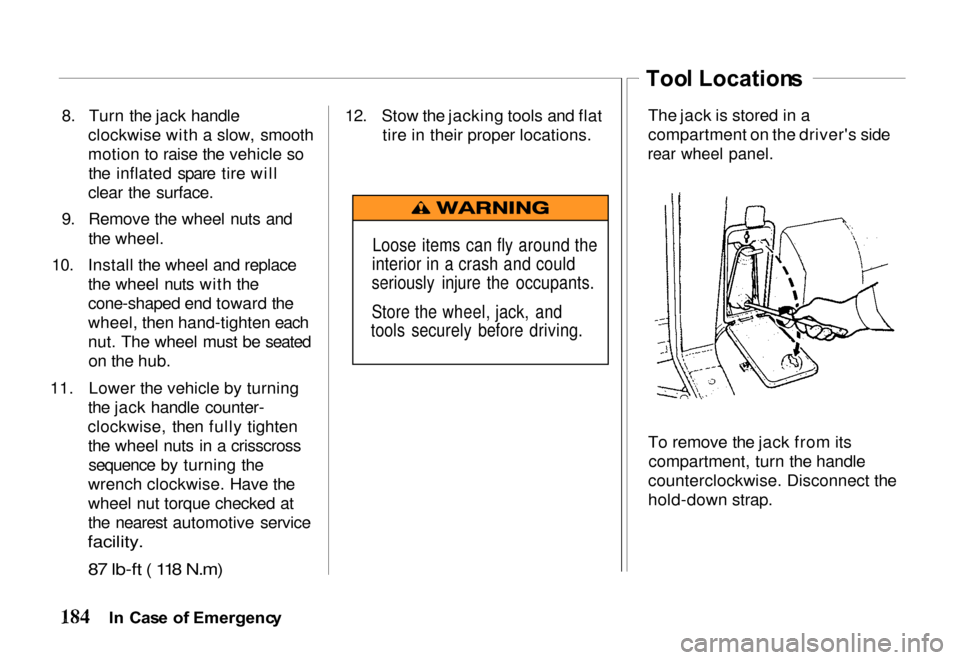
The jack is stored in a
compartment on the driver's side
rear wheel panel.
To remove the jack from itscompartment, turn the handle
counterclockwise. Disconnect the
hold-down strap.
I n Cas e o f Emergenc y
Loose items can fly around the
interior in a crash and could
seriously injure the occupants.
Store the wheel, jack, and
tools securely before driving.
Page 188 of 267
The tire wrench and jack handle
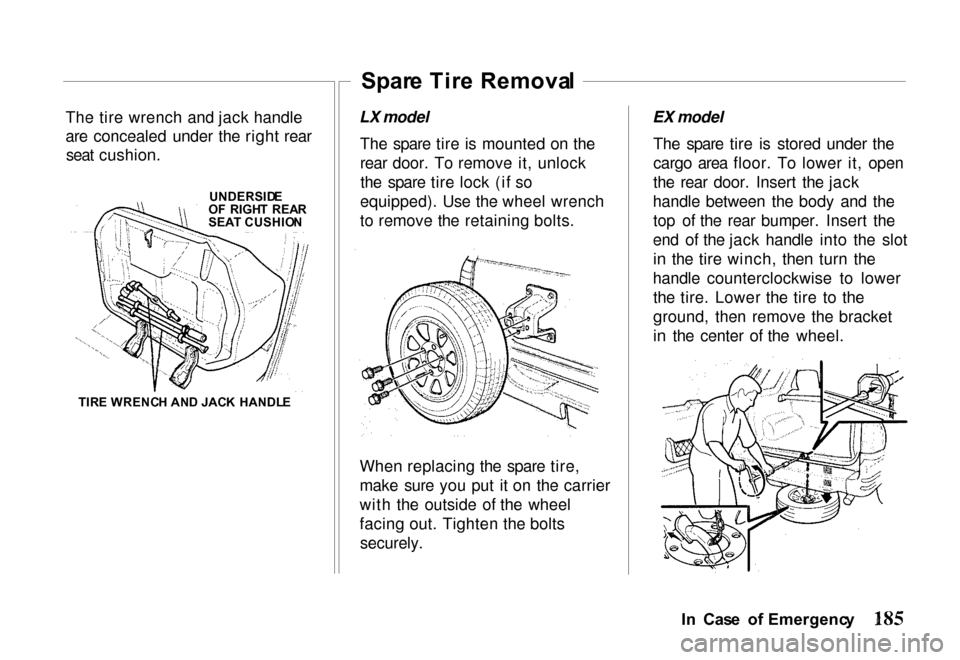
are concealed under the right rear
seat cushion.
UNDERSIDE
O F RIGH T REA R
SEA T CUSHIO N
TIR E WRENC H AN D JAC K HANDL E Spar
e Tir e Remova l
LX model The spare tire is mounted on the
rear door. To remove it, unlockthe spare tire lock (if so
equipped). Use the wheel wrench
to remove the retaining bolts.
When replacing the spare tire,
make sure you put it on the carrier
with the outside of the wheel
facing out. Tighten the bolts securely. EX model
The spare tire is stored under the
cargo area floor. To lower it, open
the rear door. Insert the jack
handle between the body and the top of the rear bumper. Insert the
end of the jack handle into the slot in the tire winch, then turn the
handle counterclockwise to lower the tire. Lower the tire to the
ground, then remove the bracket
in the center of the wheel.
In Cas e o f Emergenc y
Page 189 of 267

Reverse this procedure to store
the spare tire. Connect the spare
tire to the bracket with the outside
of the wheel facing up. Make sure
the tire does not catch on any part
of the underbody of the vehicle as
you are raising it, and that the spare tire is stored securely before
driving.
If the engine overheats:
The engine coolant temperaturegauge pointer will move up to
the "H" or higher. Engine "ping" will become
excessive.
Loss of engine power will be
noticed.
Either steam or boiling water
will squirt out of the radiator.
If you find that the engine is
overheating:
Stop the vehicle, and turn on
the hazard warning lights.
If you see or hear steam or
coolant coming from the
engine compartment, turn off the engine immediately. If you do not see or hear steam
or spray, turn off the A/C (if
on) and run the engine at a
speed slightly higher than idle
speed (about 1,500 rpm) for
several minutes. Watch the
coolant temperature gauge. If it
remains at the ''H" mark, turn
off the engine.
Open the hood only after all
signs of steam or hot coolant
spray have stopped. Look for
signs of an obvious leak, such
as a split radiator hose. If you
I n Cas e o f Emergenc y
Steam and spray from an
overheated engine can
seriously scald you.
Do not open the hood if steam
is coming out.
Engin
e Overheatin g
Page 191 of 267
Use only towing equipment
specifically designed for this
purpose, following the instructions of the equipment
manufacturer. A separate safety
chain system must be used.
For such towing, the parking
brake must be released, thetransmission must be in neutraland the key switch turned to
the "OFF" position (not
"LOCK").
Towing attachments must be made to main structural
members of the vehicle. Do not attach to bumpers or associated
brackets.
Remember that the power brake assist will not beavailable when the engine is
inoperative.
Towin
g Tip s
All Four Wheels on the Ground
1. Transfer case in 2H (4WD model only).
2. Transmission in Neutral
position.
3. Maximum speed 30 mph (50 km/h).
4. Maximum distance 50 miles (80 kilometers).
If you are towing the vehicle at distances and speeds greater thanshown, disconnect the propeller
shaft from the rear axle carrier.
On 4WD models, also disconnect
the front propeller shaft. Safely
secure the propeller shafts so they
will not fall and scrape the
ground.
Front Wheels off the Ground
1. Transfer case in 2H (4WD model only).
2. Transmission in Neutral position.
3. Maximum speed 30 mph (50 km/h).
4. Maximum distance 50 miles (80 kilometers).
If you are towing the vehicle at
distances and speeds greater than shown, disconnect the propeller
shaft from the rear axle carrier.
Safely secure the propeller shaft so it will not fall and scrape the
ground.
I n Cas e o f Emergenc y
Page 192 of 267

Rear Wheels off the Ground
1. Transfer case in 2H (4WD model only).
2. Transmission in Neutral position.
3. Maximum speed 30 mph (50 km/h).
4. Maximum distance 50 miles (80 kilometers).
If you need to tow your vehicle by
this method, secure the steering
wheel to keep the front wheels
pointed straight ahead. Do not
rely on the steering column lock; it is not strong enough to hold the
front wheels straight while
towing. The ignition switch must
be in the OFF position.
Inoperativ
e Electrica l Device s
If you have electrical problems without extreme damage to any
electrical parts, check for burned out fuses, broken wires, poor
connections or poor grounding. Correct as necessary.
The fuse boxes are located under
the left hand side of theinstrument panel and in the right
hand side of the engine compartment. (See "Fuses" on
page 236.)
Replacing a fuse with one that has
a higher rating greatly increases
the chances of damaging the
electrical system. If you do not
have a replacement fuse with the
proper rating for the circuit,
install one with a lower rating.
In Cas e o f Emergenc y
NOTIC
E
Page 199 of 267

To Close
1. Lift the hood slightly to remove tension from the support rod.
2. Place the support rod in its retaining clip and lower the
hood.
Always make sure the hood is securely latched before you begin
driving.
Engin
e Oi l Dipstic k
Check the oil level when the
engine is off and the oil is warm, such as during a fuel stop. See
page 209. Your Honda operates most
effectively on unleaded gasoline with a pump octane number of 86
or higher. Use of a lower octane
gasoline can cause a persistent, heavy metallic rapping noise in
the engine that can lead to
mechanical damage.
We recommend gasolines containing
detergent additives that help prevent
fuel system and engine deposits.
Using gasoline containing lead will
damage your vehicle's emission
controls. This contributes to air
pollution and can void certain parts
of your warranty.
Oxygenate d Fuel s
Some conventional gasolines are
being blended with alcohol or an
ether compound. These gasolines are collectively referred to as
oxygenated fuels. To meet clean air
Car e an d Maintenanc e
Fue
l Requirement s
Page 208 of 267
Sit in the driver's seat and
perform these checks:
1. With the engine stopped, depress the brake pedal severaltimes; the travel distance and
effective pedal stroke should
remain unchanged.
2. Start the engine with the brake pedal fully depressed.
The brake pedal should go downa little as the engine starts.
3. Depress the brake pedal, stop the engine and hold the pedal
depressed for about 30
seconds; the brake pedal
should remain in position
without rising or going down.
4. Restart the engine and run it for about a minute, then turn it
off and depress the brake
pedal firmly several times; the
brake pedal travel should decrease each time the brake
pedal is depressed.
If the brakes do not operate
normally, have them checked and
corrected by your Honda dealer.
Exhaus t syste m — Be alert to any
changes in the sound of the exhaust system or any smell of fumes.
These are signs the system may be leaking or overheating. Have the
system checked and/or repaired at
once if these conditions exist. (Also see "Carbon Monoxide Hazard" in
the "Driver and Passenger Safety"
section and "Three-Way Catalytic
Converter" in the "Driving Tips"
section.)
Windshiel d wiper s an d
washer s — Check the operation
and condition of the wiper blades.
Check the flow and aim of the
washer spray.
Defroster
s — Check performance
by moving the controls to the
defrost setting and noting the amount of air directed against the
windshield.
Rea r vie w mirror s an d su n
visor s — Check that the friction
joints hold the mirrors and sun visors firmly in place.
Hor n — Blow the horn now and
then to be sure it works.
La p an d shoulde r belt s — Check
the belt system, including
webbing, buckles, latch plates,
retractors, guide loops and anchors for proper operation and
damage.
Sea t adjuster s — When adjusting
a seat, be sure the seat adjusters
latch securely by pushing the seat
forward and backward.
Car e an d Maintenanc e
Page 209 of 267
Seat-bac
k latche s — Seat-back
latches are designed to prevent
forward motion of the seat-back when the vehicle stops suddenly.
Check to see that the seat-backlatches are holding by pulling
forward on the top of the folding
seat-back.
Also check to see that the
reclining seats are operating properly.
Light s an d beepers — Check
panel lighting, warning lights, and
the seat belt reminder light and
beeper. Also check the key beeper and interior lights. On the outside,
check the license plate light, sidemarker lights, headlights, parking
lights, taillights, brake lights, turnsignals, backup lights and hazard
warning flashers. Have the
headlight aim checked promptly if the beams seem to be aimed
improperly.
Glas
s — Check for broken,
scratched or damaged glass that
could reduce visibility or cause injury.
Doo r latches — Check that the
doors close, latch and lock
securely.
Hoo d latc h — Check that the
hood closes firmly. Check for
broken, damaged, or missing parts that might prevent secure
latching. Make sure the secondarylatch keeps the hood from
opening all the way when first
released.
Flui
d leaks — Check for fuel,
water, oil or other fluid leaks by
looking at the surface beneath the
vehicle after it has been parked
for awhile. Water dripping from
the air conditioning system after use is normal. If you notice
gasoline fumes or fluid at any
time, locate the source and have it
corrected at once.
Spar e tir e an d jac k — Check that
the spare tire and all jack gear are securely stowed at all times.
Tailgat e latc h — Check that the
tailgate closes, latches and locks
securely.
Car e an d Maintenanc e