2000 HONDA ODYSSEY v tech
[x] Cancel search: v techPage 1 of 352

2000 Odyssey Online Reference Owner's Manual Use these links (and links throughout this manual) to navigate through this reference.
For a printed owner's manual, click on authorized manuals or go to www.helminc.com.
Contents
Owner's Identification Form
Introduction ........................................................................\
............................................................................. i
A Few Words About Safety ........................................................................\
.................................................. ii
Your Vehicle at a Glance ........................................................................\
....................................................... 2
Driver and Passenger Safety ........................................................................\
............................................... 5
Proper use and care of your vehicle's seat belts, and Supplemental Restraint System.
Instruments and Controls........................................................................\
...................................................55
Instrument panel indica tor and gauge, and how to use dashboard and steering column controls.
Comfort and Convenience Features........................................................................\
...............................129
How to operate the climate control system, the audio system, and other convenience features.
Before Driving ........................................................................\
.....................................................................187
What gasoline to use, how to break-in your new vehicle, and how to load luggage and other cargo.
Driving........................................................................\
...................................................................................201
The proper way to start the engine, shift the transmission, and park, plus towing a trailer.
Maintenance........................................................................\
.........................................................................225
The Maintenance Schedule shows you when you need to take your vehicle to the dealer.
Appearance Care........................................................................\
.................................................................283
Tips on cleaning and protecting your vehicle. Things to look for if your car ever needs body repairs.
Taking Care of the Unexpected........................................................................\
.......................................291
This section covers several problems motorists sometimes experience, and how to handle them.
Technical Information........................................................................\
.......................................................319
ID numbers, dimensions, capaciti es, and technical information.
Warranty and Customer Relations (U.S. and Canada)......................................................................331
A summary of the warranties covering your new Honda, and how to contact us.
Authorized Manuals (U.S. only)........................................................................\
.......................................337
How to order manuals and other technical literature.
Index ........................................................................\
......................................................................................... I
Service Information Summary
A summary of information you need when you pull up to the fuel pump.
Page 216 of 352
The Brakin g System , Tractio n Contro l Syste m
If the ABS indicator and the brake
system indicator come on together,
and the parking brake is fully
released, the front-to-rear braking
distribution system may also shut
down.
Test your brakes as instructed on page 310. If the brakes feel normal,drive slowly and have your vehicle
repaired by your dealer as soon as
possible. Avoid sudden hard braking
which could cause the rear wheels to lock up and possibly lead to a loss of
control.
On EX model
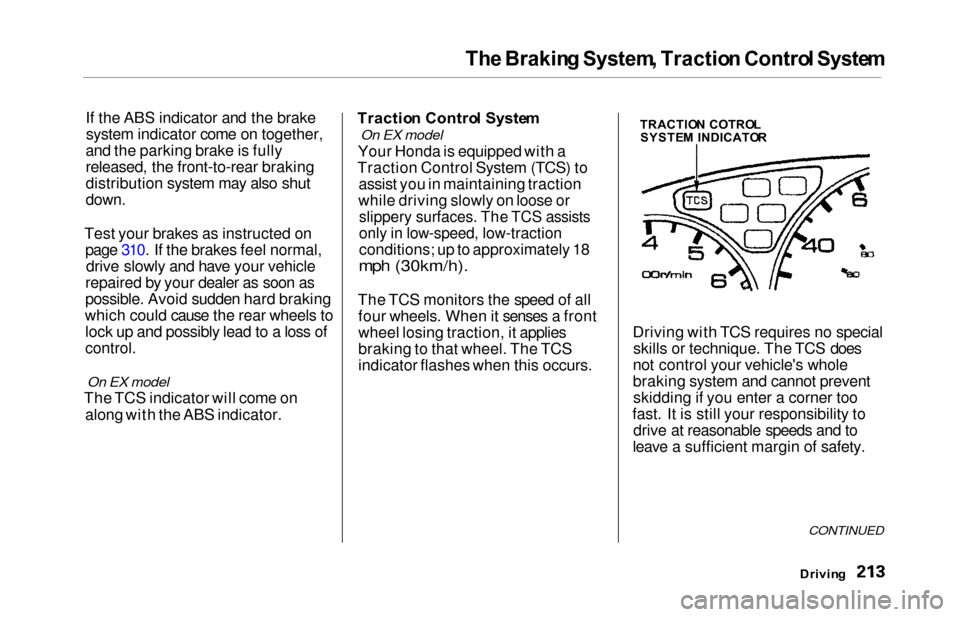
The TCS indicator will come on
along with the ABS indicator. Tractio
n Contro l Syste m
On EX model
Your Honda is equipped with a
Traction Control System (TCS) to assist you in maintaining traction
while driving slowly on loose or
slippery surfaces. The TCS assists
only in low-speed, low-traction
conditions; up to approximately 18
mph (30km/h).
The TCS monitors the speed of all four wheels. When it senses a front
wheel losing traction, it applies
braking to that wheel. The TCS
indicator flashes when this occurs. Driving with TCS requires no special
skills or technique. The TCS does
not control your vehicle's whole
braking system and cannot prevent skidding if you enter a corner too
fast. It is still your responsibility to drive at reasonable speeds and to
leave a sufficient margin of safety.
Drivin g
CONTINUED
TRACTIO N COTRO L
SYSTE M INDICATO R
Page 219 of 352
Driving in Ba d Weathe r
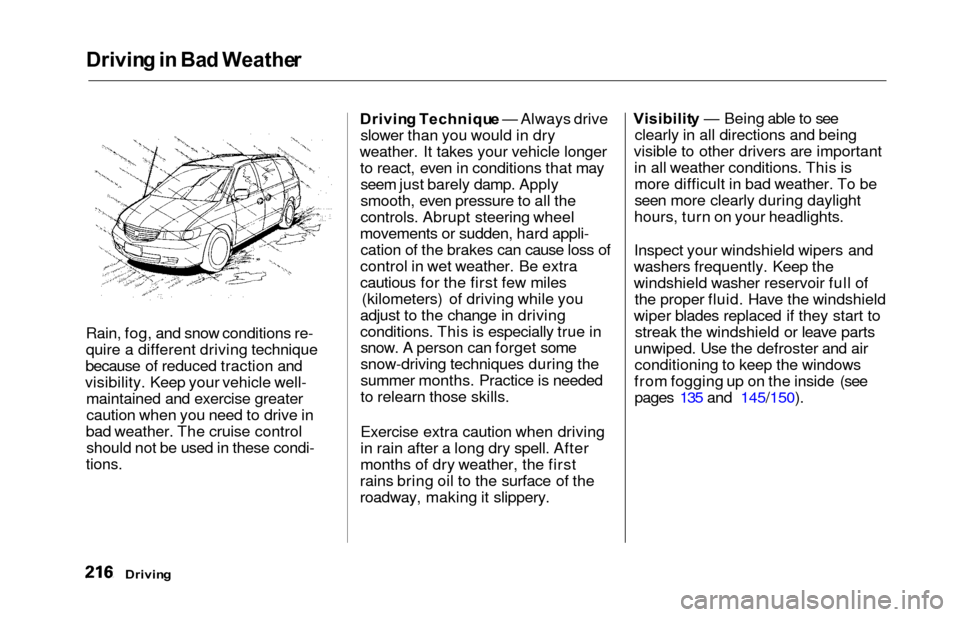
Rain, fog, and snow conditions re-
quire a different driving technique
because of reduced traction and
visibility. Keep your vehicle well- maintained and exercise greater
caution when you need to drive in
bad weather. The cruise control should not be used in these condi-
tions.
Drivin g Techniqu e — Always drive
slower than you would in dry
weather. It takes your vehicle longer to react, even in conditions that mayseem just barely damp. Apply
smooth, even pressure to all the
controls. Abrupt steering wheel
movements or sudden, hard appli- cation of the brakes can cause loss of
control in wet weather. Be extra
cautious for the first few miles (kilometers) of driving while you
adjust to the change in driving
conditions. This is especially true in snow. A person can forget some
snow-driving techniques during the
summer months. Practice is needed
to relearn those skills.
Exercise extra caution when driving
in rain after a long dry spell. After
months of dry weather, the first
rains bring oil to the surface of the
roadway, making it slippery. Visibilit
y — Being able to see
clearly in all directions and being
visible to other drivers are important in all weather conditions. This ismore difficult in bad weather. To be
seen more clearly during daylight
hours, turn on your headlights.
Inspect your windshield wipers and
washers frequently. Keep the
windshield washer reservoir full of the proper fluid. Have the windshield
wiper blades replaced if they start to streak the windshield or leave parts
unwiped. Use the defroster and air conditioning to keep the windows
from fogging up on the inside (see pages 135 and 145/150).
Drivin g
Page 224 of 352
Towing a Traile r
Trailer Brakes
Honda recommends that any trailer
having a total weight of 1,000 Ibs (450 kg) or more be equipped with
its own electric or surge-type brakes.
If you choose electric brakes, be sure they are electronically actuated.
Do not attempt to tap into your
vehicle's hydraulic system. No matter how successful it may seem,any attempt to attach trailer brakes
to your vehicle's hydraulic system
will lower braking effectiveness and create a potential hazard.
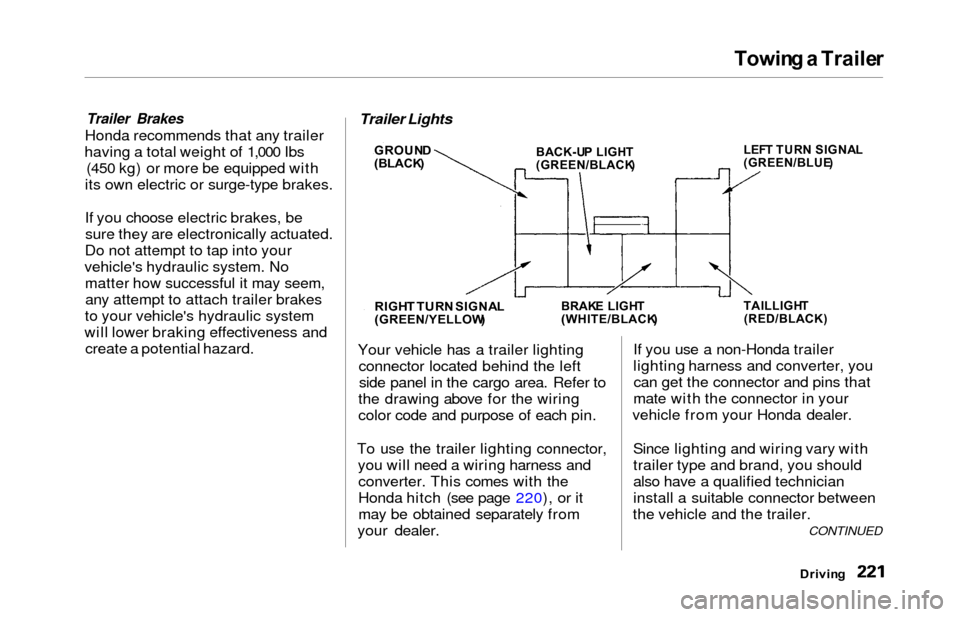
Your vehicle has a trailer lightingconnector located behind the leftside panel in the cargo area. Refer to
the drawing above for the wiring
color code and purpose of each pin.
To use the trailer lighting connector, you will need a wiring harness andconverter. This comes with the
Honda hitch (see page 220), or it
may be obtained separately from
your dealer. If you use a non-Honda trailer
lighting harness and converter, you
can get the connector and pins that
mate with the connector in your
vehicle from your Honda dealer.
Since lighting and wiring vary with
trailer type and brand, you should
also have a qualified technician
install a suitable connector between
the vehicle and the trailer.
Drivin g
CONTINUED
Trailer Lights
GROUN
D
(BLACK )
RIGHT TUR N SIGNA L(GREEN/YELLOW )
BACK-UP LIGH T(GREEN/BLACK ) LEF
T TUR N SIGNA L
(GREEN/BLUE )
BRAKE LIGH T(WHITE/BLACK )TAILLIGHT(RED/BLACK)
Page 226 of 352

Towing a Traile r
Drivin g Safel y Wit h a Traile r
The added weight, length, and height of a trailer will affect your
vehicle's handling and performance, so driving with a trailer requires
some special driving skills and
techniques.
For your safety and the safety of
others, take time to practice driving
maneuvers before heading for the
open road, and follow the guidelines
discussed below.
Towing Speeds and Gears
Driving slower than normal in all
driving situations, and obey postedspeed limits for vehicles with trailers.
Use the D
4 position when towing a
trailer on level roads. D3 is the
proper shift lever position to use
when towing a trailer in hilly terrain.
(See "Driving on Hills" in the next
column for additional gear
information.)
Making Turns and Braking
Make turns more slowly and wider
than normal. The trailer tracks a smaller arc than your vehicle, and it
can hit or run over something the
vehicle misses. Allow more time and distance for braking. Do not brake or
turn suddenly as this could cause the
trailer to jackknife or turn over.
Driving on Hills
When climbing hills, closely watch your temperature gauge. If it nearsthe red mark, turn the air
conditioning off, reduce speed and, if
necessary, pull to the side of the
road to let the engine cool.
If the automatic transmission shifts
frequently between 3rd and 4th
gears while going up a hill, shift to D
3. If you must stop when facing uphill,
use the foot brake or parking brake.
Do not try to hold the vehicle in
place by pressing on the accelerator,
as this can cause the automatic
transmission to overheat.
When driving down hills, reduce
your speed and shift down to 2nd
gear. Do not "ride" the brakes, and
remember it will take longer to slowdown and stop when towing a trailer.
Drivin g
CONTINUED
Page 229 of 352
Maintenance Safet y
Regularly maintaining your vehicle is
the best way to protect your investment. Proper maintenance is
essential to your safety and the
safety of your passengers. It will also
reward you with more economical,
trouble-free driving and help reduce air pollution. This section includes instructions for
simple maintenance tasks, such as
checking and adding oil. Any service
items not detailed in this section
should be performed by a Honda
technician or other qualified mechanic. Some of the most important safety
precautions are given here. However,
we cannot warn you of every conceivable hazard that can arise in
performing maintenance. Only you
can decide whether or not youshould perform a given task.
Maintenanc e
Improperly maintaining this
vehicle or failing to correct a problem before driving can
cause a crash in which you can be seriously hurt or killed.
Always follow the inspection
and maintenance recommendations and
schedules in this owner's manual. Failure to properly follow
maintenance instructions and
precautions can cause you to
be seriously hurt or killed.
Always follow the procedures
and precautions in this owner's manual.
Page 275 of 352
Lights
Headligh t Aimin g
The headlights were properly aimed when your vehicle was new. If youregularly carry heavy items in the
cargo area or pull a trailer,
readjustment may be required.
Adjustment of the headlights should be performed by a Honda technicianor other qualified mechanic. Replacin
g a Headligh t Bul b
Your vehicle has halogen headlight bulbs, one on each side. When
replacing a bulb, handle it by its steel
base and protect the glass fromcontact with your skin or hard
objects. If you touch the glass, clean
it with denatured alcohol and a clean
cloth.
Halogen headlight bulbs get very hot
when lit. Oil, perspiration, or a scratch
on the glass can cause the bulb to
overheat and shatter.
1. Open the hood.
If you need to change the head-
light bulb on the driver's side,
remove the air intake cover (see
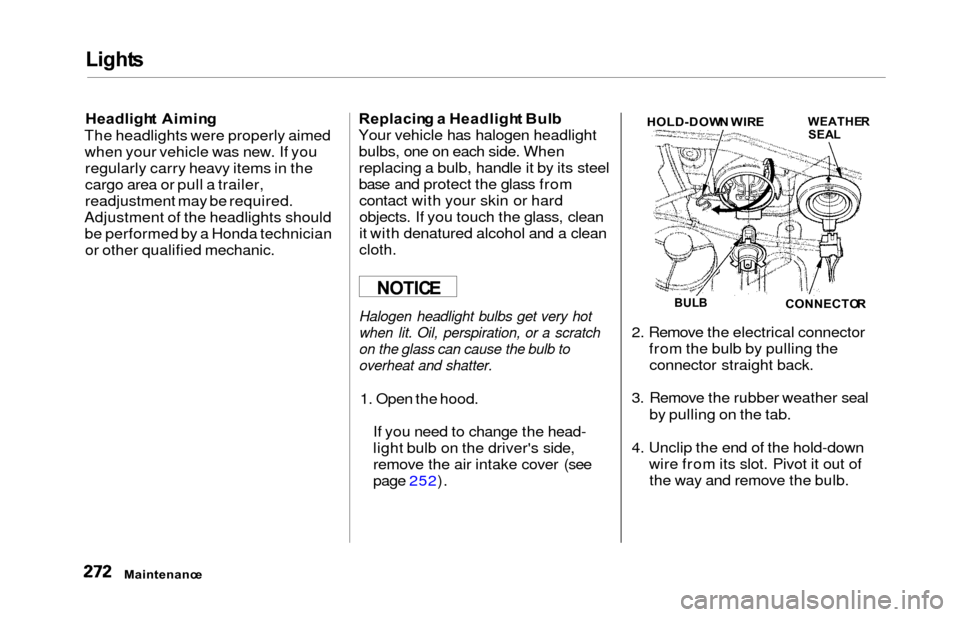
page 252). 2. Remove the electrical connector
from the bulb by pulling theconnector straight back.
3. Remove the rubber weather seal by pulling on the tab.
4. Unclip the end of the hold-down wire from its slot. Pivot it out ofthe way and remove the bulb.
Maintenanc e
NOTICEBULBCONNECTO R
WEATHERSEALHOLD-DOW N WIR E
Page 305 of 352
If You r Engin e Won' t Star t
Diagnosing why your engine won't
start falls into two areas, depending
on what you hear when you turn the
key to START (III):
You hear nothing, or almostnothing. The engine's starter
motor does not operate at all, or
operates very slowly.
You can hear the starter motor operating normally, or the starter
motor sounds like it is spinning
faster than normal, but the engine does not start up and run.
Nothin g Happen s o r th e Starte r
Moto r Operate s Ver y Slowl y
When you turn the ignition switch to START (III), you do not hear the
normal noise of the engine trying to
start. You may hear a clicking sound
or series of clicks, or nothing at all.
Check these things:
Your vehicle has the ImmobilizerSystem. You should use a
properly-coded master or valet key
to start the engine (see page 77).
A key that is not properly coded will cause the immobilizer systemindicator in the dash panel to blink
rapidly.
Check the transmission interlock.
The transmission must be in Park or Neutral or the starter will not
operate.
Turn the ignition switch to ON (II).
Turn on the headlights and checktheir brightness. If the headlightsare very dim or don't light at all,the battery is discharged. See
Jum p Startin g on page 303 .
Turn the ignition switch to START
(III). If the headlights do not dim,
check the condition of the fuses. If
the fuses are OK, there is proba-
bly something wrong with the electrical circuit for the ignition
switch or starter motor. You will
need a qualified technician to determine the problem. (See
Emergency Towing on page 317.)
If the headlights dim noticeably or
go out when you try to start the
engine, either the battery is dis-
charged or the connections are
corroded. Check the condition of
the battery and terminal connec-
tions (see page 257). You can then try jump starting the vehicle
from a booster battery (see page 303).
Takin g Car e o f th e Unexpecte d