Page 131 of 352
Interior Light s
Ignitio n Switc h Ligh t
The ignition switch light comes on when you open the driver's door, andstays on several seconds after you
close the door.
Instrument s an d Control s
Page 132 of 352

Comfort an d Convenienc e Feature s
The heating and air conditioning
systems in your Honda provide a
comfortable driving environment in
all weather conditions.
The standard audio system has
many features. This section de-
scribes those features and how to
use them. (If you selected an
optional audio system, refer to the
operating instructions that came
with it.)
On EX model
Your Honda has an anti-theft audio
system that requires a code number
to enable it.
Heating and Cooling...................... 130
What Each Control Does.......... 130How to Use the System............. 133
To Turn Everything Off........... 137
Climate Control System................ 138 (EX model without Navigation
System)
Fully-automatic Operation........ 140
Semi-automatic Operation........ 142
(EX model with Navigation
System)
Fully-automatic Operation........ 146
Semi-automatic Operation........ 147
Sunlight Sensor/ Temperature Sensor............. 151
Rear A/C Unit............................ 152
Audio System (LX)........................ 155 AM/FM/Cassette StereoAudio System......................... 155
Operating the Radio.................. 156
Adjusting the Sound.................. 159
Audio System Lighting............. 160
Operating the Cassette Player...................................... 160
Tape Search Functions............. 160 Operating the Optional CD
Player/Changer..................... 163
CD Changer Error Indications.............................. 166
Audio System (EX)........................ 167 AM/FM/CD Audio System..... 167Operating the Radio.................. 168
Adjusting the Sound.................. 172
Audio System Lighting............. 173 Radio Frequencies.................... . 173
Radio Reception......................... 173 Operating the CD Player.......... 175
Operating the CD Changer...... 177
Protecting Compact Discs........ 178 CD Player Error Indications..... 179
CD Changer Error Indications.............................. 180
Operating the Cassette Player..................................... . 181
Tape Search Functions............. 182
Caring for the Cassette Player...................................... 184
Remote Audio Controls ............ 185
Theft Protection........................ 186
Comfor t an d Convenienc e Feature s
Page 133 of 352

Heating an d Coolin g
On LX model
Proper use of the Heating and
Cooling system can make the
interior dry and comfortable, and
keep the windows clear for best
visibility.
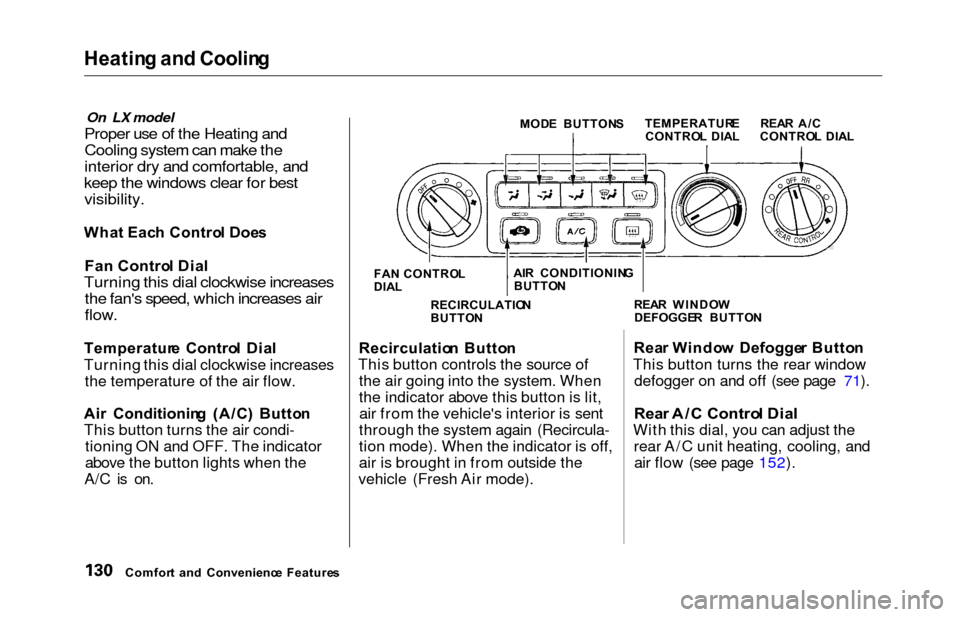
Wha t Eac h Contro l Doe s
Fa n Contro l Dia l
Turning this dial clockwise increases
the fan's speed, which increases air
flow.
Temperatur e Contro l Dia l
Turning this dial clockwise increases the temperature of the air flow.
Ai r Conditionin g (A/C ) Butto n
This button turns the air condi- tioning ON and OFF. The indicator
above the button lights when the
A/C is on.
MOD E BUTTON S
FA N CONTRO L
DIA L
Recirculatio n Butto n
This button controls the source of the air going into the system. When
the indicator above this button is lit,air from the vehicle's interior is sent
through the system again (Recircula-
tion mode). When the indicator is off,
air is brought in from outside the
vehicle (Fresh Air mode). Rea
r Windo w Defogge r Butto n
This button turns the rear window defogger on and off (see page 71).
Rea r A/ C Contro l Dia l
With this dial, you can adjust the
rear A/C unit heating, cooling, andair flow (see page 152).
Comfor t an d Convenienc e Feature s RECIRCULATIO
N
BUTTO N REA
R WINDO W
DEFOGGE R BUTTO N
TEMPERATUR
E
CONTRO L DIA L REA
R A/ C
CONTRO L DIA L
AI R CONDITIONIN G
BUTTO N
Page 137 of 352

Heating an d Coolin g
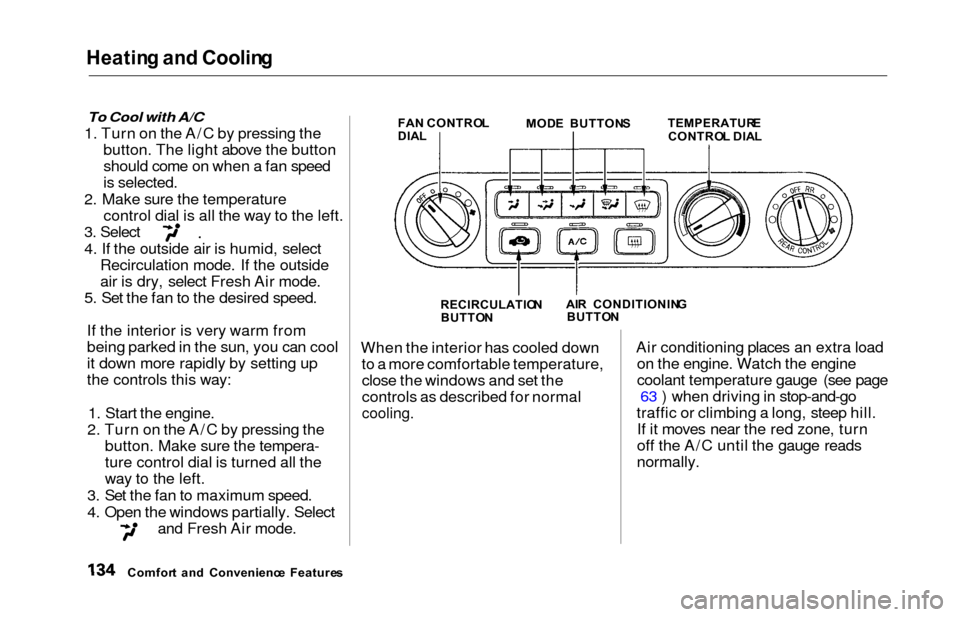
To Cool with A/C
1. Turn on the A/C by pressing the
button. The light above the button
should come on when a fan speed
is selected.
2. Make sure the temperature control dial is all the way to the left.
3. Select
4. If the outside air is humid, selectRecirculation mode. If the outside
air is dry, select Fresh Air mode.
5. Set the fan to the desired speed.
If the interior is very warm from
being parked in the sun, you can cool
it down more rapidly by setting up
the controls this way:
1. Start the engine.
2. Turn on the A/C by pressing the button. Make sure the tempera-
ture control dial is turned all the
way to the left.
3. Set the fan to maximum speed.
4. Open the windows partially. Select
and Fresh Air mode.
FA N CONTRO L
DIA L MOD
E BUTTON S TEMPERATUR ECONTROL DIA L
RECIRCULATIO N
BUTTO N AI
R CONDITIONIN G
BUTTO N
When the interior has cooled down
to a more comfortable temperature,close the windows and set the
controls as described for normal
cooling.
Air conditioning places an extra load on the engine. Watch the engine
coolant temperature gauge (see page 63 ) when driving in stop-and-go
traffic or climbing a long, steep hill. If it moves near the red zone, turn
off the A/C until the gauge reads
normally.
Comfor t an d Convenienc e Feature s
Page 143 of 352
Climate Contro l Syste m
EX model without Navigation System
Fully-automati c Operatio n
To put the Automatic Climate Control in fully-automatic mode,
press the AUTO button and set the
fan control dial to AUTO, then set the desired temperature by turning
the temperature control dial. You will see FULL AUTO in the system's
display. The light above the
button also shows you which
mode, Recirculation or Fresh Air, is
selected.
The system automatically selects the proper mix of conditioned and/or
heated air that will, as quickly as
possible, raise or lower the interior
temperature from its current level to
the set temperature.
TEMPERATUR ECONTROL DIA LFUL L AUT O
DISPLA YFAN CONTRO L DIA L
AUT O BUTTO N
Comfor t an d Convenienc e Feature s
OFF BUTTO N
Page 154 of 352
Climat
e Contro l Syste m
Sunligh t Sensor/Temperatur e
Senso r
The climate control system has two sensors. A sunlight sensor is located
in the top of the dashboard and a
temperature sensor is next to the steering column. Do not cover thesensors or spill any liquid on them.
TEMPERATUR
E SENSO R
Comfort an d Convenienc e Feature s
SUNLIGH
T SENSO R
Page 162 of 352

Audio Syste m
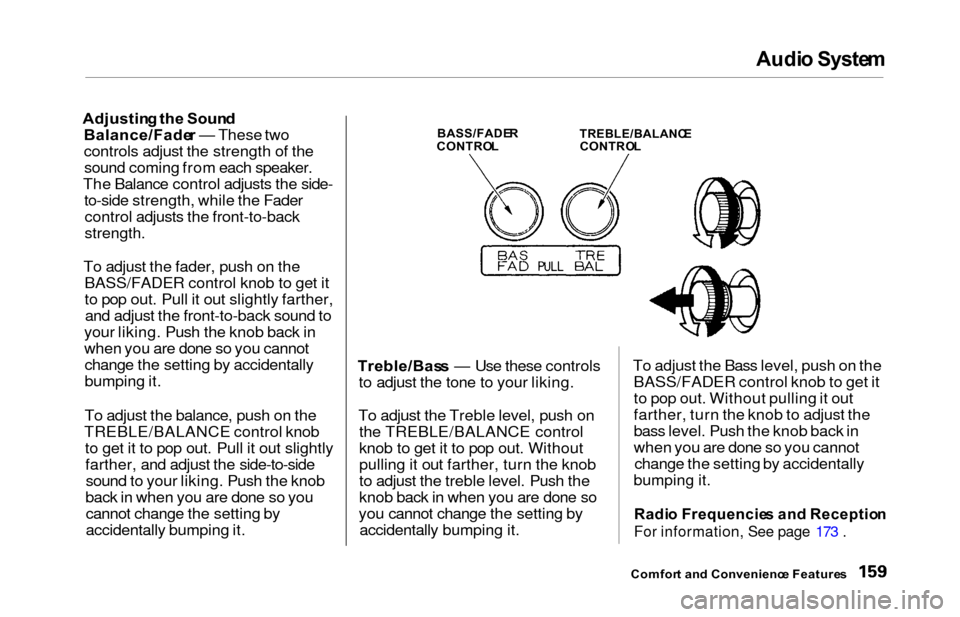
Adjustin g th e Soun d
Balance/Fade r — These two
controls adjust the strength of the sound coming from each speaker.
The Balance control adjusts the side- to-side strength, while the Fadercontrol adjusts the front-to-back
strength.
To adjust the fader, push on the BASS/FADER control knob to get it
to pop out. Pull it out slightly farther,and adjust the front-to-back sound to
your liking. Push the knob back in
when you are done so you cannot change the setting by accidentally
bumping it.
To adjust the balance, push on the
TREBLE/BALANCE control knob to get it to pop out. Pull it out slightlyfarther, and adjust the side-to-sidesound to your liking. Push the knob
back in when you are done so you cannot change the setting by
accidentally bumping it. Treble/Bas
s — Use these controls
to adjust the tone to your liking.
To adjust the Treble level, push on the TREBLE/BALANCE control
knob to get it to pop out. Without
pulling it out farther, turn the knob
to adjust the treble level. Push the
knob back in when you are done so
you cannot change the setting by accidentally bumping it. To adjust the Bass level, push on the
BASS/FADER control knob to get it
to pop out. Without pulling it out
farther, turn the knob to adjust the
bass level. Push the knob back in
when you are done so you cannotchange the setting by accidentally
bumping it.
Radi o Frequencie s an d Receptio n
For information, See page 173 .
Comfort an d Convenienc e Feature s
BASS/FADE R
CONTRO LTREBLE/BALANC ECONTROL
Page 163 of 352

Audio Syste m
Audio Syste m Lightin g
You can use the instrument panel brightness control knob to adjust theillumination of the audio system (see
page 67 ). The audio system illuminates when the parking lightsare on, even if the radio is turned off.
Operatin g th e Cassett e Playe r
Turn the audio system ON. Make sure the tape opening on the cassette
is facing to the right, then insert the cassette most of the way into the slot.
The system will pull it in the rest of the way, and begin to play.
The tape direction indicator will light to show you which side of the
cassette is playing. The indicatesthe side you inserted facing upward
is now playing. If you want to play
the other side, press the PROG
button. Dolby B noise reduction turns on
when you insert a cassette. If the tape was not recorded with Dolby B
noise reduction, turn it off by
pressing the button.
When the system reaches the end of
the tape, it will automatically reversedirection and play the other side. If
you want to remove the cassette from the drive, press the EJECT
button.
Tap e Searc h Function s
With a cassette playing, you can use the FF, REW, SKIP, or REPEAT
function to find a desired program.
FF/RE W — Fast Forward and Re-
wind move the tape rapidly. To re-
wind the tape, push the REW button.
You will see REW in the display. To fast forward the tape, push the FF
button. You will see FF displayed. Press the PLAY button to take the
system out of rewind or fast forward. If the system reaches the end of the
tape while in fast forward or rewind,
it automatically stops that function,
reverses direction, and begins to play.
SKI P — The Skip Function allows
you to find the beginning of a song or passage. To find the beginning of
the song or passage currently
playing, push the SKIP switch down.
You will see REW flashing in the display as the tape rewinds. To find
the beginning of the next song, push
the SKIP switch up. You will see FF
flashing in the display as the tape
fast forwards. When the system
finds the beginning of a song or
passage, it goes back to PLAY mode.
Comfor t an d Convenienc e Feature s