Page 74 of 352
Controls Nea r th e Steerin g Whee l
Rear Windo w Defogge r
The rear window defogger will clear fog, frost, and thin ice from the
window. Push the defogger button to turn it on and off. The light above
the button lights to show the defogger is on. If you do not turn it
off, the defogger will shut itself off
after about 15 minutes. It also shuts off when you turn off the ignition.
You have to turn it on again when you restart the vehicle. Make sure the rear window is clear
and you have good visibility before
starting to drive.
The defogger wires on the inside of the rear window can be accidentallydamaged. When cleaning the glass,
always wipe side to side.
Instrument s an d Control s
E
X mode l
LX mode l
Page 75 of 352
Controls Nea r th e Steerin g Whee l
Steerin g Whee l Adjustmen t
See page 19 for important safety
information about how to properly
position the steering wheel.
Make any steering wheel adjustment
before you start driving.
To adjust the steering wheel upwardor downward:
1. Push the lever under the steering column all the way down.
2. Move the steering wheel to the desired position, making sure the
wheel points toward your chest, not toward your face. Make sure
you can see the instrument panel gauges and the indicator lights. 3. Push the lever up to lock the
steering wheel in that position.
4. Make sure you have securely locked the steering wheel in place
by trying to move it up and down.
Instrument s an d Control s
Adjusting the steering wheel
position while driving may
cause you to lose control of the
vehicle and be seriously injured in a crash.
Adjust the steering wheel only
when the vehicle is stopped.
Page 76 of 352

Steering Whee l Control s
Cruise Contro l
Cruise control allows you to maintain
a set speed above 25 mph (40 km/h)
without keeping your foot on the accelerator pedal. It should be used for cruising on straight, open
highways. It is not recommended for conditions such as city driving,
winding roads, slippery roads, heavy rain, or bad weather. You should
have full control of the vehicle under
those conditions.Using the Cruise Control
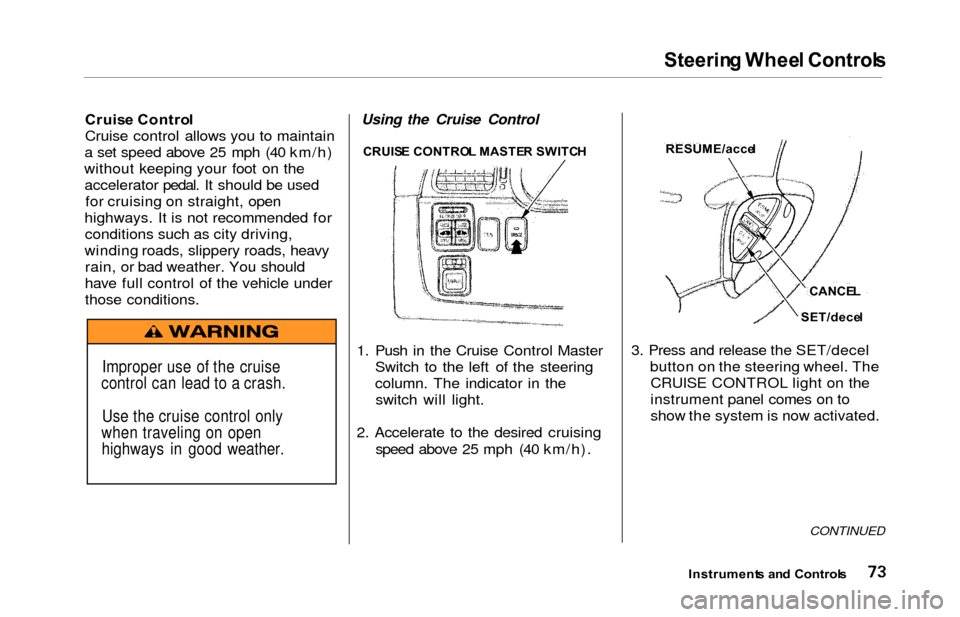
1. Push in the Cruise Control Master Switch to the left of the steering
column. The indicator in theswitch will light.
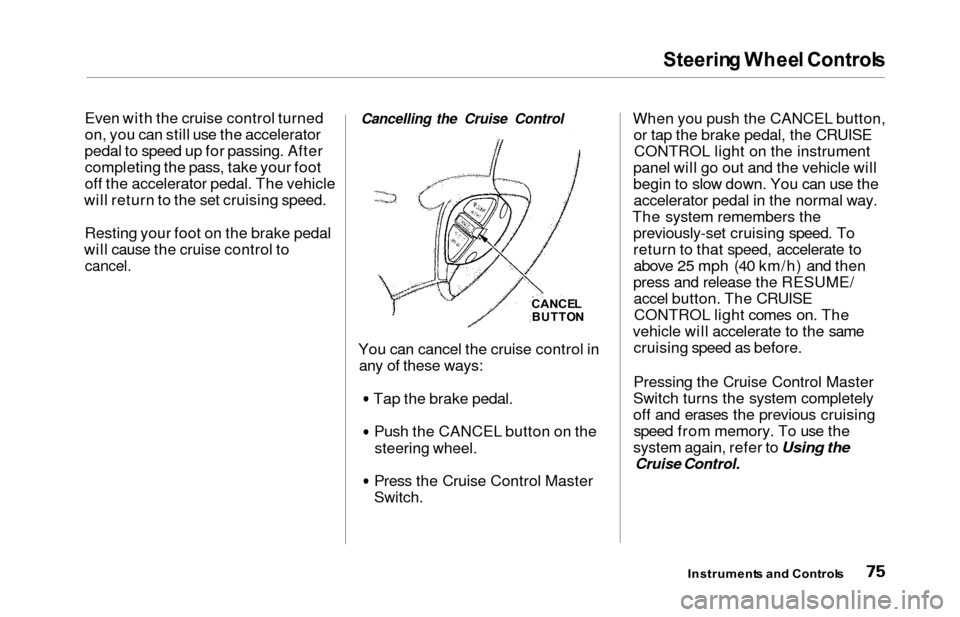
2. Accelerate to the desired cruising speed above 25 mph (40 km/h). 3. Press and release the SET/decel
button on the steering wheel. TheCRUISE CONTROL light on the
instrument panel comes on to
show the system is now activated.
CONTINUED
Instrument s an d Control s
Improper use of the cruise
control can lead to a crash.
Use the cruise control only
when traveling on open highways in good weather.
CRUIS E CONTRO L MASTE R SWITC HRESUME/acce l
CANCEL
SET/dece l
Page 77 of 352

Steering Whee l Control s
The cruise control may not hold the
set speed when you are going up and
down hills. If your speed increases
going down a hill, use the brakes to slow down to the desired speed. This
will cancel the cruise control. To resume the set speed, press theRESUME/accel button. The
CRUISE CONTROL light on the
instrument panel comes on.
When climbing a steep hill, the automatic transmission maydownshift to hold the set speed.Changing the Set Speed
You can increase the set cruising speed in any of these ways:
Press and hold the RESUME/
accel button. The vehicle will
accelerate. When you reach thedesired cruising speed, release the
button.
Push on the accelerator pedal. Ac-
celerate to the desired cruising
speed and press the SET/decel
button.
To increase your speed in very small amounts, tap the RESUME/accel button repeatedly. Each time
you do this, your vehicle will speed up about 1 mph (1.6 km/h). You can decrease the set cruising
speed in any of these ways:
Press and hold the SET/decel
button. The vehicle will decelerate. Release the button when you
reach the desired speed.
To slow down in very small amounts, tap the SET/decel
button repeatedly. Each time you do this, your vehicle will slow
down about 1 mph (1.6 km/h).
Tap the brake pedal lightly with your foot. The CRUISE CONTROL light on the instru-
ment panel will go out. When the
vehicle slows to the desired speed, press the SET/decel button. The
vehicle will then maintain the desired speed.
Instrument s an d Control s
Page 78 of 352

Steering Whee l Control s
Even with the cruise control turned
on, you can still use the accelerator
pedal to speed up for passing. After completing the pass, take your foot
off the accelerator pedal. The vehicle
will return to the set cruising speed.
Resting your foot on the brake pedal
will cause the cruise control to
cancel.
Cancelling the Cruise Control
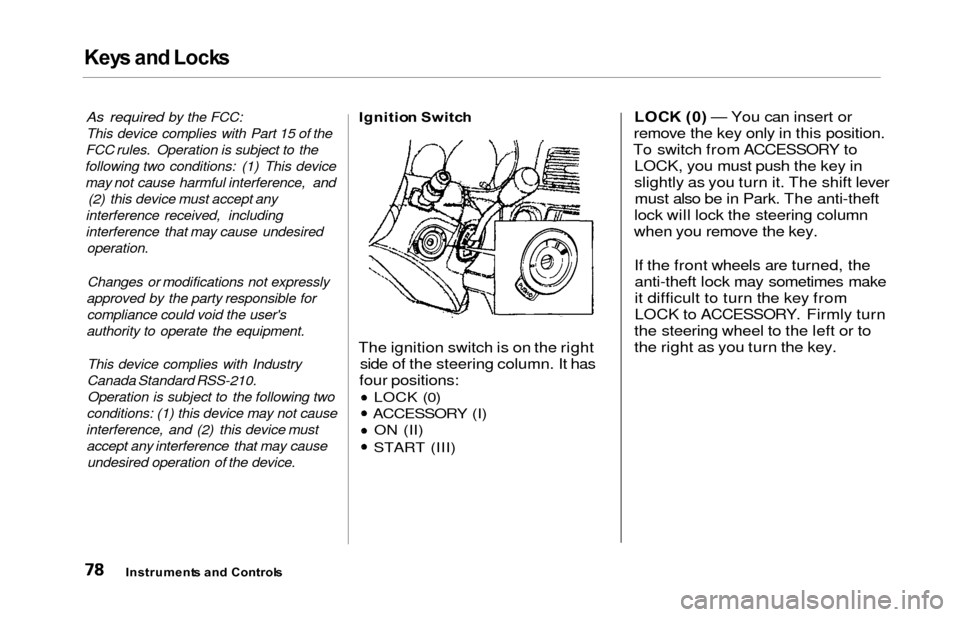
You can cancel the cruise control in any of these ways:
Tap the brake pedal.Push the CANCEL button on the
steering wheel.
Press the Cruise Control Master
Switch.
When you push the CANCEL button,or tap the brake pedal, the CRUISECONTROL light on the instrument
panel will go out and the vehicle will
begin to slow down. You can use the accelerator pedal in the normal way.
The system remembers the previously-set cruising speed. To
return to that speed, accelerate toabove 25 mph (40 km/h) and then
press and release the RESUME/ accel button. The CRUISECONTROL light comes on. The
vehicle will accelerate to the same cruising speed as before.
Pressing the Cruise Control Master
Switch turns the system completely
off and erases the previous cruising speed from memory. To use the
system again, refer to Using the
Cruise Control.
Instrument s an d Control s
CANCEL
BUTTO N
Page 80 of 352

Keys an d Lock s
These keys contain electronic
circuits that are activated by the
Immobilizer System. They will not
work to start the engine if the circuits are damaged.
Protect the keys from directsunlight, high temperature, and
high humidity.
Do not drop the keys or set heavy
objects on them.
Keep the keys away from liquids.
If they get wet, dry them immedi-
ately with a soft cloth.
The keys do not contain batteries. Do not try to take them apart.
Remote Transmitter
Some models also come with a
remote transmitter; see page 81 for
an explanation of its operation. Immobilize
r Syste m
The Immobilizer System protects
your vehicle from theft. A properly- coded master or valet key must be
used in the ignition switch for theengine to start. If an improperly-
coded key (or other device) is used,
the engine's fuel system is disabled.
When you turn the ignition switch to ON (II), the Immobilizer System
indicator should come on for a few seconds, then go out. If the indicator
starts to blink, it means the system
does not recognize the coding of the
key. Turn the ignition switch to LOCK (0), remove the key, reinsert
it, and turn the switch to ON (II)
again.
The system may not recognize your key's coding if another immobilizer
key or other metal object is near the ignition switch when you insert the
key. To make sure the system recognizes the key code: Do not keep other immobilizer
keys on the same key ring.
Use a plastic or leather key fob,
not metal.
Keep other keys away from your
vehicle's key and the ignition switch while trying to start the
engine.
If the system repeatedly does not
recognize the coding of your key,
contact your Honda dealer.
This indicator will also blink several
times when you turn the ignitionswitch from ON (II) to ACCESSORY (I) or LOCK (0).
Do not attempt to alter this system
or add other devices to it. Electrical
problems could result that may make
your vehicle undriveable. If you have lost your key and you
cannot start the engine, contact your
Honda dealer.
Instrument s an d Control s
CONTINUED
Page 81 of 352

Keys an d Lock s
As required by the FCC:
This device complies with Part 15 of the
FCC rules. Operation is subject to the
following two conditions: (1) This device may not cause harmful interference, and (2) this device must accept any
interference received, including
interference that may cause undesired operation.
Changes or modifications not expressly
approved by the party responsible for compliance could void the user's
authority to operate the equipment.
This device complies with Industry
Canada Standard RSS-210.
Operation is subject to the following two
conditions: (1) this device may not cause
interference, and (2) this device must accept any interference that may cause undesired operation of the device.
Ignitio n Switc h
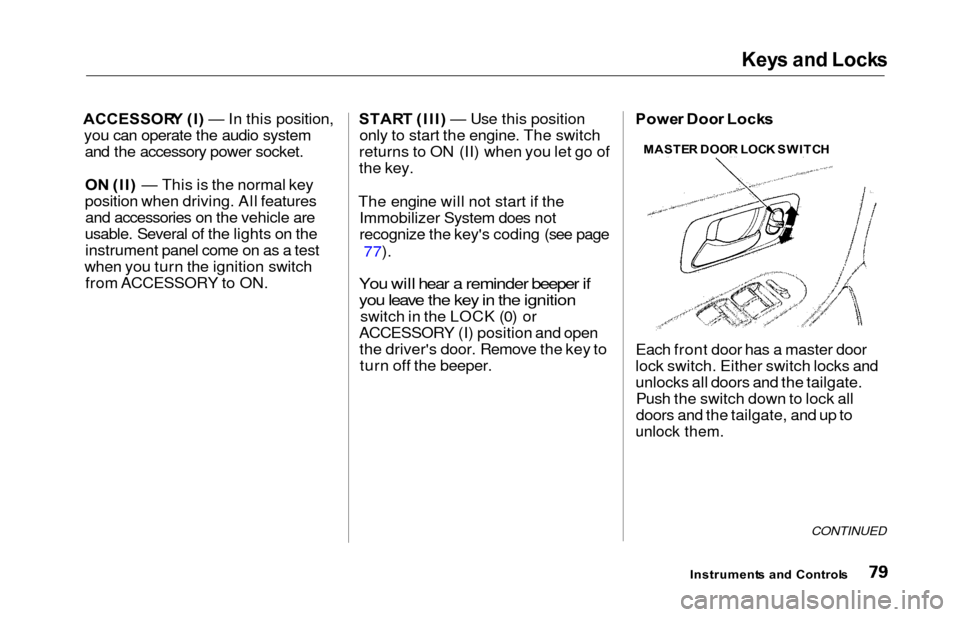
The ignition switch is on the right
side of the steering column. It has
four positions:
LOCK (0)
ACCESSORY (I) ON (II)
START (III)
LOC K (0 ) — You can insert or
remove the key only in this position.
To switch from ACCESSORY to LOCK, you must push the key in
slightly as you turn it. The shift levermust also be in Park. The anti-theft
lock will lock the steering column
when you remove the key.
If the front wheels are turned, theanti-theft lock may sometimes make
it difficult to turn the key from
LOCK to ACCESSORY. Firmly turn
the steering wheel to the left or to
the right as you turn the key.
Instrument s an d Control s
Page 82 of 352

Keys an d Lock s
ACCESSOR Y (I ) — In this position,
you can operate the audio system and the accessory power socket.
O N (II ) — This is the normal key
position when driving. All features and accessories on the vehicle are
usable. Several of the lights on the instrument panel come on as a test
when you turn the ignition switch from ACCESSORY to ON. STAR
T (III ) — Use this position
only to start the engine. The switch
returns to ON (II) when you let go of
the key.
The engine will not start if the Immobilizer System does not
recognize the key's coding (see page
77).
You will hear a reminder beeper if
you leave the key in the ignition
switch in the LOCK (0) or
ACCESSORY (I) position and open the driver's door. Remove the key toturn off the beeper. Powe
r Doo r Lock s
Each front door has a master door
lock switch. Either switch locks and
unlocks all doors and the tailgate. Push the switch down to lock all
doors and the tailgate, and up to
unlock them.
CONTINUED
Instrument s an d Control s
MASTE
R DOO R LOC K SWITC H