2000 HONDA ODYSSEY light
[x] Cancel search: lightPage 84 of 352
Keys an d Lock s
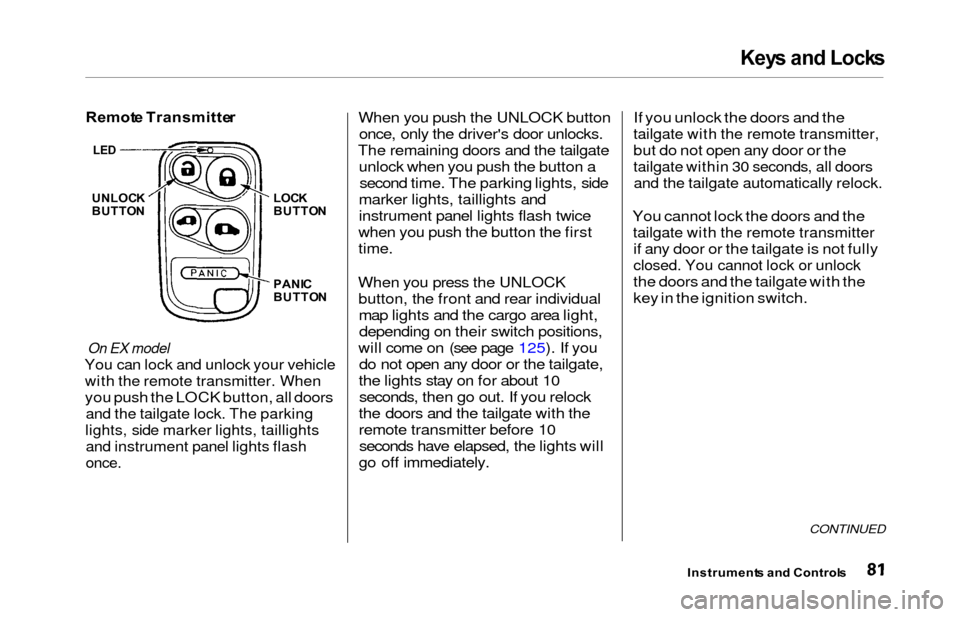
Remot e Transmitte r
On EX model
You can lock and unlock your vehicle
with the remote transmitter. When
you push the LOCK button, all doors
and the tailgate lock. The parking
lights, side marker lights, taillights
and instrument panel lights flash
once.
When you push the UNLOCK button
once, only the driver's door unlocks.
The remaining doors and the tailgate unlock when you push the button asecond time. The parking lights, side
marker lights, taillights and
instrument panel lights flash twice
when you push the button the first
time.
When you press the UNLOCK button, the front and rear individualmap lights and the cargo area light,depending on their switch positions,
will come on (see page 125). If you do not open any door or the tailgate,
the lights stay on for about 10 seconds, then go out. If you relock
the doors and the tailgate with the
remote transmitter before 10 seconds have elapsed, the lights will
go off immediately. If you unlock the doors and the
tailgate with the remote transmitter,
but do not open any door or the
tailgate within 30 seconds, all doors
and the tailgate automatically relock.
You cannot lock the doors and the
tailgate with the remote transmitter
if any door or the tailgate is not fully
closed. You cannot lock or unlock
the doors and the tailgate with the
key in the ignition switch.
CONTINUED
Instrument
s an d Control s
UNLOCK
BUTTO N LOC
K
BUTTO N
PANI C
BUTTO N
LED
Page 85 of 352
Keys an d Lock s
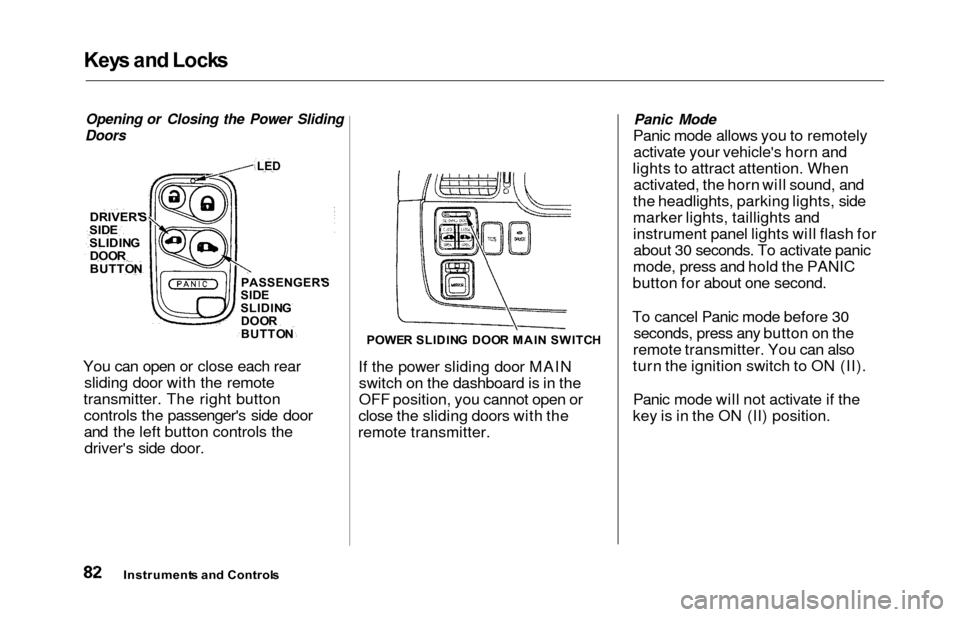
Opening or Closing the Power Sliding
Doors
You can open or close each rear sliding door with the remote
transmitter. The right button controls the passenger's side door
and the left button controls thedriver's side door.
POWE R SLIDIN G DOO R MAI N SWITC H
If the power sliding door MAIN
switch on the dashboard is in the
OFF position, you cannot open or
close the sliding doors with the
remote transmitter.
Panic Mode
Panic mode allows you to remotely activate your vehicle's horn and
lights to attract attention. When activated, the horn will sound, and
the headlights, parking lights, side
marker lights, taillights and
instrument panel lights will flash for about 30 seconds. To activate panic
mode, press and hold the PANIC
button for about one second.
To cancel Panic mode before 30 seconds, press any button on the
remote transmitter. You can also
turn the ignition switch to ON (II).
Panic mode will not activate if the
key is in the ON (II) position.
Instrument s an d Control s
DRIVER'
S
SIDESLIDIN G
DOO R
BUTTO NPASSENGER' S
SID E
SLIDIN G
DOO R
BUTTO N
LED
Page 98 of 352

HomeLink Universa l Transmitte r
On EX model
The HomeLink Universal
Transmitter built into your vehicle
can be programmed to operate
remotely controlled devices around
your home, such as garage doors, lighting, or home security systems.
It can replace up to three remote
transmitters.
Custome r Assistanc e
If you have problems with training
the HomeLink Universal Transmitter,
or would like information on home
products that can be operated by the
transmitter, call (800) 355-3515. On
the internet, go to
www.homelink.jci.com.
Importan t Safet y Precaution s
Always refer to the operating
instructions and safety information
that came with your garage door
opener or other equipment you
intend to operate with the HomeLink Universal Transmitter.
If you do not have this information,
you should contact the
manufacturer of the equipment.
While training or using the transmitter, make sure you have a
clear view of the garage door or
gate, and that no one will be injured
by its movement.
Genera l Informatio n
If you are training the transmitter to
operate a garage door or gate, it is
recommended that you unplug the
motor for that device during
training. Repeatedly pressing the
remote control button could burn
out the motor.
The HomeLink transmitter stores the code in a permanent memory.
There should be no need to retrain
the transmitter if your vehicle's
battery goes dead or is
disconnected.
If your garage door opener was manufactured before April 1982,
you may not be able to program the
HomeLink Universal Transmitter tooperate it. Garage door openers
manufactured before that date do
not have a safety feature that
causes them to stop and reverse ifan obstacle is detected during
closing, increasing the risk of injury. If you have questions, call(800) 355-3515.
Trainin g th e Transmitte r
Before you can use the HomeLink
Universal Transmitter to operate devices around your home, it must
"learn" the proper codes. For
example, to train the transmitter to
open and close the garage door:
CONTINUED
Instrument s an d Control s
Page 99 of 352
HomeLink Universa l Transmitte r
Before you begin — If you just took
delivery of your vehicle and have
not trained any of the buttons in the
HomeLink transmitter before, you should erase any previously learned
codes before training the first
button. To do this, press and hold the two outside buttons on the
HomeLink transmitter until the red light flashes. Release the buttons,
then proceed to Step 1.
If you are training the second or
third buttons, go directly to Step 1. 1. Unplug the garage door opener motor from the house current.
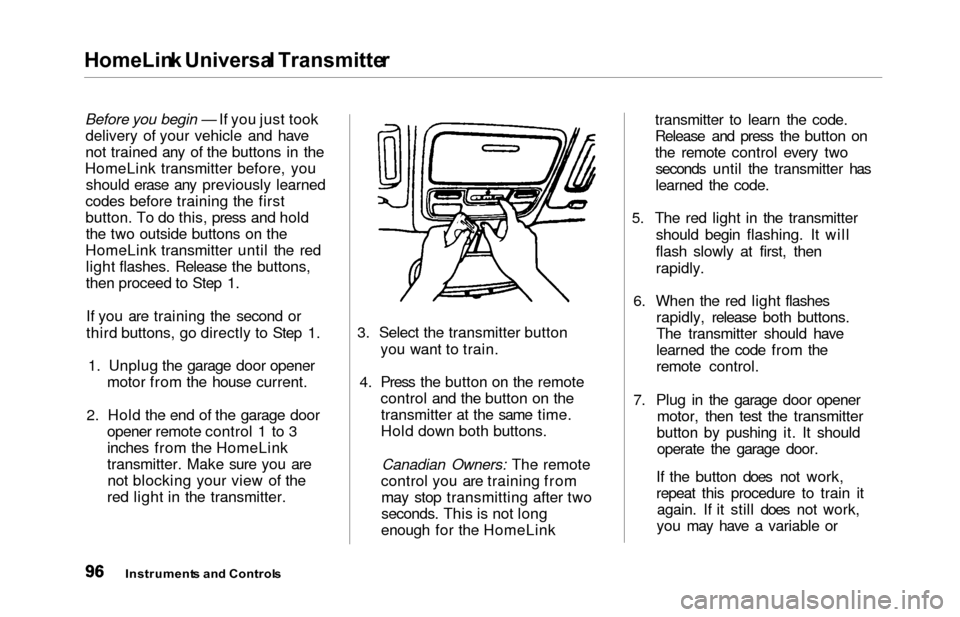
2. Hold the end of the garage door opener remote control 1 to 3
inches from the HomeLink
transmitter. Make sure you arenot blocking your view of the
red light in the transmitter. 3. Select the transmitter button
you want to train.
4. Press the button on the remote control and the button on thetransmitter at the same time.
Hold down both buttons.
Canadian Owners: The remote
control you are training from may stop transmitting after two
seconds. This is not long
enough for the HomeLink transmitter to learn the code.
Release and press the button on
the remote control every two
seconds until the transmitter has
learned the code.
5. The red light in the transmitter should begin flashing. It will
flash slowly at first, then
rapidly.
6. When the red light flashes rapidly, release both buttons.
The transmitter should have
learned the code from the
remote control.
7. Plug in the garage door opener motor, then test the transmitter
button by pushing it. It should operate the garage door.
If the button does not work,
repeat this procedure to train it again. If it still does not work,
you may have a variable or
Instrument s an d Control s
Page 100 of 352
HomeLink Universa l Transmitte r
rolling code garage door
opener. Test this by pressing
and holding the HomeLink
transmitter button you just
trained. If the red light blinks
for two seconds, then stays on,
you have a rolling code garage
door opener. You may be able
to verify this with the
manufacturer's documentation.
Go to "Training With a Rolling
Code System."
8. Repeat these steps to train the other two transmitter buttons tooperate any other remotely-
controlled devices around your
home (lighting, automatic gate, security system, etc.).
Trainin g Wit h a Rollin g Cod e
Syste m
For security purposes, newer
garage door opening systems use a
"rolling" or variable code.
Information from the remote control and the garage door opener
are needed before the HomeLink
transmitter can operate the garage
door opener. The "Training the
Transmitter" procedure trains the
HomeLink transmitter to the proper garage door opener code. The
following procedure synchronizes the HomeLink transmitter to the
garage door opener so they sendand receive the correct codes.
It may be helpful to have someone assist you with this procedure.
1. Make sure you have properly completed the "Training the
Transmitter" procedure.
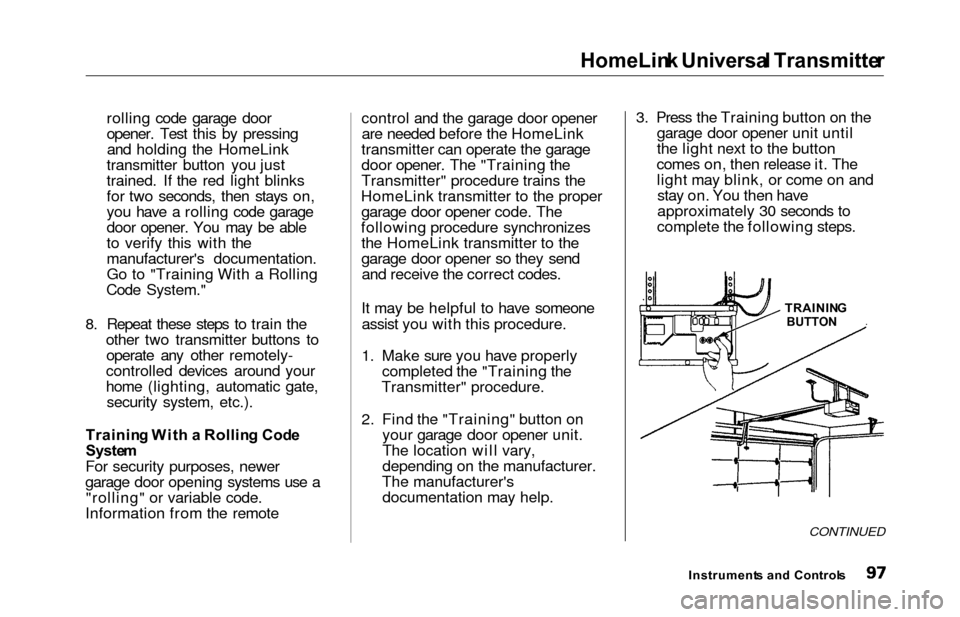
2. Find the "Training" button on your garage door opener unit.
The location will vary,
depending on the manufacturer.
The manufacturer's documentation may help. 3. Press the Training button on the
garage door opener unit until
the light next to the button
comes on, then release it. The light may blink, or come on andstay on. You then have
approximately 30 seconds to
complete the following steps.
CONTINUED
Instrument s an d Control s
TRAININ
G
BUTTON
Page 101 of 352

HomeLink Universa l Transmitte r
4. Press and release the button on
the HomeLink transmitter. (Thesame button you trained with
the "Training the Transmitter"
procedure.)
5. Press and release the HomeLink transmitter buttonagain. This should turn off the
training light on the garage door opener unit. (Somesystems may require you to
press and release the button up
to three times.)
6. Press the transmitter button again. It should operate the
garage door.
Retrainin g a Butto n
To train an already programmed
transmitter button to operate a new
device:
1. Select the transmitter button you want to train. 2. Press and hold the transmitter
button until the red light begins
to flash slowly (approximately
20 seconds).
3. While continuing to hold the transmitter button, place the
remote control for the device 1
to 3 inches from the HomeLink
transmitter.
4. Press and hold the button on the remote control. Hold both
buttons until the red light
begins to flash rapidly.
5. Release both buttons. The transmitter should now be
trained to operate the device.
Erasin g Code s
To erase the codes stored in all three buttons, press and hold the
two outside buttons until the redlight begins to flash, then release
the buttons. You should erase all three codes
before selling the vehicle.
As required by the FCC:
This device complies with Part 15
of the FCC rules. Operation is
subject to the following two
conditions: (1) This device may not
cause harmful interference, and (2)
this device must accept any
interference received, including
interference that may cause
undesired operation.
Changes or modifications not
expressly approved by the party
responsible for compliance could
void the user's authority to operate
the equipment.
This device complies with IndustryCanada Standard RSS-210.Operation is subject to the
following two conditions: (1) this
device may not cause interference,
and (2) this device must accept any
interference that may cause
undesired operation of the device.
Instrument s an d Control s
Page 111 of 352
Seats
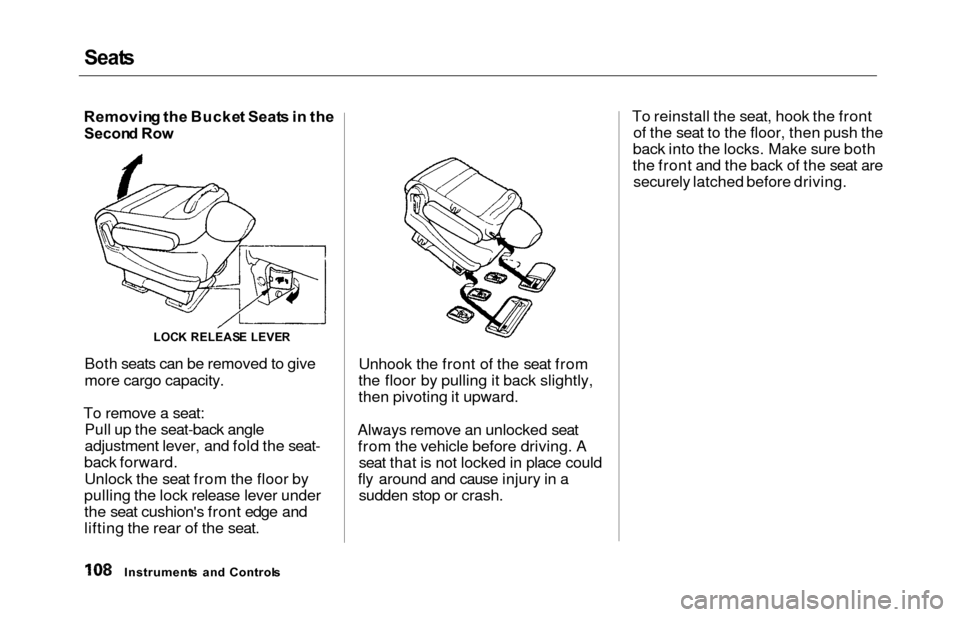
Removin g th e Bucke t Seat s in th e
Secon d Ro w
Both seats can be removed to give
more cargo capacity.
To remove a seat: Pull up the seat-back angle
adjustment lever, and fold the seat-
back forward.
Unlock the seat from the floor by
pulling the lock release lever under
the seat cushion's front edge and
lifting the rear of the seat. Unhook the front of the seat from
the floor by pulling it back slightly,
then pivoting it upward.
Always remove an unlocked seat from the vehicle before driving. A seat that is not locked in place could
fly around and cause injury in a sudden stop or crash. To reinstall the seat, hook the front
of the seat to the floor, then push the
back into the locks. Make sure both
the front and the back of the seat are securely latched before driving.
Instrument s an d Control s
LOCK RELEAS E LEVE R
Page 116 of 352

Power Window s
The master control panel also con-
tains these extra features:
AUT O — To open the driver's
window fully, push the window switch firmly down and release it.
The window automatically goes all the way down. To stop the window
from going all the way down, pull
back on the window switch briefly.
To open the driver's window only partially, push the window switchdown lightly and hold it The window
will stop as soon as you release the
switch.
The AUTO function only works to lower the driver's window. To raise
the window, you must pull back on
the window switch and hold it until
the window reaches the desired
position.
The MAIN switch controls power tothe front passenger's window and
the rear power windows. With thisswitch off, the front passenger's
window cannot be raised or lowered and the rear windows cannot beopened or closed. The MAIN switch
does not affect the driver's window.
Keep the MAIN switch off when you
have children in the vehicle so they do not injure themselves by
operating the windows
unintentionally.
CONTINUED
Instrument s an d Control s
Closing a power window on
someone's hands or fingers can
cause serious injury.
Make sure your passengers are
away from the windows before
closing them.