Page 119 of 352
Mirrors, Parkin g Brak e
HEATE D MIRRO R BUTTO N
Canadian Models
The outside mirrors are heated to re-
move fog and frost. With the ignitionswitch ON (II), turn on the heaters
by pressing the button. The light in
the button comes on as a reminder. Press the button again to turn the
heaters off.
Parkin g Brak e
PARKIN G BRAK E PEDA L
To apply the parking brake, push the
parking brake pedal down with your
foot. To release the parking brake,push on the pedal again. The parking
brake light on the instrument panel should go out when the parking
brake is fully released with the engine running, (see page 58.)
Driving the vehicle with the parking
brake applied can damage the rear
brakes and axles.
Instrument s an d Control s
NOTICE
Page 121 of 352
Center Table , Beverag e Holde r
Sitting on or getting under the table,
or putting heavy objects on the table,
may damage or deform it.
Do not put any items on the table
while driving. They may fall down or
fly around when you go around corners or brake hard. The center table can be extended by
pulling on the rear. Beverag
e Holde r
To use the front beverage holder, pull on the bottom edge. Push the
holder all the way in to close it.
Instrument s an d Control s
Page 191 of 352

Break-i
n Period , Gasolin e
Break-i n Perio d
Help assure your vehicle's future
reliability and performance by paying
extra attention to how you drive
during the first 600 miles (1,000 km).
During this period: Avoid full-throttle starts and rapid
acceleration.
Avoid hard braking. New brakes need to be broken-in by moderate
use for the first 200 miles (300
km). You should follow these same re-
commendations with an overhauled
or exchanged engine, or when the
brakes are replaced.
We also recommend that you should not tow a trailer during the first 500
miles (800 km). Gasoline
Your Honda is designed to operate on unleaded gasoline with a pump
octane number of 86 or higher. Use
of a lower octane gasoline can cause
a persistent, heavy metallic rapping
noise in the engine that can lead to
mechanical damage.
We recommend gasolines containing detergent additives that help prevent
fuel system and engine deposits.
Using gasoline containing lead will
damage your vehicle's emissions
controls. This contributes to air
pollution.
Befor e Drivin g
Page 193 of 352

Service Statio n Procedure s
3. Remove the fuel fill cap slowly.
You may hear a hissing sound aspressure inside the tank escapes.
Place the cap in the holder on the
fuel fill door.
4. Stop filling the tank after the fuel nozzle automatically clicks off. Do
not try to "top off" the tank, leavesome room for the fuel to expand
with temperature changes.
5. Screw the fuel fill cap back on, tighten it until it clicks several
times. If you do not properly
tighten the cap, the Malfunction
Indicator Lamp may come on (seepage 309 ).
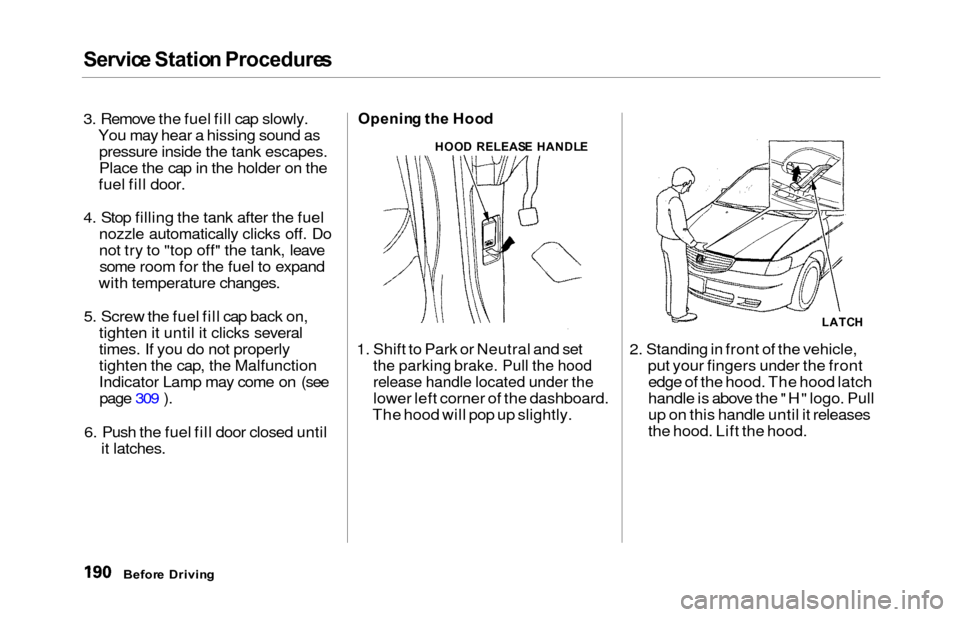
6. Push the fuel fill door closed until it latches.Openin g th e Hoo d
1. Shift to Park or Neutral and set
the parking brake. Pull the hood
release handle located under the
lower left corner of the dashboard.
The hood will pop up slightly. 2. Standing in front of the vehicle,
put your fingers under the frontedge of the hood. The hood latch
handle is above the "H" logo. Pull
up on this handle until it releases
the hood. Lift the hood.
Befor e Drivin g
HOOD RELEAS E HANDL E
LATCH
Page 198 of 352

Accessorie
s an d Modification s
Modifying your vehicle, or installing
some non-Honda accessories, can
make your vehicle unsafe. Before
you make any modifications or add any accessories, be sure to read the
following information.
Accessorie s
Your dealer has Genuine Honda accessories that allow you to
personalize your vehicle. These accessories have been designed and
approved for your vehicle, and are
covered by warranty.
Non-Honda accessories are usually
designed for universal applications.
Although aftermarket accessories may fit on your vehicle, they may not
meet factory specifications, andcould adversely affect your vehicle's
handling and stability. (See "Modifications" on page 196 for
additional information.) When properly installed, cellular
phones, alarms, two-way radios, and
low-powered audio systems should
not interfere with your vehicle's
computer-controlled systems, such
as the SRS and anti-lock brake
system.
However, if electronic accessories
are improperly installed, or exceed
your vehicle's electrical system capacity, they can interfere with the operation of your vehicle, or even
cause the airbags to deploy.
Before installing any accessory:
Make sure the accessory does notobscure any lights, or interfere
with proper vehicle operation or performance.
Be sure electronic accessories do
not overload electrical circuits (see page 311). Have the installer contact your
Honda dealer for assistance before
installing any electronic accessory.
If possible, have your dealer inspect
the final installation.
Before Drivin g
Improper accessories or
modifications can affect your
vehicle's handling, stability and performance, and cause a
crash in which you can be hurt
or killed.
Follow all instructions in this
owner's manual regarding
accessories and modifications.
Page 199 of 352

Accessories an d Modification s
Modification s
Do not remove any original
equipment or modify your vehicle in
any way that would alter its design or
operation. This could make your
vehicle unsafe and illegal to drive.
For example, do not make any
modifications that would change the
ride height of your vehicle, or install
wheels and tires with a different overall diameter.
Such modifications can adversely
affect handling, and interfere with
the operation of the vehicle's anti-
lock brakes and other systems. In addition, any modifications that
decrease ground clearance increase
the chance of undercarriage parts striking a curb, speed bump, or other
raised object, which could cause
your airbags to deploy.
Do not modify your steering wheel
or any other part of your
Supplemental Restraint System. Modifications could make the
system ineffective. Additiona
l Safet y Precautio n
Do not attach or place objects on the
airbag covers. Any object attached to
or placed on the covers marked "SRS
AIRBAG," in the center of the steering wheel and on top of the
dashboard, could interfere with the
proper operation of the airbags. Or,
if the airbags inflate, the objects
could be propelled inside the vehicle and hurt someone.
Befor e Drivin g
Page 204 of 352

Drivin
g
This section gives you tips on starting the engine under various
conditions, and how to operate the
automatic transmission. It also
includes important information on
parking your vehicle, the braking system, the Traction Control System,
and facts you need if you are
planning to tow a trailer. Preparing to Drive......................... 202
Starting the Engine........................ 203
Starting in Cold Weatherat High Altitude..................... 203
Automatic Transmission............... 204 Shift Lever Position Indicator.. 204
Shift Lever Positions................. 205
Engine Speed Limiter............... 207
Shift Lock Release..................... 207
Parking............................................ 209
The Braking System...................... 210 Brake Wear Indicators.............. 210
Brake System Design................ 211
Anti-lock Brakes........................ 211
Important SafetyReminders.......................... 212
ABS Indicator......................... 212
Traction Control System............... 213 TCS ON/OFF Switch................ 214TCS Indicator............................. 215
Driving in Bad Weather................ 216
Towing a Trailer............................ 218
Driving
Page 206 of 352

Starting th e Engin e
1. Apply the parking brake.
2. In cold weather, turn off all electrical accessories to reduce
the drain on the battery.
3. Make sure the shift lever is in Park. Press on the brake pedal.
4. Without touching the accelerator pedal, turn the ignition key to the
START (III) position. If the engine does not start right away, do not
hold the key in START (III) for
more than 15 seconds at a time.
Pause for at least 10 seconds before trying again.
5. If the engine does not start within 15 seconds, or starts but stalls
right away, repeat step 4 with the
accelerator pedal pressed half-way
down. If the engine starts, release
pressure on the accelerator pedal so the engine does not race. 6. If the engine still does not start,
press the accelerator pedal all the
way down and hold it there while starting in order to clear flooding.
As before, keep the ignition key in the START (III) position for nomore than 15 seconds. Return tostep 5 if the engine does not start.
If it starts, lift your foot off the
accelerator pedal so the engine does not race.
Startin g in Col d Weathe r a t Hig h
Altitud e (Abov e 8,00 0 feet /
2,400 meters )
An engine is harder to start in cold
weather. The thinner air found athigh altitude above 8,000 feet (2,400
meters) adds to the problem.
Use the following procedure:
1. Turn off all electrical accessories to reduce the drain on the battery. 2. Push the accelerator pedal half-
way to the floor and hold it there
while starting the engine. Do nothold the ignition key in START(III) for more than 15 seconds.
When the engine starts, release the accelerator pedal gradually as
the engine speeds up and smoothsout.
3. If the engine fails to start in step 2, push the accelerator pedal to the
floor and hold it there while you
try to start the engine for no more
than 15 seconds. If the enginedoes not start, return to step 2.
Drivin g