Page 272 of 352
Tires
Snow Tires
If you mount snow tires on your
Honda, make sure they are radial
tires of the same size and load range as the original tires. Mount snow
tires on all four wheels to balance
your vehicle's handling in all weather conditions. Keep in mind the traction
provided by snow tires on dry roads
may not be as high as your vehicle's
original equipment tires. You should
drive cautiously even when the roads
are clear. Check with the tire dealer
for maximum speed recommenda-
tions.
Tire Chains
Because your Honda has limited tire
clearance, mount only SAE Class "S"
cable-type traction devices on the
front tires. Use traction devices only
when required by driving conditions or local laws. Make sure they are the
correct size for your tires.
Metal link-type "chains" should not
be used. No matter how tight they seem to be installed, they can come
into contact with the body and suspension, causing serious damage.
When installing cables, follow the manufacturer's instructions and
mount them as tightly as you can.Drive slowly with them installed. If
you hear them coming in contact
with the body or chassis, stop and investigate. Make sure the cables are
installed tightly, and that they are
not contacting the brake lines or
suspension.
Remove them as soon as you begin driving on cleared roads.
Traction devices that are the wrong
size or improperly installed can
damage your vehicle's brake lines,
suspension, body, and wheels. Stop driving if they are hitting any part of
the vehicle.
Maintenanc e
NOTICE
Page 295 of 352

Compact Spar e Tir e
Your vehicle has a compact spare
tire that takes up less space. Use thisspare tire as a temporary replace-
ment only. Get your regular tire
repaired or replaced and put back on
your vehicle as soon as you can.
Check the inflation pressure of the
compact spare tire every time you
check the other tires. It should be
inflated to: 60 psi (420 kPa , 4.2 kgf/cm
2)
Follow these precautions whenever
you are using the compact spare tire:
Do not exceed 50 mph (80 km/h)
under any circumstances.
This tire gives a harsher ride and less traction on some road sur-
faces than the regular tire. Use
greater caution while driving on
this tire. Do not mount snow chains on the
compact spare.
Do not use the compact spare tire
if you are towing a trailer.
The wheel of the compact spare
tire is designed especially to fit
your vehicle. Do not use your
spare tire on another vehicle
unless it is the same make and
model.
On EX model
Turn off the Traction ControlSystem (see page 213 ). Driving
with the compact spare tire may
activate the TCS.
The compact spare tire has a shorter
tread life than a regular tire. Replace
it when you can see the tread wear
indicator bars. The replacement
should be the same size and design
tire, mounted on the same wheel.
The compact spare tire is not
designed to be mounted on a regular
wheel, and the compact wheel is not
designed for mounting a regular tire.
Takin g Car e o f th e Unexpecte d
INDICATOR LOCATIO N MAR K
TREA D WEA R INDICATO R BA R
Page 296 of 352
Changing a Fla t Tir e
If you have a flat tire while driving,
stop in a safe place to change it.
Stopping in traffic or on the shoulder of a busy road is dangerous. Driveslowly along the shoulder until you
get to an exit or an area to stop that
is far away from the traffic lanes.
1. Park the vehicle on firm, level andnon-slippery ground away from
traffic. Put the transmission in Park. Apply the parking brake. 2. Turn on the hazard warning lights
and turn the ignition switch to
LOCK (0). Have all the
passengers get out of the vehicle
while you change the tire.
CONTINUED
Takin g Car e o f th e Unexpecte d
The vehicle can easily roll off
the jack, seriously injuring
anyone underneath.
Follow the directions for
changing a tire exactly, and never get under the vehicle
when it is supported only by the
jack.
TOOL S JAC
K VINYL BA GSPAR E TIR E
Page 300 of 352
Changing a Fla t Tir e
On LX model
Do not attempt to forcibly pry the
wheel cover off with a screwdriver or other tool. The wheel cover cannot
be removed without first removing
the wheel nuts. 16. Before mounting the spare tire,
wipe any dirt off the mounting
surface of the wheel and hub with
a clean cloth. Wipe the hub
carefully, it may be hot from
driving.
17. Put on the spare tire. Put the wheel nuts back on finger-tight,
then tighten them in a crisscross
pattern with the wheel wrenchuntil the wheel is firmly against
the hub. Do not try to tighten
them fully.
CONTINUED
Takin g Car e o f th e Unexpecte d
BRAKE HU B
WHEE L
COVE R
Page 304 of 352
Changin
g a Fla t Tir e
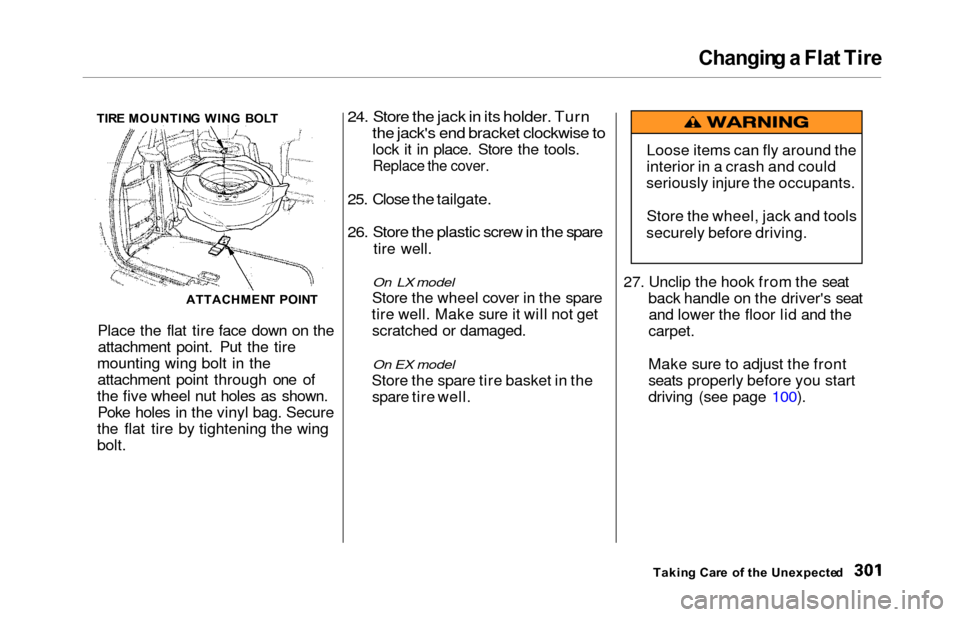
TIR E MOUNTIN G WIN G BOL T
ATTACHMEN T POIN T
Place the flat tire face down on the attachment point. Put the tire
mounting wing bolt in the attachment point through one of
the five wheel nut holes as shown. Poke holes in the vinyl bag. Secure
the flat tire by tightening the wing
bolt.
24. Store the jack in its holder. Turn
the jack's end bracket clockwise to
lock it in place. Store the tools.
Replace the cover.
25. Close the tailgate.
26. Store the plastic screw in the spare
tire well.
On LX model
Store
th
e wheel cover in the spare
tire well. Make sure it will not get scratched or damaged.
On EX model
Store th
e spare tire basket in the
spare tire well. 27. Unclip the hook from the seat
back handle on the driver's seat
and lower the floor lid and the
carpet.
Make sure to adjust the front
seats properly before you start
driving (see page 100).
Takin g Car e
o
f th e Unexpecte d
Loose items can fly around the
interior in a crash and could
seriously injure the occupants.
Store the wheel, jack and tools
securely before driving.
Page 308 of 352
If You r Engin e Overheat s
The pointer of your vehicle's
temperature gauge should stay in
the midrange under most conditions.
It may go higher if you are driving up
a long steep hill on a very hot day. If
it climbs to the red mark, you should
determine the reason.
Driving with the temperature gauge
pointer at the red mark can cause serious damage to your engine.
Your vehicle can overheat for several
reasons, such as lack of coolant or a
mechanical problem. The only
indication may be the temperature
gauge climbing to or above the red
mark. Or you may see steam or
spray coming from under the hood.
In either case, you should take
immediate action.
1. Safely pull to the side of the road. Put the transmission in Neutral or
Park and set the parking brake.
Turn off the heating and cooling/ climate control system and allother accessories. Turn on the
hazard warning indicators.
2. If you see steam and/or spray coming from under the hood, turnoff the engine.
3. If you do not see steam or spray, leave the engine running and
watch the temperature gauge. If the high heat is due to overloading (climbing a long, steep hill on a
hot day with the A/C running, for example), the engine should start
to cool down almost immediately.
If it does, wait until the tempera-
ture gauge comes down to the mid-
point then continue driving.
CONTINUED
Takin g Car e o f th e Unexpecte d
NOTICE
Steam and spray from an
overheated engine can
seriously scald you.
Do not open the hood if steam
is coming out.
Page 309 of 352
If You r Engin e Overheat s
4. If the temperature gauge stays at
the red mark, turn off the engine.
5. Wait until you see no more signs of steam or spray, then open the
hood.
6. Look for any obvious coolant leaks,
such as a split radiator hose.
Everything is still extremely hot, so use caution. If you find a leak, it
must be repaired before you
continue driving (see Emergenc y
Towin g on page 317).
7. If you don't find an obvious leak, check the coolant level in the
radiator reserve tank (see page 193). If the level is below the
MIN mark, add coolant to halfway
between the MIN and MAX marks.
8. If there was no coolant in the reserve tank, you may also have toadd coolant to the radiator. Let the
engine cool down until the pointer reaches the middle of the tempera-
ture gauge, or lower, before check-
ing the radiator.
9. Using gloves or a large heavy cloth, turn the radiator cap
counterclockwise, without pushing
down, to the first stop. This
releases any remaining pressure in
the cooling system. After the
pressure releases, push down on
the cap and turn it until it comes off. 10. Start the engine and set the
temperature control dial to
maximum (climate control to
FULL AUTO at 90°F/32°C). Add
coolant to the radiator up to the
base of the filler neck. If you do
not have the proper coolant
mixture available, you can add
plain water. Remember to have the cooling system drained and
refilled with the proper mixture assoon as you can.
11. Put the radiator cap back on tightly. Run the engine and watch
the temperature gauge. If it goes
back to the red mark, the engine needs repair. (See Emergenc y
Towin g on page 317.)
12. If the temperature stays normal, check the coolant level in the
radiator reserve tank. If it has
gone down, add coolant to the MAX mark. Put the cap back on
tightly.
Takin g Car e o f th e Unexpecte d
Removing the radiator cap
while the engine is hot can
cause the coolant to spray out,
seriously scalding you.
Always let the engine and
radiator cool down before
removing the radiator cap.
Page 310 of 352
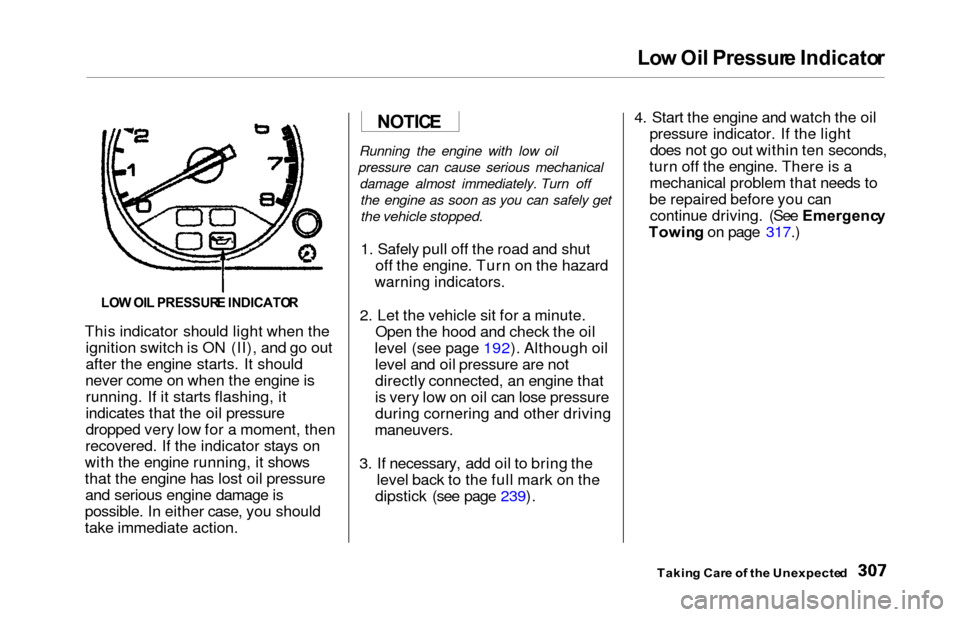
Low Oi l Pressur e Indicato r
This indicator should light when the
ignition switch is ON (II), and go out
after the engine starts. It should
never come on when the engine is running. If it starts flashing, it
indicates that the oil pressure
dropped very low for a moment, then
recovered. If the indicator stays on
with the engine running, it shows
that the engine has lost oil pressure and serious engine damage is
possible. In either case, you should
take immediate action.
Running the engine with low oil
pressure can cause serious mechanical damage almost immediately. Turn offthe engine as soon as you can safely get
the vehicle stopped.
1. Safely pull off the road and shut off the engine. Turn on the hazard
warning indicators.
2. Let the vehicle sit for a minute. Open the hood and check the oil
level (see page 192). Although oil level and oil pressure are not
directly connected, an engine that
is very low on oil can lose pressure
during cornering and other driving
maneuvers.
3. If necessary, add oil to bring the level back to the full mark on the
dipstick (see page 239). 4. Start the engine and watch the oil
pressure indicator. If the lightdoes not go out within ten seconds,
turn off the engine. There is a mechanical problem that needs to
be repaired before you can continue driving. (See Emergenc y
Towin g on page 317.)
Takin g Car e o f th e Unexpecte d
LOW OI L PRESSUR E INDICATO R
NOTICE