Page 165 of 256
Fuse/Relay
LocationFuse Amp
RatingPassenger Compartment
Fuse Panel Description
21 15A Starter Relay, Fuse 20, Transmission Range
Switch
22 10A Air Bag Module, Climate Mode Switch
(Blower Relay), EATC, EATC Blower Relay,
Feeds Fuse 7
23 10A Aux A/C, Heated Seats, Trailer Tow Battery
Charge, Turn/Hazard Flasher, 4x4 Clutch
Relay, Overhead Console, E/C Mirror, 4
Wheel Anti-Lock Brake System (4WABS)
Module
24 Ð Not Used
25 Ð Not Used
26 10A Right Side Low Beam Headlamp
27 5A Foglamp Relay and Foglamp Indicator
28 10A Left Side Low Beam Headlamp
29 5A Autolamp Module, Transmission Overdrive
Control Switch
30 30A Passive Anti Theft Transceiver, Cluster,
Ignition Coils, Powertrain Control Module
Relay
31 10A Rear Integrated Control Panel (Audio), CD
Player
Relay 1 Ð Interior Lamp Relay
Relay 2 Ð Battery Saver Relay
Relay 3 Ð Rear Window Defroster Relay
Relay 4 Ð One Touch Down Window Relay
Relay 5 Ð ACC Delay Relay
Roadside emergencies
165
Page 167 of 256

The high-current fuses are coded as follows.
Fuse/Relay
LocationFuse Amp
RatingPower Distribution Box Description
1 20A * Power Point
2 30A* Powertrain Control Module
3 30A* Headlamps/Autolamps
4 20A* Console Powerpoint
5 20A* Trailer Tow Backup/Park Lamps
6 15A* Parklamps/Autolamps, Feeds Passenger
Compartment Fuse 18
7 20A* Horn
8 30A* Power Door Locks
9 15A* Daytime Running Lamps (DRL), Fog Lamps
10 20A* Fuel Pump
11 20A* Alternator Field
12 10A* Rear Wipers
13 15A* A/C Clutch
14 Ð Not Used
15 10A* Running Board Lamps
16 Ð Not Used
17 10A* Flip Windows
18 15A* Powertrain Control Module, Fuel Injectors,
Fuel Pump, Mass Air Flow Sensor
19 10A* Trailer Tow Stop and Right Turn Lamp
20 10A* Trailer Tow Stop and Left Turn Lamp
21 Ð Not Used
22 Ð Not Used
23 15A* HEGO Sensors, Canister Vent, Automatic
Transmission, CMS Sensor
24 Ð Not Used
101 30A** Trailer Tow Battery Charge
102 50A** Four Wheel Antilock Brake Module
103 50A** Junction Block Battery Feed
Roadside emergencies
167
Page 168 of 256
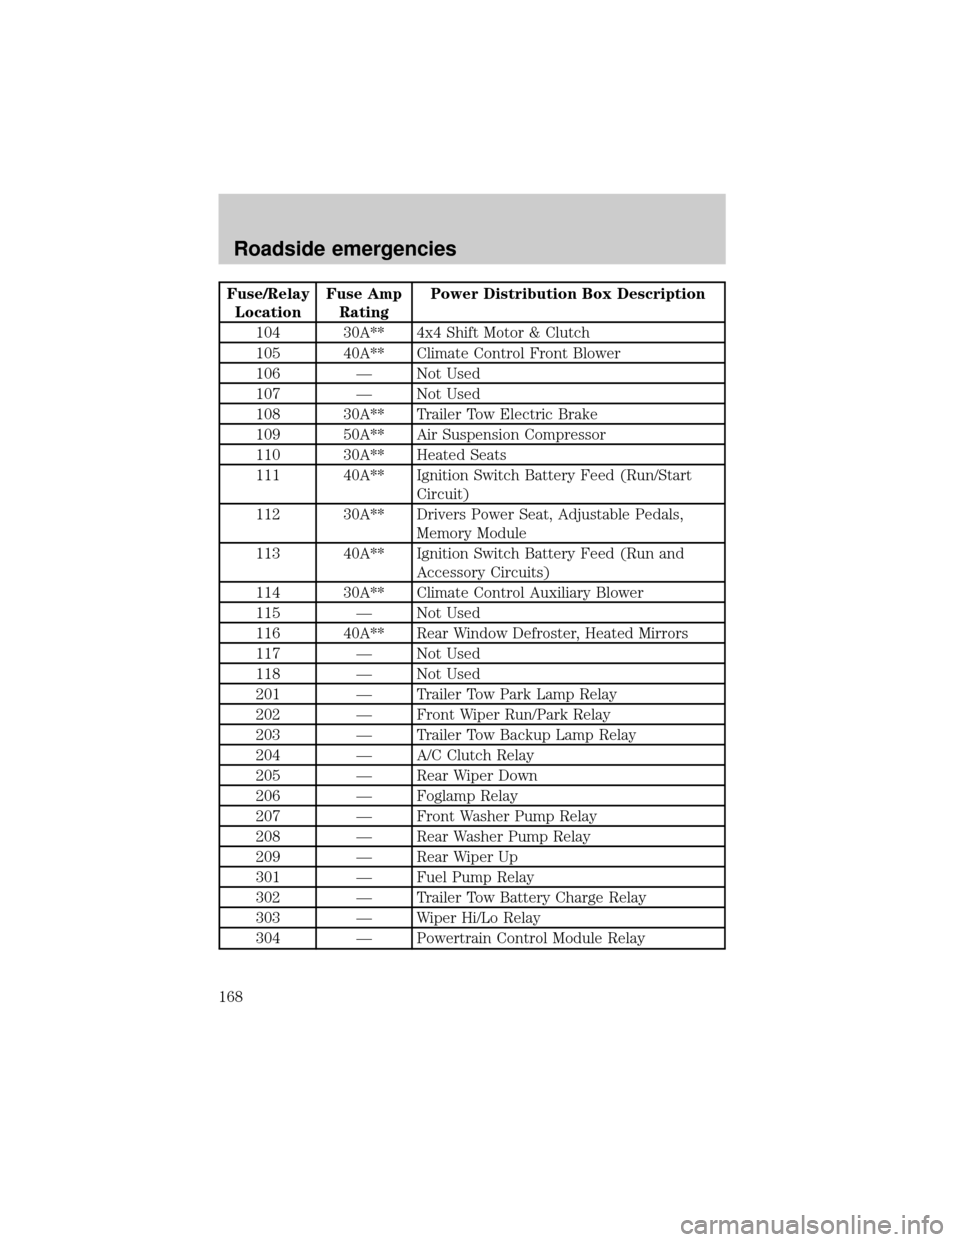
Fuse/Relay
LocationFuse Amp
RatingPower Distribution Box Description
104 30A** 4x4 Shift Motor & Clutch
105 40A** Climate Control Front Blower
106 Ð Not Used
107 Ð Not Used
108 30A** Trailer Tow Electric Brake
109 50A** Air Suspension Compressor
110 30A** Heated Seats
111 40A** Ignition Switch Battery Feed (Run/Start
Circuit)
112 30A** Drivers Power Seat, Adjustable Pedals,
Memory Module
113 40A** Ignition Switch Battery Feed (Run and
Accessory Circuits)
114 30A** Climate Control Auxiliary Blower
115 Ð Not Used
116 40A** Rear Window Defroster, Heated Mirrors
117 Ð Not Used
118 Ð Not Used
201 Ð Trailer Tow Park Lamp Relay
202 Ð Front Wiper Run/Park Relay
203 Ð Trailer Tow Backup Lamp Relay
204 Ð A/C Clutch Relay
205 Ð Rear Wiper Down
206 Ð Foglamp Relay
207 Ð Front Washer Pump Relay
208 Ð Rear Washer Pump Relay
209 Ð Rear Wiper Up
301 Ð Fuel Pump Relay
302 Ð Trailer Tow Battery Charge Relay
303 Ð Wiper Hi/Lo Relay
304 Ð Powertrain Control Module Relay
Roadside emergencies
168
Page 169 of 256
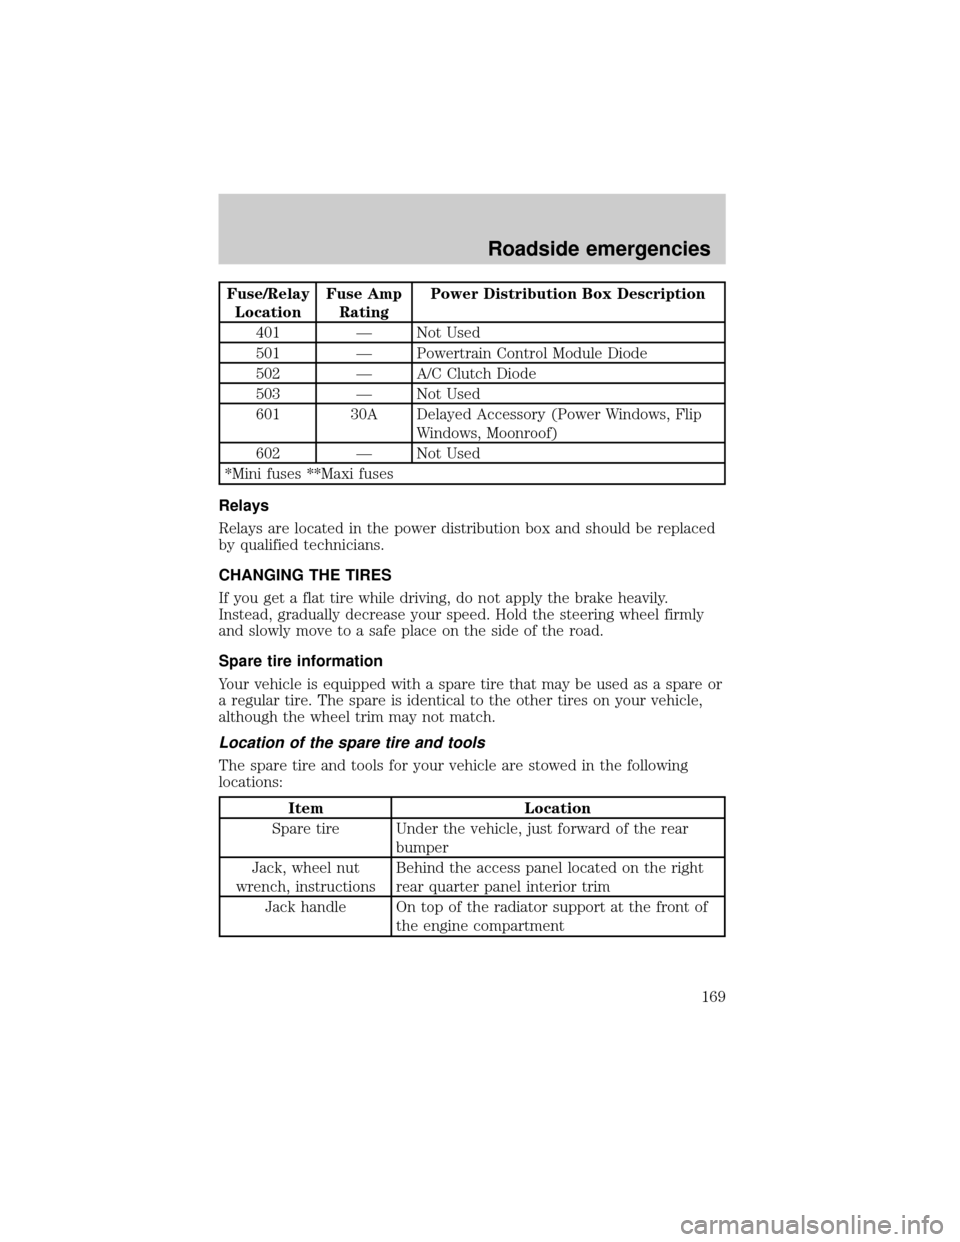
Fuse/Relay
LocationFuse Amp
RatingPower Distribution Box Description
401 Ð Not Used
501 Ð Powertrain Control Module Diode
502 Ð A/C Clutch Diode
503 Ð Not Used
601 30A Delayed Accessory (Power Windows, Flip
Windows, Moonroof)
602 Ð Not Used
*Mini fuses **Maxi fuses
Relays
Relays are located in the power distribution box and should be replaced
by qualified technicians.
CHANGING THE TIRES
If you get a flat tire while driving, do not apply the brake heavily.
Instead, gradually decrease your speed. Hold the steering wheel firmly
and slowly move to a safe place on the side of the road.
Spare tire information
Your vehicle is equipped with a spare tire that may be used as a spare or
a regular tire. The spare is identical to the other tires on your vehicle,
although the wheel trim may not match.
Location of the spare tire and tools
The spare tire and tools for your vehicle are stowed in the following
locations:
Item Location
Spare tire Under the vehicle, just forward of the rear
bumper
Jack, wheel nut
wrench, instructionsBehind the access panel located on the right
rear quarter panel interior trim
Jack handle On top of the radiator support at the front of
the engine compartment
Roadside emergencies
169
Page 170 of 256
Removing the jack handle
1. Open the hood.
2. Unsnap the end of the handle that is retained by the clip on the top of
the windshield washer bottle.
3. Unsnap the shaft of the handle from the two retaining clips attached
to the top of the radiator shroud.
Removing the jack and tools
1. Locate the access panel on the right rear quarter panel interior trim.
Lift the two panel retaining clips and remove the panel.
2. Unsnap the wheel lug nut wrench and instructions from their retaining
bracket.
3. Remove the jack by turning the thumbwheel counterclockwise to
relieve tension against the stowage bracket.
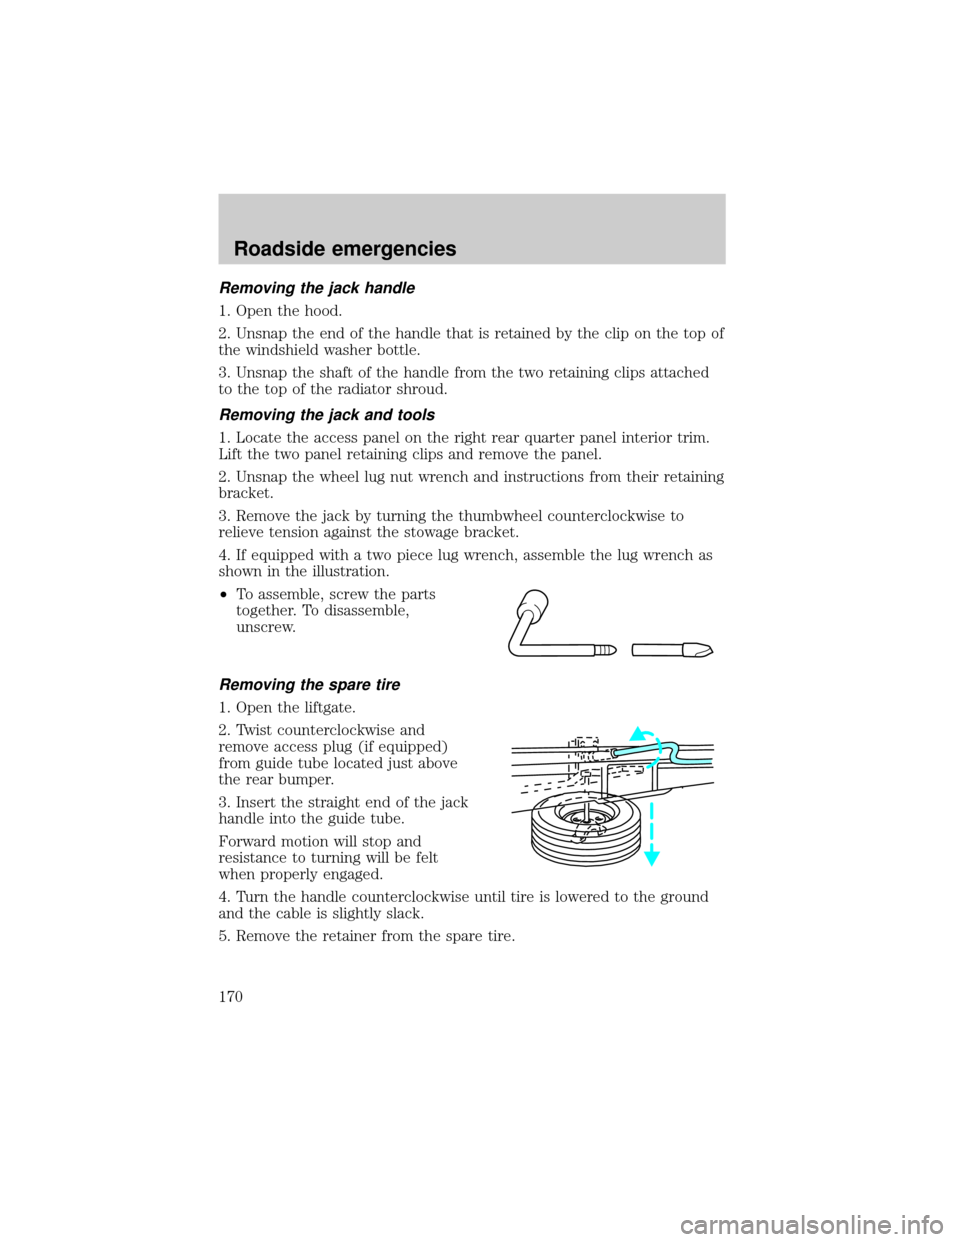
4. If equipped with a two piece lug wrench, assemble the lug wrench as
shown in the illustration.
²To assemble, screw the parts
together. To disassemble,
unscrew.
Removing the spare tire
1. Open the liftgate.
2. Twist counterclockwise and
remove access plug (if equipped)
from guide tube located just above
the rear bumper.
3. Insert the straight end of the jack
handle into the guide tube.
Forward motion will stop and
resistance to turning will be felt
when properly engaged.
4. Turn the handle counterclockwise until tire is lowered to the ground
and the cable is slightly slack.
5. Remove the retainer from the spare tire.
Roadside emergencies
170
Page 171 of 256
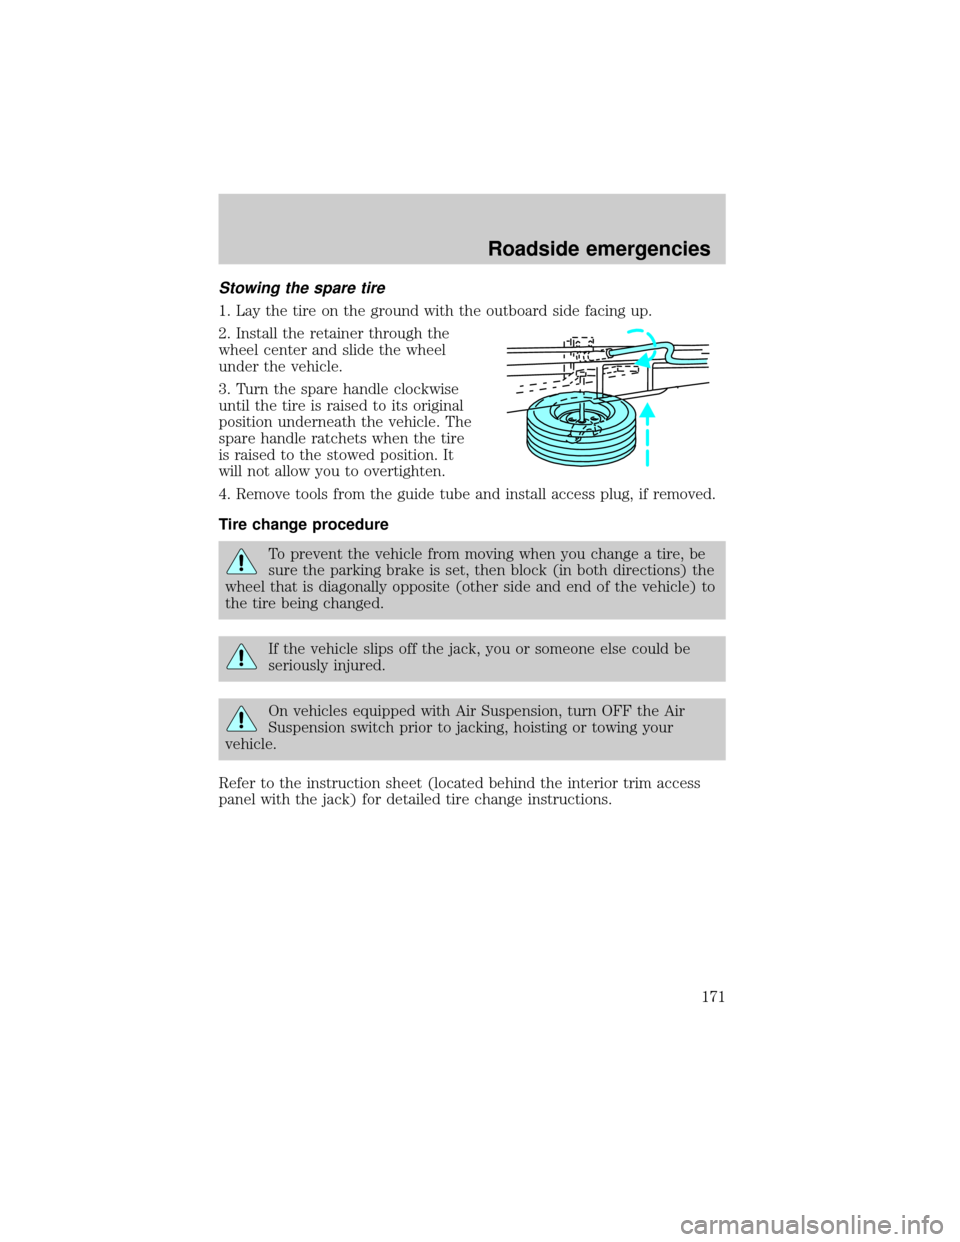
Stowing the spare tire
1. Lay the tire on the ground with the outboard side facing up.
2. Install the retainer through the
wheel center and slide the wheel
under the vehicle.
3. Turn the spare handle clockwise
until the tire is raised to its original
position underneath the vehicle. The
spare handle ratchets when the tire
is raised to the stowed position. It
will not allow you to overtighten.
4. Remove tools from the guide tube and install access plug, if removed.
Tire change procedure
To prevent the vehicle from moving when you change a tire, be
sure the parking brake is set, then block (in both directions) the
wheel that is diagonally opposite (other side and end of the vehicle) to
the tire being changed.
If the vehicle slips off the jack, you or someone else could be
seriously injured.
On vehicles equipped with Air Suspension, turn OFF the Air
Suspension switch prior to jacking, hoisting or towing your
vehicle.
Refer to the instruction sheet (located behind the interior trim access
panel with the jack) for detailed tire change instructions.
Roadside emergencies
171
Page 180 of 256
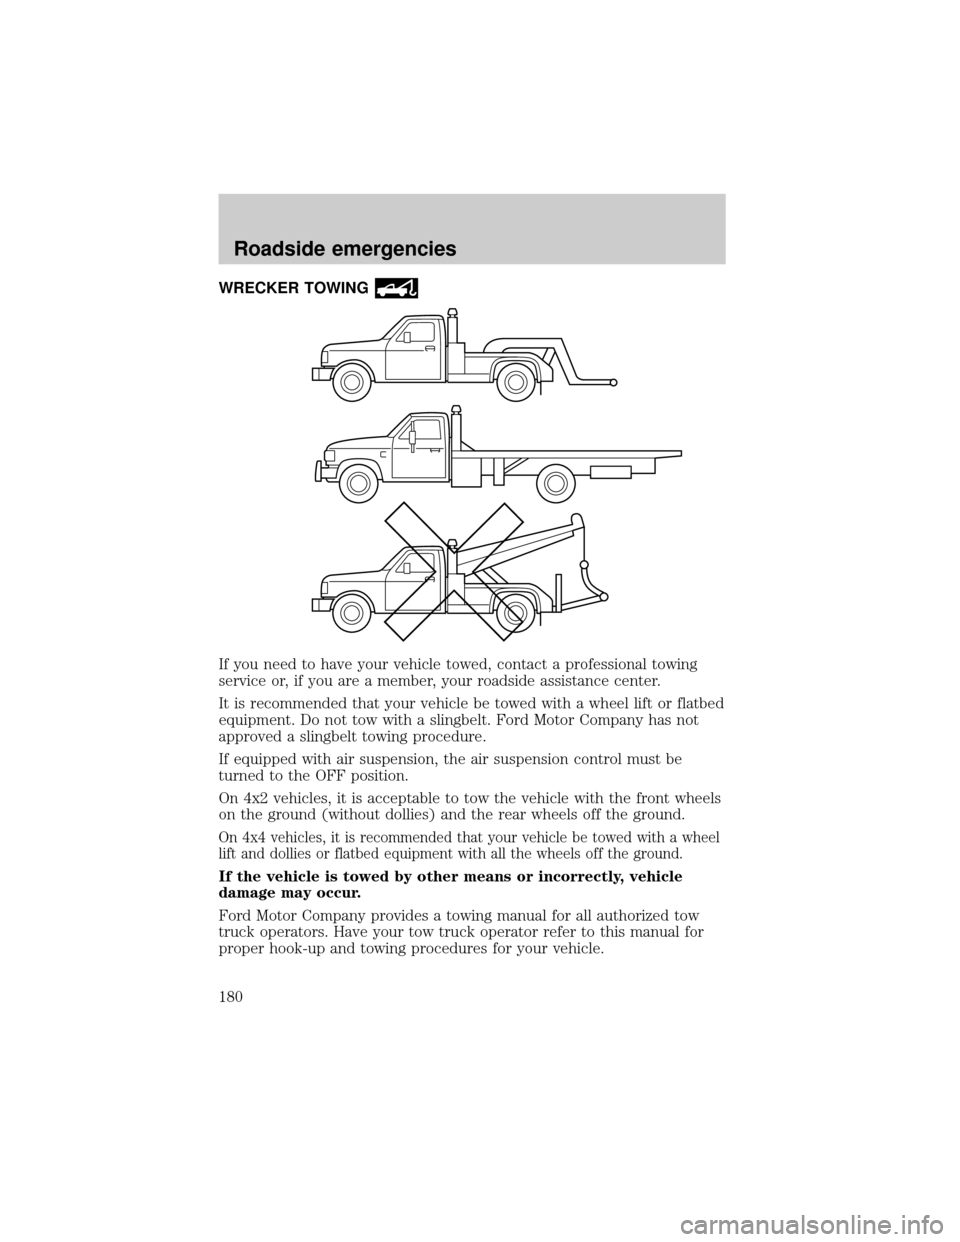
WRECKER TOWING
If you need to have your vehicle towed, contact a professional towing
service or, if you are a member, your roadside assistance center.
It is recommended that your vehicle be towed with a wheel lift or flatbed
equipment. Do not tow with a slingbelt. Ford Motor Company has not
approved a slingbelt towing procedure.
If equipped with air suspension, the air suspension control must be
turned to the OFF position.
On 4x2 vehicles, it is acceptable to tow the vehicle with the front wheels
on the ground (without dollies) and the rear wheels off the ground.
On 4x4 vehicles, it is recommended that your vehicle be towed with a wheel
lift and dollies or flatbed equipment with all the wheels off the ground.
If the vehicle is towed by other means or incorrectly, vehicle
damage may occur.
Ford Motor Company provides a towing manual for all authorized tow
truck operators. Have your tow truck operator refer to this manual for
proper hook-up and towing procedures for your vehicle.
Roadside emergencies
180
Page 201 of 256
WINDSHIELD WIPER BLADES
Check the wiper blades at least twice a year or when they seem less
effective. Substances such as tree sap and some hot wax treatments used
by commercial car washes reduce the effectiveness of wiper blades.
Checking the wiper blades
If the wiper blades do not wipe properly, clean both the windshield and
wiper blades using undiluted windshield wiper solution or a mild
detergent. Rinse thoroughly with clean water. To avoid damaging the
blades, do not use fuel, kerosene, paint thinner or other solvents.
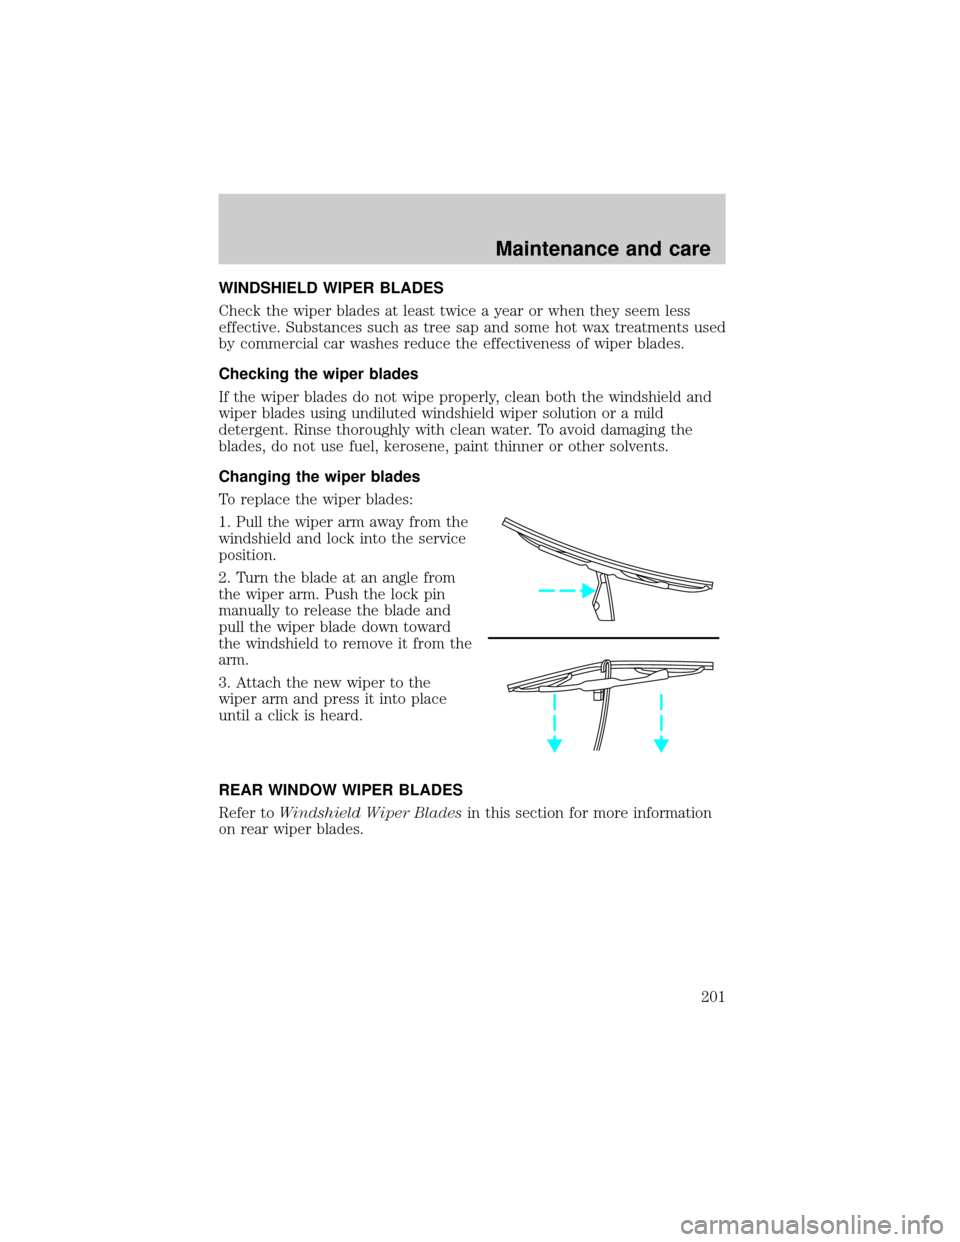
Changing the wiper blades
To replace the wiper blades:
1. Pull the wiper arm away from the
windshield and lock into the service
position.
2. Turn the blade at an angle from
the wiper arm. Push the lock pin
manually to release the blade and
pull the wiper blade down toward
the windshield to remove it from the
arm.
3. Attach the new wiper to the
wiper arm and press it into place
until a click is heard.
REAR WINDOW WIPER BLADES
Refer toWindshield Wiper Bladesin this section for more information
on rear wiper blades.
Maintenance and care
201