2000 DODGE NEON wiring
[x] Cancel search: wiringPage 228 of 1285
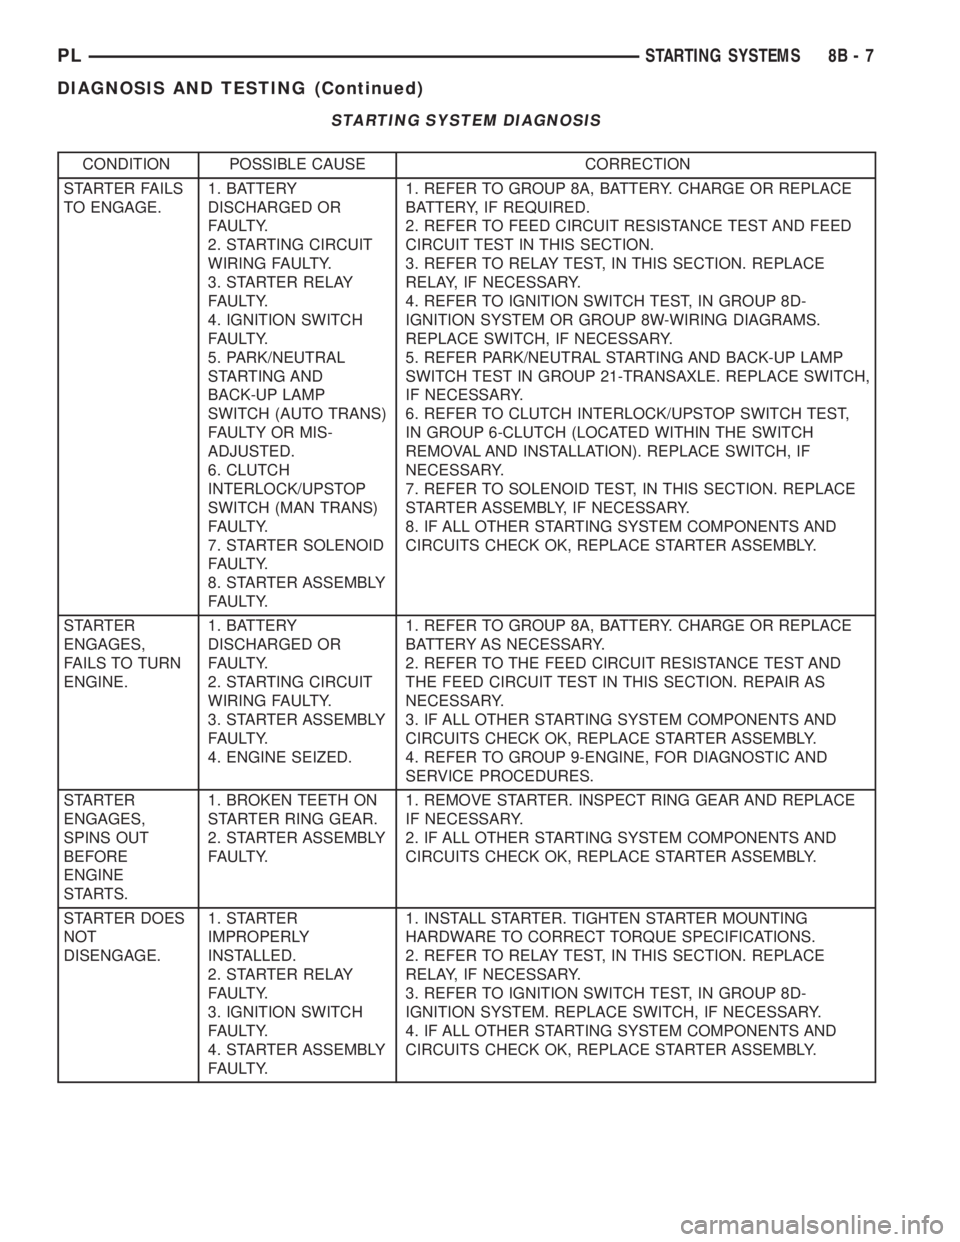
STARTING SYSTEM DIAGNOSIS
CONDITION POSSIBLE CAUSE CORRECTION
STARTER FAILS
TO ENGAGE.1. BATTERY
DISCHARGED OR
FAULTY.
2. STARTING CIRCUIT
WIRING FAULTY.
3. STARTER RELAY
FAULTY.
4. IGNITION SWITCH
FAULTY.
5. PARK/NEUTRAL
STARTING AND
BACK-UP LAMP
SWITCH (AUTO TRANS)
FAULTY OR MIS-
ADJUSTED.
6. CLUTCH
INTERLOCK/UPSTOP
SWITCH (MAN TRANS)
FAULTY.
7. STARTER SOLENOID
FAULTY.
8. STARTER ASSEMBLY
FAULTY.1. REFER TO GROUP 8A, BATTERY. CHARGE OR REPLACE
BATTERY, IF REQUIRED.
2. REFER TO FEED CIRCUIT RESISTANCE TEST AND FEED
CIRCUIT TEST IN THIS SECTION.
3. REFER TO RELAY TEST, IN THIS SECTION. REPLACE
RELAY, IF NECESSARY.
4. REFER TO IGNITION SWITCH TEST, IN GROUP 8D-
IGNITION SYSTEM OR GROUP 8W-WIRING DIAGRAMS.
REPLACE SWITCH, IF NECESSARY.
5. REFER PARK/NEUTRAL STARTING AND BACK-UP LAMP
SWITCH TEST IN GROUP 21-TRANSAXLE. REPLACE SWITCH,
IF NECESSARY.
6. REFER TO CLUTCH INTERLOCK/UPSTOP SWITCH TEST,
IN GROUP 6-CLUTCH (LOCATED WITHIN THE SWITCH
REMOVAL AND INSTALLATION). REPLACE SWITCH, IF
NECESSARY.
7. REFER TO SOLENOID TEST, IN THIS SECTION. REPLACE
STARTER ASSEMBLY, IF NECESSARY.
8. IF ALL OTHER STARTING SYSTEM COMPONENTS AND
CIRCUITS CHECK OK, REPLACE STARTER ASSEMBLY.
STARTER
ENGAGES,
FAILS TO TURN
ENGINE.1. BATTERY
DISCHARGED OR
FAULTY.
2. STARTING CIRCUIT
WIRING FAULTY.
3. STARTER ASSEMBLY
FAULTY.
4. ENGINE SEIZED.1. REFER TO GROUP 8A, BATTERY. CHARGE OR REPLACE
BATTERY AS NECESSARY.
2. REFER TO THE FEED CIRCUIT RESISTANCE TEST AND
THE FEED CIRCUIT TEST IN THIS SECTION. REPAIR AS
NECESSARY.
3. IF ALL OTHER STARTING SYSTEM COMPONENTS AND
CIRCUITS CHECK OK, REPLACE STARTER ASSEMBLY.
4. REFER TO GROUP 9-ENGINE, FOR DIAGNOSTIC AND
SERVICE PROCEDURES.
STARTER
ENGAGES,
SPINS OUT
BEFORE
ENGINE
STARTS.1. BROKEN TEETH ON
STARTER RING GEAR.
2. STARTER ASSEMBLY
FAULTY.1. REMOVE STARTER. INSPECT RING GEAR AND REPLACE
IF NECESSARY.
2. IF ALL OTHER STARTING SYSTEM COMPONENTS AND
CIRCUITS CHECK OK, REPLACE STARTER ASSEMBLY.
STARTER DOES
NOT
DISENGAGE.1. STARTER
IMPROPERLY
INSTALLED.
2. STARTER RELAY
FAULTY.
3. IGNITION SWITCH
FAULTY.
4. STARTER ASSEMBLY
FAULTY.1. INSTALL STARTER. TIGHTEN STARTER MOUNTING
HARDWARE TO CORRECT TORQUE SPECIFICATIONS.
2. REFER TO RELAY TEST, IN THIS SECTION. REPLACE
RELAY, IF NECESSARY.
3. REFER TO IGNITION SWITCH TEST, IN GROUP 8D-
IGNITION SYSTEM. REPLACE SWITCH, IF NECESSARY.
4. IF ALL OTHER STARTING SYSTEM COMPONENTS AND
CIRCUITS CHECK OK, REPLACE STARTER ASSEMBLY.
PLSTARTING SYSTEMS 8B - 7
DIAGNOSIS AND TESTING (Continued)
Page 229 of 1285
REMOVAL AND INSTALLATION
SAFETY SWITCHES
For Removal and Installation of:
²Clutch Interlock/Upstop Switch, refer to
Removal and Installation in Group 6-Clutch.
²Park/Neutral Starting and Back-Up Lamp
Switch, refer to Removal and Installation in Group
21-Transaxle.
STARTER MOTOR
REMOVAL
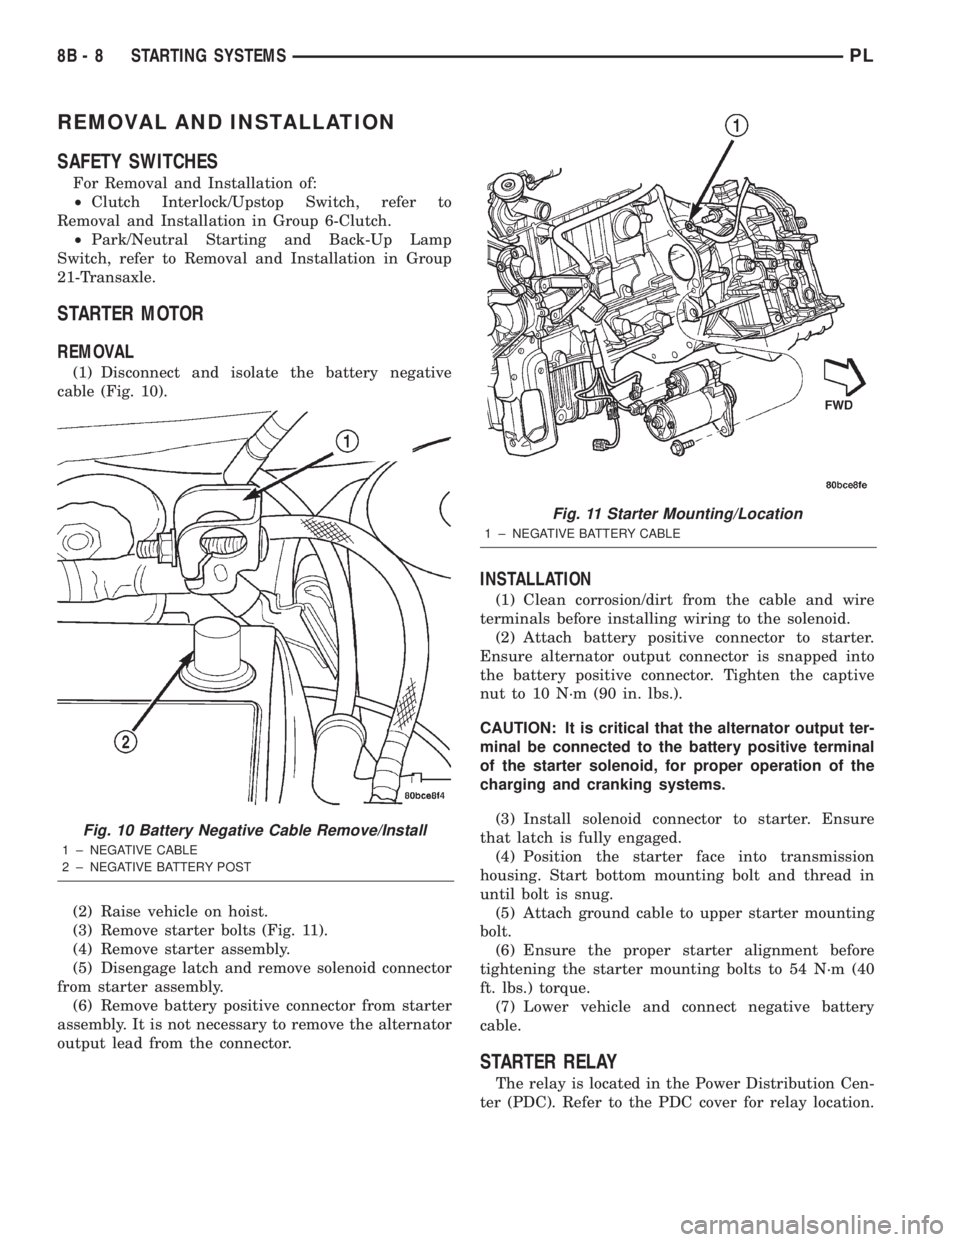
(1) Disconnect and isolate the battery negative
cable (Fig. 10).
(2) Raise vehicle on hoist.
(3) Remove starter bolts (Fig. 11).
(4) Remove starter assembly.
(5) Disengage latch and remove solenoid connector
from starter assembly.
(6) Remove battery positive connector from starter
assembly. It is not necessary to remove the alternator
output lead from the connector.
INSTALLATION
(1) Clean corrosion/dirt from the cable and wire
terminals before installing wiring to the solenoid.
(2) Attach battery positive connector to starter.
Ensure alternator output connector is snapped into
the battery positive connector. Tighten the captive
nut to 10 N´m (90 in. lbs.).
CAUTION: It is critical that the alternator output ter-
minal be connected to the battery positive terminal
of the starter solenoid, for proper operation of the
charging and cranking systems.
(3) Install solenoid connector to starter. Ensure
that latch is fully engaged.
(4) Position the starter face into transmission
housing. Start bottom mounting bolt and thread in
until bolt is snug.
(5) Attach ground cable to upper starter mounting
bolt.
(6) Ensure the proper starter alignment before
tightening the starter mounting bolts to 54 N´m (40
ft. lbs.) torque.
(7) Lower vehicle and connect negative battery
cable.
STARTER RELAY
The relay is located in the Power Distribution Cen-
ter (PDC). Refer to the PDC cover for relay location.
Fig. 10 Battery Negative Cable Remove/Install
1 ± NEGATIVE CABLE
2 ± NEGATIVE BATTERY POST
Fig. 11 Starter Mounting/Location
1 ± NEGATIVE BATTERY CABLE
8B - 8 STARTING SYSTEMSPL
Page 232 of 1285
CHARGING SYSTEM
TABLE OF CONTENTS
page page
DESCRIPTION AND OPERATION
CHARGING SYSTEM.......................1
GENERATOR.............................1
ELECTRONIC VOLTAGE REGULATOR..........1
REMOVAL AND INSTALLATION
GENERATOR.............................2SPECIFICATIONS
GENERATOR RATINGS.....................3
TORQUE................................3
DESCRIPTION AND OPERATION
CHARGING SYSTEM
DESCRIPTION
The charging system consists of:
²Generator
²Electronic Voltage Regulator (EVR) circuitry
within the Powertrain Control Module (PCM)
²Ignition switch (refer to the Ignition System for
information)
²Battery (refer to the Battery for information)
²Battery temperature sensor
²Wiring harness and connections (refer to the
Wiring for information)
OPERATION
The charging system is turned on and off with the
ignition switch. When the ignition switch is turned to
the ON position, battery voltage is applied to the
generator rotor through one of the two field termi-
nals to produce a magnetic field. The generator is
driven by the engine through a serpentine belt and
pulley arrangement.
The amount of DC current produced by the gener-
ator is controlled by the EVR (field control) circuitry,
contained within the PCM. This circuitry is con-
nected in series with the second rotor field terminal
and ground.
Temperature data, along with data from monitored
line voltage, is used by the PCM to vary the battery
charging rate. This is done by cycling the ground
path to control the strength of the rotor magnetic
field. The PCM then compensates and regulates gen-
erator current output accordingly and to maintain
the proper voltage depending on battery tempera-
ture.
All vehicles are equipped with On-Board Diagnos-
tics (OBD). All OBD-sensed systems, including the
EVR (field control) circuitry, are monitored by thePCM. Each monitored circuit is assigned a Diagnos-
tic Trouble Code (DTC). The PCM will store a DTC in
electronic memory for any failure it detects.
GENERATOR
DESCRIPTION
The generator is belt-driven by the engine. It is
serviced only as a complete assembly. If the genera-
tor fails for any reason, the entire assembly must be
replaced.
OPERATION
As the energized rotor begins to rotate within the
generator, the spinning magnetic field induces a cur-
rent into the windings of the stator coil. Once the
generator begins producing sufficient current, it also
provides the current needed to energize the rotor.
The Y type stator winding connections deliver the
induced AC current to 3 positive and 3 negative
diodes for rectification. From the diodes, rectified DC
current is delivered to the vehicles electrical system
through the generator, battery, and ground terminals.
Noise emitting from the generator may be caused
by:
²Worn, loose or defective bearings
²Loose or defective drive pulley
²Incorrect, worn, damaged or misadjusted drive
belt
²Loose mounting bolts
²Misaligned drive pulley
²Defective stator or diode
²Damaged internal fins
ELECTRONIC VOLTAGE REGULATOR
DESCRIPTION
The Electronic Voltage Regulator (EVR) is not a
separate component. It is actually a voltage regulat-
ing circuit located within the Powertrain Control
PLCHARGING SYSTEM 8C - 1
Page 233 of 1285
Module (PCM). The EVR is not serviced separately. If
replacement is necessary, the PCM must be replaced.
OPERATION
The amount of DC current produced by the gener-
ator is controlled by EVR circuitry contained within
the PCM. This circuitry is connected in series with
the generators second rotor field terminal and its
ground.
Voltage is regulated by cycling the ground path to
control the strength of the rotor magnetic field. The
EVR circuitry monitors system line voltage (B+) and
battery temperature (refer to Battery Temperature
Sensor for more information). It then determines a
target charging voltage. If sensed battery voltage is
0.5 volts or lower than the target voltage, the PCM
grounds the field winding until sensed battery volage
is 0.5 volts above target voltage. A circuit in the PCM
cycles the ground side of the generator field up to
100 times per second (100Hz), but has the capability
to ground the field control wire 100% of the time (full
field) to achieve the target voltage. If the charging
rate cannot be monitored (limp-in), a duty cycle of
25% is used by the PCM in order to have some gen-
erator output. Also refer to Charging System Opera-
tion for additional information.
REMOVAL AND INSTALLATION
GENERATOR
REMOVAL
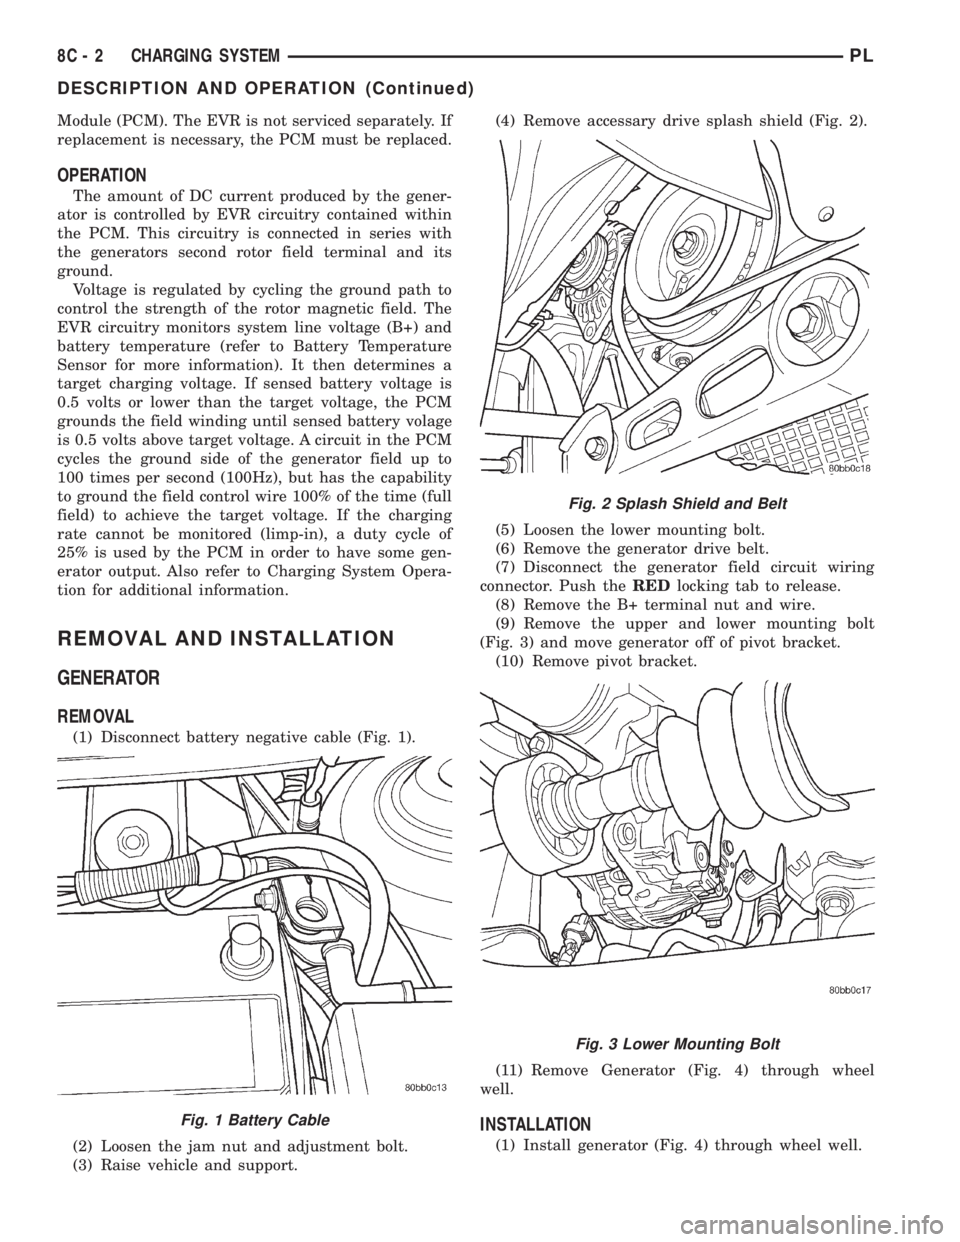
(1) Disconnect battery negative cable (Fig. 1).
(2) Loosen the jam nut and adjustment bolt.
(3) Raise vehicle and support.(4) Remove accessary drive splash shield (Fig. 2).
(5) Loosen the lower mounting bolt.
(6) Remove the generator drive belt.
(7) Disconnect the generator field circuit wiring
connector. Push theREDlocking tab to release.
(8) Remove the B+ terminal nut and wire.
(9) Remove the upper and lower mounting bolt
(Fig. 3) and move generator off of pivot bracket.
(10) Remove pivot bracket.
(11) Remove Generator (Fig. 4) through wheel
well.
INSTALLATION
(1) Install generator (Fig. 4) through wheel well.
Fig. 1 Battery Cable
Fig. 2 Splash Shield and Belt
Fig. 3 Lower Mounting Bolt
8C - 2 CHARGING SYSTEMPL
DESCRIPTION AND OPERATION (Continued)
Page 234 of 1285
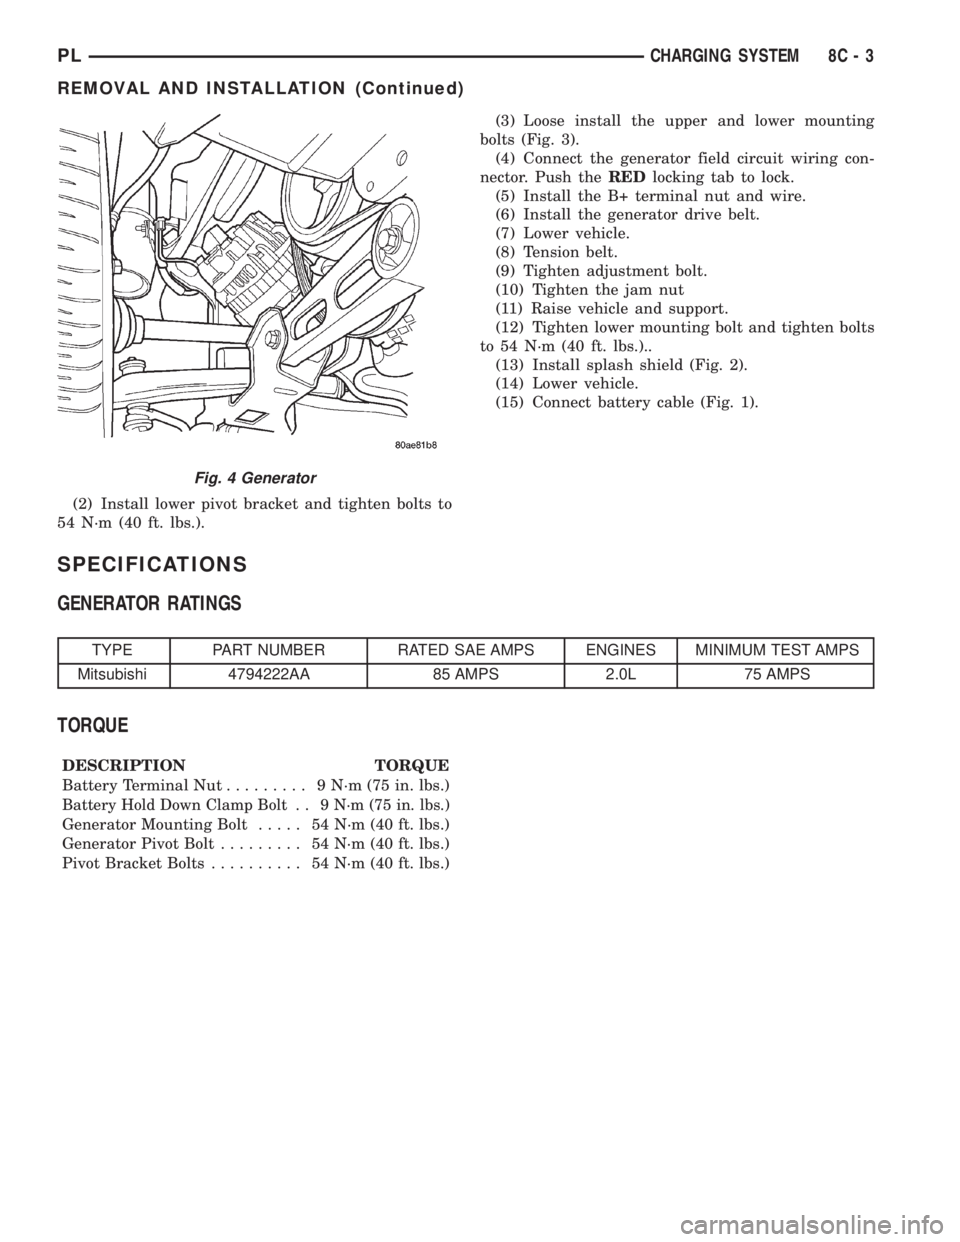
(2) Install lower pivot bracket and tighten bolts to
54 N´m (40 ft. lbs.).(3) Loose install the upper and lower mounting
bolts (Fig. 3).
(4) Connect the generator field circuit wiring con-
nector. Push theREDlocking tab to lock.
(5) Install the B+ terminal nut and wire.
(6) Install the generator drive belt.
(7) Lower vehicle.
(8) Tension belt.
(9) Tighten adjustment bolt.
(10) Tighten the jam nut
(11) Raise vehicle and support.
(12) Tighten lower mounting bolt and tighten bolts
to 54 N´m (40 ft. lbs.)..
(13) Install splash shield (Fig. 2).
(14) Lower vehicle.
(15) Connect battery cable (Fig. 1).
SPECIFICATIONS
GENERATOR RATINGS
TYPE PART NUMBER RATED SAE AMPS ENGINES MINIMUM TEST AMPS
Mitsubishi 4794222AA 85 AMPS 2.0L 75 AMPS
TORQUE
DESCRIPTION TORQUE
Battery Terminal Nut......... 9N´m(75in.lbs.)
Battery Hold Down Clamp Bolt . . 9 N´m (75 in. lbs.)
Generator Mounting Bolt..... 54N´m(40ft.lbs.)
Generator Pivot Bolt......... 54N´m(40ft.lbs.)
Pivot Bracket Bolts.......... 54N´m(40ft.lbs.)
Fig. 4 Generator
PLCHARGING SYSTEM 8C - 3
REMOVAL AND INSTALLATION (Continued)
Page 238 of 1285
OPERATION
The Automatic Shutdown (ASD) relay supplies bat-
tery voltage to the fuel injectors, electronic ignition
coil and the heating elements in the oxygen sensors.
A buss bar in the Power Distribution Center (PDC)
supplies voltage to the solenoid side and contact side
of the relay. The fuse also protects the power circuit
for the fuel pump relay and pump. The fuse is
located in the PDC. Refer to the Wiring Diagrams for
circuit information.
The PCM controls the ASD relay by switching the
ground path for the solenoid side of the relay on and
off. The PCM turns the ground path off when the
ignition switch is in the Off position. When the igni-
tion switch is in On or Start, the PCM monitors the
crankshaft and camshaft position sensor signals to
determine engine speed and ignition timing (coil
dwell). If the PCM does not receive crankshaft and
camshaft position sensor signals when the ignition
switch is in the Run position, it will de-energize the
ASD relay.
CRANKSHAFT POSITION SENSORÐPCM
INPUT
DESCRIPTION
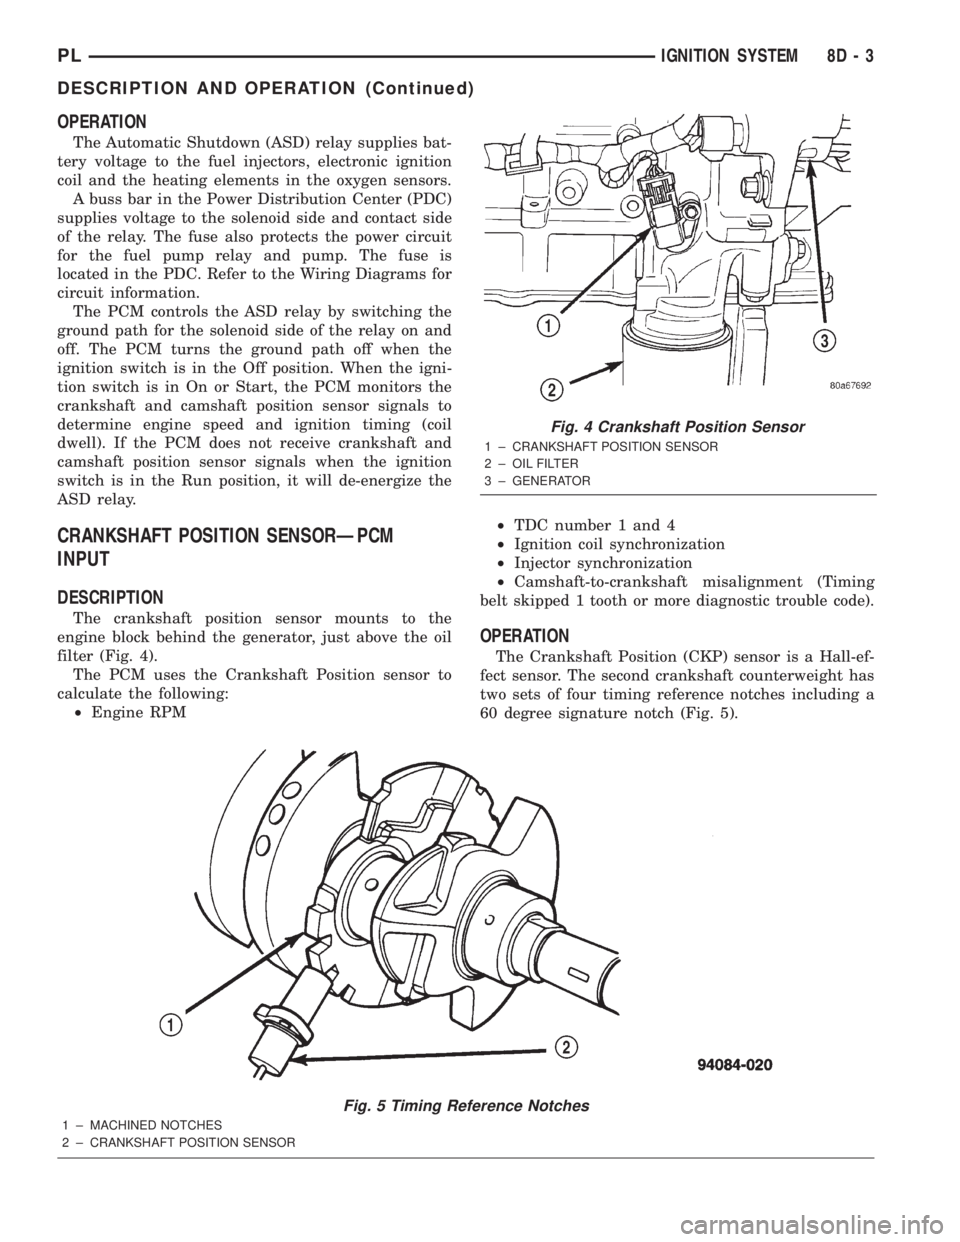
The crankshaft position sensor mounts to the
engine block behind the generator, just above the oil
filter (Fig. 4).
The PCM uses the Crankshaft Position sensor to
calculate the following:
²Engine RPM²TDC number 1 and 4
²Ignition coil synchronization
²Injector synchronization
²Camshaft-to-crankshaft misalignment (Timing
belt skipped 1 tooth or more diagnostic trouble code).
OPERATION
The Crankshaft Position (CKP) sensor is a Hall-ef-
fect sensor. The second crankshaft counterweight has
two sets of four timing reference notches including a
60 degree signature notch (Fig. 5).
Fig. 5 Timing Reference Notches
1 ± MACHINED NOTCHES
2 ± CRANKSHAFT POSITION SENSOR
Fig. 4 Crankshaft Position Sensor
1 ± CRANKSHAFT POSITION SENSOR
2 ± OIL FILTER
3 ± GENERATOR
PLIGNITION SYSTEM 8D - 3
DESCRIPTION AND OPERATION (Continued)
Page 243 of 1285
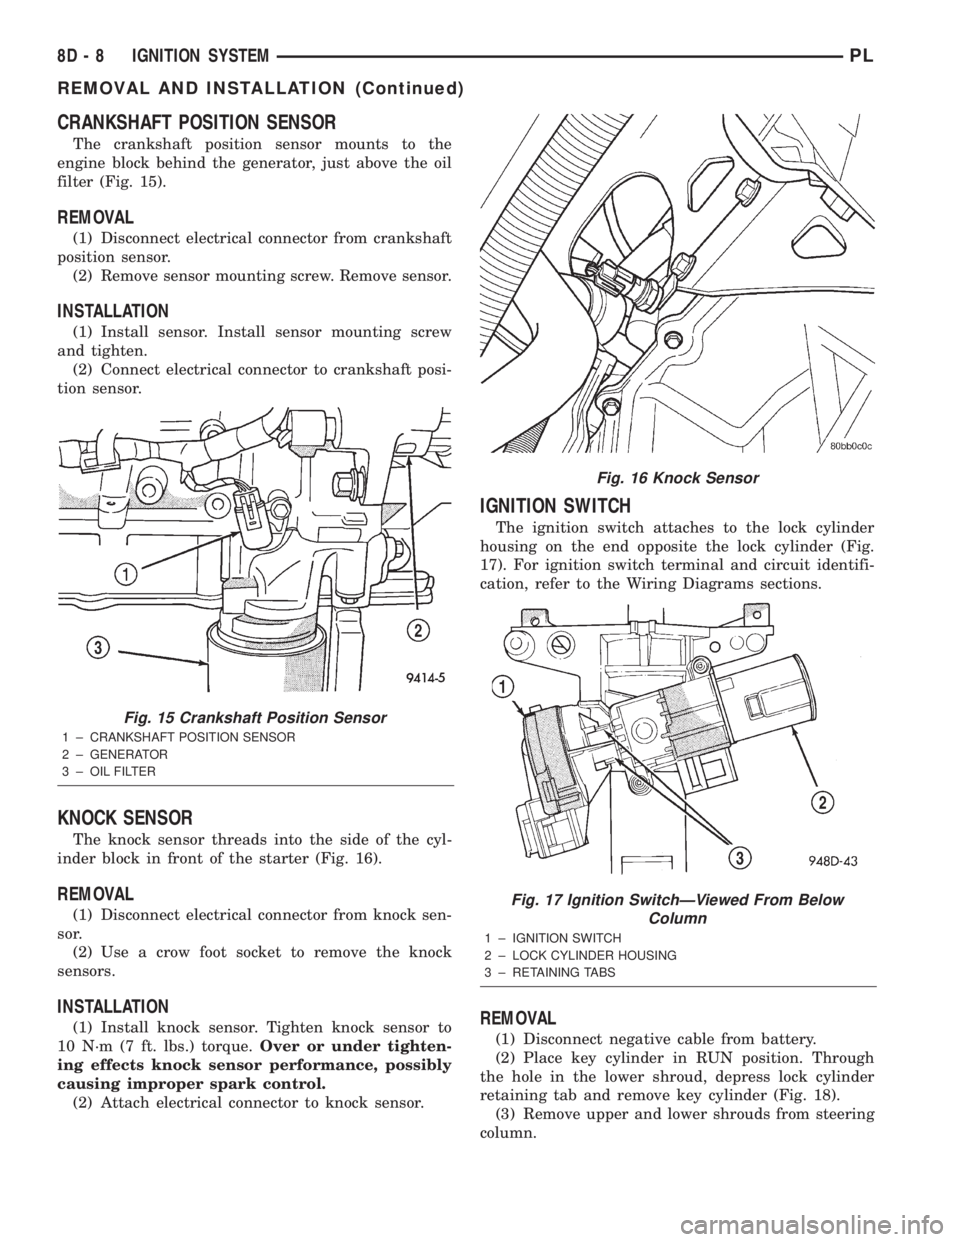
CRANKSHAFT POSITION SENSOR
The crankshaft position sensor mounts to the
engine block behind the generator, just above the oil
filter (Fig. 15).
REMOVAL
(1) Disconnect electrical connector from crankshaft
position sensor.
(2) Remove sensor mounting screw. Remove sensor.
INSTALLATION
(1) Install sensor. Install sensor mounting screw
and tighten.
(2) Connect electrical connector to crankshaft posi-
tion sensor.
KNOCK SENSOR
The knock sensor threads into the side of the cyl-
inder block in front of the starter (Fig. 16).
REMOVAL
(1) Disconnect electrical connector from knock sen-
sor.
(2) Use a crow foot socket to remove the knock
sensors.
INSTALLATION
(1) Install knock sensor. Tighten knock sensor to
10 N´m (7 ft. lbs.) torque.Over or under tighten-
ing effects knock sensor performance, possibly
causing improper spark control.
(2) Attach electrical connector to knock sensor.
IGNITION SWITCH
The ignition switch attaches to the lock cylinder
housing on the end opposite the lock cylinder (Fig.
17). For ignition switch terminal and circuit identifi-
cation, refer to the Wiring Diagrams sections.
REMOVAL
(1) Disconnect negative cable from battery.
(2) Place key cylinder in RUN position. Through
the hole in the lower shroud, depress lock cylinder
retaining tab and remove key cylinder (Fig. 18).
(3) Remove upper and lower shrouds from steering
column.
Fig. 15 Crankshaft Position Sensor
1 ± CRANKSHAFT POSITION SENSOR
2 ± GENERATOR
3 ± OIL FILTER
Fig. 16 Knock Sensor
Fig. 17 Ignition SwitchÐViewed From Below
Column
1 ± IGNITION SWITCH
2 ± LOCK CYLINDER HOUSING
3 ± RETAINING TABS
8D - 8 IGNITION SYSTEMPL
REMOVAL AND INSTALLATION (Continued)
Page 255 of 1285
(19) Disconnect one left side harness connector at
top left of instrument panel for vanity and rear view
mirrors.
(20) Pull off the hvac control head knobs.
(21) Remove two screws retaining the top front of
the center bezel.
(22) Using a trim stick, gently pry out on the
instrument panel center bezel and remove.
(23) Remove the two retaining screws to the hvac
control head.
(24) Disconnect the one instrument panel wire
harness connector.
(25) Disconnect the one vacuum harness connector.
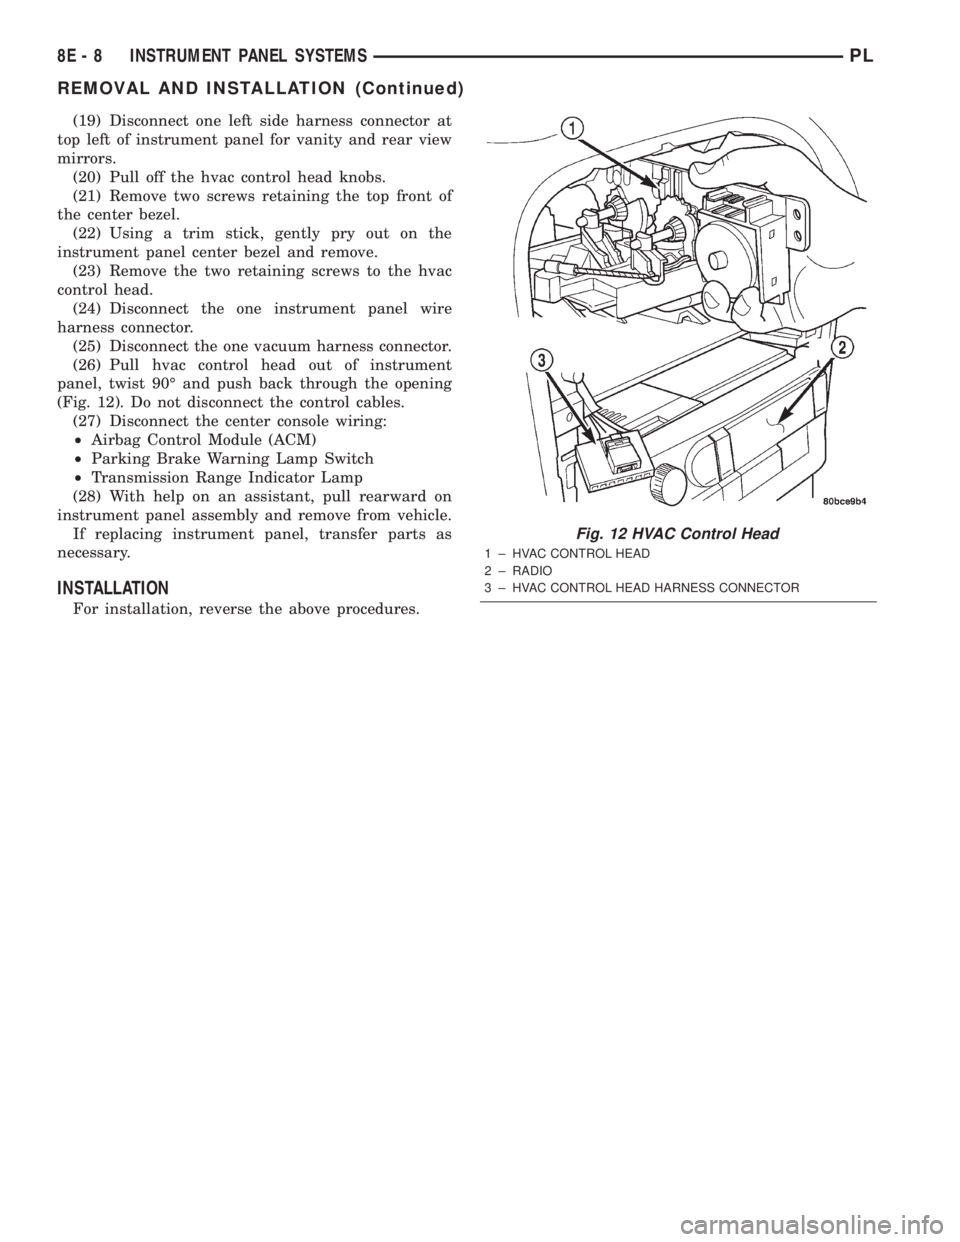
(26) Pull hvac control head out of instrument
panel, twist 90É and push back through the opening
(Fig. 12). Do not disconnect the control cables.
(27) Disconnect the center console wiring:
²Airbag Control Module (ACM)
²Parking Brake Warning Lamp Switch
²Transmission Range Indicator Lamp
(28) With help on an assistant, pull rearward on
instrument panel assembly and remove from vehicle.
If replacing instrument panel, transfer parts as
necessary.
INSTALLATION
For installation, reverse the above procedures.
Fig. 12 HVAC Control Head
1 ± HVAC CONTROL HEAD
2 ± RADIO
3 ± HVAC CONTROL HEAD HARNESS CONNECTOR
8E - 8 INSTRUMENT PANEL SYSTEMSPL
REMOVAL AND INSTALLATION (Continued)