Page 209 of 279
Light
s
5. Check the vertical angle gauge.
The bubble should be centered underneath the longest scribemark on the gauge.
6. If either indicator is not aligned
with its "0" mark as described, an
adjustment can be made using a
Phillips-head screwdriver to
realign it with the "0" mark. Please
refer to the illustrations.
7. If you cannot get an indicator to
align, have your Acura dealer
inspect the car for body damage or suspension problems.
Maintenanc e
VERTICA
L ANGL E GAUG E
HORIZONTA
L ADJUSTMEN T
VERTICAL ADJUSTMEN T
Page 210 of 279

Light
s
Replacin g a Headligh t Bul b
Your car has two bulbs on each side, four in total. Make sure you arereplacing the bulb that is burned out.
Your car uses halogen headlight bulbs. When replacing a bulb, handle
it by its plastic case and protect the
glass from contact with your skin or
hard objects. If you touch the glass,clean it with denatured alcohol and a
clean cloth.
Halogen headlight bulbs get very hot when lit. Oil, perspiration, or a scratch
on the glass can cause the bulb to
overheat and shatter.
1. Open the hood.
If you need to change the high
beam headlight bulb on the
passenger's side, remove the
radiator reserve tank by pulling it straight up.
2. To disconnect the bulb from the
electrical harness, push on the end
of the lock tab to release the
connector then push the connec-
tor straight down.
3. Turn the bulb about one-eighth
turn counterclockwise to unlock it
from the headlight assembly.
4. Remove the bulb by pulling it
straight out of its recess.
5. Align the tabs on the new bulb
with the slots in the headlightassembly and push it into place.
6. Turn the bulb clockwise to lock it
in place. Do not force it. Check the seating of the bulb's tabs in the
slots if the bulb will not return to
its original position.
7. Reinstall the harness connector on
the bulb connector. Make sure it
locks in place.
Turn on the headlights to test the new bulb.
8. (Passenger's side)
Reinstall the radiator reserve tank.
Maintenanc e
NOTIC
E
Page 211 of 279
Light
s
Replacing Front Turn Signal/
Parkin g an d Sid e Marke r Ligh t
Bulb s
1. Use a Phillips-head screwdriver to
loosen the light assembly's mounting screw.
2. Remove the light assembly from
the bumper.
3. Remove the socket of the burned-
out bulb from the light assembly
by turning it one-quarter turn counterclockwise.
4. To remove the front bulb, push it
in slightly and turn it counterclock-
wise. To remove the side bulb, pull it straight out of its socket.
5. Install the new bulb in the socket.
6. Insert the socket back into the
light assembly. Turn it clockwise
to lock it in place.
7. Test the lights to make sure the
new bulb is working.
8. Put the light assembly into the
bumper. Make sure the tab on the
light assembly fits into the bumper slot. Tighten the mounting screw.
Maintenanc e
SCRE
W
Page 212 of 279
Light
s
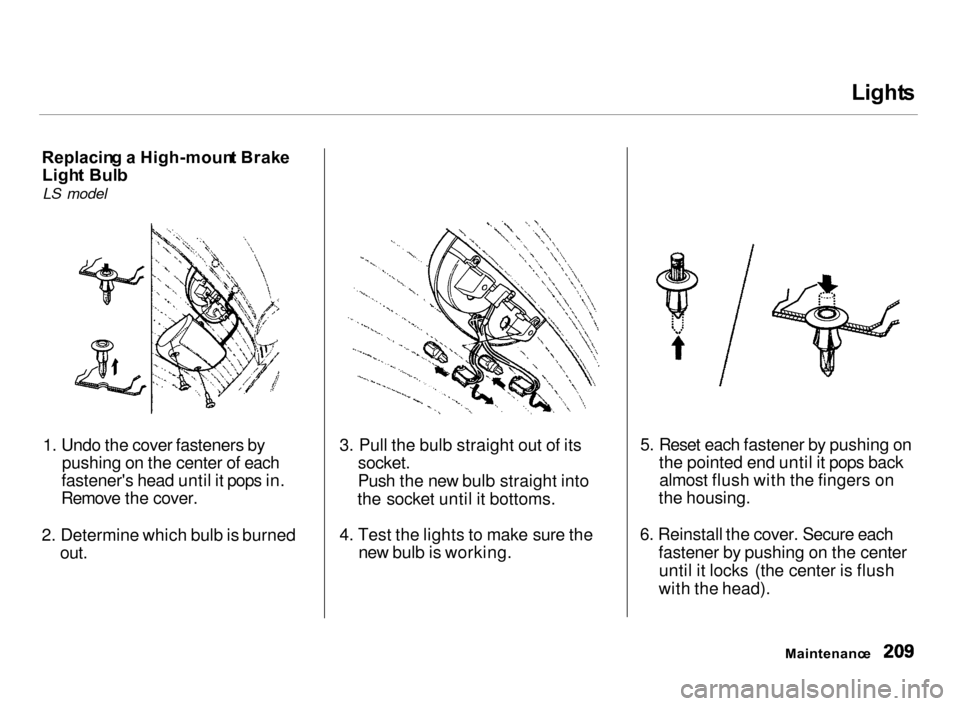
Replacin g a High-moun t Brak e
Ligh t Bul b
LS model
1. Undo the cover fasteners by
pushing on the center of each
fastener's head until it pops in.
Remove the cover.
2. Determine which bulb is burned
out.
3. Pull the bulb straight out of its
socket.
Push the new bulb straight into
the socket until it bottoms.
4. Test the lights to make sure the
new bulb is working.
5. Reset each fastener by pushing on
the pointed end until it pops back almost flush with the fingers on
the housing.
6. Reinstall the cover. Secure each
fastener by pushing on the center
until it locks (the center is flush
with the head).
Maintenanc e
Page 213 of 279

Light
s
Replacin g Rea r Tur n Signa l an d
Sid e Marke r Ligh t Bulb s
1. Open the hatch and remove the
light assembly cover by pulling the
edge.
2. Remove the socket from the light assembly by turning it one-quarter
turn counterclockwise.
3. If the turn signal light bulb is
burned out, remove it by pushing
it in and turning counterclockwise.If the side marker light bulb is
burned out, remove it by pulling it straight out of its socket.
4. Install the new bulb in the reverse
order of removal.
5. Push the socket into the light
assembly and turn it clockwise
until it locks.
6. Test the lights to make sure the
new bulb is working.
7. Install the light assembly cover.
Make sure it locks in place.
Replacin g Tail/Stopligh t an d
Back-u p Ligh t Bulb s
1. Open the hatch. Remove the
tether hardware cover with a small
flat-tip screwdriver and tether
anchor plate with a wrench by turning the bolt counterclockwise.
When reinstalling tether hardware,
see Protecting Children on page
41.
On Type-R model
You cannot replace these bulbs
yourself, contact your Acura dealer.
Maintenanc e
Page 214 of 279
Light
s
2. Undo the seven cover fasteners by
pushing on the center of each
fastener's head until it pops in. Remove the taillight cover panel.
3. Remove the socket by turning it
one-quarter turn counterclockwise. 4
. Try the tail/stoplights and back-up
light to verify which bulb needsreplacing. Remove the bulb by
turning it counterclockwise.
5. Install the new bulb in the socket.
Test it to make sure it works.
6. Reinstall the socket into the light
assembly.
7. Reinstall the tether anchor
hardware. Make sure the toothed washer ison the bottom of the bolt. Tighten
the bolt to:
16 lbf.ft (22 N.m , 2.2 kgf.m)
If a torque wrench was not used,
see your Acura dealer as soon as
possible to verify proper
installation.
CONTINUED
Maintenanc e
Page 215 of 279
Light
s
8. Reset each fastener by pushing onthe pointed end until it pops back almost flush with the fingers on
the housing.
9. Reinstall the cover. Secure each
fastener by pushing on the center
until it locks (the center is flush with the head).
Replacin g a Rea r Licens e Bul b
1. Remove the two screws and
remove the license light assembly.
2. Remove the socket from the light assembly by turning it one-quarter
turn counterclockwise.
3. Pull the bulb straight out of its
socket. Push the new bulb in until
it bottoms in the socket.
4. Turn on the parking lights and
check that the new bulb is
working.
5. Reinstall the license light assem-
bly. Install the two screws and
tighten them securely.
Maintenanc e
Page 216 of 279
Light
s
Replacin g Ceiling , Spo t an d Carg o
Are a Ligh t Bulb s
The ceiling, spot and cargo area lights come apart the same way.
They do not all use the same bulb.
1. Remove the lens by carefully
prying on the edge of the lens with
a fingernail file or a small flat-tip
screwdriver. Do not pry on the
edge of the housing around the
lens.
2. Remove the bulb by pulling it
straight out of its metal tabs.
3. Push the new bulb into the metal
tabs. Snap the lens back in place.
LS, GS and GS-R models
Maintenance
SPOTLIGHT
S
CEILIN G LIGH T CARG
O ARE A LIGH T