Page 121 of 381

3 - 52
CHK
ADJ
CHECKING THE TIRES
2. Check:
• tire surfaces
Damage/wear ® Replace the tire.
1Tire tread depth
2Side wall
3Wear indicator
WARNINGWARNING
• Do not use a tubeless tire on a wheel
designed only for tube tires to avoid
tire failure and personal injury from
sudden deflation.
• When using a tube tire, be sure to
install the correct tube.
• Always replace a new tube tire and a
new tube as a set.
• To avoid pinching the tube, make sure
that the wheel rim band and tube are
centered in the wheel groove.
• Patching a punctured tube is not rec-
ommended. If it is absolutely neces-
sary to do so, use great care and
replace the tube as soon as possible
with a good quality replacement.
Tire õWheel
• After extensive tests, the tires listed
below have been approved by
Yamaha Motor Co., Ltd. for this
model. The front and rear tires should
always be by the same manufacturer
and of the same design. No guarantee
concerning handling characteristics
can be given if a tire combination
other than one approved by Yamaha is
used on this motorcycle.
Minimum tire tread depth
1.6 mm (0.06 in)
Tube wheel Tube tire only
Tubeless wheelTube or tubeless
tire
Front tire
Manufacturer Size Model
PIRELLI120/70 ZR17
(58W)MTR01A
Rear tire
Manufacturer Size Model
PIRELLI180/55 ZR17
(73W)MTR08
õ
Page 122 of 381
3 - 53
CHK
ADJ
WARNINGWARNING
After mounting a new tire, ride conser-
vatively for a while to become accus-
tomed to the “feel” of the new tire and
to allow the tire to seat itself properly in
the rim. Failure to do so could lead to an
accident with possible injury to the rider
or damage to the motorcycle.
NOTE:
For tires with a direction of rotation
mark 1:
• Install the tire with the mark pointing
in the direction of wheel rotation.
• Align the mark 2 with the valve instal-
lation point.
EB304180
CHECKING THE WHEELS
The following procedure applies to both of
the wheels.
1. Check:
• wheel
Damage/out-of-round ® Replace.
WARNINGWARNING
Never attempt to make any repairs to
the wheel.
NOTE:
After a tire or wheel has been changed
or replaced, always balance the wheel.
CHECKING THE TIRES/CHECKING THE WHEELS
Page 123 of 381

3 - 54
CHK
ADJ
EB304200
CHECKING AND LUBRICATING THE
CABLES
The following procedure applies to all of
the cable sheaths and cables.
WARNINGWARNING
Damaged cable sheaths may cause the
cable to corrode and interfere with its
movement. Replace damaged cable
sheaths and cables as soon as possible.
1. Check:
• cable sheath
Damage ® Replace.
2. Check:
• cable operation
Rough movement ® Lubricate.
NOTE:
Hold the cable end upright and pour a
few drops of lubricant into the cable
sheath or use a suitable lubing device.
EB304210
LUBRICATING THE LEVERS AND PEDALS
Lubricate the pivoting point and metal-to-
metal moving parts of the levers and ped-
als.
EB304220
LUBRICATING THE SIDESTAND
Lubricate the pivoting point and metal-to-
metal moving parts of the sidestand.
EB304240
LUBRICATING THE REAR SUSPENSION
Lubricate the pivoting point and metal-to-
metal moving parts of the rear suspension.
Recommended lubricant
Engine oil or a suitable cable
lubricant
Recommended lubricant
Lithium soap base grease
Recommended lubricant
Lithium soap base grease
Recommended lubricant
Molybdenum disulfide grease
CHECKING AND LUBRICATING THE CABLES/
LUBRICATING THE LEVERS AND PEDALS/LUBRICATING THE
SIDESTAND/LUBRICATING THE REAR SUSPENSION
Page 124 of 381

3 - 55
CHK
ADJ
EB305020
ELECTRICAL SYSTEM
CHECKING AND CHARGING THE BATTERY
WARNINGWARNING
Batteries generate explosive hydrogen
gas and contain electrolyte which is
made of poisonous and highly caustic
sulfuric acid.
Therefore, always follow these preven-
tive measures:
• Wear protective eye gear when han-
dling or working near batteries.
• Charge batteries in a well-ventilated
area.
• Keep batteries away from fire, sparks
or open flames (e.g., welding equip-
ment, lighted cigarettes).
• DO NOT SMOKE when charging or
handling batteries.
• KEEP BATTERIES AND ELECTROLYTE
OUT OF REACH OF CHILDREN.
• Avoid bodily contact with electrolyte
as it can cause severe burns or perma-
nent eye injury.
FIRST AID IN CASE OF BODILY CON-
TACT:
EXTERNAL
• Skin – Wash with water.
• Eyes – Flush with water for 15 minutes
and get immediate medical attention.
INTERNAL
• Drink large quantities of water or milk
followed with milk of magnesia,
beaten egg or vegetable oil. Get
immediate medical attention.
ACHTUNG:CAUTION:
• This is a sealed battery. Never remove
the sealing caps because the balance
between cells will not be maintained
and battery performance will deterio-
rate.
• Charging time, charging amperage
and charging voltage for an MF bat-
tery are different from those of con-
ventional batteries. The MF battery
should be charged as explained in the
charging method illustrations. If the
battery is overcharged, the electrolyte
level will drop considerably. There-
fore, take special care when charging
the battery.
CHECKING AND CHARGING THE BATTERY
Page 126 of 381

WARNINGWARNING
Do not quick charge a battery.
ACHTUNG:CAUTION:
• Never remove the MF battery sealing
cap")
3 - 57
CHK
ADJ
5. Charge:
• battery
(refer to the appropriate charging
method illustration)
WARNINGWARNING
Do not quick charge a battery.
ACHTUNG:CAUTION:
• Never remove the MF battery sealing
caps.
• Do not use a high-rate battery charger
since it forces a high-amperage cur-
rent into the battery quickly and can
cause battery overheating and bat-
tery plate damage.
• If it is impossible to regulate the
charging current on the battery
charger, be careful not to overcharge
the battery.
• When charging a battery, be sure to
remove it from the motorcycle. (If
charging has to be done with the bat-
tery mounted on the motorcycle, dis-
connect the negative lead from the
battery terminal.)
• To reduce the chance of sparks, do not
plug in the battery charger until the
battery charger leads are connected to
the battery.
• Before removing the battery charger
lead clips from the battery terminals,
be sure to turn off the battery charger.
• Make sure that the battery charger
lead clips are in full contact with the
battery terminal and that they are not
shorted. A corroded battery charger
lead clip may generate heat in the con-
tact area and a weak clip spring may
cause sparks.
• If the battery becomes hot to the
touch at any time during the charging
process, disconnect the battery
charger and let the battery cool before
reconnecting it. Hot batteries can
explode!
• As shown in the following illustration,
the open-circuit voltage of an MF bat-
tery stabilizes about 30 minutes after
charging has been completed. There-
fore, wait 30 minutes after charging is
completed before measuring the
open-circuit voltage.
(68 ˚F)
(68 ˚F)
CHECKING AND CHARGING THE BATTERY
Page 130 of 381
3 - 61
CHK
ADJ
3. Replace:
• blown fuse
t t t t t t t t t t t t t t t t t t t t t t t t t t t
a. Set the main switch to “OFF”.
b. Install a new fuse of the correct
amperage.
c. Set the main switch to “ON” and ver-
ify if the electrical circuit is opera-
tional.
d. If the fuse immediately blows again,
check the electrical circuit.
s s s s s s s s s s s s s s s s s s s s s s s s s s s
WARNINGWARNING
Never use a fuse with an amperage
other than that specified. Improvising or
using a fuse with the wrong amperage
rating may cause extensive damage to
the electrical system, cause the lighting
and ignition systems to malfunction
and could possibly cause a fire.
4. Install:
• rear cowling
Refer to “COWLINGS”.Item Amperage Q’ty
Main fuse 30 A 1
Headlight
fuse20 A 1
Signaling
system fuse20 A 1
Electronic
fuel injection
system fuse20 A 1
ECU fuse 7.5 A 1
Radiator
fan motor
fuse7.5 A 1
Backup fuse
(odometer)7.5 A 1
Reserve 30 A 1
Reserve 20 A 2
Reserve 7.5 A 2
CHECKING THE FUSES
Page 131 of 381
3 - 62
CHK
ADJ
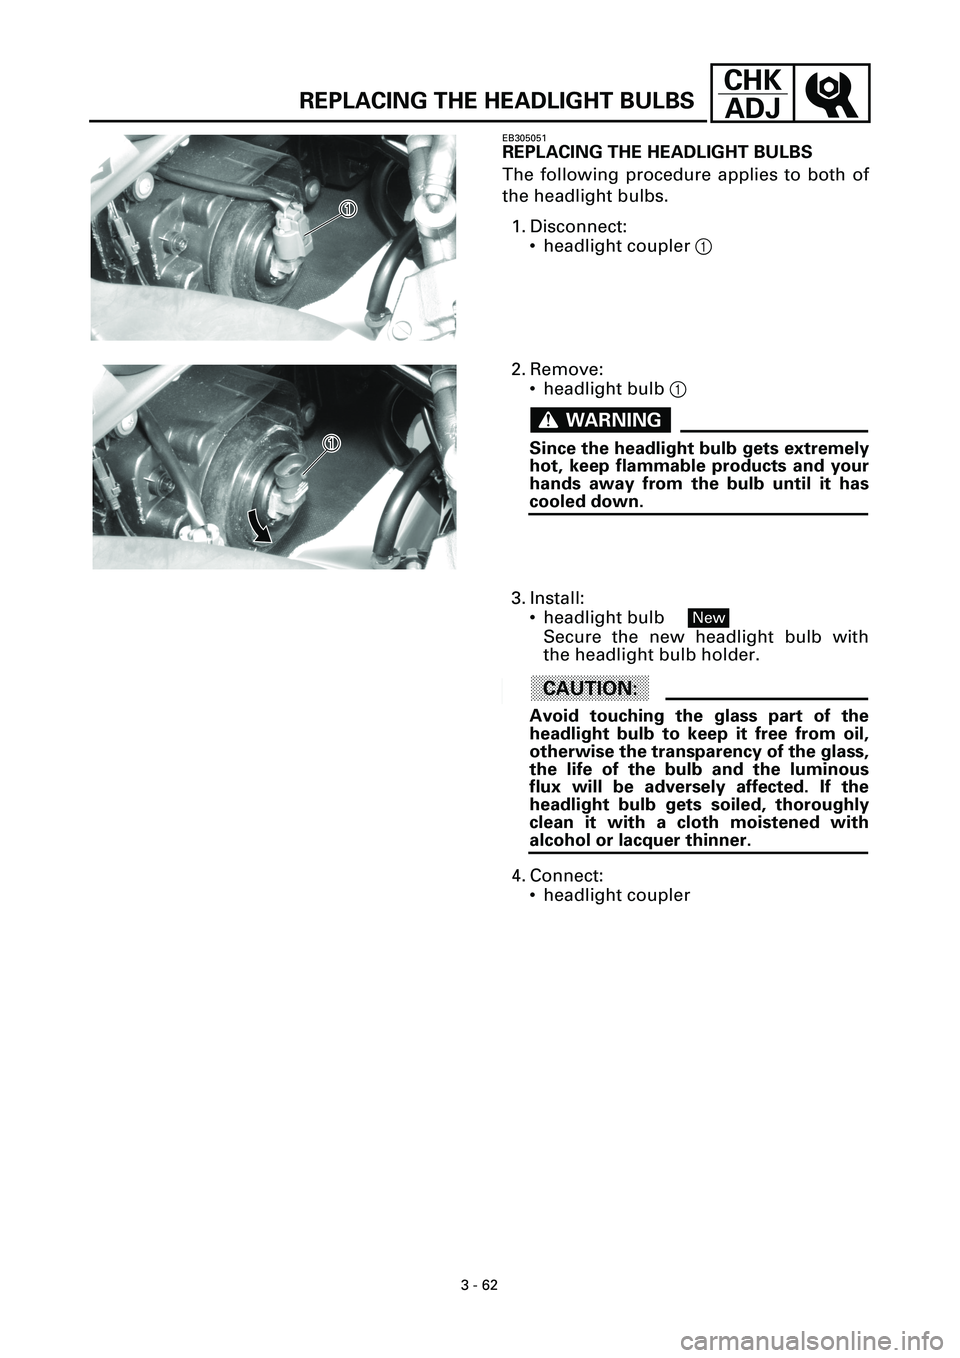
REPLACING THE HEADLIGHT BULBS
EB305051
REPLACING THE HEADLIGHT BULBS
The following procedure applies to both of
the headlight bulbs.
1. Disconnect:
• headlight coupler 1
1�
1�
2. Remove:
• headlight bulb 1
WARNINGWARNING
Since the headlight bulb gets extremely
hot, keep flammable products and your
hands away from the bulb until it has
cooled down.
1�
1�
3. Install:
• headlight bulb
Secure the new headlight bulb with
the headlight bulb holder.
ACHTUNG:CAUTION:
Avoid touching the glass part of the
headlight bulb to keep it free from oil,
otherwise the transparency of the glass,
the life of the bulb and the luminous
flux will be adversely affected. If the
headlight bulb gets soiled, thoroughly
clean it with a cloth moistened with
alcohol or lacquer thinner.
4. Connect:
• headlight coupler
New
Page 148 of 381

5. Install:
• timing chain tensioner
t t t t t t t t t t t t t t t t t t t t t t t t t t t
a. Lightly press the timing chain te")
4 - 16
ENGCAMSHAFTS
4. Install:
• timing chain guide (exhaust side)
5. Install:
• timing chain tensioner
t t t t t t t t t t t t t t t t t t t t t t t t t t t
a. Lightly press the timing chain ten-
sioner rod into the timing chain ten-
sioner housing by hand.
b. While pressing the timing chain ten-
sioner rod, wind it clockwise with a
thin screwdriver 1 until it stops.
c. With the screwdriver still inserted
into the timing chain tensioner, install
the timing chain tensioner and gasket
onto the cylinder block. Then, tighten
the timing chain tensioner bolts to the
specified torque.
WARNINGWARNING
Always use a new gasket.
NOTE:
The “UP” mark on the timing chain ten-
sioner should face up.
d. Remove the screwdriver, make sure
that the timing chain tensioner rod
releases, and tighten the cap bolt to
the specified torque.
s s s s s s s s s s s s s s s s s s s s s s s s s s s
T R..
Timing chain tensioner bolt
10 Nm (1.0 m • kg, 7.2 ft • lb)
T R..
Cap bolt
10 Nm (1.0 m • kg, 7.2 ft • lb)
6. Turn:
• crankshaft
(several turns counterclockwise)