Page 304 of 381
7 - 54
CHAS
• When refilling, be careful that water
does not enter the reservoir. Water
will significantly lower the boiling
point of the clutch fluid and could
cause vapor lock.
ACHTUNG:CAUTION:
Clutch fluid may damage painted sur-
faces or plastic parts. Therefore, always
clean up any spilt clutch fluid immedi-
ately.
3. Bleed:
• clutch system
Refer to “BLEEDING THE HYDRAULIC
CLUTCH SYSTEM” in chapter 3.
4. Check:
• clutch fluid level
Below the minimum level mark a ®
Add the recommended clutch fluid to
the proper level.
Refer to “CHECKING THE CLUTCH
FLUID LEVEL” in chapter 3.
5. Check:
• clutch lever operation
Soft or spongy feeling ® Bleed the
clutch system.
Refer to “BLEEDING THE HYDRAULIC
CLUTCH SYSTEM” in chapter 3.
aa
HYDRAULIC CLUTCH
Page 311 of 381
7 - 61
CHAS
4. Check:
• cap bolt O-ring
Damage/wear
®
Replace.
EB703702
ASSEMBLING THE FRONT FORK LEGS
The following procedure applies to both of
the front fork legs.
WARNINGWARNING
• Make sure that the oil levels in both
front fork legs are equal.
• Uneven oil levels can result in poor
handling and a loss of stability.
NOTE:
• When assembling the front fork leg, be
sure to replace the following parts:
- inner tube bushing
- outer tube bushing
- oil seal
- dust seal
• Before assembling the front fork leg,
make sure that all of the components
are clean.
1. Install:
• damper rod assembly
1
ACHTUNG:CAUTION:
Allow the damper rod assembly to slide
slowly down the inner tube
2
until it
protrudes from the bottom of the inner
tube. Be careful not to damage the inner
tube.
NOTE:
Be sure that the clip
3
is still correctly
installed.
2. Lubricate:
• inner tube’s outer surface
Recommended lubricant
Yamaha fork and shock oil
M1 or equivalent
FRONT FORK
Page 313 of 381
7 - 63
CHAS
8. Install:
• dust seal
1
(with the fork seal driver
2
)
9. Install:
• rod puller
1
• adapter
2
(onto the damper rod
3
)
10.Fully compress the front fork leg.
11.Fill:
• front fork leg
(with the specified amount of the rec-
ommended fork oil)
ACHTUNG:CAUTION:
• Be sure to use the recommended fork
oil. Other oils may have an adverse
effect on front fork performance.
• When disassembling and assembling
the front fork leg, do not allow any for-
eign material to enter the front fork.
Rod puller
90890-01437
Adapter
90890-01436
Quantity (each front fork leg)
460 cm
3
(16.2 Imp oz, 15.6 US oz)
Recommended oil
Yamaha fork and shock oil
01 or equivalent
12.After filling the front fork leg, slowly
stroke the damper rod
1
up and down
(at least ten times) to distribute the fork
oil.
NOTE:
Be sure to stroke the damper rod slowly
because the fork oil may spurt out.
FRONT FORK
Page 329 of 381
7 - 79
CHAS
CHECKING THE RELAY ARM AND
CONNECTING ARM
1. Check:
• relay arm 1
• connecting arm 2
Damage/wear ® Replace.
• bearings
• oil seals
Damage/pitting ® Replace.
• spacers
Damage/scratches ® Replace.
1�
1�
2�
2�
2�
2�
EB706701
INSTALLING THE REAR SHOCK ABSORBER
ASSEMBLY
1. Lubricate:
• bearings
• oil seals
• spacers
2. Install:
• relay arm
• connecting arms
• rear shock absorber assembly
NOTE:
When installing the rear shock absorber
assembly, lift up the swingarm.
3. Tighten:
• relay arm-to-frame nut
• relay arm-to-connecting arm nut
• connecting arm-to-swingarm nut
• rear shock absorber assembly upper nut
• rear shock absorber assembly lower nut
Recommended lubricant
Molybdenum disulfide grease
T R..40 Nm (4.0 m · kg, 29 ft · lb)
T R..40 Nm (4.0 m · kg, 29 ft · lb)
T R..40 Nm (4.0 m · kg, 29 ft · lb)
T R..40 Nm (4.0 m · kg, 29 ft · lb)
T R..40 Nm (4.0 m · kg, 29 ft · lb)
REAR SHOCK ABSORBER ASSEMBLY
Page 335 of 381

7 - 85
CHAS
c. Remove the drive chain from the ker-
osine and completely dry it.
ACHTUNG:CAUTION:
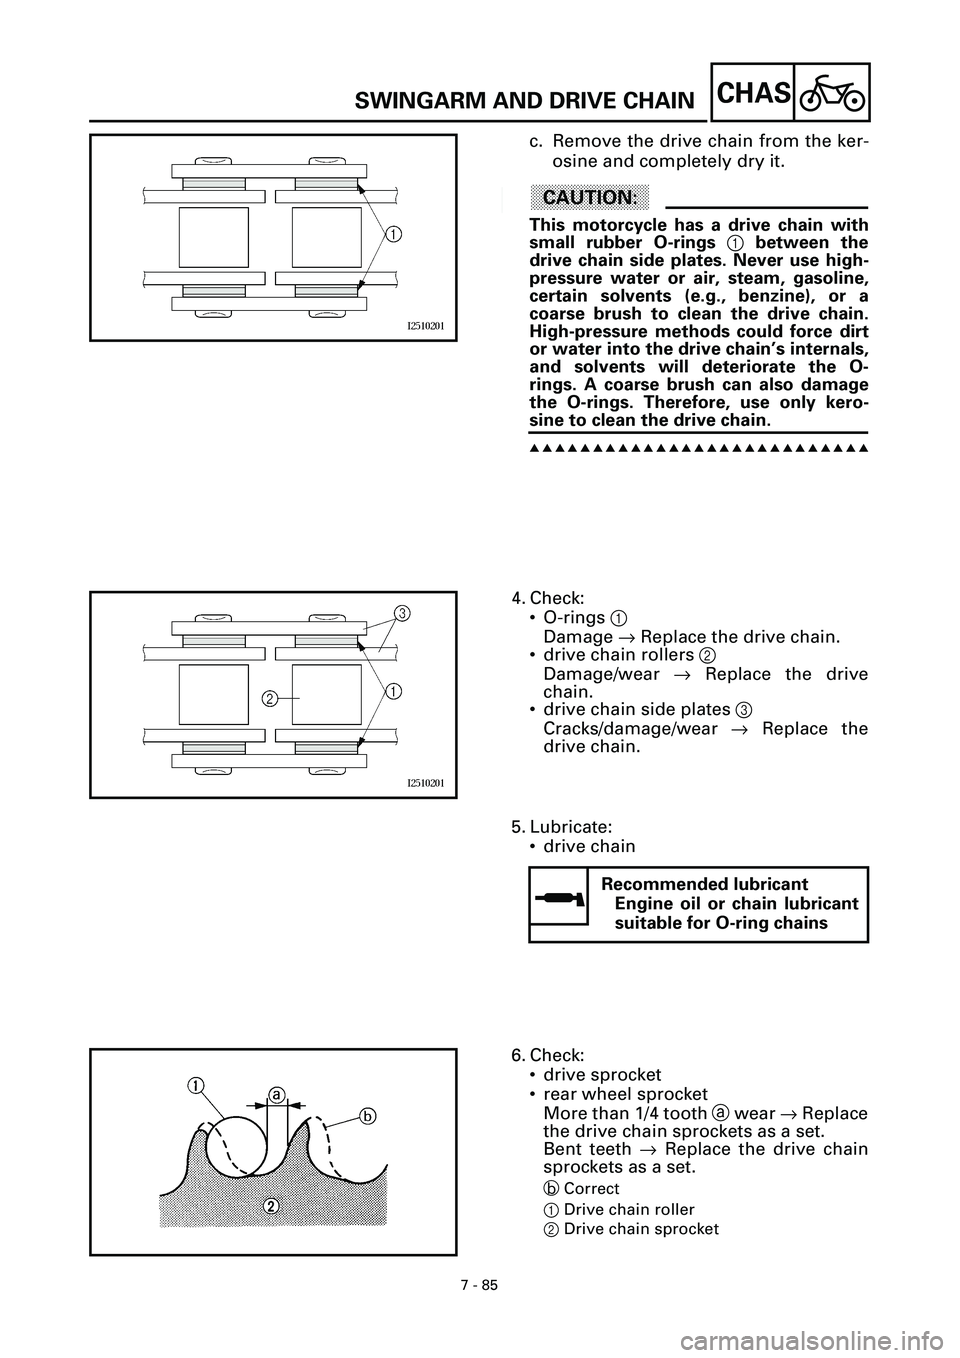
This motorcycle has a drive chain with
small rubber O-rings 1 between the
drive chain side plates. Never use high-
pressure water or air, steam, gasoline,
certain solvents (e.g., benzine), or a
coarse brush to clean the drive chain.
High-pressure methods could force dirt
or water into the drive chain’s internals,
and solvents will deteriorate the O-
rings. A coarse brush can also damage
the O-rings. Therefore, use only kero-
sine to clean the drive chain.
s s s s s s s s s s s s s s s s s s s s s s s s s s s
4. Check:
• O-rings 1
Damage ® Replace the drive chain.
• drive chain rollers 2
Damage/wear ® Replace the drive
chain.
• drive chain side plates 3
Cracks/damage/wear ® Replace the
drive chain.
5. Lubricate:
• drive chain
Recommended lubricant
Engine oil or chain lubricant
suitable for O-ring chains
6. Check:
• drive sprocket
• rear wheel sprocket
More than 1/4 tooth a wear ® Replace
the drive chain sprockets as a set.
Bent teeth ® Replace the drive chain
sprockets as a set.
b Correct
1Drive chain roller
2Drive chain sprocket
SWINGARM AND DRIVE CHAIN