1999 TOYOTA CAMRY overall wiring
[x] Cancel search: overall wiringPage 4011 of 4592

A INTRODUCTION
This manual consists of the following 13 sections:
No.
SectionDescription
A
INDEXIndex of the contents of this manual.
A
INTRODUCTIONBrief explanation of each section.
BHOW TO USE THIS
MANUALInstructions on how to use this manual.
CTROUBLE±
SHOOTINGDescribes the basic inspection procedures for electrical circuits.
DABBREVIATIONSDefines the abbreviations used in this manual.
E
GLOSSARY OF
TERMS AND
SYMBOLS
Defines the symbols and functions of major parts.
FRELAY LOCATIONSShows position of the Electronic Control Unit, Relays, Relay Block, etc.
This section is closely related to the system circuit.
GELECTRICAL
WIRING ROUTINGDescribes position of Parts Connectors, Splice points, Ground points, etc.
This section is closely related to the system circuit.
INDEXIndex of the system circuits.
H
SYSTEM CIRCUITS
Electrical circuits of each system are shown from the power supply through ground
points. Wiring connections and their positions are shown and classified by code
according to the connection method. (Refer to the section, ºHow to use this manualº).
The ºSystem Outlineº and ºService Hintsº useful for troubleshooting are also contained
in this section.
IGROUND POINTShows ground positions of all parts described in this manual.
JPOWER SOURCE
(Current Flow Chart)Describes power distribution from the power supply to various electrical loads.
KCONNECTOR LISTDescribes the form of the connectors for the parts appeared in this book.
This section is closely related to the system circuit.
LPART NUMBER OF
CONNECTORSIndicates the part number of the connectors used in this manual.
M
OVERALL
ELECTRICAL
WIRING DIAGRAM
Provides circuit diagrams showing the circuit connections.
Page 4012 of 4592

HOW TO USE THIS MANUAL B
This manual provides information on the electrical circuits installed on vehicles by
dividing them into a circuit for each system.
The actual wiring of each system circuit is shown from the point where the power
source is received from the battery as far as each ground point. (All circuit
diagrams are shown with the switches in the OFF position.)
When troubleshooting any problem, first understand the operation of the circuit
where the problem was detected (see System Circuit section), the power source
supplying power to that circuit (see Power Source section), and the ground points
(see Ground Point section). See the System Outline to understand the circuit
operation.
When the circuit operation is understood, begin troubleshooting of the problem
circuit to isolate the cause. Use Relay Location and Electrical Wiring Routing
sections to find each part, junction block and wiring harness connectors, wiring
harness and wiring harness connectors, splice points, and ground points of each
system circuit. Internal wiring for each junction block is also provided for better
understanding of connection within a junction block.
Wiring related to each system is indicated in each system circuit by arrows
(from__, to__). When overall connections are required, see the Overall Electrical
Wiring Diagram at the end of this manual.
Page 4185 of 4592

M OVERALL ELECTRICAL WIRING DIAGRAM
Page 4186 of 4592
![TOYOTA CAMRY 1999 Service Repair Manual M
[A]: System Title
[B]: Indicates the wiring color.
Wire colors are indicated by an alphabetical code.
B = Black W = White BR = Brown
L = Blue V = Violet SB = Sky Blue
R = Red O = Orange LG = Light G](/manual-img/14/57448/w960_57448-4185.png "TOYOTA CAMRY 1999 Service Repair Manual M
[A]: System Title
[B]: Indicates the wiring color.
Wire colors are indicated by an alphabetical code.
B = Black W = White BR = Brown
L = Blue V = Violet SB = Sky Blue
R = Red O = Orange LG = Light G")
M
[A]: System Title
[B]: Indicates the wiring color.
Wire colors are indicated by an alphabetical code.
B = Black W = White BR = Brown
L = Blue V = Violet SB = Sky Blue
R = Red O = Orange LG = Light Green
P = Pink Y = Yellow GR = Gray
G = Green
The first letter indicates the basic wire color and the
second letter indicates the color of the stripe.
Example: L ± Y
L
(Blue)Y
(Yellow)
[C]: The position of the parts is the same as shown in
the wiring diagram and wire routing.
[D]: Indicates the pin number of the connector.
The numbering system is different for female
and male connectors.
Example :
Numbered in order
from upper left to
lower rightNumbered in order
from upper right to
lower left
Female Male
The numbering system for the overall wiring
diagram is the same as above
[E]: Indicates a Relay Block. No shading is used and
only the Relay Block No. is shown to distinguish
it from the J/B.
Example : Indicates Relay Block No.1
[F]: Junction Block (The number in the circle is the
J/B No. and the connector code is shown beside
it). Junction Blocks are shaded to clearly
separate them from other parts.
3C indicates
that it is inside
Junction Block
No.3 Example:
[G]: Indicates related system.
[H]: Indicates the wiring harness and wiring harness
connector. The wiring harness with male
terminal is shown with arrows (
).
Outside numerals are pin numbers.
Female Male ( )
[I]: ( ) is used to indicate different wiring and
connector, etc. when the vehicle model, engine
type, or specification is different.
[J]: Indicates a shielded cable.
[K]: Indicates and located on ground point.
[L]: The same code occuring on the next page
indicates that the wire harness is continuous.
Page 4187 of 4592

SYSTEM INDEX
M OVERALL ELECTRICAL WIRING DIAGRAM
SYSTEMS LOCATION SYSTEMS LOCATION
ABS 15±2. . . . . . . . . . . . . . . . . . . . . . . . . . . . . . . . . . . . . . . . . . . . . . . . . . . . .
Air Conditioning 19±2. . . . . . . . . . . . . . . . . . . . . . . . . . . . . . . . . . . . . . . . . . .
Back±Up Light 5±4. . . . . . . . . . . . . . . . . . . . . . . . . . . . . . . . . . . . . . . . . . . . . .
Charging 1±4. . . . . . . . . . . . . . . . . . . . . . . . . . . . . . . . . . . . . . . . . . . . . . . . . . .
Cigarette Lighter and Clock 12±4. . . . . . . . . . . . . . . . . . . . . . . . . . . . . . . . .
Combination Meter 17±2. . . . . . . . . . . . . . . . . . . . . . . . . . . . . . . . . . . . . . . .
Cruse Control 13±2. . . . . . . . . . . . . . . . . . . . . . . . . . . . . . . . . . . . . . . . . . . . .
Door Lock Control 11±2. . . . . . . . . . . . . . . . . . . . . . . . . . . . . . . . . . . . . . . . . .
Electronically Controlled Transmission and A/T Indicator 3±2. . . . . . . . . .
Engine Control 2±2. . . . . . . . . . . . . . . . . . . . . . . . . . . . . . . . . . . . . . . . . . . . . .
Headlight 4±2. . . . . . . . . . . . . . . . . . . . . . . . . . . . . . . . . . . . . . . . . . . . . . . . . . .
Horn 16±4. . . . . . . . . . . . . . . . . . . . . . . . . . . . . . . . . . . . . . . . . . . . . . . . . . . . .
Illumination 7±2. . . . . . . . . . . . . . . . . . . . . . . . . . . . . . . . . . . . . . . . . . . . . . . . .
Interior Light 6±3. . . . . . . . . . . . . . . . . . . . . . . . . . . . . . . . . . . . . . . . . . . . . . . .
Key Reminder and Seat Belt Warning 16±2. . . . . . . . . . . . . . . . . . . . . . . .
Light Auto Turn Off 6±2. . . . . . . . . . . . . . . . . . . . . . . . . . . . . . . . . . . . . . . . . . Power Outlet 12±3. . . . . . . . . . . . . . . . . . . . . . . . . . . . . . . . . . . . . . . . . . . . . .
Power Source 1~19±1. . . . . . . . . . . . . . . . . . . . . . . . . . . . . . . . . . . . . . . . . . .
Power Window 10±2. . . . . . . . . . . . . . . . . . . . . . . . . . . . . . . . . . . . . . . . . . . .
Radiator Fan and Condenser Fan 18±3. . . . . . . . . . . . . . . . . . . . . . . . . . . .
Radio and Player 11±7. . . . . . . . . . . . . . . . . . . . . . . . . . . . . . . . . . . . . . . . . . .
Rear Window Defogger and Mirror Heater 18±2. . . . . . . . . . . . . . . . . . . .
Remote Control Mirror 9±3. . . . . . . . . . . . . . . . . . . . . . . . . . . . . . . . . . . . . . . .
Shift Lock 12±2. . . . . . . . . . . . . . . . . . . . . . . . . . . . . . . . . . . . . . . . . . . . . . . .
SRS 14±2. . . . . . . . . . . . . . . . . . . . . . . . . . . . . . . . . . . . . . . . . . . . . . . . . . . . .
Starting and Ignition 1±2. . . . . . . . . . . . . . . . . . . . . . . . . . . . . . . . . . . . . . . . . .
Stop Light 8±4. . . . . . . . . . . . . . . . . . . . . . . . . . . . . . . . . . . . . . . . . . . . . . . . . .
Taillight 8±2. . . . . . . . . . . . . . . . . . . . . . . . . . . . . . . . . . . . . . . . . . . . . . . . . . . . .
Turn Signal and Hazard Warning Light 5±2. . . . . . . . . . . . . . . . . . . . . . . . . .
Wiper and Washer 9±2. . . . . . . . . . . . . . . . . . . . . . . . . . . . . . . . . . . . . . . . . . .
Page 4190 of 4592
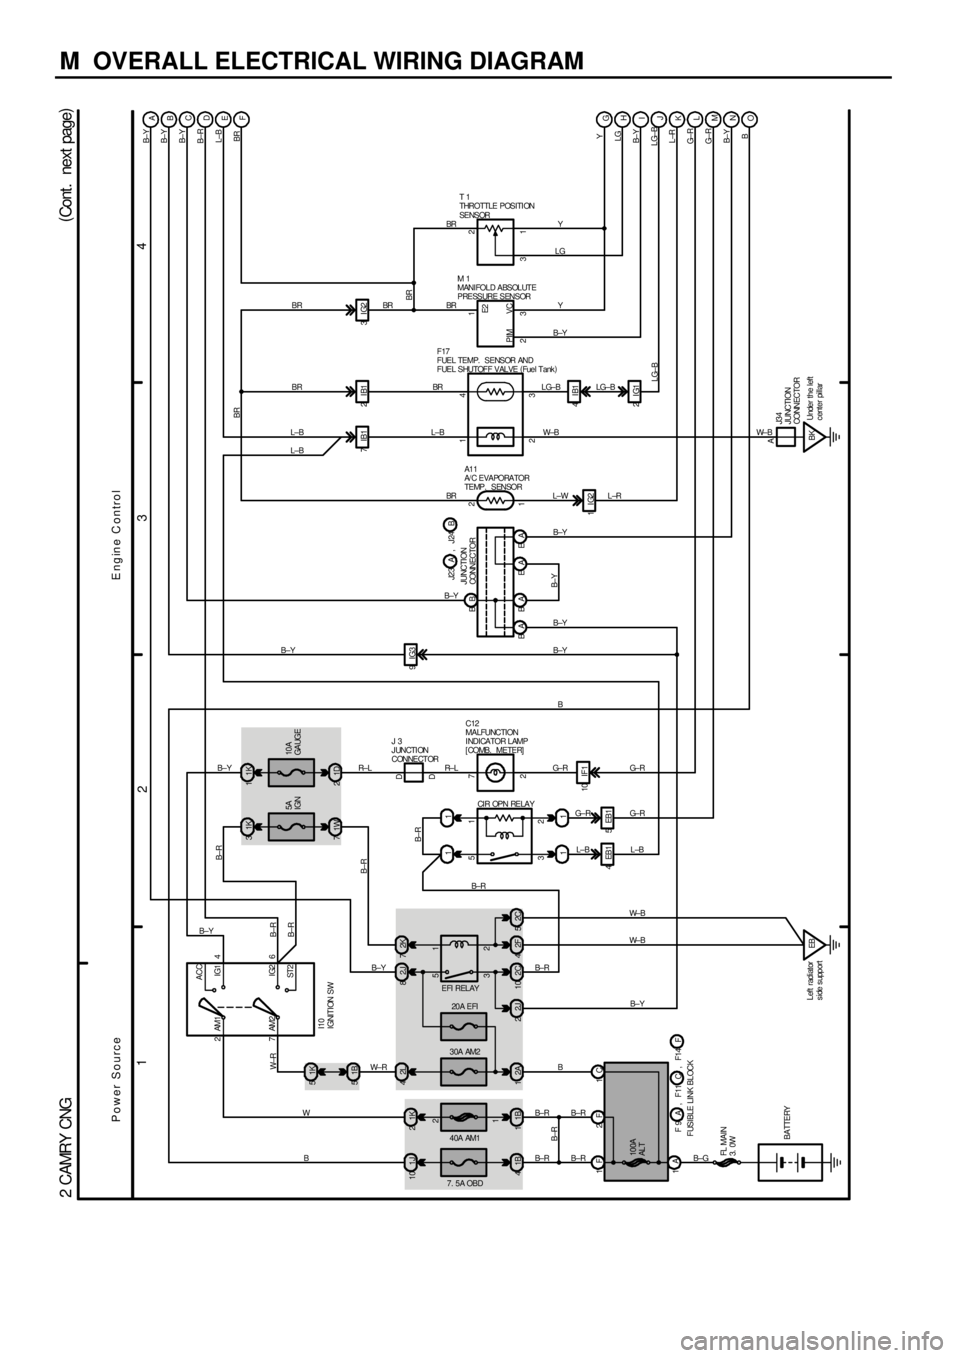
M OVERALL ELECTRICAL WIRING DIAGRAM
1
234
(
Cont . next page)
2 CAMRY CNG
EFI RELAYCIR OPN RELAY
20A EFI
40A AM1 30A AM2
7. 5A OBD
2 1
3 5
2 1
3 5 1J 10 1K22L 41K 5
82J 2K7
11
1B 41B12A12C10 2J 22F4
11 1B 5
L±B
AM2 6
I10
IGNITION SW4 AM1
ST2IG2
2 IG1 ACC
7 2
11K 31K
5A
IGN
4EB1 5EB1
EB Left radiator
s ide s upport 1F 2F 1C
1A
B±G
BATTERY10A
GA UGE
71WB± Y B± Y
1D 2B± Y
FUSIBLE LINK BLOCK10 IF1
FL MAIN
3. 0WBA
100A
AL T
B±Y
1B±R
BB W±R
2
B±R
BR
IG3 9
BR
A
B±R
B±RB
Y
C
LG
Y
B±Y
LG±B
L±W
B±Y
B±Y B±Y
R± L G± R G± R
2
G± R
3
BB±Y W± B M 1
MANIFOLD ABSOLUTE
PRESSURE SENSORT 1
THROTTLE POSITI ON
SENSOR
B±RL±B L±B
L±B G±R
W± R
W
B
IG2 1
B± R F17
FUEL TEMP. SENSOR AND
FUEL SHUTOFF VALVE (
Fuel Tank)
B± R
1
A1 1
A/ C EVAPORATOR
TEMP. SENSOR
ON ML KJI H G
B±R
Y
LG
B± Y
LG±B
L±R
G±R
G±R
B± Y
B
C12
MALFUNCTION
I NDI CA TOR L AMP
[COMB. METER]
7
2 D D
J 3
JUNCTION
CONNECTOR
JUNCTION
CONNECTOR
B±Y
23 31 1
12
R± LB
PIM VCE2
B± R
Power SourceEngine Control
D
E
F
BR
4IB1 BR
3IG2
BR BR
7IB1
LG±B
EA
W±B
L±R
EA BAL±B
B±YB± Y
, F11 F 9 A C , F14 FB J23 J24A,
2C 5
W± B
B±Y L±B
2IG1
BKUnder the left
center pillar B±RB±R
B±Y
B±R
A
J34
JUNCTION
CONNECTOR
W± B
LG±BBR
B± R BR
2IB1
BR4BR
Page 4192 of 4592

M OVERALL ELECTRICAL WIRING DIAGRAM
9
101112
2 CAMRY CNG (
Cont' d)
ECIntake
manif oldB±YBR BR W± B
BR BR BR
STP 4A
LOCK IN 18 C
PRS 10 D
B±OW± L
MG C 21 AL±Y
A/CS 10 AR±B
LOCK 15 AR± W
NSW 6AB±W
STA 11 AGR
IGT1 20 CB
IGF 3CW±R
IGT2 19 CY±RBR
10 IG3
W± L Fr om Ignit ion Coil
and Igniter
No. 1, No. 2< 1±3>
BRTE1 15 B
NE
1 2
C 2
CRANKSHAFT
POSITION SENSOR
1 2C 1
CA MSHAF T
POSITION SENSORNE ± GE03 E0 2 E01 SPD
E04
Intake
ma n i f o l dECL
B±RBRL B±W
(
Shielded) (
Shielded)BRBR
BR A
AA
A
A J20
JUNCTION
CONNE CTOR
BR BR BR BR
TE1 E1+BL±W
To Tac hometer
[Comb. Met er]
< 17±5>To A/ C Magnetic
Clutch and Loc k
Sens or< 19±4> Fr om A/C Dual
Pressure SW< 19±4>Fr om MG CL T
Relay< 19±2>Fro m A/C SW
< 19±4> Fro m A/C SW
< 19±4> From º STARTERº
Fuse< 1±2>Fr om Park/ Neutral
Posit ion SW< 1±2>12
8 D 1
DA TA LI NK
CONNECTOR 1
3
E1
BR
ENGI NE CONT ROL MODULE
IG3 6
E ngine Control
BR
BR
BR
G L
A 8
AI R FUEL
RA TI O SE NS ORHTA F 2A
AF± 14 B
AF+ 6B 14 23
B±W (
Shielded)
HT AF±+B AF+ A
B
D
EB B±Y
C 16 A 13 C 5 C 17 C 4
BRA16 B 22 C 13 C
JUNCTION
CONNECTORJ23
TACH
A
, E 5 E 4 A B , E 6 C , E 7 D
BRBR CW± B1IG1G G
7IG1
G
9A 8A FA
FA
B±O From Stop Light SW
< 8±4>
V±W Fr om Speedomet er
[Comb. Meter]
< 17±8>G±W
2 1 12 C 2C
I 4
INJECTOR NO. 1
L B±W
(
Shielded)
2 1 11 C 1C
I 5
INJECTOR NO. 2
BR B±R
(
Shielded)
2 1 25 C 15 C
I 6
INJECTOR NO. 3
GR
(
Shielded)
2 1 24 C 14 C
I 7
INJECTOR NO. 4
WO
(
Shielded)
4IG1
IHCowl side
panel RH A AAA
A
W± B W± B
J21
J UNCTI ON CONNECTOR3IG1
BR
26 C
A A
J18
JUNCT I ON
CONNECTOR
BRBR BR
W±B BR
BREO5 #40 #40+ #30 #30+ # 10+ # 10 # 20+ # 20
Page 4195 of 4592

M OVERALL ELECTRICAL WIRING DIAGRAM