Page 274 of 349
BO0IO–04
I12751
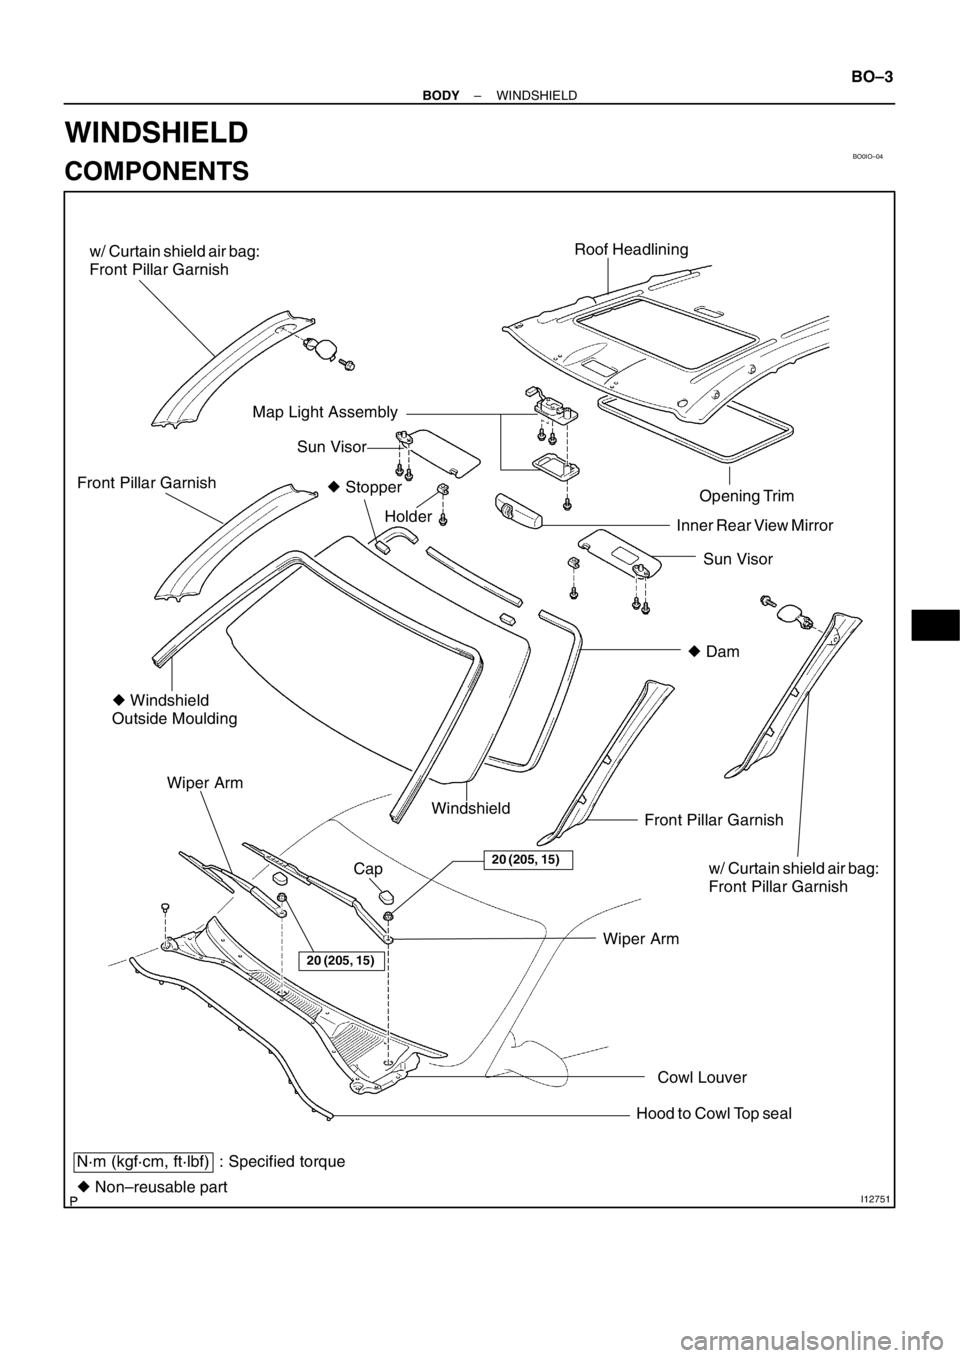
Roof Headlining
Sun Visor Opening Trim
Holder Front Pillar Garnish
� Windshield
Outside Moulding
Front Pillar Garnish Windshield Wiper Arm
N·m (kgf·cm, ft·lbf) : Specified torque
� Non–reusable partWiper Arm
Sun Visor
20 (205, 15)
20 (205, 15)
� Dam Inner Rear View Mirror
Cowl Louver Map Light Assembly
Cap
Hood to Cowl Top seal � Stopper
w/ Curtain shield air bag:
Front Pillar Garnish
w/ Curtain shield air bag:
Front Pillar Garnish
– BODYWINDSHIELD
BO–3
WINDSHIELD
COMPONENTS
Page 275 of 349
BO2J0–01
H03507
: Clip
H11626
Pillar Garniush
Cover
2 Clips
I12491
H03502
BO–4
– BODYWINDSHIELD
REMOVAL
1. REMOVE THESE PARS
(a) Remove the front wiper arms.
(b) Remove the weatherstrip.
(c) Remove the cowl louver.
(d) Remove the sun visors and holders.
(e) Remove the map light assembly.
(f) Remove the assist grip.
(g) Remove the upper part of front door opening trims.
(h) w/ Curtain Shield Airbag:
(1) Using a screwdriver, raise the pillar garnish cover.
(2) Remove the bolt, pillar garnish cover and front pillar
garnish.
(3) Remove the 2 bolts.
(4) Pack the airbag with protection cover.
NOTICE:
Protection range is from instrument panel to ceiling.
(i) Remove the front pillar garnishes.
(j) Remove the inner rear view mirror.
(k) Remove the upper back panel hole No.1 cover.
2. REMOVE WINDSHIELD OUTSIDE UPPER MOULDING
Using a knife, cut off the moulding, as shown.
NOTICE:
Do not damage the body with the knife.
Page 280 of 349
 Use a scraper to remove any excessive or protruding
adhesive.
(d) Hold the windshield glass in pl")
BO3986
BO3671AdhesiveAdhesive
H03503
H11626
Pillar Garnish
Cover
2 Clips
– BODYWINDSHIELD
BO–9
(c) Use a scraper to remove any excessive or protruding
adhesive.
(d) Hold the windshield glass in place securely with protec-
tive tape or equivalent until the adhesive hardenes.
NOTICE:
Take care not to drive the vehicle during the time described
in the table below.
TemperatureMinimum time prior to driving the vehicle
35�C (95�F)1.5 hours
20�C (68�F)5 hours
5�C (41�F)24 hours
11. INSPECT FOR LEAKAGE AND REPAIR
(a) Do a leak test after the hardening time has elapsed.
(b) Seal any leakage with sealant.
Part No. 08833–00030 or equivalent
12. APPLY ADHESIVE AT MOULDING INSTALLATION
AREA
Coat the glass with adhesive at the moulding installation area.
Part No. 08833–00030 or equivalent
13. INSTALL WINDSHIELD MOULDING
Place the moulding onto the body and tap it by hand.
14. INSTALL THESE PARTS:
(a) Install the front part of roof headlining.
(b) Install the inner rear view mirror
(c) w/ Curtain Shield Air Bag:
(1) Remove the protection cover.
(2) Install the 2 bolts.
Torque: 5 N·m (51 kgf·cm, 44 in.·lbf)
(3) Install the front pillar garnish.
(4) Install the pillar garnish cover and bolt.
NOTICE:
Be sure to tighten the bolt.
(5) Fell the pillar garnish cover.
(d) Install the front pillar garnishes.
 Remove the front wiper arms.
(b) Remove the weatherstrip.
(c) Rem")