Page 24 of 656
HEATER AND VENTILATION 1A-3
Rear Duct
REMOVAL
1) Disconnect negative (–) cable at battery.
2) Remove front and second seats.
3) Remove console box.
4) Take off carpet till rear duct is totally exposed.
5) Remove rear duct.
INSTALLATION
Reverse removal sequence to install rear duct.
1. Heater unit
2. Rear duct
1
2
Page 546 of 656

BODY SERVICE 9-1
9
SECTION 9
BODY SERVICE
CONTENTS
Glass, Windows and Mirror .............................. 9-2
Quarter Window .............................................. 9-2
Body Structure .................................................. 9-3
Under Body Dimensions ................................. 9-3
Body Dimensions ............................................ 9-4
Seat..................................................................... 9-8
Second Seat .................................................... 9-8
Third Seat (If Equipped) .................................. 9-9
Paint and Coatings.......................................... 9-10Sealant Application Area............................... 9-10
Undercoating/Anti-corrosion Compound
Application Area ............................................ 9-17
Exterior and Interior Trim ............................... 9-19
Floor Carpet .................................................. 9-19
Front floor carpet ....................................... 9-19
Rear floor carpet (without third seat
vehicle) ...................................................... 9-20
Head Lining ................................................... 9-20
WARNING:
For vehicles equipped with Supplemental Restraint (Air Bag) System:
Service on and around the air bag system components or wiring must be performed only by an
authorized SUZUKI dealer. Refer to “Air Bag System Components and Wiring Location View” under
“General Description” in air bag system section in order to confirm whether you are performing ser-
vice on or near the air bag system components or wiring. Please observe all WARNINGS and “Ser-
vice Precautions” under “On-Vehicle Service” in air bag system section before performing service
on or around the air bag system components or wiring. Failure to follow WARNINGS could result in
unintentional activation of the system or could render the system inoperative. Either of these two
conditions may result in severe injury.
Technical service work must be started at least 90 seconds after the ignition switch is turned to the
“LOCK” position and the negative cable is disconnected from the battery. Otherwise, the system
may be activated by reserve energy in the Sensing and Diagnostic Module (SDM).
When body servicing, if shock may be applied to air bag system component parts, remove those
parts beforehand. (Refer to Section 10B.)
NOTE:
For the descriptions (items) not found in this section, refer to the same section of the Service Man-
ual mentioned in the FOREWORD of this manual.
Fasteners are important attaching parts in that they could affect the performance of vital compo-
nents and systems, and/or could result in major repair expense. They must be replaced with one of
the same part number of with an equivalent part if replacement becomes necessary.
Do not use a replacement part of lesser quality or substitute a design. Torque values must be used
as specified during reassembly to assure proper retention of these parts.
Page 553 of 656
9-8 BODY SERVICE
Seat
Second Seat
REMOVAL
1) Remove adjuster extension cover.
2) Remove adjuster extension bracket.
3) Remove front and rear adjuster inside covers.
4) Remove adjuster outside covers.
5) Remove second seat mounting bolts.
6) Disassemble and repair seat as necessary.
INSTALLATION
Reverse removal procedure to install rear seat, noting the following instruction.
•Tighten second seat mounting bolts as specified torque.
1. Head restraint 6. Rod 11. Seat adjuster cover 16. Rod belt (if equipped)
2. Head restraint guide 7. Seat reclining assembly cover 12. Cover Tightening torque
3. Seat back 8. Seat cushion 13. Adjuster extension bracket
4. Tether anchor hook 9. Adjuster handle (back side) 14. Adjuster handle (front side)
5. Seat reclining assembly 10. Seat adjuster 15. Second seat mounting bolt
Page 554 of 656
BODY SERVICE 9-9
Third Seat (If Equipped)
REMOVAL
1) Raise the front portion of seat cushion to remove rear seat cushion.
2) Remove 6 mounting bolts to remove seat back.
3) Disassemble and repair seat if necessary.
INSTALLATION
Reverse removal procedure to install rear seat noting the following instruction.
•Tighten third seat mounting bolts as specified torque.
1. Head restraint 6. Reclining supporter Tightening torque
2. Head restraint guide 7. Seat reclining assembly
3. Seat back 8. Seat reclining assembly cover
4. Seat reclining knob 9. Seat cushion
5. Seat reclining rod 10. Third seat mounting bolt
4
5
87
91
21
24
5
8
7
12
612 3
10 35 N·m (3.5 kg-m)10 35 N·m (3.5 kg-m)
Page 564 of 656
BODY SERVICE 9-19
Exterior and Interior Trim
Floor Carpet
Front floor carpet
REMOVAL
1) Remove front and second seats.
2) Remove third seat cushion (if equipped).
3) Remove front and second seat belt lower anchor bolts.
4) Remove dash side trims (1), front side sill scuffs (2), center
pillar inner lower trims (3), rear side sill scuffs (4) and rear
quarter lower trims (5).
5) Remove parking brake lever cover, console box and console
box front extension.
6) Remove front floor carpet.
INSTALLATION
Reverse removal sequence to install front floor carpet noting the
following point.
•Tighten seat belt anchor bolts as specified torque referring to
Section 10A.
1. Front floor carpet 2. Dash panel insulation 3. Rear floor carpet
3
Page 565 of 656

9-20 BODY SERVICE
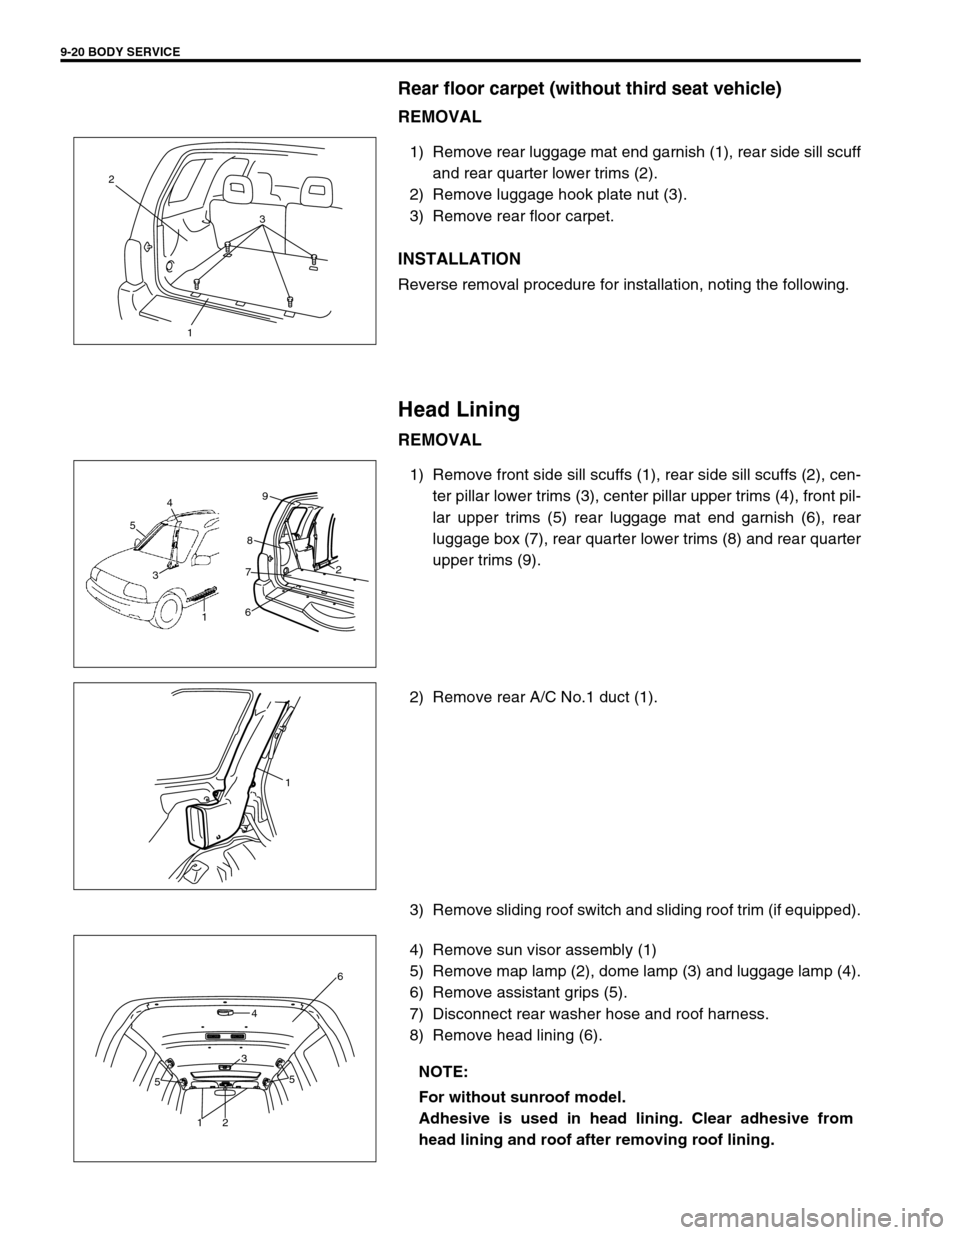
Rear floor carpet (without third seat vehicle)
REMOVAL
1) Remove rear luggage mat end garnish (1), rear side sill scuff
and rear quarter lower trims (2).
2) Remove luggage hook plate nut (3).
3) Remove rear floor carpet.
INSTALLATION
Reverse removal procedure for installation, noting the following.
Head Lining
REMOVAL
1) Remove front side sill scuffs (1), rear side sill scuffs (2), cen-
ter pillar lower trims (3), center pillar upper trims (4), front pil-
lar upper trims (5) rear luggage mat end garnish (6), rear
luggage box (7), rear quarter lower trims (8) and rear quarter
upper trims (9).
2) Remove rear A/C No.1 duct (1).
3) Remove sliding roof switch and sliding roof trim (if equipped).
4) Remove sun visor assembly (1)
5) Remove map lamp (2), dome lamp (3) and luggage lamp (4).
6) Remove assistant grips (5).
7) Disconnect rear washer hose and roof harness.
8) Remove head lining (6).
1 2
3
4
5
3
1
6
7
8
9
2
1
NOTE:
For without sunroof model.
Adhesive is used in head lining. Clear adhesive from
head lining and roof after removing roof lining.
12
55 346
Page 566 of 656
BODY SERVICE 9-21
INSTALLATION
Reverse removal procedure to install head lining noting the follow-
ing instructions.
•Set roof harness (1) and rear washer hose (2) to head lining
(3) with adhesive tape as shown.
•For without sunroof model
Apply double coated tape (4) to head lining as shown.
•Tighten seat belt anchor bolt as specified torque referring to
Section 10A. CAUTION:
Do not remove rear A/C No.2 duct (1) from head lining (2).
If perform this prohibited service, head lining (2) will be
broken.
13
2
1 4
2
Page 570 of 656

SEAT BELT 10A-1
10A
SECTION 10A
SEAT BELT
CONTENTS
On-Vehicle Service....................................... 10A-2
Service Precautions ................................... 10A-2
Service and diagnosis ............................ 10A-2
Disabling air bag system ........................ 10A-2
Enabling air bag system ......................... 10A-2
Handling and storage ............................. 10A-2Disposal ................................................. 10A-2
Front Seat Belt ........................................... 10A-3
Second Rear Seat Belt .............................. 10A-6
Third Rear Seat Belt (If Equipped) ............. 10A-7
Tightening Torque Specification ................ 10A-8
WARNING:
For vehicles equipped with Supplemental Restraint (Air Bag) System:
Service on and around the air bag system components or wiring must be performed only by an
authorized SUZUKI dealer. Refer to “Air Bag System Components and Wiring Location View” under
“General Description” in air bag system section in order to confirm whether you are performing ser-
vice on or near the air bag system components or wiring. Please observe all WARNINGS and “Ser-
vice Precautions” under “On-Vehicle Service” in air bag system section before performing service
on or around the air bag system components or wiring. Failure to follow WARNINGS could result in
unintentional activation of the system or could render the system inoperative. Either of these two
conditions may result in severe injury.
Technical service work must be started at least 90 seconds after the ignition switch is turned to the
“LOCK” position and the negative cable is disconnected from the battery. Otherwise, the system
may be activated by reserve energy in the Sensing and Diagnostic Module (SDM).
CAUTION:
When fasteners are removed, always reinstall them at the same location from which they were
removed. If a fastener needs to be replaced, use the correct part number fastener for that application.
If the correct part number fastener is not available, a fastener of equal size and strength (or stronger)
may be used. Fasteners that are not reused, and those requiring thread-locking compound, will be
called out. The correct torque value must be used when installing fasteners that require it. If the above
procedures are not followed, parts or system damage could result.