1999 SUZUKI GRAND VITARA Ignition fuse
[x] Cancel search: Ignition fusePage 39 of 656

1B-14 AIR CONDITIONING (OPTIONAL)
Wiring Circuit
ACG
LT GRN
PNK
PNK
BLKORN
BLK
YEL/GRNRED/BLKBLK/WHT
BLU/WHTPNK/BLK
PNK/GRN
RED/BLK
WHT/RED
YEL/GRN
YEL/BLU
A/C
RED/BLU
RED/BLU
RED/BLKBLK
BLU/ORN
BLU/WHT
BLU/WHT
PNK
PNK/BLU
BLK
PNK/WHT
YEL/BLK
GRY/WHT
GRN/BLK
BLK/WHT
RED/BLK
YEL/GRN
BLK
BLK
BLK
YEL/BLK
YEL/GRN
YEL/GRNBLU/GRN
BLU/YELBLUBLU/BLK
BLU/BLK
17
21
22 18
16
15
19
2026 25 24 23
14
12
29
3
4
7
33 30
31
32
28
27
1213
10
11
35 349
856
A
1. Front blower motor main relay 10. Compressor relay 19. Battery 28. Solenoid valve relay
2. Front blower motor 11. Compressor 20. Generator 29. Rear blower motor relay
3. Front blower motor resistor 12. Condenser cooling fan motor
relay21. Ignition main fuse 60 A 30. Rear blower motor resistor
4. Front blower motor switch 13. Condenser cooling fan motor 22. Heater/A/C main fuse 60 A 31. Rear blower motor
5. A/C controller 14. Fuse box 23.“IG METER” fuse 20 A 32. Rear blower motor switch
6. ECM (PCM) 15.“A/C” fuse 25 A 24.“REAR DEFG” fuse 25 A 33. Rear A/C main switch
7. Heater mode control switch 16. Ignition switch 25.“REAR BLOW” fuse 20A 34. Rear A/C evaporator temperature con-
troller
8. Dual (refrigerant) pressure switch 17. Main fuse box 26.“FRONT BLOW” fuse 30A 35. Rear A/C evaporator temperature sensor
9. A/C evaporator thermistor
(A/C evaporator temperature sensor)18. Battery main fuse 100 A 27. Solenoid valve [A] : Rear A/C wiring circuit (if equipped)
Page 139 of 656

5E2-14 ANTILOCK BRAKE SYSTEM (ABS)
System Circuit
1. Battery 11. ABS fail-safe transistor (Solenoid valve transistor) 21. To ECM and SDM (if equipped)
2. Main fuses 12. ABS pump motor transistor 22. Stop lamp
3. Ignition switch 13. Pump motor 23. Stop lamp switch
4. Circuit fuses 14. Solenoid valves 24. G sensor (For 4WD vehicle only)
5. Combination meter 15. Diagnosis monitor coupler 25. 4WD lamp (For 4WD vehicle only)
6. ABS warning lamp 16. Right-rear wheel speed sensor 26. ECM (PCM) (For 4WD vehicle only)
7. Brake warning lamp (“EBD” warning lamp) 17. Left-rear wheel speed sensor 27. 4WD switch (For 4WD vehicle only)
8. Warning lamp driver module (for ABS) 18. Right-front wheel speed sensor 28. ECM (PCM)
9. ABS hydraulic unit/control module assembly 19. Left-front wheel speed sensor
10. Terminal arrangement of connector E136 for
ABS hydraulic unit/control module assembly20. Data link connector
TERMINAL CIRCUIT TERMINAL CIRCUIT
E1361 Idle up signal
E13614 ABS warning lamp
2 Stop lamp switch 15 Left-front wheel speed sensor (+)
3 Right-front wheel speed sensor (+) 16 Left-front wheel speed sensor (–)
4 Right-front wheel speed sensor (–) 17 4WD switch
5–18 Ignition switch
6 Right-rear wheel speed sensor (–) 19 Left-rear wheel speed sensor (+)
7 Right-rear wheel speed sensor (+) 20 Left-rear wheel speed sensor (–)
8–21 Data link connector
9–22 Ground (for ABS pump motor)
10 Brake warning lamp (EBD warning lamp) 23 ABS pump motor relay
11 G sensor (For 4WD vehicle only) 24 Ground (for ABS control module)
12 Diagnosis switch terminal 25 ABS fail-safe relay
13 Ground (For G sensor) (For 4WD vehicle only)
Page 140 of 656

ANTILOCK BRAKE SYSTEM (ABS) 5E2-15
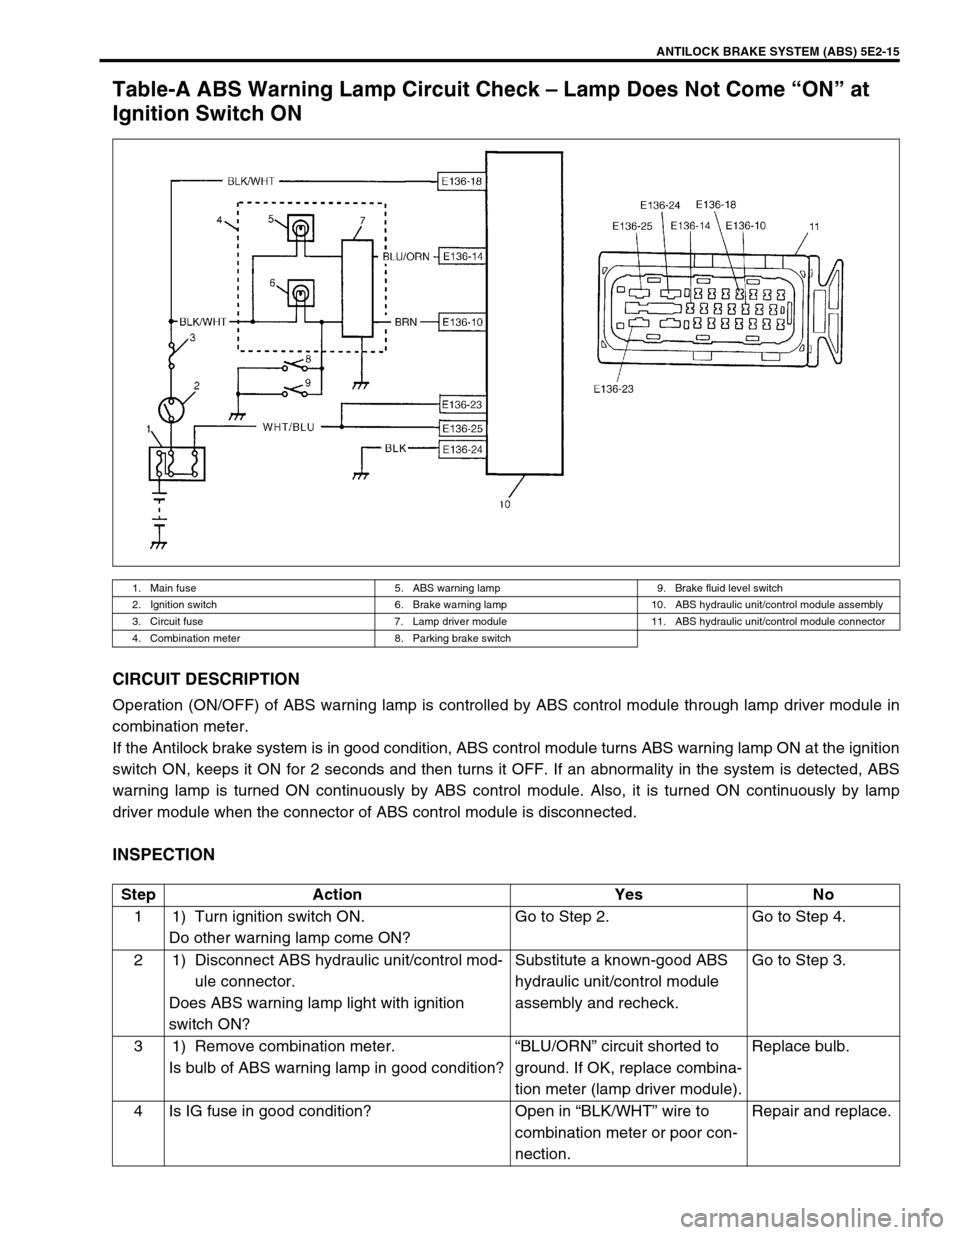
Table-A ABS Warning Lamp Circuit Check – Lamp Does Not Come “ON” at
Ignition Switch ON
CIRCUIT DESCRIPTION
Operation (ON/OFF) of ABS warning lamp is controlled by ABS control module through lamp driver module in
combination meter.
If the Antilock brake system is in good condition, ABS control module turns ABS warning lamp ON at the ignition
switch ON, keeps it ON for 2 seconds and then turns it OFF. If an abnormality in the system is detected, ABS
warning lamp is turned ON continuously by ABS control module. Also, it is turned ON continuously by lamp
driver module when the connector of ABS control module is disconnected.
INSPECTION
1. Main fuse 5. ABS warning lamp 9. Brake fluid level switch
2. Ignition switch 6. Brake warning lamp 10. ABS hydraulic unit/control module assembly
3. Circuit fuse 7. Lamp driver module 11. ABS hydraulic unit/control module connector
4. Combination meter 8. Parking brake switch
Step Action Yes No
1 1) Turn ignition switch ON.
Do other warning lamp come ON?Go to Step 2. Go to Step 4.
2 1) Disconnect ABS hydraulic unit/control mod-
ule connector.
Does ABS warning lamp light with ignition
switch ON?Substitute a known-good ABS
hydraulic unit/control module
assembly and recheck.Go to Step 3.
3 1) Remove combination meter.
Is bulb of ABS warning lamp in good condition?“BLU/ORN” circuit shorted to
ground. If OK, replace combina-
tion meter (lamp driver module).Replace bulb.
4 Is IG fuse in good condition? Open in “BLK/WHT” wire to
combination meter or poor con-
nection.Repair and replace.
Page 150 of 656

ANTILOCK BRAKE SYSTEM (ABS) 5E2-25
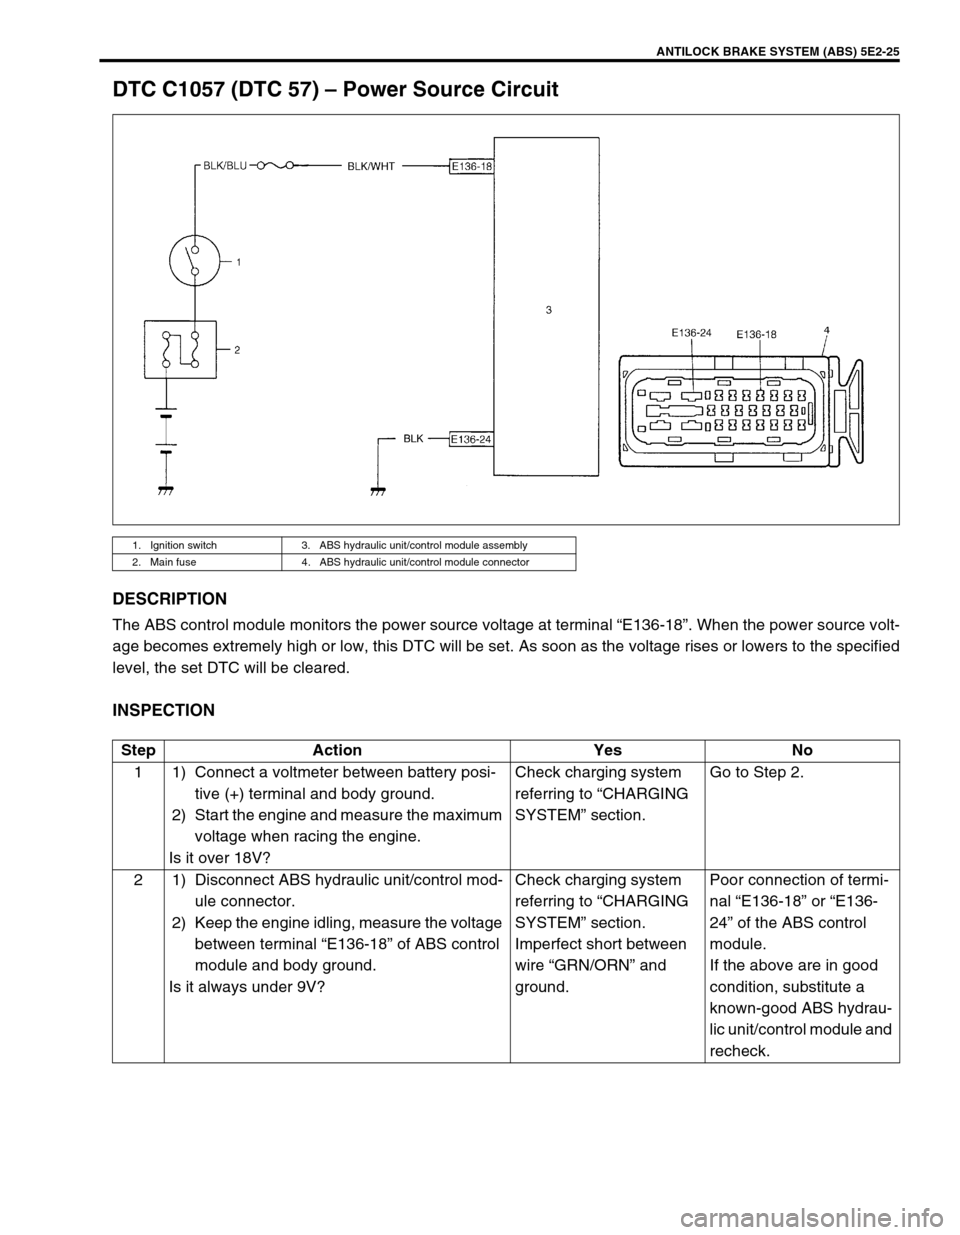
DTC C1057 (DTC 57) – Power Source Circuit
DESCRIPTION
The ABS control module monitors the power source voltage at terminal “E136-18”. When the power source volt-
age becomes extremely high or low, this DTC will be set. As soon as the voltage rises or lowers to the specified
level, the set DTC will be cleared.
INSPECTION
1. Ignition switch 3. ABS hydraulic unit/control module assembly
2. Main fuse 4. ABS hydraulic unit/control module connector
Step Action Yes No
1 1) Connect a voltmeter between battery posi-
tive (+) terminal and body ground.
2) Start the engine and measure the maximum
voltage when racing the engine.
Is it over 18V?Check charging system
referring to “CHARGING
SYSTEM” section.Go to Step 2.
2 1) Disconnect ABS hydraulic unit/control mod-
ule connector.
2) Keep the engine idling, measure the voltage
between terminal “E136-18” of ABS control
module and body ground.
Is it always under 9V?Check charging system
referring to “CHARGING
SYSTEM” section.
Imperfect short between
wire “GRN/ORN” and
ground.Poor connection of termi-
nal “E136-18” or “E136-
24” of the ABS control
module.
If the above are in good
condition, substitute a
known-good ABS hydrau-
lic unit/control module and
recheck.
Page 152 of 656

ANTILOCK BRAKE SYSTEM (ABS) 5E2-27
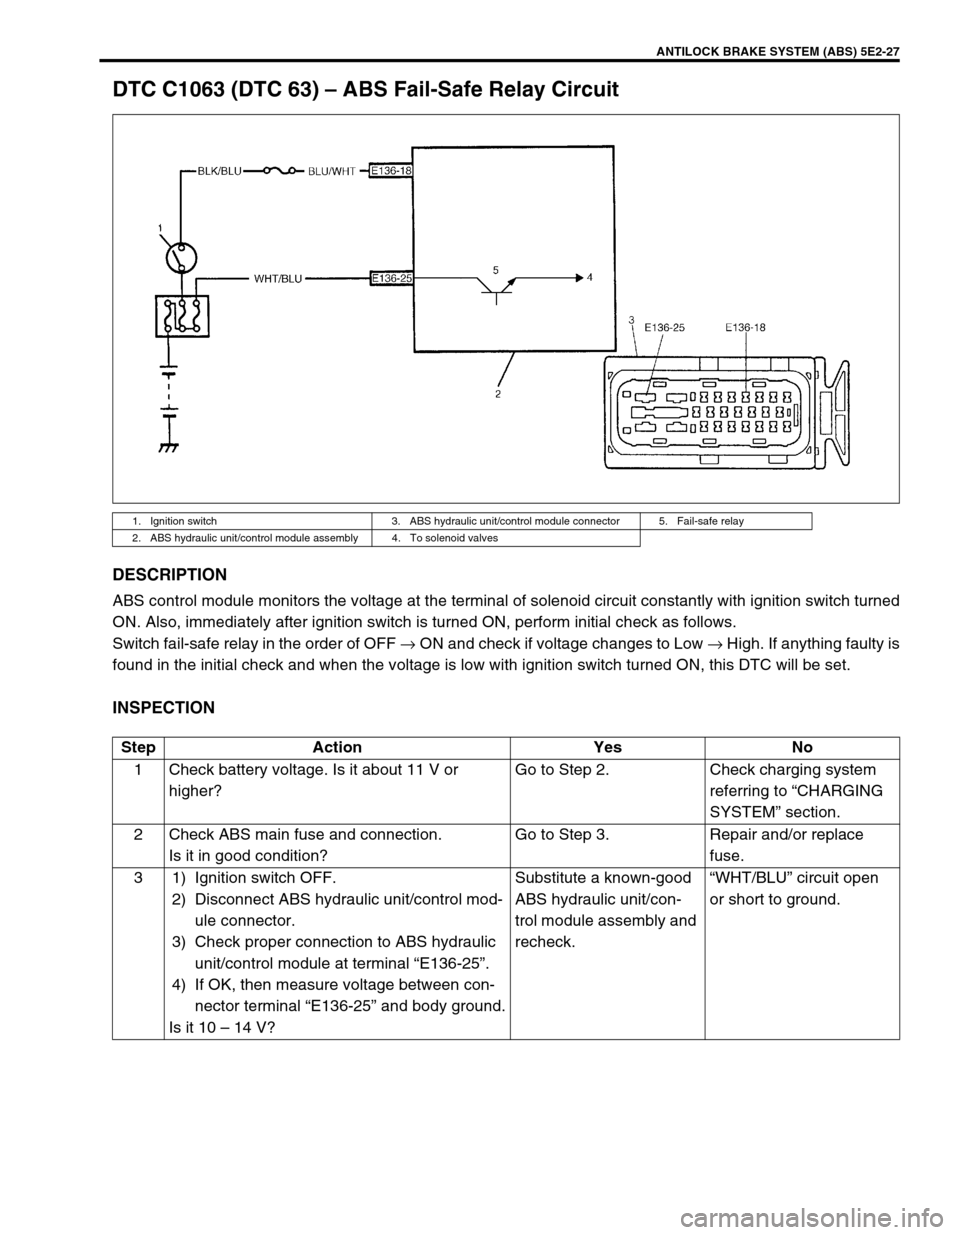
DTC C1063 (DTC 63) – ABS Fail-Safe Relay Circuit
DESCRIPTION
ABS control module monitors the voltage at the terminal of solenoid circuit constantly with ignition switch turned
ON. Also, immediately after ignition switch is turned ON, perform initial check as follows.
Switch fail-safe relay in the order of OFF → ON and check if voltage changes to Low → High. If anything faulty is
found in the initial check and when the voltage is low with ignition switch turned ON, this DTC will be set.
INSPECTION
1. Ignition switch 3. ABS hydraulic unit/control module connector 5. Fail-safe relay
2. ABS hydraulic unit/control module assembly 4. To solenoid valves
Step Action Yes No
1 Check battery voltage. Is it about 11 V or
higher?Go to Step 2. Check charging system
referring to “CHARGING
SYSTEM” section.
2 Check ABS main fuse and connection.
Is it in good condition?Go to Step 3. Repair and/or replace
fuse.
3 1) Ignition switch OFF.
2) Disconnect ABS hydraulic unit/control mod-
ule connector.
3) Check proper connection to ABS hydraulic
unit/control module at terminal “E136-25”.
4) If OK, then measure voltage between con-
nector terminal “E136-25” and body ground.
Is it 10 – 14 V?Substitute a known-good
ABS hydraulic unit/con-
trol module assembly and
recheck.“WHT/BLU” circuit open
or short to ground.
Page 166 of 656

ENGINE GENERAL INFORMATION AND DIAGNOSIS (H27 ENGINE) 6-1-5
Fuel Pressure Relief Procedure
After making sure that engine is cold, relief fuel pressure as fol-
lows.
1) Place transmission gear shift lever in “Neutral” (shift selector
lever to “P” range for A/T vehicle), set parking brake, and
block drive wheels.
2) Remove fuel pump relay (1) from its connector.
3) Remove fuel filler cap to release fuel vapor pressure in fuel
tank and then reinstall it.
4) Start engine and run it till it stops for lack of fuel. Repeat
cranking engine 2 – 3 times of about 3 seconds each time to
dissipate fuel pressure in lines. Fuel connections are now
safe for servicing.
5) Upon completion of servicing, install fuel pump relay to relay
box.
Fuel Leakage Check Procedure
After performing any service on fuel system, check to make sure
that there are no fuel leakages as follows.
1) Turn ON ignition switch for 3 seconds (to operate fuel pump)
and then turn it OFF.
Repeat this (ON and OFF) 3 or 4 times and apply fuel pres-
sure to fuel line (till fuel pressure is felt by hand placed on
fuel return hose).
2) In this state, check to see that there are no fuel leakages
from any part of fuel system. CAUTION:
This work must not be done when engine is hot. If done
so, it may cause adverse effect to catalyst.
[A] : Left hand steering vehicle
[B] : Right hand steering vehicle
2. Fuse box
Page 178 of 656
![SUZUKI GRAND VITARA 1999 2.G Owners Manual ENGINE GENERAL INFORMATION AND DIAGNOSIS (H27 ENGINE) 6-1-17
[Without Using SUZUKI Scan Tool] (Vehicle with Monitor
Connector)
1) Check malfunction indicator lamp referring to “Malfunction
Indicato SUZUKI GRAND VITARA 1999 2.G Owners Manual ENGINE GENERAL INFORMATION AND DIAGNOSIS (H27 ENGINE) 6-1-17
[Without Using SUZUKI Scan Tool] (Vehicle with Monitor
Connector)
1) Check malfunction indicator lamp referring to “Malfunction
Indicato](/manual-img/20/7583/w960_7583-177.png)
ENGINE GENERAL INFORMATION AND DIAGNOSIS (H27 ENGINE) 6-1-17
[Without Using SUZUKI Scan Tool] (Vehicle with Monitor
Connector)
1) Check malfunction indicator lamp referring to “Malfunction
Indicator Lamp Check” in this section.
2) With the ignition switch OFF position, disconnect SUZUKI
scan tool if connected and using service wire (4), connect
diagnosis switch terminal (1) to ground terminal (2) in moni-
tor connector (3).
3) With the ignition switch ON position and leaving engine OFF,
read DTC from flashing pattern of malfunction indicator
lamp. Refer to “Diagnostic Trouble Code Table”.
If lamp remains ON, go to “Diagnostic Flow Table A-4”.
4) After completing the check, turn the ignition switch OFF posi-
tion and disconnect service wire from monitor coupler.
Diagnostic Trouble Code (DTC) Clearance
[Using scan tool]
1) With ignition switch OFF, connect generic scan tool or
SUZUKI scan tool to data link connector (DLC).
2) Turn ignition switch ON.
3) Erase DTC according to instructions displayed on scan tool.
Freeze frame data is cleared with the DTC. Refer to scan tool
operator’s manual for further details.
4) After completing the clearance, turn ignition switch off and
disconnect scan tool from data link connector. NOTE:
If abnormality or malfunction lies in two or more areas,
malfunction indicator lamp indicates applicable codes
three times each.
And flashing of these codes is repeated as long as
diagnosis terminal is grounded and ignition switch is
held at ON position.
Take a note of diagnostic trouble code indicated first.
NOTE:
DTC and freeze frame data stored in ECM (PCM) memory
are also cleared in following cases. Be careful not to
clear them before keeping their record.
When power to ECM (PCM) is cut off (by disconnecting
battery cable, removing fuse or disconnecting ECM
(PCM) connectors)
When the same malfunction (DTC) is not detected
again during 40 engine warm-up cycles (refer to
“WARM-UP CYCLE” of “ON-BOARD DIAGNOSTIC SYS-
TEM” in this section) (Vehicle without monitor connec-
tor)
Page 204 of 656

ENGINE GENERAL INFORMATION AND DIAGNOSIS (H27 ENGINE) 6-1-43
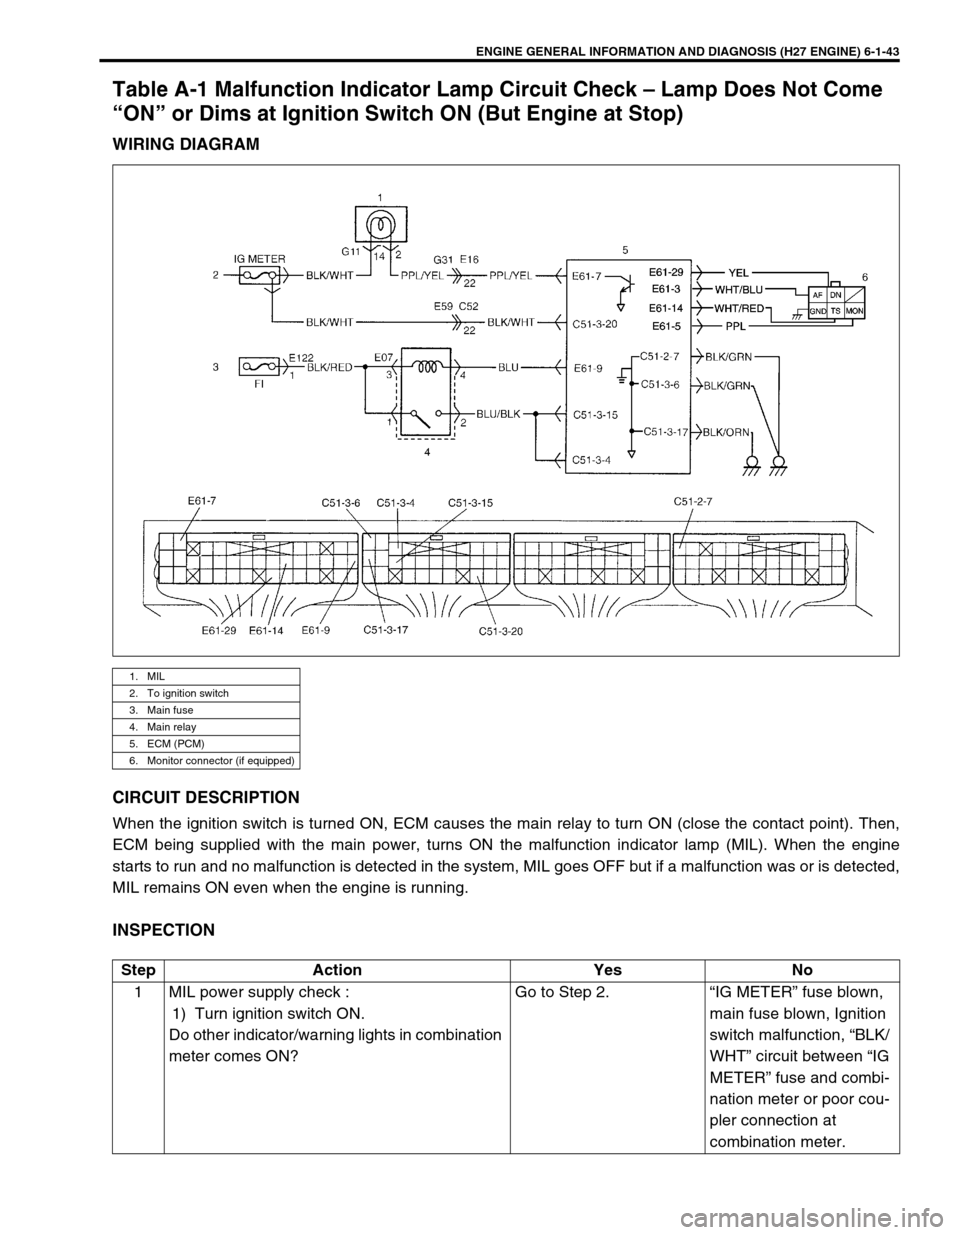
Table A-1 Malfunction Indicator Lamp Circuit Check – Lamp Does Not Come
“ON” or Dims at Ignition Switch ON (But Engine at Stop)
WIRING DIAGRAM
CIRCUIT DESCRIPTION
When the ignition switch is turned ON, ECM causes the main relay to turn ON (close the contact point). Then,
ECM being supplied with the main power, turns ON the malfunction indicator lamp (MIL). When the engine
starts to run and no malfunction is detected in the system, MIL goes OFF but if a malfunction was or is detected,
MIL remains ON even when the engine is running.
INSPECTION
1. MIL
2. To ignition switch
3. Main fuse
4. Main relay
5. ECM (PCM)
6. Monitor connector (if equipped)
Step Action Yes No
1 MIL power supply check :
1) Turn ignition switch ON.
Do other indicator/warning lights in combination
meter comes ON?Go to Step 2. “IG METER” fuse blown,
main fuse blown, Ignition
switch malfunction, “BLK/
WHT” circuit between “IG
METER” fuse and combi-
nation meter or poor cou-
pler connection at
combination meter.