1999 SUZUKI BALENO wheel
[x] Cancel search: wheelPage 2 of 65

60G-74E
MODIFICATION WARNING
60G-00-004
The circle with a slash in this manual
means "Don't do this" or "Don't let this
happen".
Do not modify this vehicle. Modification
could adversely affect safety, handling,
performance, or durability and may
contravene regulations. In addition,
damage or performance problems
resulting from modification may not be
covered under warranty.
Improper installation of mobile
communication equipment such as
cellular talephones or CB (Citizen's
Band) radios may cause electronic
interference with your vehicle's ignition
system, resulting in vehicle
performance problems. Consult your
MARUTI dealer or qualified service
technician for advice on installing such
mobile communication equipment.
0-2
Copying, quoting or reproduction of any
part of this manual is not permitted without
explicit approval by MARUTI UDYOG
LIMITED.
60G-74E
WARRANTY POLICY
WARRANTY POLICY
Maruti Udyog Limited (hereinafter called "Maruti"), warrants that each
new Maruti vehicle distributed in India by Maruti and sold by an
authorised Maruti dealer will be free, under normal use and service,
from any defects in material and workmanship at the time of
manufacture SUBJECT TO THE FOLLOWING TERMS AND
CONDITIONS:
(1) Qualification:
To qualify for this warranty:
(a) The Maruti vehicle must be delivered by Maruti authorised
dealer and set-up, serviced by Maruti authorised dealer/
service station.
(b) The warranty registration card in respect of each vehicle
must be completed by the dealer at the time of delivery
of the vehicle and dealer should retain the same.
(2) Term:
The term of the warranty shall be twenty four (24) months
or 40,000 kilometers (whichever occurs first) from the date
of delivery to the first owner.
(3) Maruti's Warranty Obligation:
If any defect(s) should be found in a Maruti vehicle within the
term stipulated above, Maruti's only obligation is to repair or
replace at its sole discretion any part shown to be defective,
with a new part or the equivalent at no cost to the owner for
parts or labour, when Maruti acknowledges that such a defect
is attributable to faulty material or workmanship at the time of
manufacture. The owner is responsible of any repair or
replacements which are not covered by this warranty.
(4) Limitation:
This warranty shall not apply to:
(a) normal maintenance service required other than the three
free services, including without limitation, oil and fluid
changes, headlight aiming, fastener retightening, wheel
balancing, wheelalignment and tyre rotation, cleaning of
injectors, adjustments of carburettor, ignition timing, clutch
and valve clearance.
(b) the replacement of normal wear parts including without
limitation, bulbs, battery, tyres and tubes, spark plugs, belts,
hoses, filters, wiper blades, brushes, contact points, fuses,
clutch disc, brake shoes, brake pads, cable and all rubber
parts (except oil seal and glass run).
(c) any vehicle which has been used for competition or racing.
(d) any repairs or replacement required as a result of accidents
or collision.
(e) any defects caused by misuse, negligence, abnormal use or
insufficient care.
(f) any vehicle which has been modified or altered, including
without limitation, the installation of performance accessories.
(g) any vehicle on which parts or accessories not approved by
Maruti have been used.
(h) any vehicle which has not been operated in accordance with
the operating instructions in the Maruti Owner's Manual,
(i) any vehicle which has not received, during the warranty
term, the service inspections prescribed in the Maruti
Owner's Manual.
G) any vehicle which has been assembled, disassembled,
adjusted or repaired by other than an Maruti authorised
2-1
Page 3 of 65

60G-74E
MODIFICATION WARNING
60G-00-004
The circle with a slash in this manual
means "Don't do this" or "Don't let this
happen".
Do not modify this vehicle. Modification
could adversely affect safety, handling,
performance, or durability and may
contravene regulations. In addition,
damage or performance problems
resulting from modification may not be
covered under warranty.
Improper installation of mobile
communication equipment such as
cellular talephones or CB (Citizen's
Band) radios may cause electronic
interference with your vehicle's ignition
system, resulting in vehicle
performance problems. Consult your
MARUTI dealer or qualified service
technician for advice on installing such
mobile communication equipment.
0-2
Copying, quoting or reproduction of any
part of this manual is not permitted without
explicit approval by MARUTI UDYOG
LIMITED.
60G-74E
WARRANTY POLICY
WARRANTY POLICY
Maruti Udyog Limited (hereinafter called "Maruti"), warrants that each
new Maruti vehicle distributed in India by Maruti and sold by an
authorised Maruti dealer will be free, under normal use and service,
from any defects in material and workmanship at the time of
manufacture SUBJECT TO THE FOLLOWING TERMS AND
CONDITIONS:
(1) Qualification:
To qualify for this warranty:
(a) The Maruti vehicle must be delivered by Maruti authorised
dealer and set-up, serviced by Maruti authorised dealer/
service station.
(b) The warranty registration card in respect of each vehicle
must be completed by the dealer at the time of delivery
of the vehicle and dealer should retain the same.
(2) Term:
The term of the warranty shall be twenty four (24) months
or 40,000 kilometers (whichever occurs first) from the date
of delivery to the first owner.
(3) Maruti's Warranty Obligation:
If any defect(s) should be found in a Maruti vehicle within the
term stipulated above, Maruti's only obligation is to repair or
replace at its sole discretion any part shown to be defective,
with a new part or the equivalent at no cost to the owner for
parts or labour, when Maruti acknowledges that such a defect
is attributable to faulty material or workmanship at the time of
manufacture. The owner is responsible of any repair or
replacements which are not covered by this warranty.
(4) Limitation:
This warranty shall not apply to:
(a) normal maintenance service required other than the three
free services, including without limitation, oil and fluid
changes, headlight aiming, fastener retightening, wheel
balancing, wheelalignment and tyre rotation, cleaning of
injectors, adjustments of carburettor, ignition timing, clutch
and valve clearance.
(b) the replacement of normal wear parts including without
limitation, bulbs, battery, tyres and tubes, spark plugs, belts,
hoses, filters, wiper blades, brushes, contact points, fuses,
clutch disc, brake shoes, brake pads, cable and all rubber
parts (except oil seal and glass run).
(c) any vehicle which has been used for competition or racing.
(d) any repairs or replacement required as a result of accidents
or collision.
(e) any defects caused by misuse, negligence, abnormal use or
insufficient care.
(f) any vehicle which has been modified or altered, including
without limitation, the installation of performance accessories.
(g) any vehicle on which parts or accessories not approved by
Maruti have been used.
(h) any vehicle which has not been operated in accordance with
the operating instructions in the Maruti Owner's Manual,
(i) any vehicle which has not received, during the warranty
term, the service inspections prescribed in the Maruti
Owner's Manual.
G) any vehicle which has been assembled, disassembled,
adjusted or repaired by other than an Maruti authorised
2-1
Page 15 of 65

60G-74E
STEERING COLUMN CONTROLS
STEERING COLUMN CONTROLS
ignition Switch 4.1
Lighting/Tum Signal Control Lever 4-2
Windscreen Wiper and Washer Lever 4-4
Horn 4.5
Rear Wiper and Washer(lf equipped) 4-5
31
STEERING COLUMN CONTROLS
60G-74E
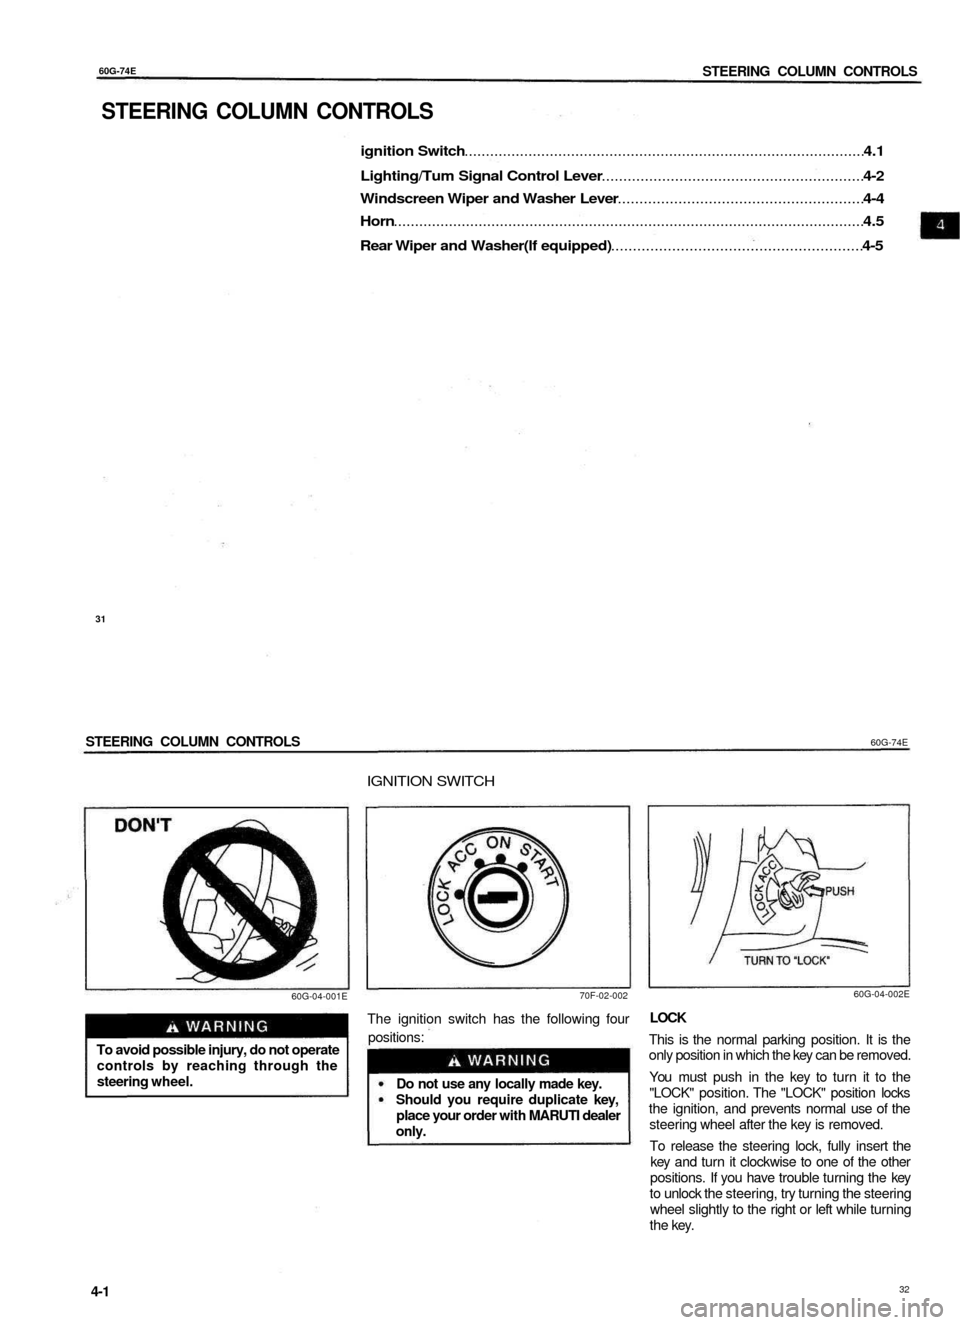
IGNITION SWITCH
60G-04-001E
70F-02-002
To avoid possible injury, do not operate
controls by reaching through the
steering wheel.
The ignition switch has the following four
positions:
Do not use any locally made key.
Should you require duplicate key,
place your order with MARUTI dealer
only.
60G-04-002E
LOCK
This is the normal parking position. It is the
only position in which the key can be removed.
You must push in the key to turn it to the
"LOCK" position. The "LOCK" position locks
the ignition, and prevents normal use of the
steering wheel after the key is removed.
To release the steering lock, fully insert the
key and turn it clockwise to one of the other
positions. If you have trouble turning the key
to unlock the steering, try turning the steering
wheel slightly to the right or left while turning
the key.
4-1
32
Page 16 of 65

6OG-74E
STEERING COLUMN CONTROLS
ACC
Accessories such as the radio can operate,
but the engine is off.
ON
This is the normal operating position. All
electrical systems are on.
START
This is the position for starting the engine using
the starter motor. The key should be released
from this position as soon as the engine starts.
Never remove the ignition key while
the vehicle is moving. The steering
wheel will lock and you will not be
able to steer the vehicle.
Do not leave children alone In a
parked vehicle. Unattended children
could cause accidental movement of
the vehicle, which could result in
severe personal Injury.
Always remove the key when parked
to prevent unintentional operation of
the vehicle and to improve security.
LIGHTING/TURN SIGNAL
CONTROL LEVER
CAUTION
Do not use the starter motor for
more than 15 seconds at a time. If
the engine does not start; wait 15
seconds before trying again. If the
engine does not start after several
attempts, check the fuel and ignition
systems or consult your MARUTI
dealer.
Do not leave the ignition switch in
the "ON" position if the engine is not
running as the battery will
discharge.
60G-04-003
This control lever is located on the outboard
side of the steering column. Operate the lever
as described below.
Lighting Operation
To turn the lights on or off, twist the knob on
the end of the lever. There are three positions:
in the "OFF" position all lights are off; in the
middle position the front parking lights, tail-
lights, registration plate light, and instrument
lights are on, but the headlights are off; in the
third position the headlights come on in
addition to the other lights.
33
4-2
STEERING COLUMN CONTROLS
60G-74E
With the headlights on, push the lever forward
to switch to the high beams (main beams) or
pull the lever toward you to switch to the low
beams. When the high beams (main beams)
are on, a light on the instrument panel will
come on. To flash the high beams (main
beams) pull the lever slightly towards you and
release it.
Lights "On" Reminder (if Equipped)
A buzzer/chime sounds to remind you to turn
off the lights if they are left on when the ignition
key is removed and the driver's door is opened.
Turn Signal Operation
With the ignition switch in the "ON" position,
move the lever up or down to activate the left
or right turn signals.
Normal Turn Signal
Move the lever clockwise until it clicks to signal
a right turn or anticlockwise to signal a left
turn. When the turn is completed, the signal
will cancel and the lever will return to its normal
position.
6OG-04-006
Lane Change Signal
Some times, such as when changing lanes,
the steering wheel is not turned far enough
to cancel the turn signal. For convenience,
you can flash the turn signal by moving the
lever part way and holding it there. The
lever will return to its normal position when
you release it.
4-3
34
60G-04-006
60G-04-005
60G-04-004E
Page 17 of 65

60G-74E
STEERING COLUMN CONTROLS
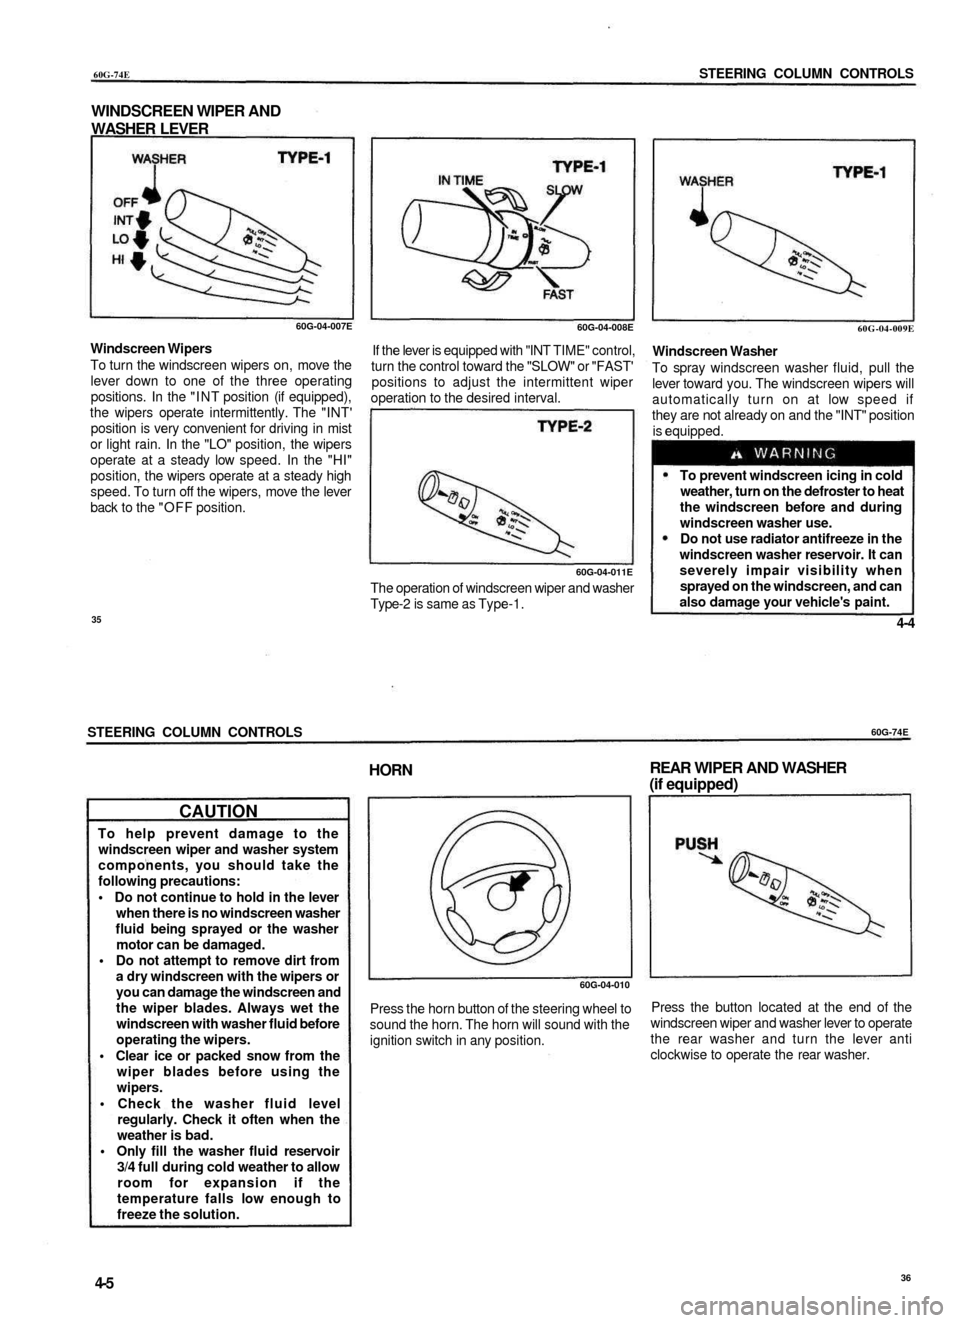
WINDSCREEN WIPER AND
WASHER LEVER
60G-04-007E
Windscreen Wipers
To turn the windscreen wipers on, move the
lever down to one of the three operating
positions. In the "INT position (if equipped),
the wipers operate intermittently. The "INT'
position is very convenient for driving in mist
or light rain. In the "LO" position, the wipers
operate at a steady low speed. In the "HI"
position, the wipers operate at a steady high
speed. To turn off the wipers, move the lever
back to the "OFF position.
60G-04-008E
If the lever is equipped with "INT TIME" control,
turn the control toward the "SLOW" or "FAST'
positions to adjust the intermittent wiper
operation to the desired interval.
60G-04-011E
The operation of windscreen wiper and washer
Type-2 is same as Type-1.
60G-04-009E
Windscreen Washer
To spray windscreen washer fluid, pull the
lever toward you. The windscreen wipers will
automatically turn on at low speed if
they are not already on and the "INT" position
is equipped.
To prevent windscreen icing in cold
weather, turn on the defroster to heat
the windscreen before and during
windscreen washer use.
Do not use radiator antifreeze in the
windscreen washer reservoir. It can
severely impair visibility when
sprayed on the windscreen, and can
also damage your vehicle's paint.
35
4-4
STEERING COLUMN CONTROLS
60G-74E
CAUTION
To help prevent damage to the
windscreen wiper and washer system
components, you should take the
following precautions:
• Do not continue to hold in the lever
when there is no windscreen washer
fluid being sprayed or the washer
motor can be damaged.
• Do not attempt to remove dirt from
a dry windscreen with the wipers or
you can damage the windscreen and
the wiper blades. Always wet the
windscreen with washer fluid before
operating the wipers.
• Clear ice or packed snow from the
wiper blades before using the
wipers.
• Check the washer fluid level
regularly. Check it often when the
weather is bad.
• Only fill the washer fluid reservoir
3/4 full during cold weather to allow
room for expansion if the
temperature falls low enough to
freeze the solution.
HORN
REAR WIPER AND WASHER
(if equipped)
60G-04-010
Press the horn button of the steering wheel to
sound the horn. The horn will sound with the
ignition switch in any position.
Press the button located at the end of the
windscreen wiper and washer lever to operate
the rear washer and turn the lever anti
clockwise to operate the rear washer.
4-5
36
Page 25 of 65

60G-74E
INSTRUMENT PANEL
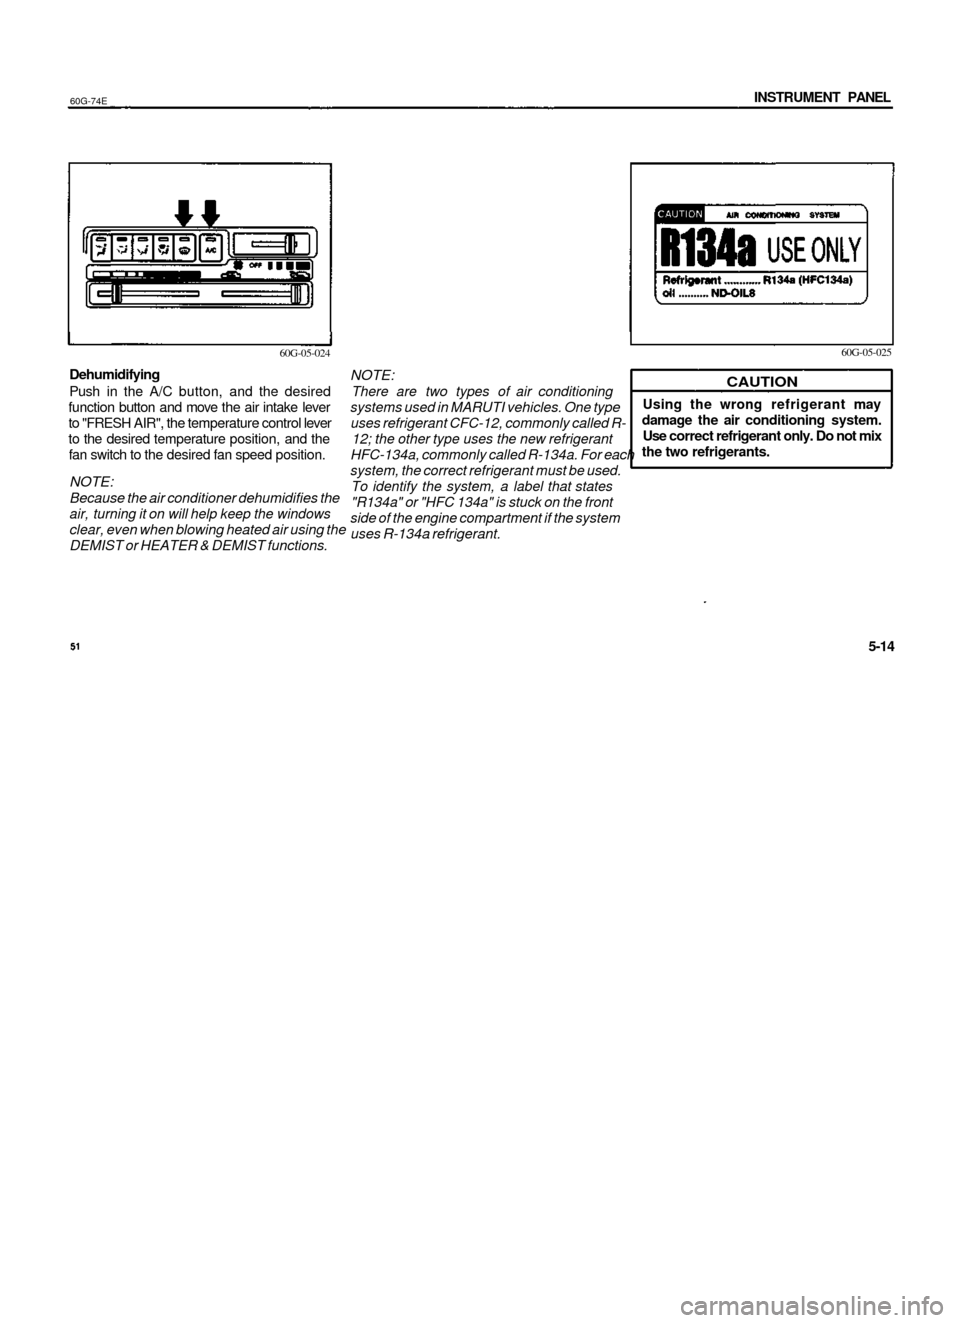
60G-05-024
Dehumidifying
Push in the A/C button, and the desired
function button and move the air intake lever
to "FRESH AIR", the temperature control lever
to the desired temperature position, and the
fan switch to the desired fan speed position.
NOTE:
Because the air conditioner dehumidifies the
air, turning it on will help keep the windows
clear, even when blowing heated air using the
DEMIST or HEATER & DEMIST functions.
60G-05-025
NOTE:
There are two types of air conditioning
systems used in MARUTI vehicles. One type
uses refrigerant CFC-12, commonly called R-
12; the other type uses the new refrigerant
HFC-134a, commonly called R-134a. For each
system, the correct refrigerant must be used.
To identify the system, a label that states
"R134a" or "HFC 134a" is stuck on the front
side of the engine compartment if the system
uses R-134a refrigerant.
CAUTION
Using the wrong refrigerant may
damage the air conditioning system.
Use correct refrigerant only. Do not mix
the two refrigerants.
60G-74E
5-14
OTHER CONTROLS AND EQUIPMENT
OTHER CONTROLS AND EQUIPMENT
Parking Brake Lever 6-1
Pedals 6-2
Gear Lever 6-2
Fuel Filler Cap 6-3
Folding Rear Seats 6-4
Sun Visor 6-5
Interior Light Switch 6-5
Assist Grips 6-5
Bonnet 6-6
Cup Holder (if equipped) 6-7
Tyre Changing Tools 6-7
Luggage Compartment Trim 6-8
Trunk (Boot) Light 6-8
Front Seat Back Pocket (if equipped) 6-9
Rear spoiler with Stop lamp (if equipped) 6-9
Alloy Wheels (if equipped) 6-9
Power Antenna (if equipped) 6-10
Leather Cover (if equipped) 6-10
High Mount Stop Lamp 6-10
53
Page 26 of 65

60G-74E
INSTRUMENT PANEL
60G-05-024
Dehumidifying
Push in the A/C button, and the desired
function button and move the air intake lever
to "FRESH AIR", the temperature control lever
to the desired temperature position, and the
fan switch to the desired fan speed position.
NOTE:
Because the air conditioner dehumidifies the
air, turning it on will help keep the windows
clear, even when blowing heated air using the
DEMIST or HEATER & DEMIST functions.
60G-05-025
NOTE:
There are two types of air conditioning
systems used in MARUTI vehicles. One type
uses refrigerant CFC-12, commonly called R-
12; the other type uses the new refrigerant
HFC-134a, commonly called R-134a. For each
system, the correct refrigerant must be used.
To identify the system, a label that states
"R134a" or "HFC 134a" is stuck on the front
side of the engine compartment if the system
uses R-134a refrigerant.
CAUTION
Using the wrong refrigerant may
damage the air conditioning system.
Use correct refrigerant only. Do not mix
the two refrigerants.
60G-74E
5-14
OTHER CONTROLS AND EQUIPMENT
OTHER CONTROLS AND EQUIPMENT
Parking Brake Lever 6-1
Pedals 6-2
Gear Lever 6-2
Fuel Filler Cap 6-3
Folding Rear Seats 6-4
Sun Visor 6-5
Interior Light Switch 6-5
Assist Grips 6-5
Bonnet 6-6
Cup Holder (if equipped) 6-7
Tyre Changing Tools 6-7
Luggage Compartment Trim 6-8
Trunk (Boot) Light 6-8
Front Seat Back Pocket (if equipped) 6-9
Rear spoiler with Stop lamp (if equipped) 6-9
Alloy Wheels (if equipped) 6-9
Power Antenna (if equipped) 6-10
Leather Cover (if equipped) 6-10
High Mount Stop Lamp 6-10
53
Page 27 of 65

OTHER CONTROLS AND EQUIPMENTS
60G-74E
PARKING BRAKE LEVER
63B-06-001E
The parking brake lever is located between
the seats. To apply the parking brake, hold the
brake pedal down and pull the parking brake
lever all the way up.
63B-06-002E
To release the parking brake, hold the brake
pedal down, pull up slightly on the parking
brake lever, push the button on the end of the
lever with your thumb, and lower the lever to
its original position.
Never drive your vehicle with the
parking brake on: rear brake
effectiveness can be reduced from
over heating, brake life may be
shortened, or permanent brake
damage may result.
If the parking brake does not hold
the vehicle securely or does not fully
release, have your vehicle inspected
immediately by an authorized
MARUTI dealer.
Always apply the parking brake fully
before leaving your vehicle or it may
move, causing injury or damage. When
parking, make sure the gear shift lever
is left in first gear or reverse.
Remember, even though the
transmission is in gear, you must
always apply the parking brake fully.
6-1
54
60G-74E
OTHER CONTROLS AND EQUIPMENT
PEDALS
GEAR LEVER
60G-06-001
Clutch Pedal ©
The clutch pedal is used to disengage the drive
to the wheels when starting the engine,
stopping, or shifting the transmission lever.
Depressing the pedal disengages the clutch.
CAUTION
Do not drive with your foot resting on
the clutch pedal. It could result in
excessive clutch wear, clutch damage,
or unexpected loss of engine braking.
Brake Pedal ®
Your MARUTI vehicle is equipped with front
disc brakes and rear drum brakes. Depressing
the brake pedal applies both sets of brakes.
You may hear occasional brake squeal when
you apply the brakes. This is a normal
condition caused by environmental factors
such as cold, wet, snow, etc.
If brake squeal is excessive and occurs
each time the brakes are applied, you
should have the brakes checked by
your MARUTI dealer.
A WARNING
Do not "ride" the brakes by applying
them continuously or resting your foot
on the pedal. This will result in
overheating of the brakes which could
cause unpredictable braking action,
longer stopping distances, or
permanent brake damage.
Accelerator Pedal ®
This pedal controls the speed of the engine.
Depressing the accelerator pedal increases
power output and speed.
70F-04-005E
The gear change pattern is shown in the
illustration. For details on how to use the
transmission, refer to USING THE
TRANSMISSION in the OPERATING YOUR
VEHICLE section.
55
6-2