1999 SUZUKI BALENO fuel type
[x] Cancel search: fuel typePage 6 of 65

60G-74E
BEFORE DRIVING
BEFORE DRIVING
Fuel Recommendation 3-1
Remote Keyless Entry System (if equipped) 3-2
Keys 3-2
Door Locks 3-3
Windows 3-5
Mirrors 3-8
Front Seat Adjustment 3-9
Driver Seat Height Adjuster 3-10
Adjustable Head Restraints (if equipped) 3-10
Seat Belts 3-11
BEFORE DRIVING
60G-74E
FUEL RECOMMENDATION
UNLEADED
FUEL ONLY
You must use unleaded petrol with an
octane number (RON) of 87 or higher. Your
vehicle is fitted with a restrictor in the fuel
filler pipe which will not allow the use of
large nozzle used for dispensing leaded fuel
at filling station. A label is also attached
near the fuel filler pipe of your vehicle that
states: "UNLEADED FUEL ONLY".
CAUTION
Use of leaded fuel in vehicle equipped
with catalytic converter is prohibited,
because leads deactivates the pollutant
reducing components of catalytic
converter and may result in permanent
damage to catalytic converter.
Petrol/Ethanol Blends
Blends of unleaded petrol and ethanol (grain
alcohol), also known as gasohol, are
commercially available in some areas.
Blends of this type may be used in your
vehicle if they are no more than 10%
ethanol. Make sure this petrol-ethanol blend
has octane ratings no lower than those
recommended for petrol.
Petrol/Methanol Blends
Blends of unleaded petrol and methanol (wood
alcohol) are also commercially
available in some areas. DO NOT USE
fuels containing more than 5% methanol
under any circumstances. Fuel system
damage or vehicle performance problems
resulting from the use of such fuels are not
the responsibility of MARUTI and may not
be covered under Warranty.
Fuels containing 5% or less methanol may
be suitable for use in your vehicle if they
contain cosolvents and corrosion inhibitors.
NOTE:
If you are not satisfied with the driveability
or fuel economy of your vehicle when you
are using a petmrol/alcohol blend, you should
switch back to unleaded petrol containing no
alcohol.
CAUTION
Be careful not to spill fuel containing
alcohol while refuelling. Fuels
containing alcohol can cause paint
damage, which is not covered under
Warranty.
CAUTION
The fuel tank has an air space to allow
for fuel expansion in hot weather. If you
continue to add fuel after the filler
nozzle has automatically shut off or an
initial blowback occurs, the air chamber
will become full. Exposure to heat when
fully fuelled in this manner will result
in leakage due to fuel expansion. To
prevent such fuel leakage, stop filling
after the filler nozzle has automatically
shut off, or when using an alternative
non automatic system, initial vent
blowback occurs.
3-1
Page 25 of 65

60G-74E
INSTRUMENT PANEL
60G-05-024
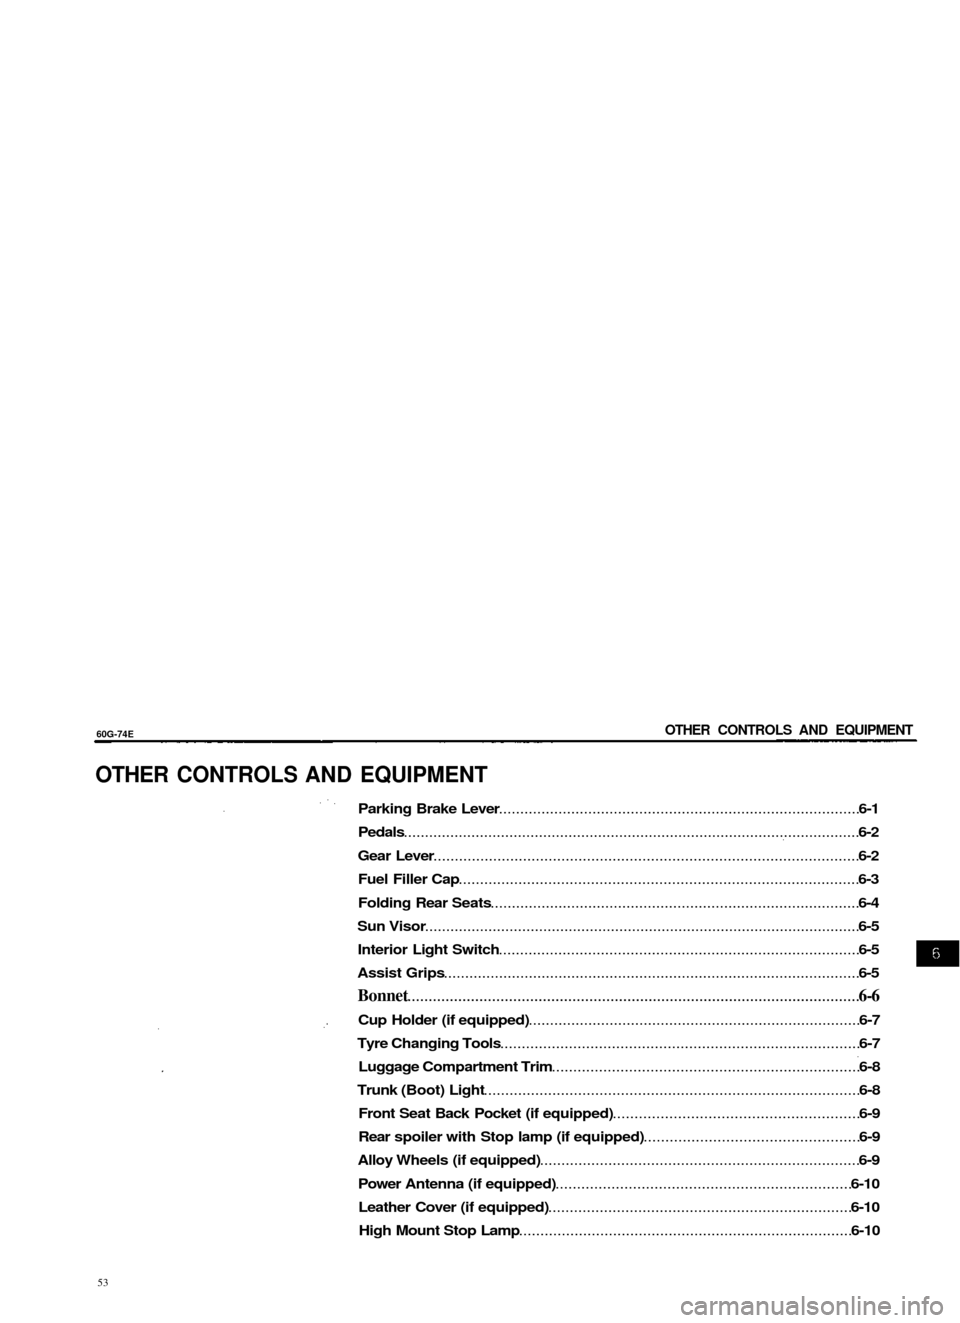
Dehumidifying
Push in the A/C button, and the desired
function button and move the air intake lever
to "FRESH AIR", the temperature control lever
to the desired temperature position, and the
fan switch to the desired fan speed position.
NOTE:
Because the air conditioner dehumidifies the
air, turning it on will help keep the windows
clear, even when blowing heated air using the
DEMIST or HEATER & DEMIST functions.
60G-05-025
NOTE:
There are two types of air conditioning
systems used in MARUTI vehicles. One type
uses refrigerant CFC-12, commonly called R-
12; the other type uses the new refrigerant
HFC-134a, commonly called R-134a. For each
system, the correct refrigerant must be used.
To identify the system, a label that states
"R134a" or "HFC 134a" is stuck on the front
side of the engine compartment if the system
uses R-134a refrigerant.
CAUTION
Using the wrong refrigerant may
damage the air conditioning system.
Use correct refrigerant only. Do not mix
the two refrigerants.
60G-74E
5-14
OTHER CONTROLS AND EQUIPMENT
OTHER CONTROLS AND EQUIPMENT
Parking Brake Lever 6-1
Pedals 6-2
Gear Lever 6-2
Fuel Filler Cap 6-3
Folding Rear Seats 6-4
Sun Visor 6-5
Interior Light Switch 6-5
Assist Grips 6-5
Bonnet 6-6
Cup Holder (if equipped) 6-7
Tyre Changing Tools 6-7
Luggage Compartment Trim 6-8
Trunk (Boot) Light 6-8
Front Seat Back Pocket (if equipped) 6-9
Rear spoiler with Stop lamp (if equipped) 6-9
Alloy Wheels (if equipped) 6-9
Power Antenna (if equipped) 6-10
Leather Cover (if equipped) 6-10
High Mount Stop Lamp 6-10
53
Page 26 of 65

60G-74E
INSTRUMENT PANEL
60G-05-024
Dehumidifying
Push in the A/C button, and the desired
function button and move the air intake lever
to "FRESH AIR", the temperature control lever
to the desired temperature position, and the
fan switch to the desired fan speed position.
NOTE:
Because the air conditioner dehumidifies the
air, turning it on will help keep the windows
clear, even when blowing heated air using the
DEMIST or HEATER & DEMIST functions.
60G-05-025
NOTE:
There are two types of air conditioning
systems used in MARUTI vehicles. One type
uses refrigerant CFC-12, commonly called R-
12; the other type uses the new refrigerant
HFC-134a, commonly called R-134a. For each
system, the correct refrigerant must be used.
To identify the system, a label that states
"R134a" or "HFC 134a" is stuck on the front
side of the engine compartment if the system
uses R-134a refrigerant.
CAUTION
Using the wrong refrigerant may
damage the air conditioning system.
Use correct refrigerant only. Do not mix
the two refrigerants.
60G-74E
5-14
OTHER CONTROLS AND EQUIPMENT
OTHER CONTROLS AND EQUIPMENT
Parking Brake Lever 6-1
Pedals 6-2
Gear Lever 6-2
Fuel Filler Cap 6-3
Folding Rear Seats 6-4
Sun Visor 6-5
Interior Light Switch 6-5
Assist Grips 6-5
Bonnet 6-6
Cup Holder (if equipped) 6-7
Tyre Changing Tools 6-7
Luggage Compartment Trim 6-8
Trunk (Boot) Light 6-8
Front Seat Back Pocket (if equipped) 6-9
Rear spoiler with Stop lamp (if equipped) 6-9
Alloy Wheels (if equipped) 6-9
Power Antenna (if equipped) 6-10
Leather Cover (if equipped) 6-10
High Mount Stop Lamp 6-10
53
Page 28 of 65

OTHER CONTROLS AND EQUIPMENTS
60G-74E
FUEL FILLER CAP
60G-06-002
The fuel filler cap is located on the left rear
side of the vehicle. The fuel filler lid can be
unlocked by pulling up the opener lever located
on the outboard side of the driver's seat and
locked by simply closing the lid.
Remove the fuel filler cap slowly. The
fuel may be under pressure and may
spray out, causing injury.
Petrol Is extremely flammable. Do not
smoke when refuelling, and make sure
there are no open flames or sparks in
the area.
60G-06-OO3
The fuel tank filler cap has a "screw-on ratcheting
type" feature.
• To remove - turn the cap counterclockwise.
Turn the cap slowly to allow any residual
pressure to escape.
• To install - turn the cap clockwise and
tighten it securely until a "ratcheting"
(clicking) sound is heard. The "ratcheting"
sound indicates that the cap is on properly.
6-3
56
60G-74E
OTHER CONTROLS AND EQUIPMENT
FOLDING REAR SEATS
70F-04-008E
If you need to replace the fuel cap, use
only a cap specified for your model.
Using an improper fuel cap can cause
a serious malfunction of the fuel
system. You can get the correct
replacement cap from your MARUTI
dealer.
63B-06-013
The rear seat of your vehicle can be folded
forward ro provide additional luggage space.
To lower the seatback, hook the webbing of
both outboard lap-shoulder belts in the belt
hangers, pull up the lock knobs (© and @)
simultaneously and fold forward the seatback.
To raise the seatback, lift it up and push back
until it locks into place.
When you move a seatback, make sure
the belt webbing is hooked in the belt
hangers (if equipped) so the seat belts
are not caught by the seatback, seat
hinge, or seat latch.This helps prevent
damage to the belt system.
63B-06-014
When returning a rear seat to the
normal position, make sure that
movement of the seatback is
unobstructed and the seatback is
securely latched.
57
6-4
Page 47 of 65

60G-74E
INSPECTION AND MAINTENANCE
CAUTION
When adding or replacing coolant,
use a high quality ethylene glycol
antifreeze and anticorrosion (Non-
Amine type) diluted with distilled
water. If the lowest ambient
temperature in your area is expected
to be -15°C (5°F) or above, make the
antifreeze concentration of the
mixture you use at least 30% but no
more than 50%. If -16°C (3°F) or
below, make the concentration at
least 50%. If the 50% concentration
does not provide adequate
protection against freezing, follow
the instructions on the antifreeze
container to obtain the desired
freezing point.
When putting the cap on the
reservoir tank, line up the arrow on
the cap and the arrow on the tank,
or coolant can leak out.
70F-07-019E
Coolant Replacement
1) When the engine is cool, remove the
radiator cap by turning it slowly to the left
until a "stop" is felt. Do not press down
while turning the cap. Wait until any
pressure is released, then press down on
the cap and continue turning it
anticlockwise.
60G-09-039E
It is dangerous to remove the radiator
cap when the water temperature is
high, because scalding fluid and steam
may be blown out under pressure. Watt
until the coolant temperature has
lowered before removing the cap.
2) Remove the reservoir tank cap. Remove
the reservoir by lifting it up, and drain the
reservoir completely by pouring the
coolant in to a suitable container.
95
9-12
INSPECTION AND MAINTENANCE
60G-74E
WINDSCREEN WASHER FLUID
AIR CLEANER
60G-09-008
3) Loosen the drain plug attached to the
lower part of the radiator and drain the
coolant into a suitable container.
4) Tighten the drain plug on the radiator, fill
the radiator with coolant and install the
radiator cap.
5) Refit the reservoir and fill it with the correct
coolant to the "FULL" line. Refit the
reservoir tank cap, ensuring the arrows are
correctly aligned.
CAUTION
The coolant must be replaced with the
vehicle on level ground.
63B-09-001
Check that there is washer fluid in the tank.
Refill it if necessary. Use a good quality
windscreen washer fluid, diluted with water as
necessary.
Do not use "antifreeze" solution in the
windscreen washer reservoir.This can
severely impair visibility when sprayed
on the windscreen, and can also
damage your vehicle's paint.
CAUTION
Damage may result if the washer motor
is operated whilst the fluid or fluid
nozzles are frozen or with no fluid in
the washer tank.
6OG-09-009
If the air cleaner is clogged with dust, there
will be greater intake resistance, resulting in
decreased power output and increased fuel
consumption.
Take out the air cleaner element after
unhooking the clamps shown in the illustration.
Blow off dust on air cleaner element by
compressed air. If the air cleaner element
appears to be dirty, replace it with a new one.
9-13
96