1999 SUZUKI BALENO wheel
[x] Cancel search: wheelPage 30 of 65

OTHER CONTROLS AND EQUIPMENTS
60G-74E
CUP HOLDER (if equipped)
TYRE CHANGING TOOLS
60G-06-007
3)
Continue to lift up the bonnet until it is high
enough to support with the prop rod.
Make sure the bonnet Is fully closed
and latched before driving. If it is not,
it can fly up unexpectedly during
driving, obstructing your view and
resulting in an accident.
60G-06-008
To use the cup holder, pull it out fully. After
using the holder, push it back in.
Do not use the cup holder to hold cups
containing hot liquids, or objects other
than cups. Objects in the cup holder
may be thrown about during a sudden
stop or impact, and could cause
personal injury.
60G-06-009
The jack, wheel wrench and jack crank are
stowed in the luggage compartment behind
the rear seat.
To remove the jack, turn its shaft
counterclockwise and pull the jack out of the
storage bracket. To stow the jack, place it in
the storage bracket and turn the shaft
clockwise until the jack is securely held in
place.
6-7
60
60G-74E
OTHER CONTROLS AND EQUIPMENT
LUGGAGE COMPARTMENT TRIM TRUNK (BOOT) LIGHT (if equipped)
Luggage or other cargo placed in the luggage
compartment are hidden from view by a
luggage compartment trim.
Do not carry items on top of the
luggage compartment trim, even if they
are small and light. Objects on top of
the trim could be thrown about In an
accident, causing injury, or could
obstruct the driver's rear view.
60G-06-010
6OG-O6-O11
The jack should be used only to change
wheels. It is important to read the
jacking Instructions in the
EMERGENCY SERVICE section of this
manual before attempting to use the
jack.
When you open the trunk (boot) lid, the trunk
(boot) light comes on and remains on as
long as you keep the lid open.
Do not leave the boot (trunk) lid open
for a long time, or the battery will
discharge.
After using the jack, jack crank and
wheel wrench, be sure to stow them
securely or they can cause injury if an
accident occurs.
61
6-8
Page 31 of 65
OTHER CONTROLS AND EQUIPMENTS
60G-74E
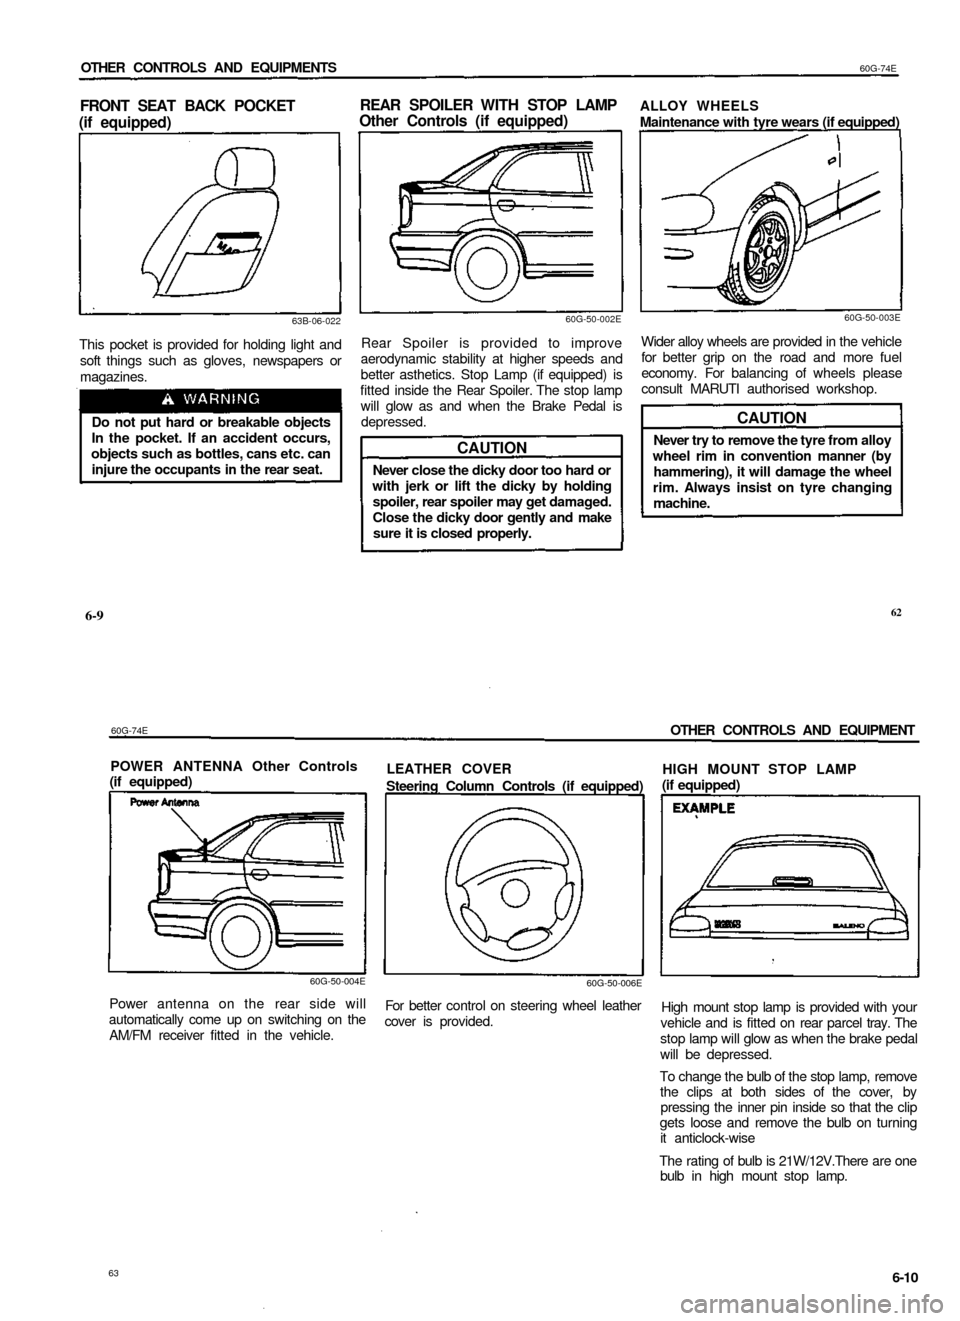
FRONT SEAT BACK POCKET
(if equipped)
REAR SPOILER WITH STOP LAMP
Other Controls (if equipped)
63B-06-022
This pocket is provided for holding light and
soft things such as gloves, newspapers or
magazines.
Do not put hard or breakable objects
In the pocket. If an accident occurs,
objects such as bottles, cans etc. can
injure the occupants in the rear seat.
60G-50-002E
Rear Spoiler is provided to improve
aerodynamic stability at higher speeds and
better asthetics. Stop Lamp (if equipped) is
fitted inside the Rear Spoiler. The stop lamp
will glow as and when the Brake Pedal is
depressed.
CAUTION
Never close the dicky door too hard or
with jerk or lift the dicky by holding
spoiler, rear spoiler may get damaged.
Close the dicky door gently and make
sure it is closed properly.
ALLOY WHEELS
Maintenance with tyre wears (if equipped)
60G-50-003E
Wider alloy wheels are provided in the vehicle
for better grip on the road and more fuel
economy. For balancing of wheels please
consult MARUTI authorised workshop.
CAUTION
Never try to remove the tyre from alloy
wheel rim in convention manner (by
hammering), it will damage the wheel
rim. Always insist on tyre changing
machine.
6-9
62
60G-74E
OTHER CONTROLS AND EQUIPMENT
POWER ANTENNA Other Controls
(if equipped)
LEATHER COVER
Steering Column Controls (if equipped)
60G-50-004E
60G-50-006E
Power antenna on the rear side will
automatically come up on switching on the
AM/FM receiver fitted in the vehicle.
For better control on steering wheel leather
cover is provided.
HIGH MOUNT STOP LAMP
(if equipped)
High mount stop lamp is provided with your
vehicle and is fitted on rear parcel tray. The
stop lamp will glow as when the brake pedal
will be depressed.
To change the bulb of the stop lamp, remove
the clips at both sides of the cover, by
pressing the inner pin inside so that the clip
gets loose and remove the bulb on turning
it anticlock-wise
The rating of bulb is 21W/12V.There are one
bulb in high mount stop lamp.
63
6-10
Page 34 of 65
60G-74E
OPERATING YOUR VEHICLE
Reduce your speed and change
down to a lower gear before going
down a long or steep hill. A lower
gear will allow the engine to provide
braking. Avoid riding the brakes or
they may overheat, resulting in brake
failure.
When driving on slippery roads, be
sure to slow down before changing
down. Excessive and or sudden
changes in engine speed may cause
loss of traction, which could cause
you to lose control.
Make sure that the vehicle is
completely stationary before you
change into reverse.
CAUTION
To help avoid clutch damage, do not
use the clutch pedal as a footrest
while driving or use the clutch to
keep the vehicle stationary on a hill.
Depress the clutch fully when
changing gear.
When changing gears or starting off,
do not race the engine. Racing the
engine can shorten engine life and
prevent smooth operation.
BRAKING
The distance needed to bring any vehicle to a
halt increases with the speed of the vehicle.
The braking distance needed, for example, at
60 km/h will be approximately 4 times greater
than the braking distance needed at 20 km/h.
Start to brake the vehicle when there is plenty
of distance between your vehicle and the
stopping point, and slow down gradually.
69
7-4
OPERATING YOUR VECHILE
60G-74E
RUNNING-IN
Servo assisted brakes
Your vehicle has servo assisted brakes which
works with the assistance of engine vacuum.
Do not switch off the engine while
vehicle is in motion, for example, while
driving down a hill as this will cause
loss of vacuum assistance leading to
reduction of braking efficiency
substantially.
If servo assistance is lost due to a stalled
engine or other failures, the system is still fully
operational on reserve power and you can
bring the vehicle to a complete stop by
pressing the brake pedal once and holding it
down. The reserve power is partly used up
each time you depress the brake pedal. Apply
smooth and constant pressure to the pedal.
Do not pump the pedal.
Even without reserve power in the
brake system, you can still stop the
vehicle by pressing the brake pedal
harder than normally required.
However, the stopping distance may be
lonaer.
On loose surface where the wheels can
easily loose traction (such as gravel,
etc.), the stopping distance required for
your vehicle may be greater than for a
comparable vehicle with a conventional
brake system. Allow for extra stopping
distance when driving on loose
surfaces.
CAUTION
The future performance and reliability
of the engine depends on the care and
restraint exercised during its early life.
It is especially important to observe the
following precautions during the initial
1000 km of vehicle operation.
• After starting, do not race the
engine. Warm it up gradually.
• Avoid prolonged vehicle operation at
a constant speed. Moving parts will
bed in better if you vary your speed.
• Do not exceed 100 km/h.
• Start off from a stop slowly. Avoid
full throttle starts.
• If possible, avoid hard braking,
especially during the first 300 km of
driving.
• Do not drive slowly with the
transmission in a high gear.
• Drive the vehicle at moderate engine
speeds.
7-5
70
If water gets into the brake drums,
brake performance may become poor
and unpredictable. After driving
through water or washing the
underside of the vehicle, test the brakes
while driving at a slow speed to see if
they have maintained their normal
effectiveness. If the brakes are less
effective than normal, dry them by
repeatedly applying the brakes while
driving slowly until the brakes have
regained their normal effectiveness.
Page 37 of 65
60G-74E
DRIVING TIPS AND SAFE DRIVING
Snow Chains
If you must use snow chains to increase tyre
traction, observe the following precautions:
• Choose a safe place away from traffic to
install the chains.
• When installing the chains carefully follow
the manufacturer's instructions.
• Install the chains on the front tyres.
• With the chains on, drive only at slow and
moderate speeds.
• If Your Vehicle Gets Stuck
If your vehicle gets stuck in snow, mud, or
sand, follow the directions below:
1) Change back and forth between first gear
and reverse. This will create a rocking
motion which may give you enough
momentum to free the vehicle. Press
gently on the accelerator to keep wheel
spin to a minimum. Remove your foot from
the accelerator while changing gear.
Do not race the engine. Excessive wheel
spin will cause the tyres to dig deeper,
making it more difficult to free the vehicle.
2) If your vehicle remains stuck after a few
minutes of rocking, get another vehicle to
pull you out.
Do not allow anyone to stand near the
vehicle when you are rocking it, and do
not spin the wheels faster than an
indicated 40 km/h on the speedometer.
Personal injury and/or vehicle damage
may result from spinning the wheels
too fast.
CAUTION
Do not continue rocking the vehicle for
more than a few minutes. Prolonged
rocking can cause engine overheating
or transmission damage.
DRIVING ON WET ROADS
CAUTION
When driving on wet roads, avoid driv-
ing through large amount of standing
water on the road. Large amount of
water entering the engine compart-
ment may cause damage to the engine
and or electrical components.
If stuck in deep water, do not start till
water level drops.
Water Is incompressible substance,
water inside engine is harmful to
the engine."
Make sure your tyres are in good
condition and always maintain the
specified tyre pressure. Refer to
"TYRES" in the "INSPECTION AND
MAINTENANCE" section for details.
Do not use tyres other than those
specified by MARUTI. never use
different sizes or types of tyres on
the front and rear wheels. For
information regarding the specified
tyres, refer to ^"SPECIFICATIONS"
section.
Never use oversized tyres or special
shock absorbers and springs to
raise (jack up) your vehicle.This will
change the handling characteristics.
After driving through water, test the
brakes while driving at a slow speed
to see if they have maintained their
normal effectiveness. If the brakes
are less effective than normal, dry
them by repeatedly applying the
brakes while driving slowly until the
brakes have regained their normal
effectiveness.
75
8-2
DRIVING TIPS AND SAFE DRIVING
60G-74E
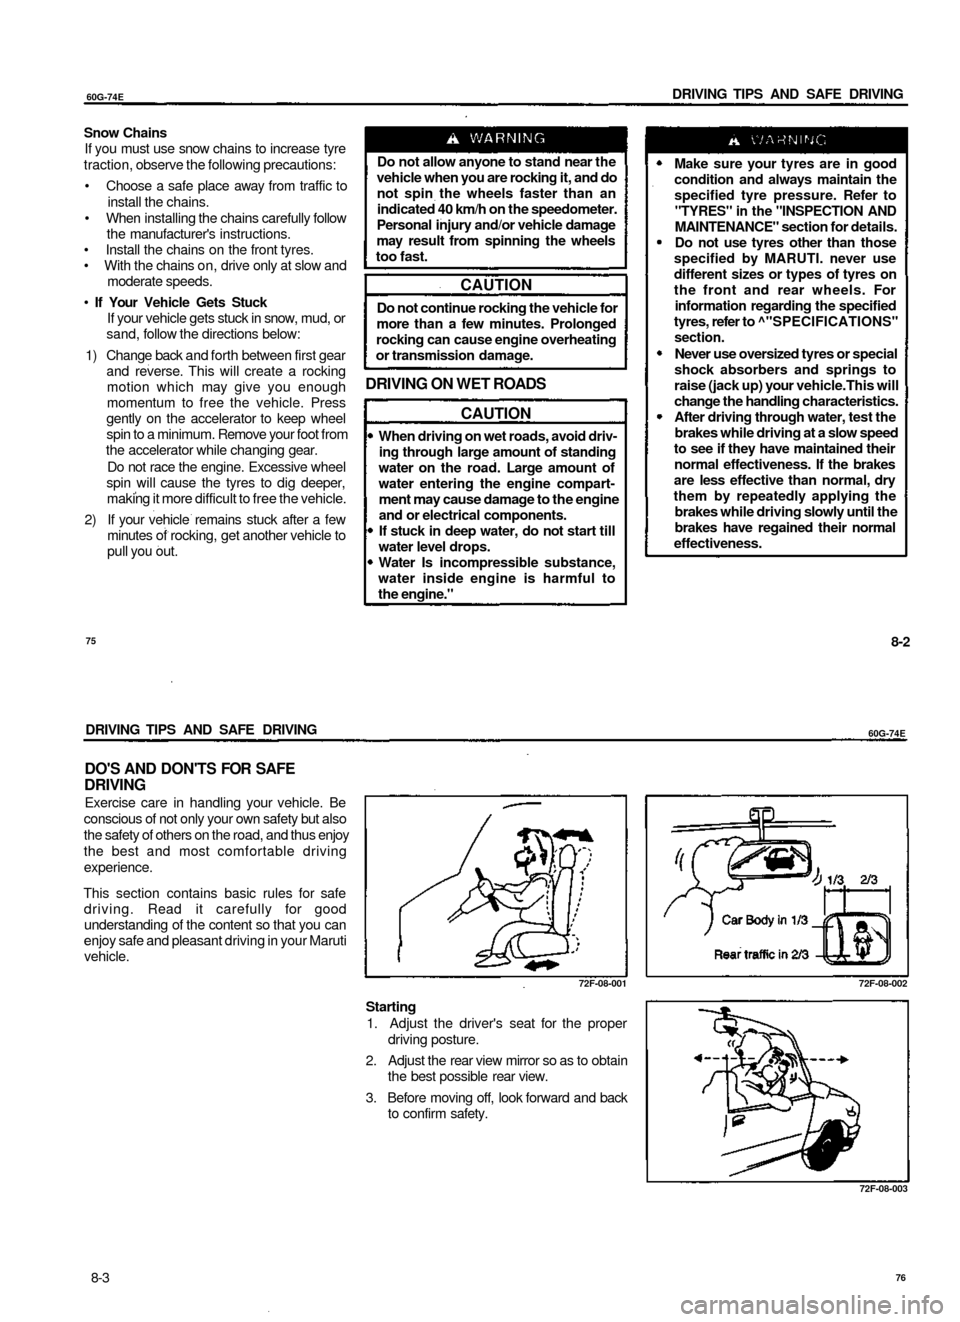
DO'S AND DON'TS FOR SAFE
DRIVING
Exercise care in handling your vehicle. Be
conscious of not only your own safety but also
the safety of others on the road, and thus enjoy
the best and most comfortable driving
experience.
This section contains basic rules for safe
driving. Read it carefully for good
understanding of the content so that you can
enjoy safe and pleasant driving in your Maruti
vehicle.
72F-08-001
Starting
1. Adjust the driver's seat for the proper
driving posture.
2. Adjust the rear view mirror so as to obtain
the best possible rear view.
3. Before moving off, look forward and back
to confirm safety.
72F-08-002
72F-08-003
8-3
76
Page 43 of 65
60G-74E
INSPECTION AND MAINTENANCE
Interval: This interval should be Judged
by odometer reading or months,
whichever comes first.
km (x 1,000)
months
FUEL
1. Air cleaner Paved-road
Dusty condition
2. Accelerator cable and Throttle shafts
3. Fuel tank cap, fuel lines & connections(leakage,damage)
4. Fuel filter (leakage)
CLUTCH AND TRANSMISSION
1. Clutch pedal (play)
2. Clutch slipping (dragging or excessive damage)
3. Manual Transmission/Transfer and Differential oil (level, leakage)
DRIVE SHAFTS
1. Drive shafts boots (bent of boots damage)
BRAKE
1. Brake fluid (level, leakage)
2. Brake pedal (pedal-to-wall clearance)
3. Parking brake lever and cable (play, damage)
4. a. Brake discs and pads, (wear)
b. Brake drums & shoes
5. Master cylinder and wheel cylinder or calliper (oil leakage.boot kit)
6. Brake hoses and pipes (leakage, damage)
FREE
1
1
INSPECTIONS
5
6
10
12
Clean every 5,000 km. F
PERIODIC MAINTENANCE
20
24
30
36
40
48
Replace every 40,000 krr
50
60
SERVICE
60
72
AT
70
84
COST
80
96
Clean every 2,500 km or as required. Replace every 40,000 km. More frequent
replacement if dust condition is severe.
-
-
I
I
I
I
-
I
I
I
-
-
I
I
I&L
I
I
I
I
I
I
I
I
I
I
-
I
I
I&L
-
I
I
I
I
I
I
I
I
I
I
I
I
I&L
-
I
I
I
R
I
R
I
I
I
I
I
I
I&L
-
I
I
I
I
I
I
I
I
I
I
I
I
I&L
I
R
I
I
R
I
R
I
I
I
I
R
I
I&L
-
I
I
I
I
I
I
I
I
I
I
I
I
I&L
-
I
I
I
R
I
R
I
I
I
I
I
I
I&L
-
I
I
I
I
I
I
I
I
I
I
I
I
I&L
I
R
I
I
R
I
R
I
I
I
I
R
I
87
9-4
INSPECTION AND MAINTENANCE
60G-74E
Interval: This Interval should be judged
by odometer reading or months,
whichever comes first
km (x 1,000)
months
WHEEL
1. Tyres (air pressure, abnormal wear, crack, ROTATION)
2. Wheels (damage)
3. Front wheel bearings (loose, damage)
4. Rear wheel bearings (loose, damage)
FRONT AND REAR SUSPENSION
1. Suspension strut (oil leakage, damage)
2. Suspension arms and knuckle supports (loose.damage)
3. Rear spring (damage)
4. Shock absorbers (oil leakage, damage)
5. All bolts and nuts (loose)
6. Suspension arms and Tension rods
STEERING
1. Steering wheel (play, loose)
2. Power steering fluid (level, leakage)/connections
3. All rods and arms (loose, damage, wear)
ELECTRICAL
1. Battery electrolyte (level, leakage)
2. Wiring harness connection (looseness, damage)
3. Lighting system (operation, stains, damage)
4. Horn (operation)
5. System voltage
BODY
1. All chassis bolts and nuts (tighten)
2. All Latches, Hinges & Locks (function)
FREE
1
1
INSPECTIONS
5
6
Rotate and
I
-
-
I
-
-
I
-
-
I
I
I
I
-
I
I
-
-
I
I
I
I
I
I
I
I
T
I
I
I
I
I
I
I
I
I
I
I&L
10
12
PERIODIC
20
24
inspect every 5,000
I
I
I
I
I
I
I
T
I
I
I
I
I
I
I
I
I
T
I&L
I
I
I
I
I
I
I
T
I
I
I
I
I
I
I
I
I
T
I&L
30
36
km
I
I
I
I
I
I
I
T
I
I
I
I
I
I
I
I
I
T
I&L
MAINTENANCE
40
48
I
I
I
I
I
I
I
T
I
I
I
I
I
I
I
I
I
T
I&L
50
60
I
I
I
I
I
I
I
T
I
I
I
I
I
I
I
I
I
T
I&L
SERVICE
60
72
I
I
I
I
I
I
I
T
I
I
I
I
I
I
I
I
I
T
I&L
AT
70
84
I
I
I
I
I
I
I
T
I
I
I
I
I
I
I
I
I
T
I&L
COST
80
96
I
I
I
I
I
I
I
T
I
I
I
I
I
I
I
I
I
T
I&L
9-5
88
Page 49 of 65

60G-74E
INSPECTION AND MAINTENANCE
70F-07-029
Do not use any fluid other than SAE
J1703 or DOT-3 brake fluid. Do not
use reclaimed fluid or fluid that has
been stored in old or open
containers. It is essential that foreign
particles and other liquids are kept
out of the brake fluid reservoir.
CAUTION
The brake fluid should be replaced
every two years or 20,000 km.
panel will come on (the engine must
be running with the parking brake
fully disengaged). Should the light
come on, immediately ask your
MARUTI dealer to inspect the brake
system.
A rapid fluid loss Indicates a leak in
the brake system which should be
inspected by your MARUTI dealer
immediately.
Brake fluid can harm your eyes and
damage painted surfaces. Use
caution when refilling the reservoir.
NOTE:
With disc brakes, the fluid level can be
expected to gradually fall as the brake pads
wear.
99
70F-07-030
Brake Pedal
Check if the brake pedal stops at the regular
height without "spongy" feeling when you
depress it. If not, have the brake system
inspected by your MARUTI dealer. If you doubt
the brake pedal for the regular height, check
it as follows:
With the engine running, measure the distance
between the brake pedal and floor wall when
the pedal is depressed with approximately 30
kg (66 lbs) of force. The minimum distance
required is 80 mm (3.1 in). Since your vehicle's
brake system is self-adjusting, there is no need
for pedal adjustment. If the pedal to floor wall
distance as measured above is less than the
minimum distance required, have your vehicle
inspected by your MARUTI dealer.
9-16
INSPECTION AND MAINTENANCE
60G-74E
STEERING
60G-09-015E
NOTE:
When measuring the distance between the
brake pedal and floor wall, be sure not to
include any floor covering in the measurement.
If you experience any of the following
problems with your vehicle's brake
system, have the vehicle inspected
immediately by your MARUTI dealer.
Poor braking performance
Uneven braking (Brakes not working
uniformly on all wheels.)
Excessive pedal travel
Brake dragging
Excessive noise
Pedal pulsation (Pedal pulsates
when depressed.)
63B-09-00SE
Parking brake
Check the parking brake for proper adjustment
by counting the number of clicks made by the
ratchet teeth as you slowly pull up on the
parking brake lever to the point of full
engagement. The parking brake lever should
stop between the 3rd and 5th ratchet tooth
and the rear wheels should be securely locked.
If the parking brake is not properly adjusted
or the brakes drag after the lever has been
fully released, have the parking brake
inspected and/or adjusted by your MARUTI
dealer.
60G-09-016
Check the play of the steering wheel by gently
turning it from left to right and measuring the
distance that it moves before you feel slight
resistance. The play should be between 0 -
30
mm
(0.0 -1.2 in).
Check that the steering wheel turns easily and
smoothly without rattling by turning it all the
way to the right and to the left while driving
very slowly in an open area. If the amount of
free play is outside the specification or you
find anything else to be wrong, an inspection
must be performed by your MARUTI dealer.
9-17
100
Page 51 of 65
60G-74E
INSPECTION AND MAINTENANCE
Hitting curbs and running over rocks
can damage tyres and affect wheel
alignment. Be sure to have tyres and
wheel alignment checked periodically
by your MARUTI dealer.
4) Check for loose wheel nuts.
5) Check that there are no nails, stones, or
other objects sticking into the tyres.
Your MARUTI is equipped with tyres
which are all the same type and size.
This is important to ensure proper
steering and handling of the vehicle.
Never mix tyres of different size or type
on the four wheels of your vehicle. The
size and type of tyres used should be
only those approved by MARUTI as
standard or optional equipment for
your vehicle.
Replacing the wheels and tyres
equipped on your vehicle with certain
combinations of aftermarket wheels
and tyres can significantly change the
steering and handling characteristics
of your vehicle. Therefore, use only
those wheel and tyre combinations
approved by MARUTI as standard or
optional equipment for your vehicle.
CAUTION
Replacing the original tyres with tyres
of a different size may result in false
speedometer or odometer readings.
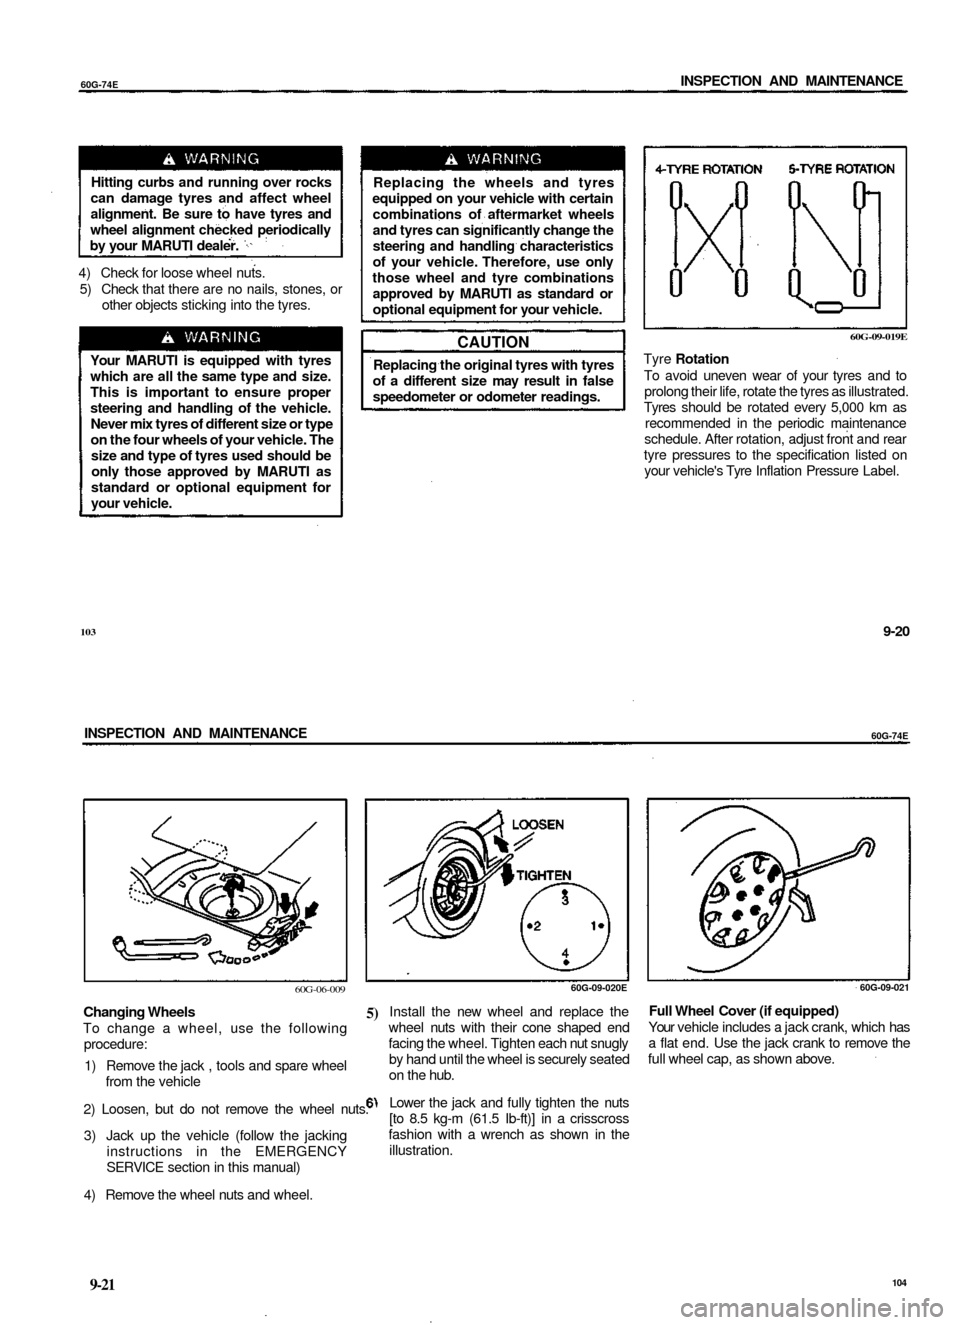
60G-09-019E
Tyre Rotation
To avoid uneven wear of your tyres and to
prolong their life, rotate the tyres as illustrated.
Tyres should be rotated every 5,000 km as
recommended in the periodic maintenance
schedule. After rotation, adjust front and rear
tyre pressures to the specification listed on
your vehicle's Tyre Inflation Pressure Label.
103
9-20
INSPECTION AND MAINTENANCE
60G-74E
60G-06-009
5)
Changing Wheels
To change a wheel, use the following
procedure:
1) Remove the jack , tools and spare wheel
from the vehicle
2) Loosen, but do not remove the wheel nuts. '
3) Jack up the vehicle (follow the jacking
instructions in the EMERGENCY
SERVICE section in this manual)
4) Remove the wheel nuts and wheel.
60G-09-020E
Install the new wheel and replace the
wheel nuts with their cone shaped end
facing the wheel. Tighten each nut snugly
by hand until the wheel is securely seated
on the hub.
Lower the jack and fully tighten the nuts
[to 8.5 kg-m (61.5 Ib-ft)] in a crisscross
fashion with a wrench as shown in the
illustration.
60G-09-021
Full Wheel Cover (if equipped)
Your vehicle includes a jack crank, which has
a flat end. Use the jack crank to remove the
full wheel cap, as shown above.
9-21
104
Page 58 of 65

EMERGENCY SERVICE
60G-74E
JACKING INSTRUCTIONS
60G-06-009
1) Park the vehicle securely on hard level
ground.
2) Apply the parking brake firmly and shift into
"R" (Reverse). Choke the front and rear wheel
diagonally opposite the wheel to be changed.
3) Switch on the hazard warning flasher if your
vehicle is in or near traffic.
4) Slacken but do not remove wheel nuts on the
wheel to be changed.
5) Position the jack vertically and raise the jack
by turning the jack handle clockwise until the
jack head recess fits the frame boss.
6) Continue to raise the jack slowly and smoothly
until the tyre clears the ground. Do not raise
the vehicle more than necessary.
10-1
63B-10-001E
70F-08-001
60G-10-001
NOTE:
Use the wheel nut wrench in combination with
jack crank to raise or lower the jack as shown
in the illustration.
Use the jack only to change wheels.
Never jack up the vehicle on an
inclined surface.
Never raise the vehicle with the jack in
a location other than under the frame
boss near the wheel to be changed.
Make sure that the jack is raised at
least 2 inches (51 mm) before it
contacts the vehicle. Use of the jack
when it is within 2 inches of being
fully collapsed may result in failure
of the jack.
Never get under the vehicle when it
is supported by the jack. t=>
116
60G-74E
EMERGENCY SERVICE
JUMP STARTING INSTRUCTIONS
60G-10-002
60G-10-003
Never run the engine when the
vehicle is supported by the jack and
never allow passengers to remain in
the vehicle.
Never attempt to jump start your
vehicle if the battery appears to be
frozen. Batteries in this condition
may explode or rupture if jump
starting is attempted.
When making jump lead
connections, be certain that your
hands and the Jump leads remain
clear from pulleys, belts, or fans.
Batteries produce flammable
hydrogen gas. Keep flames and
sparks away from the battery or an
explosion may occur. Never smoke
when working in the vicinity of the
battery.
If the booster battery you use for
jump starting is installed in another
vehicle, make sure the two vehicles
are not touching each other.
If your battery discharges
repeatedly, for no apparent reason,
have your vehicle inspected by an
authorized MARUTI dealer.
To avoid harm to yourself or damage
to your vehicle or battery, follow the
jump starting instructions below
precisely and in order. If you are in
doubt, call for qualified road service.
10-2