Page 197 of 345
8.
A:
1\)
2\)
3\)
6-2
4\)
[W3A0].>
5\)
5-1
6\)
CAUTION:
Be
fender
S5M0165
7\)
NOTE:
Check
front
necessary
G5M0175
G5M0176
9.
A:
1\)
2\)
toward
guard.
S5M0166
3\)
CAUTION:
Only
39
[W9A0]5-1SER
9.
Page 198 of 345
8.
A:
1\)
2\)
3\)
6-2
4\)
[W3A0].>
5\)
5-1
6\)
CAUTION:
Be
fender
S5M0165
7\)
NOTE:
Check
front
necessary
G5M0175
G5M0176
9.
A:
1\)
2\)
toward
guard.
S5M0166
3\)
CAUTION:
Only
39
[W9A0]5-1SER
9.
Page 230 of 345
NOTE:
Always adjust the two rear sash adjusting bolts (2)
by the same amount. Do not adjust the adjusting
bolts with the sash bracket inclined toward the
inner panel, as this increases effort required to
operate the regulator.
S5M0201A
2) Adjust the front sash fit using the rear sash
adjustment procedure outlined in the former proce-
dure as a guide. The two adjusting bolts must be
adjusted by the same amount.
NOTE:
IFront and rear sash adjustment procedures are
basically the same; however, the amount of adjust-
ment is not always the same due to alignment dis-
persion of individual doors.
IAdjust front and rear sash fit, as equally as pos-
sible. Otherwise, effort required to operate regula-
tor may increase.
3) After adjusting front sash-to-glass fit, secure
front sash.
22
5-2[W2B4]SERVICE PROCEDURE
2. Door
Page 334 of 345

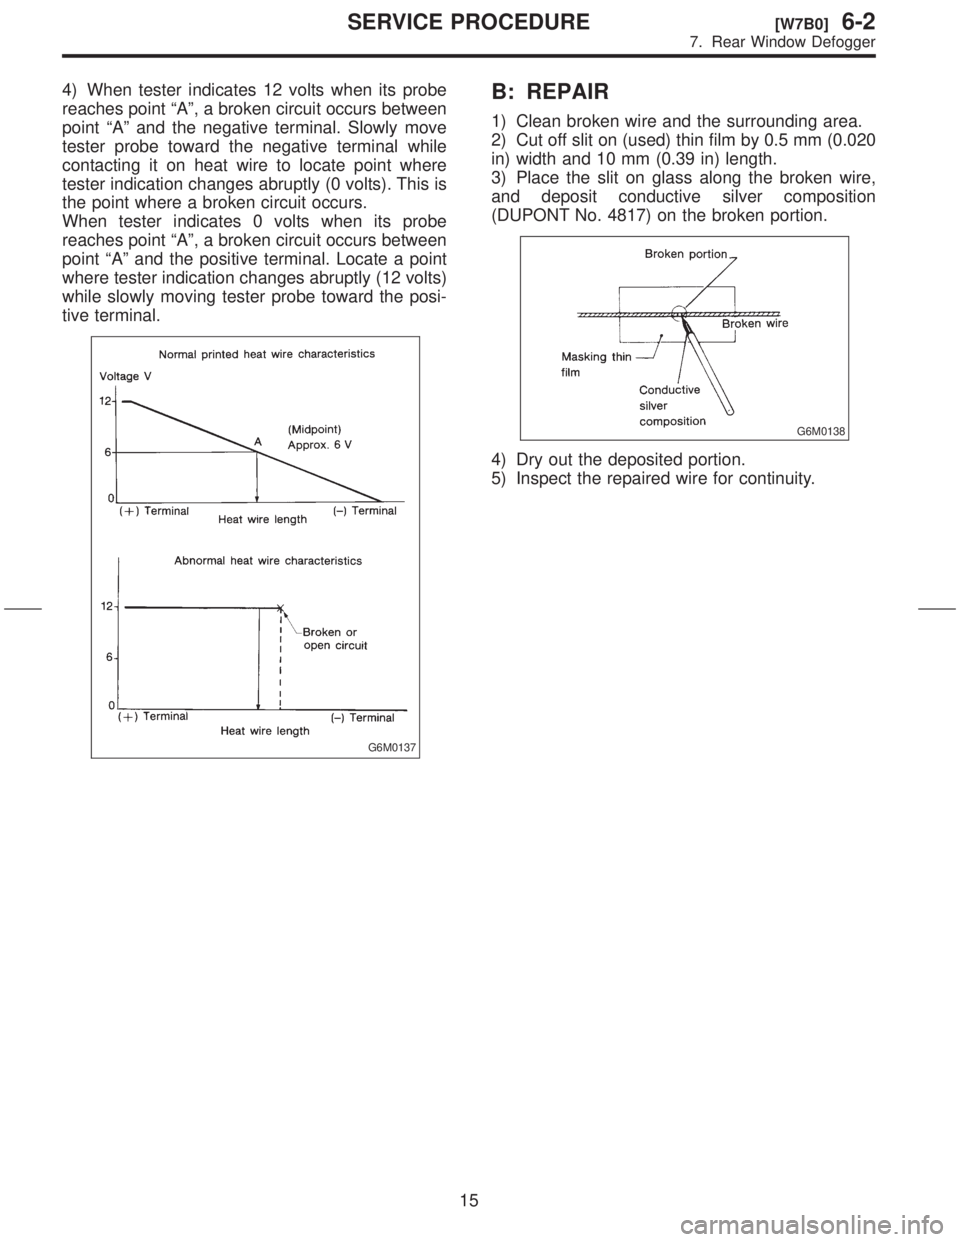
4) When tester indicates 12 volts when its probe
reaches point ªAº, a broken circuit occurs between
point ªAº and the negative terminal. Slowly move
tester probe toward the negative terminal while
contacting it on heat wire to locate point where
tester indication changes abruptly (0 volts). This is
the point where a broken circuit occurs.
When tester indicates 0 volts when its probe
reaches point ªAº, a broken circuit occurs between
point ªAº and the positive terminal. Locate a point
where tester indication changes abruptly (12 volts)
while slowly moving tester probe toward the posi-
tive terminal.
G6M0137
B: REPAIR
1) Clean broken wire and the surrounding area.
2) Cut off slit on (used) thin film by 0.5 mm (0.020
in) width and 10 mm (0.39 in) length.
3) Place the slit on glass along the broken wire,
and deposit conductive silver composition
(DUPONT No. 4817) on the broken portion.
G6M0138
4) Dry out the deposited portion.
5) Inspect the repaired wire for continuity.
15
[W7B0]6-2SERVICE PROCEDURE
7. Rear Window Defogger