1999 NISSAN FRONTIER ECU
[x] Cancel search: ECUPage 193 of 247
snow traction than All Season tires and may
be more appropriate in some areas.
Summer tires
NISSAN specifies summer tires on some
models to provide superior performance on
dry roads. Summer tire performance in
snow and ice will be substantially reduced.
Summer tires do not have the tire traction
rating ``M&S'' on the tire sidewall.
If you plan to operate your vehicle in snowy
or icy conditions, NISSAN recommends the
use of ``SNOW'' or ``ALL SEASON'' tires on
all four wheels.
Snow tires
If snow tires are needed, it is necessary to
select tires equivalent in size and load rating
to the original equipment tires. If you do not,
it can adversely affect the safety and han-
dling of your vehicle.
Generally, snow tires will have lower speed
ratings than factory equipped tires and may
not match the potential maximum vehicle
speed. Never exceed the maximum speed
rating of the tire.
For additional traction on icy roads, studded
tires may be used. However, some U.S.States and Canadian provinces prohibit
their use. Check local, state and provincial
laws before installing studded tires. Skid
and traction capabilities of studded snow
tires on wet or dry surfaces may be poorer
than that of non-studded snow tires.
Four-wheel drive model
If you install snow tires, they must be the
same size, brand, construction and tread
pattern on all four wheels.
CAUTION
ONLY use spare tires specified for each
four-wheel drive model.
Tire chains
Use of tire chains may be prohibited accord-
ing to location. Check the local laws before
installing tire chains. When installing tire
chains, make sure they are the proper size
for the tires on your vehicle and are installed
according to the chain manufacturer's sug-
gestions.Use only SAE class ``S'' chains.
Other types may damage your vehicle. Use
chain tensioners when recommended by
the tire chain manufacturer to ensure a tight
fit. Loose end links of the tire chain must besecured or removed to prevent the possibil-
ity of whipping action damage to the fenders
or undercarriage. If possible, avoid fully
loading your vehicle when using tire chains.
In addition, drive at a reduced speed. Oth-
erwise, your vehicle may be damaged
and/or vehicle handling and performance
may be adversely affected.
Never install tire chains on a TEMPORARY
USE ONLY spare tire.
Tire chains must be installed only on the
rear wheels and not on the front wheels.
Do not use tire chains on dry roads. Driving
with chains in such conditions can cause
damage to the various mechanisms of the
vehicle due to some overstress. When driv-
ing on clear paved roads, be sure to change
to 2WD.
Do-it-yourself
8-33
ZX
Page 201 of 247

sure no wheel nuts are missing, and check for
any loose wheel nuts. Tighten if necessary.
Tire rotation*Tires should be rotated every
7,500 miles (12,000 km) for 2WD vehicles
and 3,750 miles (6,000 km) for 4WD ve-
hicles.
Wheel alignment and balanceIf the ve-
hicle should pull to either side while driving
on a straight and level road, or if you detect
uneven or abnormal tire wear, there may be
a need for wheel alignment.
If the steering wheel or seat vibrates at
normal highway speeds, wheel balancing
may be needed.
Windshield wiper blades*Check for
cracks or wear if they do not wipe properly.
Doors and hoodCheck that all doors and
the hood operate properly. Also ensure that
all latches lock securely. Lubricate hinges,
latches, rollers and links if necessary. Make
sure that the secondary latch keeps the
hood from opening when the primary latch
is released.
When driving in areas using road salt or
other corrosive materials, check lubrication
frequently.Lights*Make sure that the headlights, stop
lights, tail lights, turn signal lights, and other
lights are all operating properly and installed
securely. Also check headlight aim.
INSIDE THE VEHICLE
The maintenance items listed here should
be checked on a regular basis, such as
when performing periodic maintenance,
cleaning the vehicle, etc.
Additional information on the following
items with an ``*'' is found in the ``Do-it-
yourself'' section of this manual.
Warning lights and chimesMake sure all
warning lights and chimes are operating
properly.
Windshield wiper and washer*Check that
the wipers and washer operate properly and
that the wipers do not streak.
Windshield defrosterCheck that the air
comes out of the defroster outlets properly
and in sufficient quantity when operating the
heater or air conditioner.
Steering wheelCheck for changes in the
steering conditions, such as excessive free-
play, hard steering or strange noises.SeatsCheck seat position controls such as
seat adjusters, seatback recliner, etc. to
ensure they operate smoothly and all
latches lock securely in every position.
Check that the head restraints move up and
down smoothly and the locks (if so
equipped) hold securely in all latched posi-
tions.
Seat beltsCheck that all parts of the seat
belt system (e.g., buckles, anchors, adjust-
ers and retractors) operate properly and
smoothly, and are installed securely. Check
the belt webbing for cuts, fraying, wear or
damage.
Accelerator pedalCheck the pedal for
smooth operation and make sure the pedal
does not catch or require uneven effort.
Keep the floor mat away from the pedal.
Clutch pedal*Make sure the pedal oper-
ates smoothly and check that it has the
proper free travel.
BrakesCheck that the brakes do not pull
the vehicle to one side when applied.
Brake pedal and booster*Check the pedal
for smooth operation and make sure it has
the proper distance under it when de-
pressed fully. Check the brake booster func-
Maintenance
9-3
ZX
Page 202 of 247

tion. Be certain to keep the floor mat away
from the pedal.
Parking brake*Check that the lever has
the proper travel and confirm that your
vehicle is held securely on a fairly steep hill
with only the parking brake applied.
Automatic transmission Park position
mechanismCheck that the lock release
button on the selector lever operates prop-
erly and smoothly. On a fairly steep hill
check that your vehicle is held securely with
the selector lever in the P position without
applying any brakes.
UNDER THE HOOD AND
VEHICLE
The maintenance items listed here should
be checked periodically (e.g., each time you
check the engine oil or refuel).
Additional information on the following
items with an ``*'' is found in the ``Do-it-
yourself operations'' section.
Windshield washer fluid*Check that there
is adequate fluid in the reservoir.
Engine coolant level*Check the coolant
level when the engine is cold.Radiator and hosesCheck the front of the
radiator and clean off any dirt, insects,
leaves, etc., that may have accumulated.
Make sure the hoses have no cracks, de-
formation, rot or loose connections.
Brake and clutch fluid levels*Make sure
that the brake and clutch fluid level is be-
tween the MIN and MAX lines on the reser-
voir.
Battery*Check the fluid level in each cell. It
should be between the MAX and MIN lines.
Engine drive belts*Make sure the drive
belts are not frayed, worn, cracked or oily.
Engine oil level*Check the level after
parking the vehicle on a level surface with
the engine off. Wait a few minutes for the oil
to drain back into the oil pan.
Power steering fluid level* and lines
Check the level when the fluid is cold, with
the engine off. Check the lines for proper
attachment, leaks, cracks, etc.
Automatic transmission fluid level*
Check the level after putting the selector
lever in P with the engine idling at operating
temperature.
Exhaust systemMake sure there are noloose supports, cracks or holes. If the sound
of the exhaust seems unusual or there is a
smell of exhaust fumes, immediately have
the exhaust system inspected by an autho-
rized NISSAN dealer. See the carbon mon-
oxide warning in the ``Starting and driving''
section of this manual.
UnderbodyThe underbody is frequently
exposed to corrosive substances such as
those used on icy roads or to control dust. It
is very important to remove these sub-
stances from the underbody, otherwise rust
may form on the floor pan, frame, fuel lines
and exhaust system. At the end of winter,
the underbody should be thoroughly flushed
with plain water, in those areas where mud
and dirt may have accumulated. See the
``Appearance and care'' section of this
manual.
Fluid leaksCheck under the vehicle for
fuel, oil, water or other fluid leaks after the
vehicle has been parked for a while. Water
dripping from the air conditioner after use is
normal. If you should notice any leaks or if
gasoline fumes are evident, check for the
cause and have it corrected immediately.
9-4Maintenance
ZX
Page 211 of 247

10 Technical and consumer information
Capacities and recommended fuel/lubricants ......10-2
Fuel recommendation...........................................10-4
Engine oil and oil filter recommendation ..............10-6
Recommended sae viscosity number ..................10-7
Air conditioner system refrigerant and
lubricant recommendations ..................................10-8
Engine ..................................................................10-9
Wheel/tire size ....................................................10-10
Dimensions and weights .................................... 10-11
Registering your vehicle in another country.......10-12
Vehicle identification ..........................................10-12
Vehicle identification number (VIN) plate...........10-12
Vehicle identification number (chassis
number) ..............................................................10-12
Engine serial number .........................................10-13
FMVSS certification label ...................................10-13Emission control information label .....................10-14
Tire placard ........................................................10-14
Air conditioner specification label.......................10-14
Installing license plate ........................................10-15
Vehicle loading information ................................10-15
Securing the load ...............................................10-16
Truck-camper loading.........................................10-17
Trailer towing ......................................................10-21
Towing load/specification chart ..........................10-23
Uniform tire quality grading ................................10-26
Emission control system warranty......................10-27
Reporting safety defects (USA) .........................10-27
Readiness for inspection/maintenance (I/M)
test (US only) .....................................................10-28
ZX
Page 226 of 247
IGVWR (Gross Vehicle Weight Rating) þ
maximum total weight (load) limit speci-
fied for the vehicle.
IGAWR (Gross Axle Weight Rating) þ
maximum weight (load) limit specified
for the front or rear axle.
Determining Vehicle Load Capacity
The load capacity of this vehicle is deter-
mined by weight, not by available cargo
space. For example, a luggage rack, bike
carrier, cartop carrier or similar equipment
does not increase load carrying capacity of
your vehicle.
To determine vehicle load capacity:
Vehicle weight can be determined by using
a commercial-grade scale, found at places
such as a truck stop, gravel quarry, grain
elevator, or a scrap metal recycling facility.
1) Determine the curb weight of your ve-
hicle.
2) Compare the curb weight amount to the
GVWR specified for your vehicle to de-
termine how much more weight your
vehicle can carry.
3) After loading (cargo and passengers),reweigh your vehicle to determine if ei-
ther GVWR or GAWR for your vehicle is
exceeded. If GVWR is exceeded, re-
move cargo as necessary. If either the
front or rear GAWR is exceeded, shift the
load or remove cargo as necessary.
Loading Tips
IThe GVW must not exceed GVWR or
GAWR as specified on the FMVSS Cer-
tification Label.
IDo not load the front and rear axle to the
GAWR. Doing so will exceed the GVWR.
ILoads should be spread out, and cargo
should be properly secured. Large or
heavy objects should be placed toward
the front of the trunk box to help prevent
sliding or shifting.
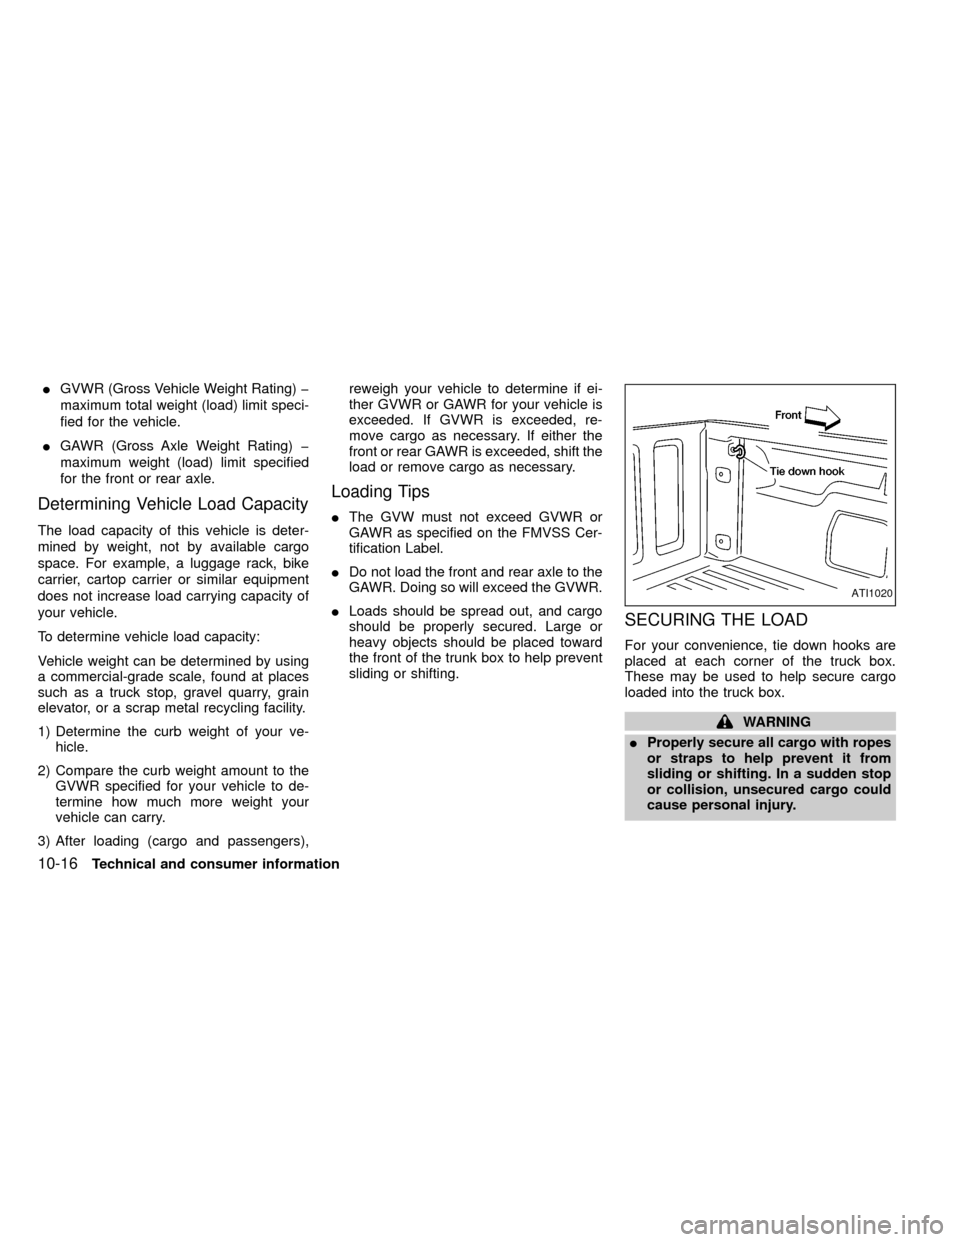
SECURING THE LOAD
For your convenience, tie down hooks are
placed at each corner of the truck box.
These may be used to help secure cargo
loaded into the truck box.
WARNING
IProperly secure all cargo with ropes
or straps to help prevent it from
sliding or shifting. In a sudden stop
or collision, unsecured cargo could
cause personal injury.
ATI1020
10-16Technical and consumer information
ZX
Page 227 of 247
IDo not place cargo higher than the
seatbacks. In a sudden stop or colli-
sion, unsecured cargo could cause
personal injury.
IDo not load your vehicle any heavier
than the GVWR or the maximum
front and rear GAWR's. If you do,
parts on your vehicle can break, or it
can change the way your vehicle
handles. This could result in loss of
control and cause personal injury.
CAUTION
Overloading can shorten the life of your
vehicle. Failures caused by overloading
are not covered by your warranty.
This information is provided for you to prop-
erly install a slide-in camper and is based on
the National Highway Traffic Safety Admin-
istration regulations. It is recommended
that, before installing the camper, you care-
fully read the following information and en-
sure that the camper meets the specifica-
tions.
This information may not apply to some
Canada model vehicles.
Special body vehicles
Some vehicles are equipped with commer-
cial or camper bodies. However, this Own-
er's Manual does not cover these options.
For further information, please refer to the
body manufacturer's instruction manual.
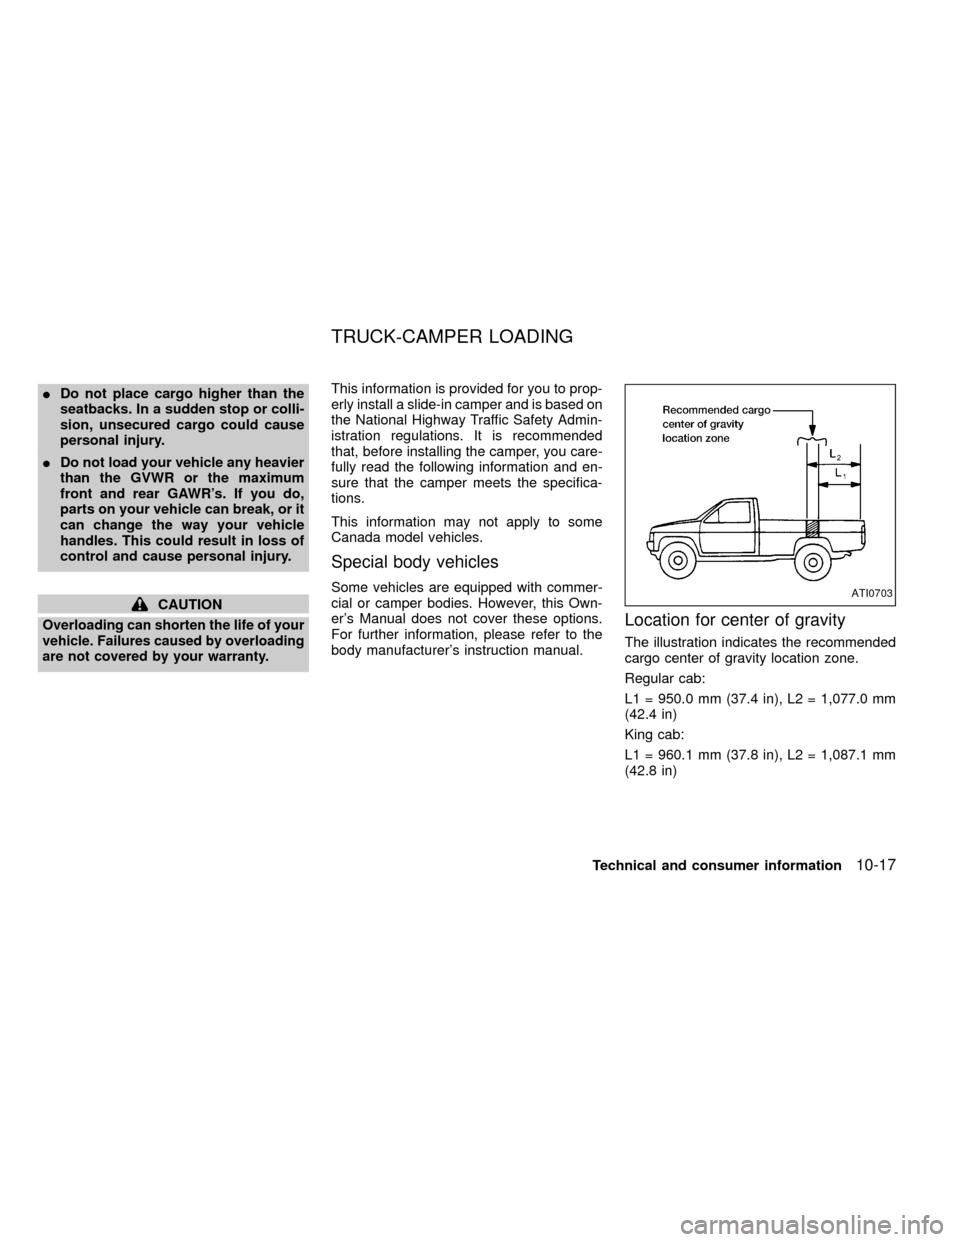
Location for center of gravity
The illustration indicates the recommended
cargo center of gravity location zone.
Regular cab:
L1 = 950.0 mm (37.4 in), L2 = 1,077.0 mm
(42.4 in)
King cab:
L1 = 960.1 mm (37.8 in), L2 = 1,087.1 mm
(42.8 in)
ATI0703
TRUCK-CAMPER LOADING
Technical and consumer information10-17
ZX
Page 230 of 247
Cargo Weight Rating Chart (VG33E Engine)
4WD
King Cab
Manual
TransmissionAutomatic
TransmissionManual
TransmissionAutomatic
Transmission
XE XE SE SE
lbs kg lbs kg lbs kg lbs kg
Federal 1288 585 1269 575 1235 560 1213 550
California 1275 580 1256 570 1222 554 1200 544
Canada 1275 580 1256 570 1190 540 1168 530
Federal Vehicles
1 Occupant 1138 517 1119 509 1085 493 1063 483
2 Occupants 988 449 969 441 935 425 913 415
3 Occupants 838 381 819 372 785 357 763 347
4 Occupants 688 313 669 304 635 288 613 278
California Vehicles
1 Occupant 1125 511 1106 503 1072 487 1050 477
2 Occupants 975 443 956 435 922 419 900 409
3 Occupants 825 375 806 367 772 351 750 341
4 Occupants 675 307 656 298 622 283 600 273
Canadian Vehicles
1 Occupant 1125 511 1106 503 1040 473 1018 463
2 Occupants 975 443 956 435 890 405 868 395
3 Occupants 825 375 806 367 740 337 718 326
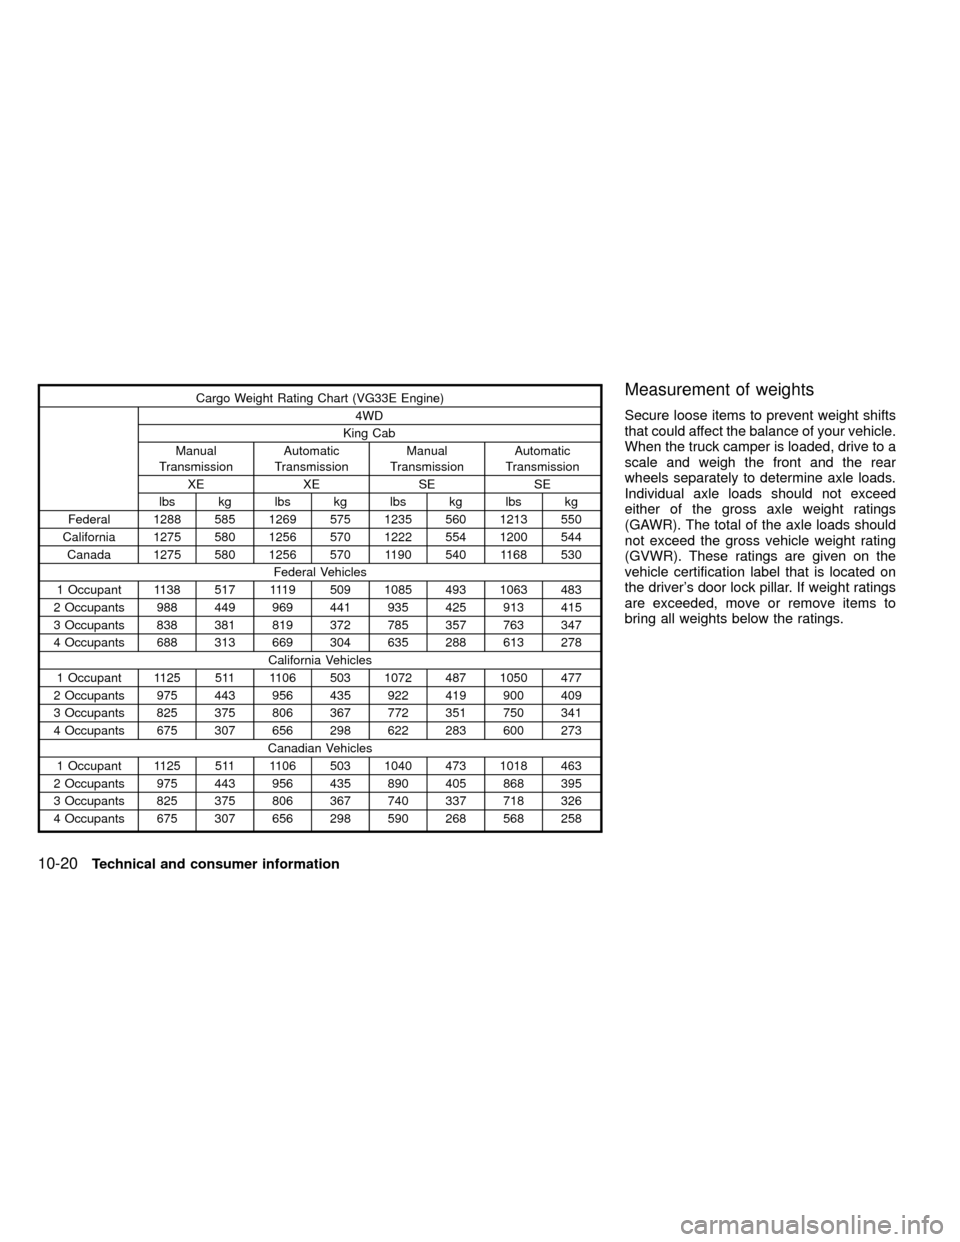
4 Occupants 675 307 656 298 590 268 568 258Measurement of weights
Secure loose items to prevent weight shifts
that could affect the balance of your vehicle.
When the truck camper is loaded, drive to a
scale and weigh the front and the rear
wheels separately to determine axle loads.
Individual axle loads should not exceed
either of the gross axle weight ratings
(GAWR). The total of the axle loads should
not exceed the gross vehicle weight rating
(GVWR). These ratings are given on the
vehicle certification label that is located on
the driver's door lock pillar. If weight ratings
are exceeded, move or remove items to
bring all weights below the ratings.
10-20Technical and consumer information
ZX
Page 234 of 247
Trailer hitch
Check the towing capacity of your bumper
hitch or receiver-type frame mounted hitch.
Choose a proper hitch for your vehicle and
trailer. A genuine Nissan trailer hitch is avail-
able from your NISSAN dealer (Canada
only). Make sure the trailer hitch is securely
attached to the vehicle to help avoid per-
sonal injury or property damage due to
sway caused by crosswinds, rough road
surfaces or passing trucks.
CAUTION
ISpecial hitches which include frame
reinforcements are required for tow-
ing above 2,000 lb (907 kg). Suitable
genuine NISSAN hitches for pickup
trucks are available at an authorized
NISSAN dealer.
IDo not use axle-mounted hitches.
IDo not modify the vehicle exhaust
system, brake system, etc. when the
hitch is installed.
ITo reduce the possibility of addi-
tional damage if your vehicle is
struck from the rear, where practical,remove the hitch when not in use.
Remove receiver when not in use.
After the hitch is removed, seal the
bolt holes to prevent exhaust fumes,
water or dust from entering the pas-
senger compartment.
ICheck regularly to make sure that all
trailer hitch mounting bolts are se-
curely fastened.Tire pressures
IWhen towing a trailer, inflate the vehicle
tires to the recommended cold tire pres-
sure indicated on the tire placard (af-
fixed to the inside of the glove box lid).
ITrailer tire condition, size, load rating
and proper inflation pressure should be
in accordance with the trailer and tire
manufacturers' specifications.
Safety chain
Always use suitable safety chains between
your vehicle and the trailer. Safety chains
should be crossed and should be attached
to the hitch, not to the vehicle bumper or
axle. Be sure to leave enough slack in the
chain to permit turning corners.
Trailer lights
Trailer lights should comply with Federal
and/or local regulations. For assistance in
hooking up trailer lights, contact an autho-
rized NISSAN dealer.
Trailer brakes
If your trailer is equipped with a braking
system, make sure it conforms to Federal
and/or local regulations and that it is prop-
erly installed.
WARNING
Never connect a trailer brake system
directly to the vehicle brake system.
Pre-towing tips
IBe certain your vehicle maintains a level
position when a loaded and/or unloaded
trailer is hitched. Do not drive the vehicle
if it has an abnormal nose-up or nose-
down condition; check for improper
tongue load, overload, worn suspension
or other possible causes of either con-
dition.
IAlways secure items in the trailer to
10-24Technical and consumer information
ZX