1999 NISSAN FRONTIER hood release
[x] Cancel search: hood releasePage 69 of 247

3 Pre-driving checks and adjustments
Key .........................................................................3-2
Door locks ..............................................................3-2
Power door lock (if so equipped) ...........................3-3
Multi-remote control system (if so equipped).........3-4
Battery replacement ...............................................3-7
Hood release ..........................................................3-8
Glove box ...............................................................3-9
Fuel filler cap ..........................................................3-9Tailgate latch ........................................................3-10
Tie down hooks ....................................................3-12
Tilting steering wheel (if so equipped) .................3-13
Outside mirror remote control (if so equipped) ....3-13
Outside mirrors .....................................................3-14
Inside mirror .........................................................3-14
Vanity mirror (if so equipped)...............................3-15
ZX
Page 76 of 247

device must accept any interference re-
ceived including interference that may
cause undesired operation of the device.
WARNING
IMake sure the hood is completely
closed and latched before driving.
Failure to do so could cause the
hood to fly open and result in an
accident.
IIf you see steam or smoke coming
from the engine compartment, to
avoid injury do not open the hood.
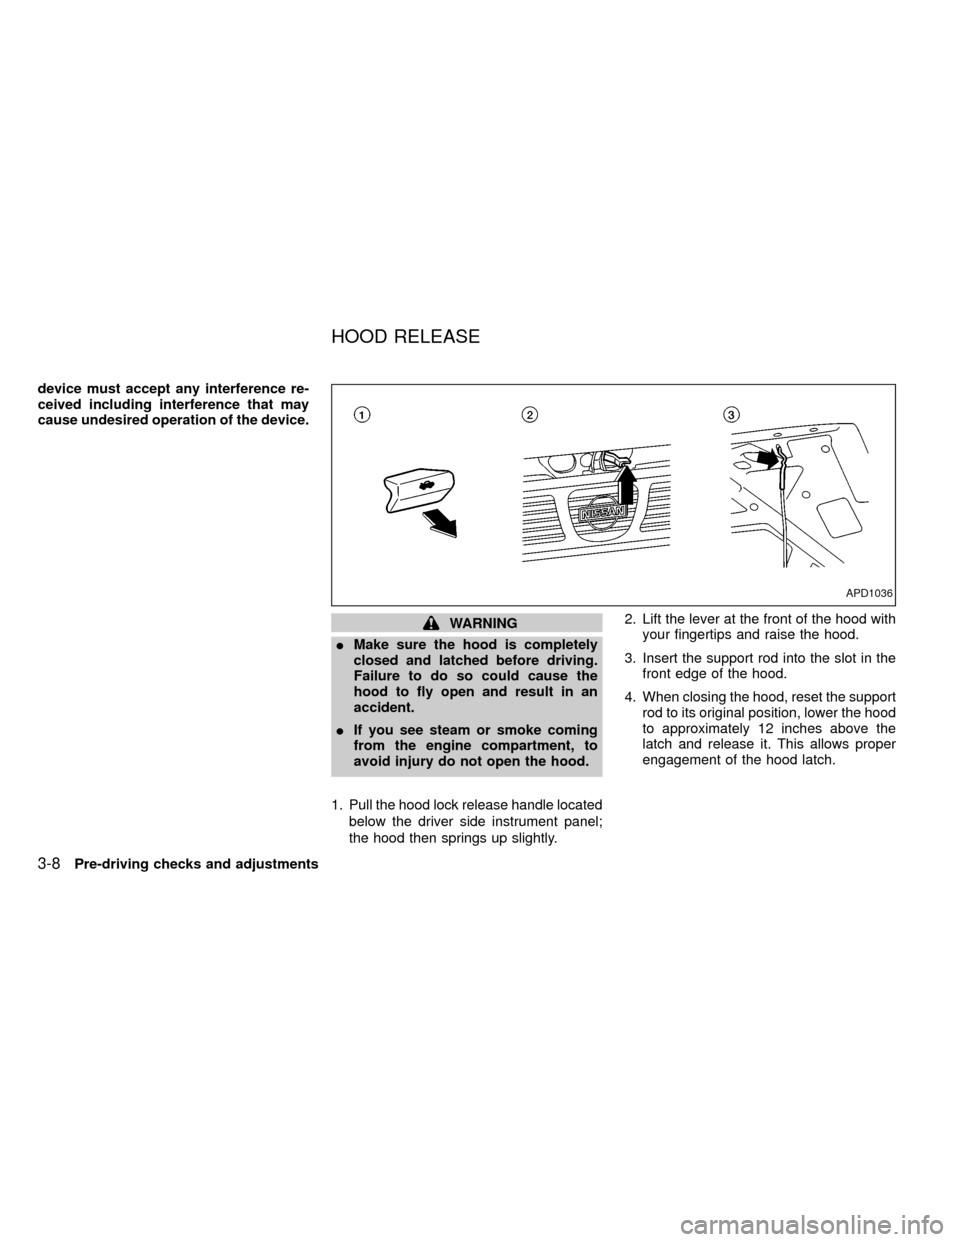
1. Pull the hood lock release handle located
below the driver side instrument panel;
the hood then springs up slightly.2. Lift the lever at the front of the hood with
your fingertips and raise the hood.
3. Insert the support rod into the slot in the
front edge of the hood.
4. When closing the hood, reset the support
rod to its original position, lower the hood
to approximately 12 inches above the
latch and release it. This allows proper
engagement of the hood latch.
APD1036
HOOD RELEASE
3-8Pre-driving checks and adjustments
ZX
Page 183 of 247

CAUTION
I
After wiper blade replacement, return
the wiper arm to its original position.
Otherwise it may be damaged when
the engine hood is opened.
IMake sure the wiper blade contacts
the glass. Otherwise, the arm may be
damaged from wind pressure.
If your windshield is not clear after using the
windshield washer or if a wiper blade chat-
ters when running, wax or another material
may be on the blade or windshield.Clean the outside of the windshield with a
washer solution or a mild detergent. Your
windshield is clean if beads do not form
when rinsing with clear water.
Clean the blade by wiping it with a cloth
soaked in a washer solution or a mild deter-
gent. Then rinse the blade with clear water.
If your windshield is still not clear after
cleaning the blades and using the wiper,
replace the blades.
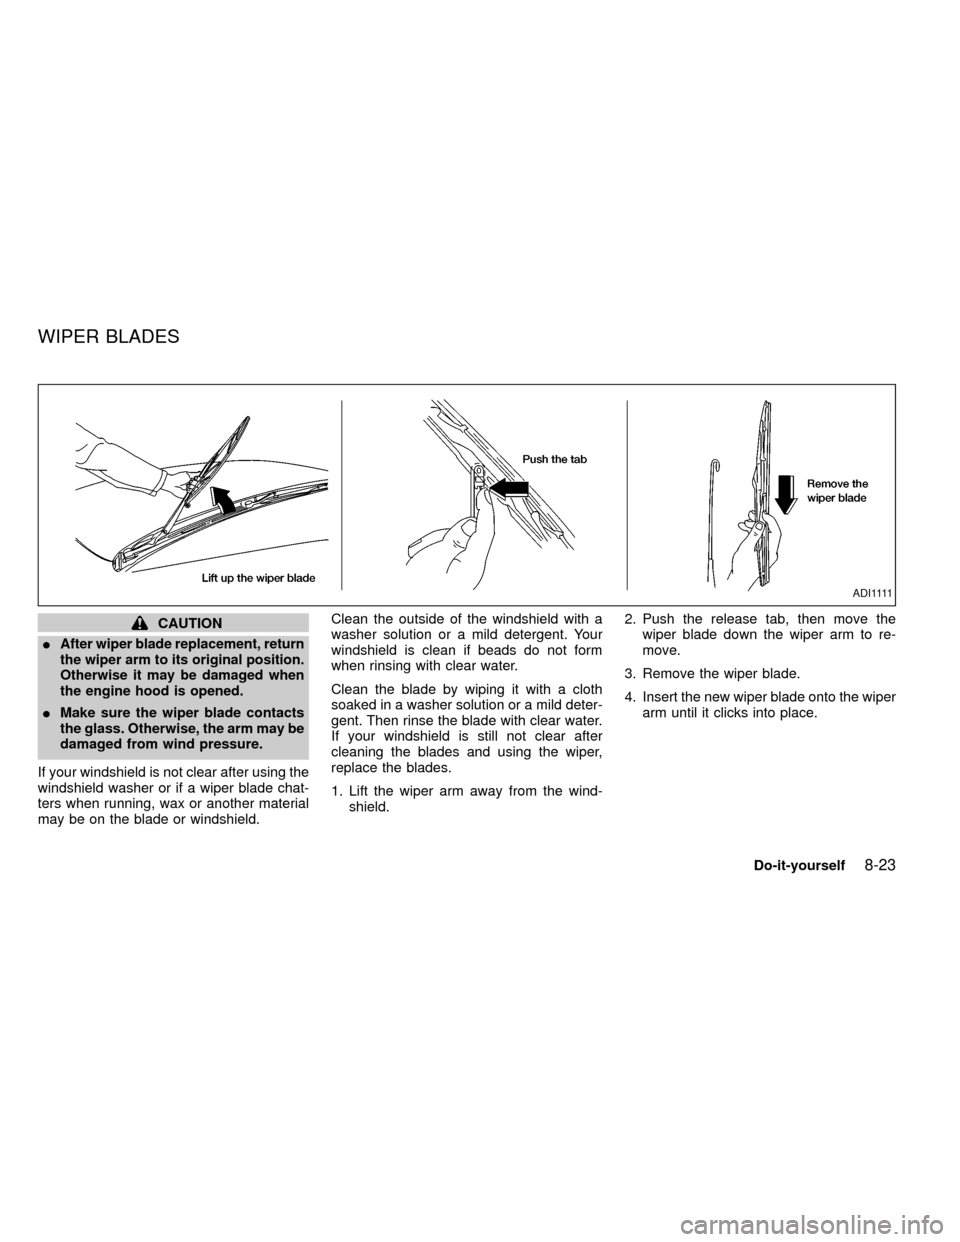
1. Lift the wiper arm away from the wind-
shield.2. Push the release tab, then move the
wiper blade down the wiper arm to re-
move.
3. Remove the wiper blade.
4. Insert the new wiper blade onto the wiper
arm until it clicks into place.
A D I 1111
WIPER BLADES
Do-it-yourself8-23
ZX
Page 201 of 247

sure no wheel nuts are missing, and check for
any loose wheel nuts. Tighten if necessary.
Tire rotation*Tires should be rotated every
7,500 miles (12,000 km) for 2WD vehicles
and 3,750 miles (6,000 km) for 4WD ve-
hicles.
Wheel alignment and balanceIf the ve-
hicle should pull to either side while driving
on a straight and level road, or if you detect
uneven or abnormal tire wear, there may be
a need for wheel alignment.
If the steering wheel or seat vibrates at
normal highway speeds, wheel balancing
may be needed.
Windshield wiper blades*Check for
cracks or wear if they do not wipe properly.
Doors and hoodCheck that all doors and
the hood operate properly. Also ensure that
all latches lock securely. Lubricate hinges,
latches, rollers and links if necessary. Make
sure that the secondary latch keeps the
hood from opening when the primary latch
is released.
When driving in areas using road salt or
other corrosive materials, check lubrication
frequently.Lights*Make sure that the headlights, stop
lights, tail lights, turn signal lights, and other
lights are all operating properly and installed
securely. Also check headlight aim.
INSIDE THE VEHICLE
The maintenance items listed here should
be checked on a regular basis, such as
when performing periodic maintenance,
cleaning the vehicle, etc.
Additional information on the following
items with an ``*'' is found in the ``Do-it-
yourself'' section of this manual.
Warning lights and chimesMake sure all
warning lights and chimes are operating
properly.
Windshield wiper and washer*Check that
the wipers and washer operate properly and
that the wipers do not streak.
Windshield defrosterCheck that the air
comes out of the defroster outlets properly
and in sufficient quantity when operating the
heater or air conditioner.
Steering wheelCheck for changes in the
steering conditions, such as excessive free-
play, hard steering or strange noises.SeatsCheck seat position controls such as
seat adjusters, seatback recliner, etc. to
ensure they operate smoothly and all
latches lock securely in every position.
Check that the head restraints move up and
down smoothly and the locks (if so
equipped) hold securely in all latched posi-
tions.
Seat beltsCheck that all parts of the seat
belt system (e.g., buckles, anchors, adjust-
ers and retractors) operate properly and
smoothly, and are installed securely. Check
the belt webbing for cuts, fraying, wear or
damage.
Accelerator pedalCheck the pedal for
smooth operation and make sure the pedal
does not catch or require uneven effort.
Keep the floor mat away from the pedal.
Clutch pedal*Make sure the pedal oper-
ates smoothly and check that it has the
proper free travel.
BrakesCheck that the brakes do not pull
the vehicle to one side when applied.
Brake pedal and booster*Check the pedal
for smooth operation and make sure it has
the proper distance under it when de-
pressed fully. Check the brake booster func-
Maintenance
9-3
ZX
Page 202 of 247

tion. Be certain to keep the floor mat away
from the pedal.
Parking brake*Check that the lever has
the proper travel and confirm that your
vehicle is held securely on a fairly steep hill
with only the parking brake applied.
Automatic transmission Park position
mechanismCheck that the lock release
button on the selector lever operates prop-
erly and smoothly. On a fairly steep hill
check that your vehicle is held securely with
the selector lever in the P position without
applying any brakes.
UNDER THE HOOD AND
VEHICLE
The maintenance items listed here should
be checked periodically (e.g., each time you
check the engine oil or refuel).
Additional information on the following
items with an ``*'' is found in the ``Do-it-
yourself operations'' section.
Windshield washer fluid*Check that there
is adequate fluid in the reservoir.
Engine coolant level*Check the coolant
level when the engine is cold.Radiator and hosesCheck the front of the
radiator and clean off any dirt, insects,
leaves, etc., that may have accumulated.
Make sure the hoses have no cracks, de-
formation, rot or loose connections.
Brake and clutch fluid levels*Make sure
that the brake and clutch fluid level is be-
tween the MIN and MAX lines on the reser-
voir.
Battery*Check the fluid level in each cell. It
should be between the MAX and MIN lines.
Engine drive belts*Make sure the drive
belts are not frayed, worn, cracked or oily.
Engine oil level*Check the level after
parking the vehicle on a level surface with
the engine off. Wait a few minutes for the oil
to drain back into the oil pan.
Power steering fluid level* and lines
Check the level when the fluid is cold, with
the engine off. Check the lines for proper
attachment, leaks, cracks, etc.
Automatic transmission fluid level*
Check the level after putting the selector
lever in P with the engine idling at operating
temperature.
Exhaust systemMake sure there are noloose supports, cracks or holes. If the sound
of the exhaust seems unusual or there is a
smell of exhaust fumes, immediately have
the exhaust system inspected by an autho-
rized NISSAN dealer. See the carbon mon-
oxide warning in the ``Starting and driving''
section of this manual.
UnderbodyThe underbody is frequently
exposed to corrosive substances such as
those used on icy roads or to control dust. It
is very important to remove these sub-
stances from the underbody, otherwise rust
may form on the floor pan, frame, fuel lines
and exhaust system. At the end of winter,
the underbody should be thoroughly flushed
with plain water, in those areas where mud
and dirt may have accumulated. See the
``Appearance and care'' section of this
manual.
Fluid leaksCheck under the vehicle for
fuel, oil, water or other fluid leaks after the
vehicle has been parked for a while. Water
dripping from the air conditioner after use is
normal. If you should notice any leaks or if
gasoline fumes are evident, check for the
cause and have it corrected immediately.
9-4Maintenance
ZX
Page 243 of 247

Heater operation ..................................... 4-4
Heater operation .......................................... 4-4
Hood release ............................................... 3-8
Hubs
Auto-lock free-running hubs ................. 5-20
Manual-lock free-running hubs ............. 5-22
I
Ignition switch .............................................. 5-4
Indicator lights and chimes (See warning/
indicator lights and chimes) ......................... 2-7
Inside mirror ............................................... 3-14
Instrument brightness control .................... 2-17
Interior light and cargo light ....................... 2-21
J
Jack
Pantograph type ..................................... 6-5
Jump seat .................................................... 1-8
Jump starting ............................................... 6-8
K
Key ............................................................... 3-2
Keyless entry system (See multi-remote control
system) ........................................................ 3-4L
Labels
Air conditioner specification label ....... 10-14
Emission control information label...... 10-14
Engine serial number ......................... 10-13
F.M.V.S.S. certification label ............... 10-13
Vehicle identification number (VIN)
plate .................................................... 10-12
Warning labels (for SRS)...................... 1-17
Light
Air bag warning light............................. 1-17
Brake light (See stop light) ................... 8-29
Bulb check/instrument panel .................. 2-7
Bulb replacement.................................. 8-29
Headlight and turn signal switch .......... 2-15
Headlights ............................................. 8-28
Interior light and cargo light .................. 2-21
Light bulbs ............................................ 8-28
Passenger supplemental air bag ON/OFF
switch and light ..................................... 1-14
Spotlights (See map light) .................... 2-21
Warning/indicator lights and chimes....... 2-7
Lock
Door locks............................................... 3-2
Power door lock...................................... 3-3
Luggage (See vehicle loading
information ............................................... 10-15
M
MaintenanceGeneral maintenance ............................. 9-2
Inside the vehicle.................................... 9-3
Maintenance precautions ....................... 8-2
Outside the vehicle ................................. 9-2
Periodic maintenance schedules ............ 9-5
Seat belt maintenance.......................... 1-27
Under the hood and vehicle ................... 9-4
Malfunction indicator light .......................... 2-11
Manual windows ........................................ 2-22
Manual-lock free-running hubs .................. 5-22
Map light .................................................... 2-21
Meters and gauges ...................................... 2-2
Mirror
Inside mirror.......................................... 3-14
Outside mirror control ........................... 3-13
Outside mirrors ..................................... 3-14
Vanity mirror.......................................... 3-15
Multi-remote control system ........................ 3-4
O
Octane rating (See fuel octane rating) ...... 10-5
Odometer ..................................................... 2-3
Oil
Capacities and recommended fuel/
lubricants .............................................. 10-2
Changing engine oil.............................. 8-10
Changing engine oil filter...................... 8-12
Checking engine oil level ....................... 8-9
Engine oil ................................................ 8-9
Engine oil and oil filter
recommendation ................................... 10-6
11-3
ZX