Page 140 of 558

MPI – Troubleshooting13-28
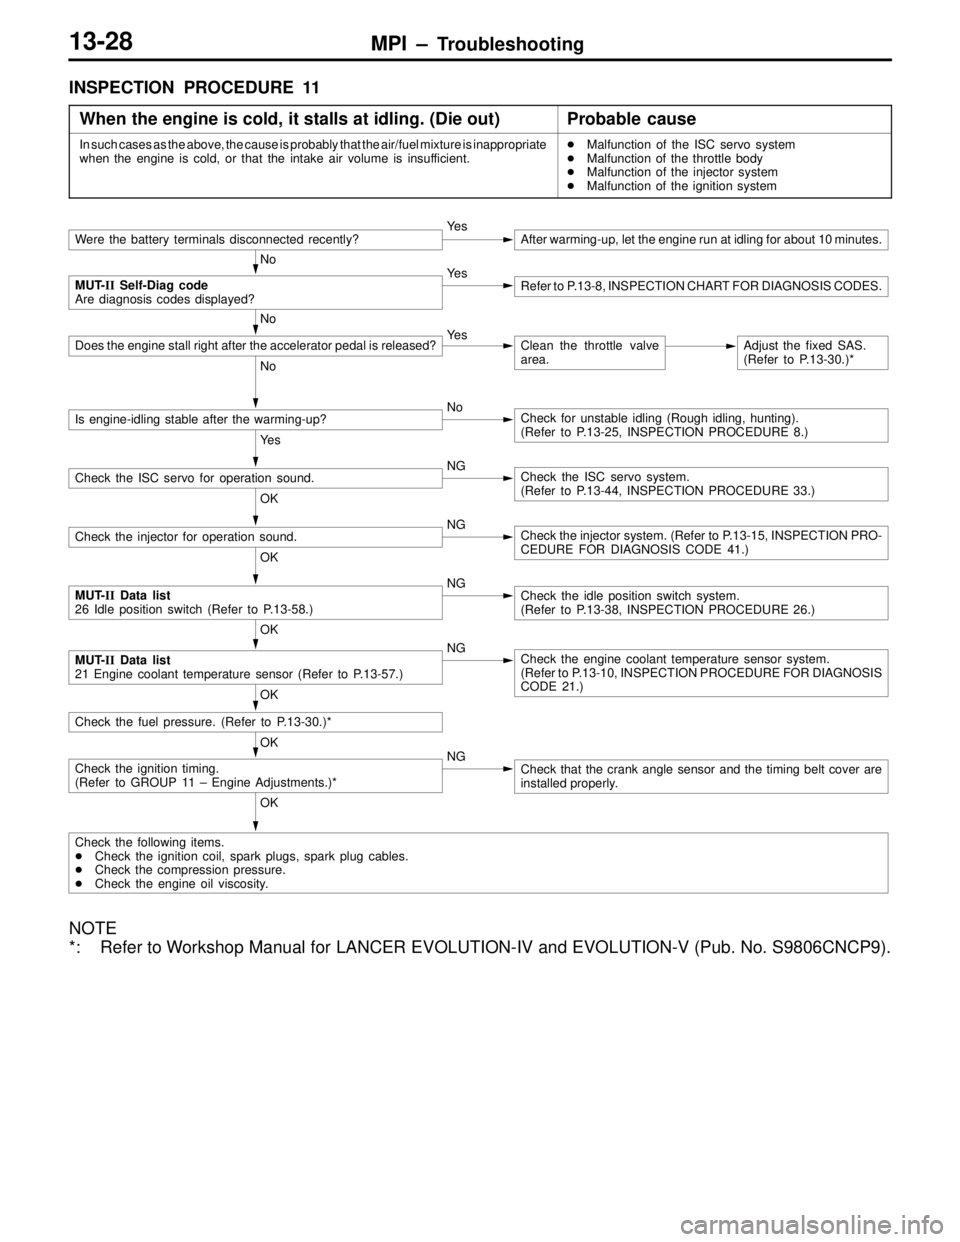
INSPECTION PROCEDURE 11
When the engine is cold, it stalls at idling. (Die out)
Probable cause
In such cases as the above, the cause is probably that the air/fuel mixture is inappropriate
when the engine is cold, or that the intake air volume is insufficient.�Malfunction of the ISC servo system
�Malfunction of the throttle body
�Malfunction of the injector system
�Malfunction of the ignition system
Were the battery terminals disconnected recently?Ye sAfter warming-up, let the engine run at idling for about 10 minutes.
No
MUT-II Self-Diag code
Are diagnosis codes displayed?Ye sRefer to P.13-8, INSPECTION CHART FOR DIAGNOSIS CODES.
OK
Check the fuel pressure. (Refer to P.13-30.)*
OK
Check the ignition timing.
(Refer to GROUP 11 – Engine Adjustments.)*NGCheck that the crank angle sensor and the timing belt cover are
installed properly.
OK
Check the following items.
�Check the ignition coil, spark plugs, spark plug cables.
�Check the compression pressure.
�Check the engine oil viscosity.
OK
MUT-II Data list
26 Idle position switch (Refer to P.13-58.)NGCheck the idle position switch system.
(Refer to P.13-38, INSPECTION PROCEDURE 26.)
OK
Check the injector for operation sound.NGCheck the injector system. (Refer to P.13-15, INSPECTION PRO-
CEDURE FOR DIAGNOSIS CODE 41.)
Ye s
Check the ISC servo for operation sound.NGCheck the ISC servo system.
(Refer to P.13-44, INSPECTION PROCEDURE 33.)
No
Is engine-idling stable after the warming-up?NoCheck for unstable idling (Rough idling, hunting).
(Refer to P.13-25, INSPECTION PROCEDURE 8.)
No
Does the engine stall right after the accelerator pedal is released?Ye sClean the throttle valve
area.Adjust the fixed SAS.
(Refer to P.13-30.)*
OK
MUT-II Data list
21 Engine coolant temperature sensor (Refer to P.13-57.)NGCheck the engine coolant temperature sensor system.
(Refer to P.13-10, INSPECTION PROCEDURE FOR DIAGNOSIS
CODE 21.)
NOTE
*: Refer to Workshop Manual for LANCER EVOLUTION-IV and EVOLUTION-V (Pub. No. S9806CNCP9).
Page 198 of 558
REAR AXLE – General / Service Specifications / Lubricant27-2
GENERAL
OUTLINE OF CHANGE
�The descriptions of the service procedures for the AYC system including the troubleshooting using
an MUT-II tester has been incorporated.
SERVICE SPECIFICATIONS
ItemsStandard valueLimit
Rear axle total backlash mm–5
Pressure generated by hydraulic unit MPa0 – 1.6–
Wheel bearing axial play mm–0.05
Wheel bearing rotation starting torque Nm–1.0 or less
LUBRICANT
ItemsSpecified lubricantCapacity
Gear oilTorque
transfer
differential
DifferentialHypoid gear oil API classification GL-5 or higher
SAE viscosity No. 90, 80W0.41 ± 0.02 �
differentialTorque transfer
mechanismMITSUBISHI GENUINE DIA QUEEN AYC FLUID0.70�0
�0.05�
Hydraulic piping fluidDia Queen ATF SPII or equivalent1 �
Torque transfer mechanism oil seal lipsVaselineAs required
Page 227 of 558

REAR AXLE – On-vehicle Service 27-31
ON-VEHICLE SERVICE
REAR AXLE TOTAL BACKLASH CHECK
If the drive system roars or the vehicle vibrates, use the
following procedure to measure total backlash in the rear
axle. Based on the measurement taken, determine whether
the differential carrier assembly needs to be removed or not.
1. Place the shift lever in the neutral position and operate
the parking brake.
2. Turn the propeller shaft fully clockwise and make an
alignment mark on the companion flange dust cover and
gear carrier.
3. Turn the propeller shaft fully counterclockwise and
measure the deviation between the alignment marks.
Limit: 5 mm
4. If the backlash exceeds the limit, replace the differential
carrier assembly.
GEAR OIL LEVEL CHECK
DIFFERENTIAL
1. Remove the filler plug.
2. Check that the gear oil level is within the specified range
from the bottom end of the filler plug hole.
Standard value (A): 6 mm
3. If the gear oil level exceeds the standard value, add the
specified gear oil up to the bottom end of the filler plug
hole.
Specified gear oil:
Hypoid gear oil API classification GL-5 or higher
SAE viscosity Number 90, 80W.
NOTE
10�C or more: #90, less than 10�C: #80
4. Fit the filler plug and tighten it to the specified torque.
Alignment marks
Filler plug
49 Nm
Gear oil
Upper
limit
Lower
limit
Page 228 of 558

REAR AXLE – On-vehicle Service 27-32
TORQUE TRANSFER MECHANISM
1. Remove the filler plug.
2. Check that the gear oil level is up to the bottom end
of the filler plug hole.
3. If the gear oil level is lower than the bottom end of the
filler plug hole, add the specified gear oil up to the bottom
end of the filler plug hole.
Specified gear oil:
MITSUBISHI GENUINE DIA QUEEN SUPER AYC
FLUID
4. Fit the filler plug and tighten it to the specified torque.
GEAR OIL CHANGE
DIFFERENTIAL
1. Remove the drain plug to discharge the gear oil.
2. Fit the drain plug and tighten it to the specified torque.
Tightening torque: 49 Nm
3. Remove the filler plug and add the specified gear oil
up to the bottom end of the filler plug hole.
Specified gear oil:
Hypoid gear oil API classification GL-5 or higher
SAE viscosity Number 90, 80W.
Quantity used: 0.41 ± 0.02 �
NOTE
10�C or more: #90, less than 10�C: #80
4. Fit the filler plug and tighten it to the specified torque.
Filler plug
49 Nm
Gear oil
Filler plug
49 Nm
Gear oil
Drain plug