Page 41 of 558
ENGINE – Timing Belt11-16
REMOVAL SERVICE POINTS
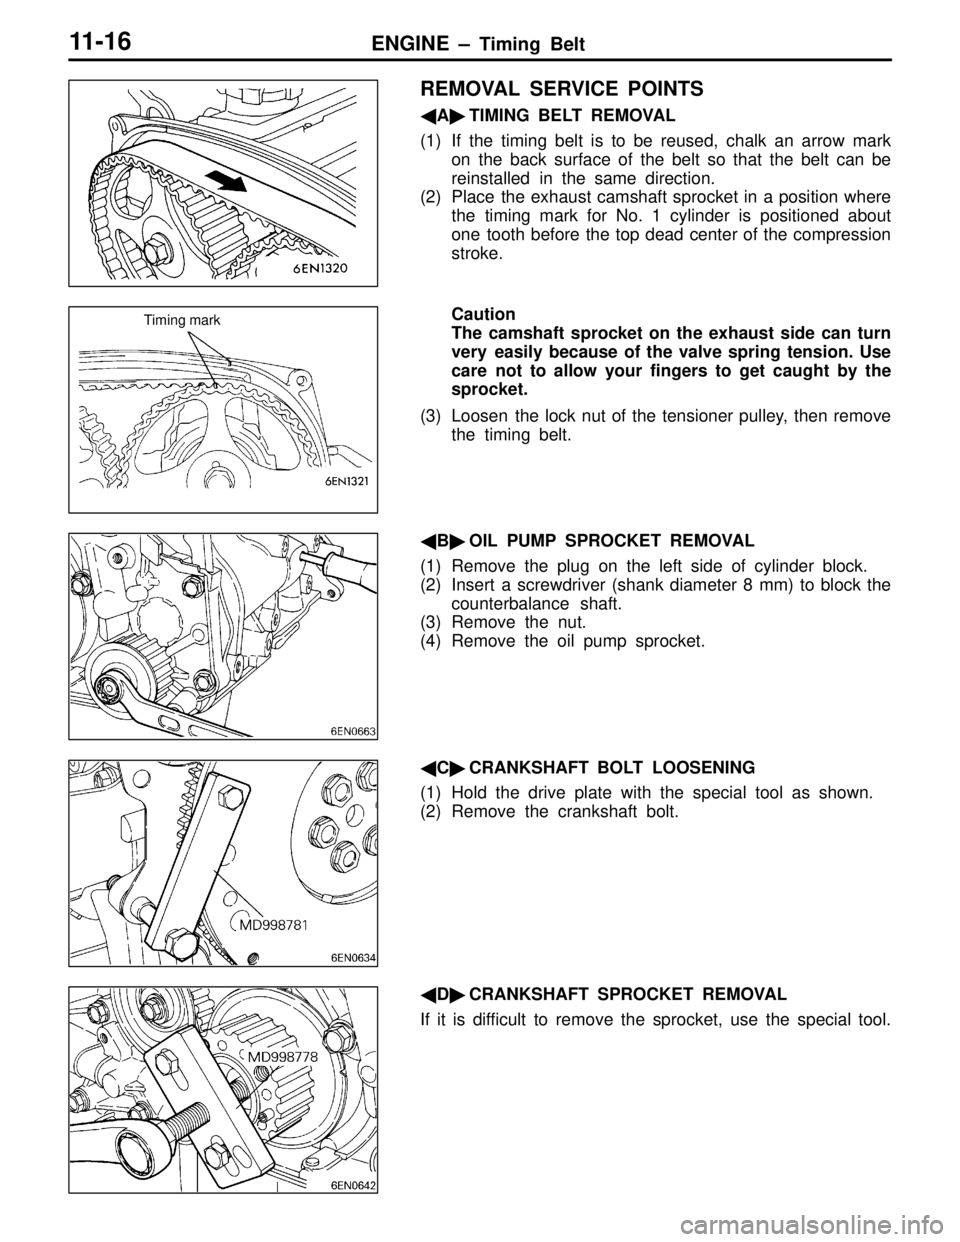
�A�TIMING BELT REMOVAL
(1) If the timing belt is to be reused, chalk an arrow mark
on the back surface of the belt so that the belt can be
reinstalled in the same direction.
(2) Place the exhaust camshaft sprocket in a position where
the timing mark for No. 1 cylinder is positioned about
one tooth before the top dead center of the compression
stroke.
Caution
The camshaft sprocket on the exhaust side can turn
very easily because of the valve spring tension. Use
care not to allow your fingers to get caught by the
sprocket.
(3) Loosen the lock nut of the tensioner pulley, then remove
the timing belt.
�B�OIL PUMP SPROCKET REMOVAL
(1) Remove the plug on the left side of cylinder block.
(2) Insert a screwdriver (shank diameter 8 mm) to block the
counterbalance shaft.
(3) Remove the nut.
(4) Remove the oil pump sprocket.
�C�CRANKSHAFT BOLT LOOSENING
(1) Hold the drive plate with the special tool as shown.
(2) Remove the crankshaft bolt.
�D�CRANKSHAFT SPROCKET REMOVAL
If it is difficult to remove the sprocket, use the special tool.
Timing mark
Page 42 of 558
ENGINE – Timing BeltENGINE – Timing Belt11-17
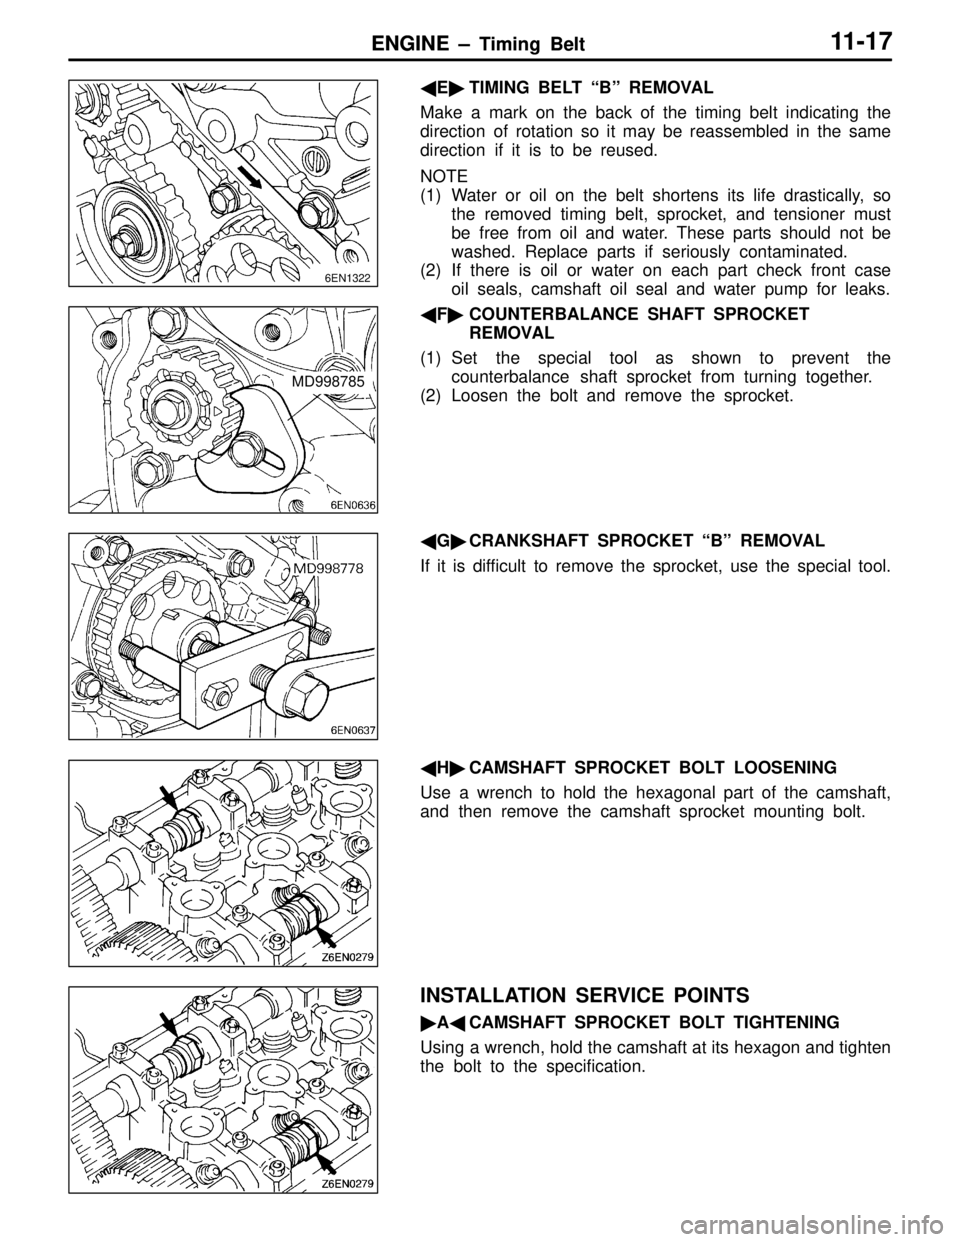
�E�TIMING BELT “B” REMOVAL
Make a mark on the back of the timing belt indicating the
direction of rotation so it may be reassembled in the same
direction if it is to be reused.
NOTE
(1) Water or oil on the belt shortens its life drastically, so
the removed timing belt, sprocket, and tensioner must
be free from oil and water. These parts should not be
washed. Replace parts if seriously contaminated.
(2) If there is oil or water on each part check front case
oil seals, camshaft oil seal and water pump for leaks.
�F�COUNTERBALANCE SHAFT SPROCKET
REMOVAL
(1) Set the special tool as shown to prevent the
counterbalance shaft sprocket from turning together.
(2) Loosen the bolt and remove the sprocket.
�G�CRANKSHAFT SPROCKET “B” REMOVAL
If it is difficult to remove the sprocket, use the special tool.
�H�CAMSHAFT SPROCKET BOLT LOOSENING
Use a wrench to hold the hexagonal part of the camshaft,
and then remove the camshaft sprocket mounting bolt.
INSTALLATION SERVICE POINTS
�A�CAMSHAFT SPROCKET BOLT TIGHTENING
Using a wrench, hold the camshaft at its hexagon and tighten
the bolt to the specification.
6EN1322
MD998785
Page 47 of 558

ENGINE – Timing Belt11-22
�L�TIMING BELT INSTALLATION
(1) Place the exhaust side camshaft sprocket in a position
where its timing mark is one tooth offset from the timing
mark on the rocker cover in the counterclockwise direction.
NOTE
Even if the timing marks on the sprocket and the rocker
cover are brought into alignment, the exhaust camshaft
is forced back by the valve spring tension. It is stabilized
at a position one tooth before the timing mark.
(2) Align the timing mark on the intake side camshaft sprocket
with that on the rocker cover.
NOTE
Even if the timing marks on the sprocket and the cover
are brought into alignment, the intake camshaft is forced
to turn one tooth in the clockwise direction by the valve
spring tension and stabilized there.
(3) Place the timing mark on the crankshaft sprocket one
tooth this side from the mated timing mark as in the case
of the camshaft sprocket.
(4) Align the timing mark on oil pump sprocket with its mating
mark.
(5) Remove the plug on cylinder block and insert a Phillips
screwdriver (shank diameter 8 mm) through the hole
(Engine with counterbalance shafts).
If it can be inserted as deep as 60 mm or more, the
timing marks are correctly aligned. If the inserted depth
is only 20 – 25 mm, turn the oil pump sprocket one turn
and realign timing marks. Then check to ensure that the
screwdriver can be inserted 60 mm or more. Keep the
screwdriver inserted until installation of timing belt is
finished.
Timing mark
Timing mark
6EN1327
Oil pump
sprocket
timing marks
Screwdriver
6EN1026
Plug
Page 48 of 558
ENGINE – Timing Belt11-23
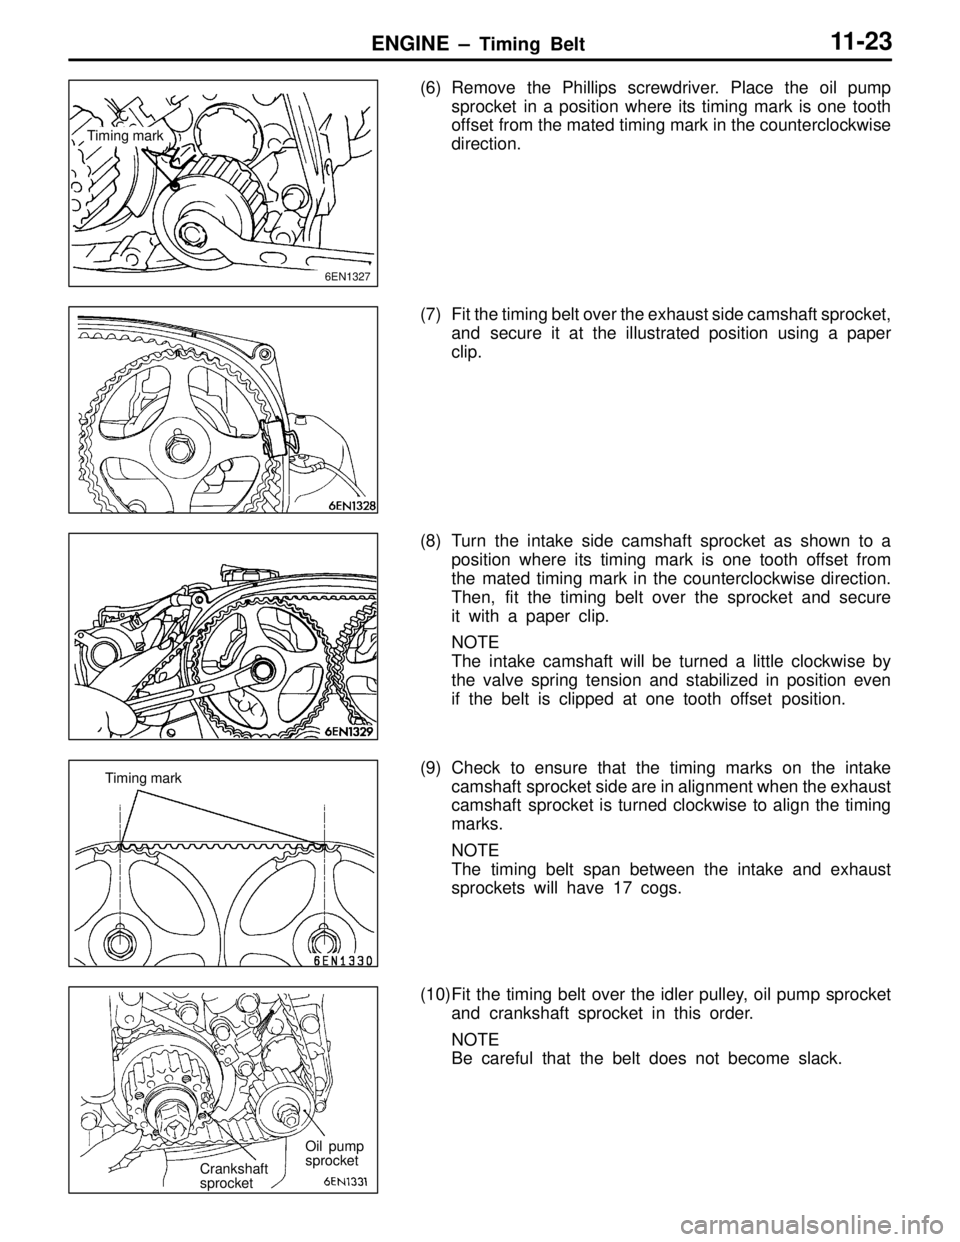
(6) Remove the Phillips screwdriver. Place the oil pump
sprocket in a position where its timing mark is one tooth
offset from the mated timing mark in the counterclockwise
direction.
(7) Fit the timing belt over the exhaust side camshaft sprocket,
and secure it at the illustrated position using a paper
clip.
(8) Turn the intake side camshaft sprocket as shown to a
position where its timing mark is one tooth offset from
the mated timing mark in the counterclockwise direction.
Then, fit the timing belt over the sprocket and secure
it with a paper clip.
NOTE
The intake camshaft will be turned a little clockwise by
the valve spring tension and stabilized in position even
if the belt is clipped at one tooth offset position.
(9) Check to ensure that the timing marks on the intake
camshaft sprocket side are in alignment when the exhaust
camshaft sprocket is turned clockwise to align the timing
marks.
NOTE
The timing belt span between the intake and exhaust
sprockets will have 17 cogs.
(10)Fit the timing belt over the idler pulley, oil pump sprocket
and crankshaft sprocket in this order.
NOTE
Be careful that the belt does not become slack.
Timing mark
6EN1327
Timing mark
Crankshaft
sprocketOil pump
sprocket
Page 49 of 558
ENGINE – Timing Belt11-24
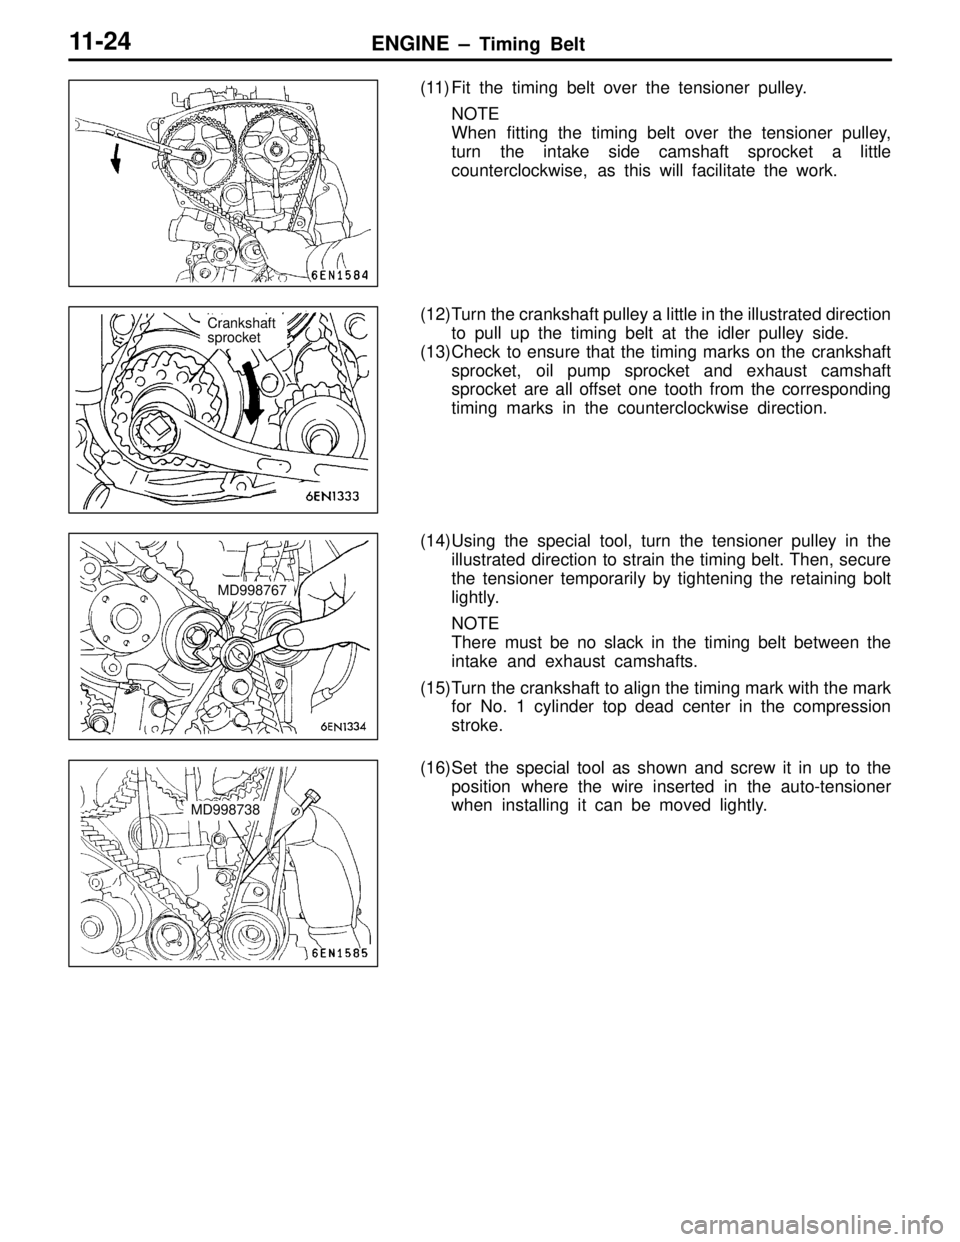
(11) Fit the timing belt over the tensioner pulley.
NOTE
When fitting the timing belt over the tensioner pulley,
turn the intake side camshaft sprocket a little
counterclockwise, as this will facilitate the work.
(12)Turn the crankshaft pulley a little in the illustrated direction
to pull up the timing belt at the idler pulley side.
(13)Check to ensure that the timing marks on the crankshaft
sprocket, oil pump sprocket and exhaust camshaft
sprocket are all offset one tooth from the corresponding
timing marks in the counterclockwise direction.
(14)Using the special tool, turn the tensioner pulley in the
illustrated direction to strain the timing belt. Then, secure
the tensioner temporarily by tightening the retaining bolt
lightly.
NOTE
There must be no slack in the timing belt between the
intake and exhaust camshafts.
(15)Turn the crankshaft to align the timing mark with the mark
for No. 1 cylinder top dead center in the compression
stroke.
(16)Set the special tool as shown and screw it in up to the
position where the wire inserted in the auto-tensioner
when installing it can be moved lightly.
Crankshaft
sprocket
MD998767
MD998738
Page 50 of 558
ENGINE – Timing Belt11-25
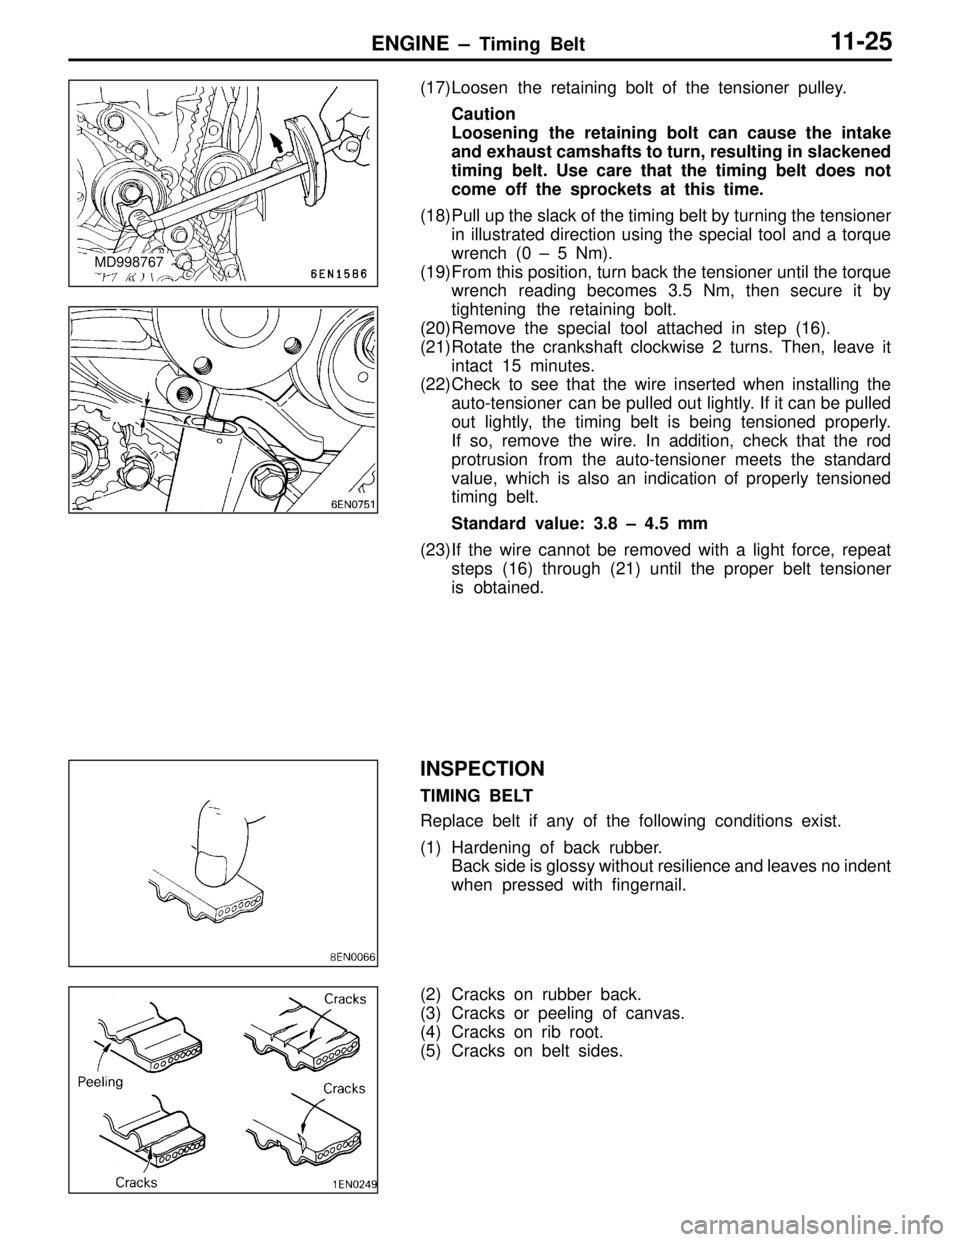
(17)Loosen the retaining bolt of the tensioner pulley.
Caution
Loosening the retaining bolt can cause the intake
and exhaust camshafts to turn, resulting in slackened
timing belt. Use care that the timing belt does not
come off the sprockets at this time.
(18)Pull up the slack of the timing belt by turning the tensioner
in illustrated direction using the special tool and a torque
wrench (0 – 5 Nm).
(19)From this position, turn back the tensioner until the torque
wrench reading becomes 3.5 Nm, then secure it by
tightening the retaining bolt.
(20)Remove the special tool attached in step (16).
(21)Rotate the crankshaft clockwise 2 turns. Then, leave it
intact 15 minutes.
(22)Check to see that the wire inserted when installing the
auto-tensioner can be pulled out lightly. If it can be pulled
out lightly, the timing belt is being tensioned properly.
If so, remove the wire. In addition, check that the rod
protrusion from the auto-tensioner meets the standard
value, which is also an indication of properly tensioned
timing belt.
Standard value: 3.8 – 4.5 mm
(23)If the wire cannot be removed with a light force, repeat
steps (16) through (21) until the proper belt tensioner
is obtained.
INSPECTION
TIMING BELT
Replace belt if any of the following conditions exist.
(1) Hardening of back rubber.
Back side is glossy without resilience and leaves no indent
when pressed with fingernail.
(2) Cracks on rubber back.
(3) Cracks or peeling of canvas.
(4) Cracks on rib root.
(5) Cracks on belt sides.
MD998767
Page 62 of 558
ENGINE – Rocker Arms and Camshaft11-37
ROCKER ARMS AND CAMSHAFT
REMOVAL AND INSTALLATION
1 2 3
4
5 6
78
9
1011
121314
15
16
1718
11 Nm9 Nm 10 Nm
13 Nm 21 Nm
20 Nm
Apply engine oil to all
moving parts before
installation.
Removal steps
1. Cam position sensor
2. O-ring
3. Cam position sensor support cover
4. Cam position sensor support
gasket
�F�5. Cam position sensing cylinder
�E�6. Cam position sensor support
�D�7. Camshaft oil seal
�C�8. Camshaft bearing cap rear right
�C�9. Camshaft bearing cap rear left�C�10. Camshaft bearing cap front
�C�11. Camshaft bearing cap No. 5
�C�12. Camshaft bearing cap No. 2
�C�13. Camshaft bearing cap No. 3
�C�14. Camshaft bearing cap No. 4
�B�15. Camshaft
16. Rocker arm
�A�17. Lash adjuster
18. Oil delivery body
Page 63 of 558

ENGINE – Rocker Arms and Camshaft11-38
INSTALLATION SERVICE POINTS
�A�LASH ADJUSTER INSTALLATION
Caution
If the lash adjuster is re-used, clean the lash adjuster.
Fit the lash adjuster onto rocker arm without allowing diesel
fuel to spill out.
�B�CAMSHAFT INSTALLATION
(1) Apply engine oil to the journals and cams of the camshafts.
Install the camshafts on the cylinder head.
Use care not to confuse the intake camshaft with the
exhaust one. The intake camshaft has a slit on its rear
end for driving the crankshaft position sensor.
(2) Install the crankshaft sprocket B or spacer and flange
to one end of the crankshaft, and turn the crankshaft
until the timing marks are lined up, setting No. 1 cylinder
to the TDC.
(3) Set the camshafts so that their dowel pins are positioned
at top.
�C�BEARING CAP INSTALLATION
(1) According to the identification mark stamped on the top
of each bearing cap, install the caps to the cylinder head.
Only “L” or “R” is stamped on front bearing cap. Cap
No. is stamped on No. 2 to No. 5 bearing caps. Rear
bearing cap has no stamping.
I: For intake camshaft side
E: For exhaust camshaft side
(2) Tighten the bearing caps in the order shown two to three
times by torquing progressively.
Tighten to the specification in the final sequence.
(3) Check to ensure that the rocker arm is positioned correctly
on the lash adjuster and valve stem end.
Camshaft sprocket side
Slit
Intake side
camshaft
Dowel pin
Cam number
Symbol identifying
intake or exhaust
Timing belt side