Page 1383 of 1529

IN CAR ENTERTAINMENT
86-6-16 DESCRIPTION AND OPERATION
Description
General
The DVD entertainment system can be fitted by Land Rover Special Vehicles as an original equipment system on the
Adventurer model or can be supplied as an accessory for fitment by the dealer. The system can be fitted to all
Discovery Series II models.
NOTE: The DVD system cannot be fitted to vehicles fitted with a Visteon single slot CD head unit.
The fitment of the system to vehicles manufactured before 2002 model year requires a different wiring harness and
connector plugs to vehicles from 2002 model year. Full details of components required for specific vehicles is
contained in the DVD System Accessory fitting instructions (Part No. STC 61947/61946).
The system comprises a main wiring harness, a lower wiring harness, CD switch box with integral noise filter, CD
switch harness, remote control handset and an overhead console containing the Liquid Crystal Display (LCD) monitor
and Digital Versatile Disc (DVD) player.
The system can play DVD films and display them on the LCD screen. The DVD audio can be played over the vehicle
audio speaker system or on headphones connected directly to the overhead console. The system can also function
as a second CD player. Rear seat occupants can listen to a CD in the overhead console via headphones, whilst the
remaining vehicle occupants can listen to CD's played from the CD autochanger in the normal way.
Page 1384 of 1529

IN CAR ENTERTAINMENT
DESCRIPTION AND OPERATION 86-6-17
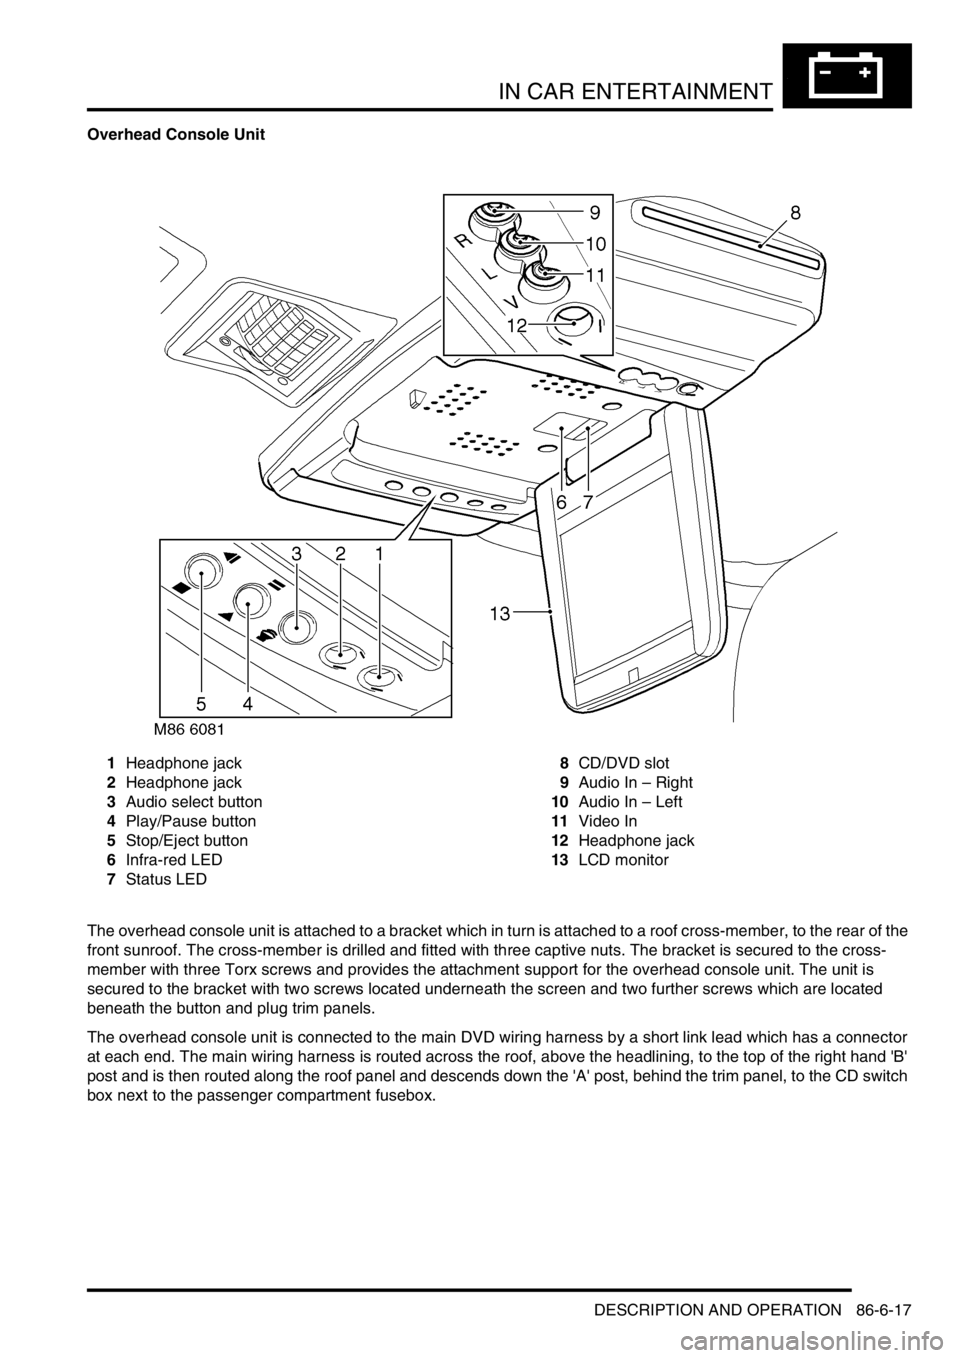
Overhead Console Unit
1Headphone jack
2Headphone jack
3Audio select button
4Play/Pause button
5Stop/Eject button
6Infra-red LED
7Status LED8CD/DVD slot
9Audio In – Right
10Audio In – Left
11Video In
12Headphone jack
13LCD monitor
The overhead console unit is attached to a bracket which in turn is attached to a roof cross-member, to the rear of the
front sunroof. The cross-member is drilled and fitted with three captive nuts. The bracket is secured to the cross-
member with three Torx screws and provides the attachment support for the overhead console unit. The unit is
secured to the bracket with two screws located underneath the screen and two further screws which are located
beneath the button and plug trim panels.
The overhead console unit is connected to the main DVD wiring harness by a short link lead which has a connector
at each end. The main wiring harness is routed across the roof, above the headlining, to the top of the right hand 'B'
post and is then routed along the roof panel and descends down the 'A' post, behind the trim panel, to the CD switch
box next to the passenger compartment fusebox.
Page 1460 of 1529

NAVIGATION SYSTEM
DESCRIPTION AND OPERATION 87-7
Calibration
Calibration is required after initial installation or replacement of the navigation computer. It may also be necessary
after repairs to system wiring and if route navigation becomes inaccurate or fails to operate. If the navigation computer
contains an existing calibration, this must be deleted, using the garage menu, prior to running the new calibration
routine. The sensor inputs should also be checked before running the calibration routine.
Sensor Check
1Call up the SENSORS screen on the LCD:
lIf the navigation CD-ROM has not been installed before, press and hold multifunction button 1 then press
multifunction button 10.
lIf the navigation CD-ROM has been installed before, use the garage menu as detailed above.
2Drive the vehicle forwards a short distance at a speed greater than 2.5 mph (4 km/h) and ensure the road speed
counter on the SENSORS screen starts to increment.
3Select reverse gear and ensure the direction arrows on the SENSORS screen point rearwards.
4Ensure the GPS data on the SENSORS screen is displayed and updated.
NOTE: The GPS data will randomly display a GPS MODULE FAILURE message. This is not a fault condition, and
no action need be taken, provided the GPS data switches between the GPS MODULE FAILURE message and
actual GPS data.
5Exit the SENSORS screen:
lIf the navigation CD-ROM has not been installed before, press and hold multifunction button 1 then press
multifunction button 10.
lIf the navigation CD-ROM has been installed before, press the Nav button.