1999 LAND ROVER DISCOVERY air conditioning
[x] Cancel search: air conditioningPage 1196 of 1529
AIR CONDITIONING
DESCRIPTION AND OPERATION 82-7
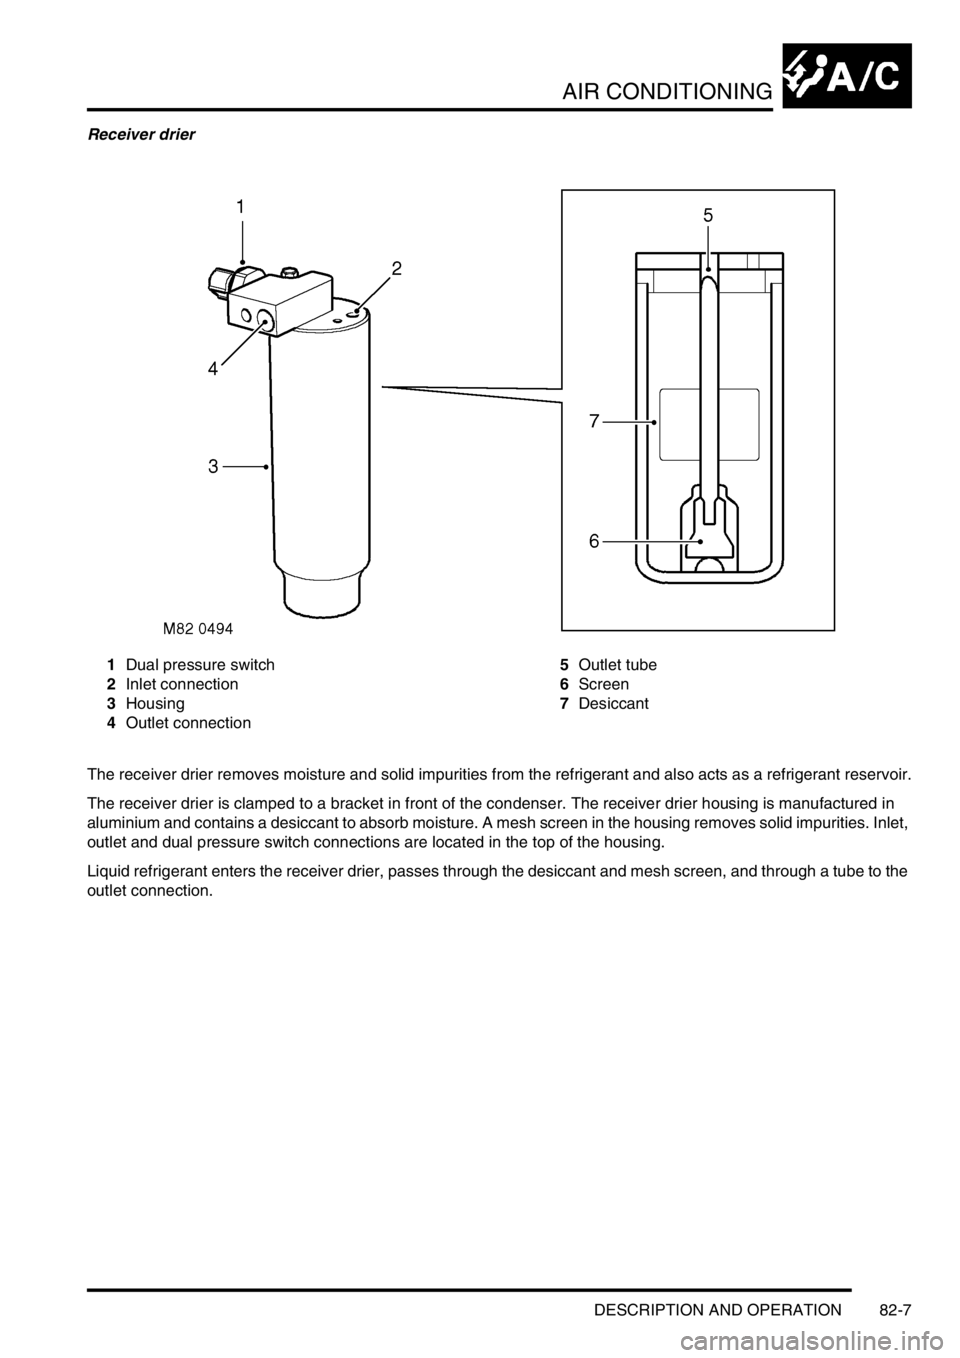
Receiver drier
1Dual pressure switch
2Inlet connection
3Housing
4Outlet connection5Outlet tube
6Screen
7Desiccant
The receiver drier removes moisture and solid impurities from the refrigerant and also acts as a refrigerant reservoir.
The receiver drier is clamped to a bracket in front of the condenser. The receiver drier housing is manufactured in
aluminium and contains a desiccant to absorb moisture. A mesh screen in the housing removes solid impurities. Inlet,
outlet and dual pressure switch connections are located in the top of the housing.
Liquid refrigerant enters the receiver drier, passes through the desiccant and mesh screen, and through a tube to the
outlet connection.
Page 1197 of 1529
AIR CONDITIONING
82-8DESCRIPTION AND OPERATION
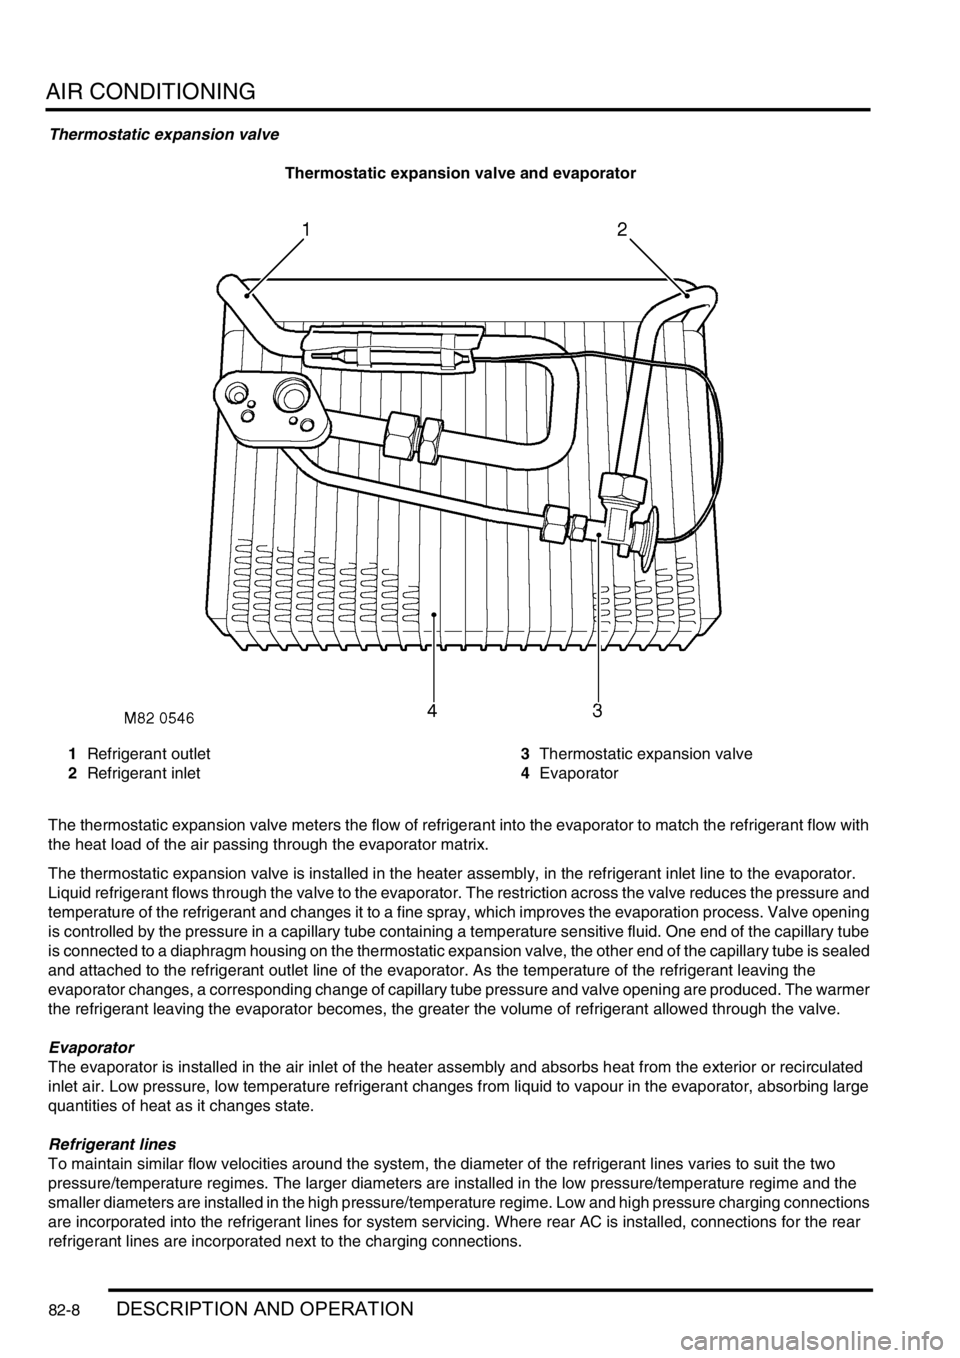
Thermostatic expansion valve
Thermostatic expansion valve and evaporator
1Refrigerant outlet
2Refrigerant inlet3Thermostatic expansion valve
4Evaporator
The thermostatic expansion valve meters the flow of refrigerant into the evaporator to match the refrigerant flow with
the heat load of the air passing through the evaporator matrix.
The thermostatic expansion valve is installed in the heater assembly, in the refrigerant inlet line to the evaporator.
Liquid refrigerant flows through the valve to the evaporator. The restriction across the valve reduces the pressure and
temperature of the refrigerant and changes it to a fine spray, which improves the evaporation process. Valve opening
is controlled by the pressure in a capillary tube containing a temperature sensitive fluid. One end of the capillary tube
is connected to a diaphragm housing on the thermostatic expansion valve, the other end of the capillary tube is sealed
and attached to the refrigerant outlet line of the evaporator. As the temperature of the refrigerant leaving the
evaporator changes, a corresponding change of capillary tube pressure and valve opening are produced. The warmer
the refrigerant leaving the evaporator becomes, the greater the volume of refrigerant allowed through the valve.
Evaporator
The evaporator is installed in the air inlet of the heater assembly and absorbs heat from the exterior or recirculated
inlet air. Low pressure, low temperature refrigerant changes from liquid to vapour in the evaporator, absorbing large
quantities of heat as it changes state.
Refrigerant lines
To maintain similar flow velocities around the system, the diameter of the refrigerant lines varies to suit the two
pressure/temperature regimes. The larger diameters are installed in the low pressure/temperature regime and the
smaller diameters are installed in the high pressure/temperature regime. Low and high pressure charging connections
are incorporated into the refrigerant lines for system servicing. Where rear AC is installed, connections for the rear
refrigerant lines are incorporated next to the charging connections.
Page 1198 of 1529
AIR CONDITIONING
DESCRIPTION AND OPERATION 82-9
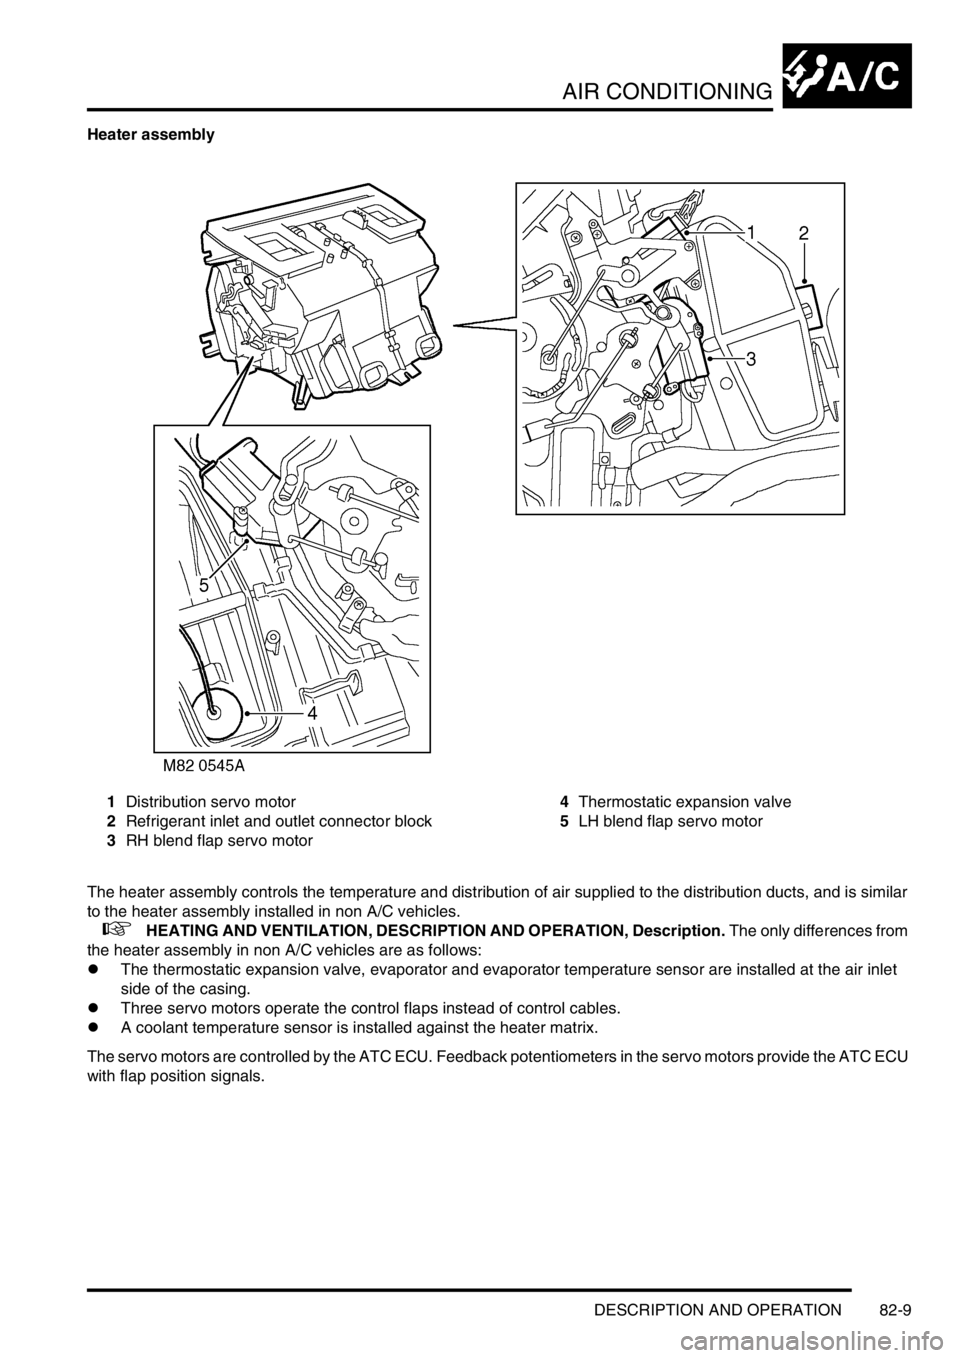
Heater assembly
1Distribution servo motor
2Refrigerant inlet and outlet connector block
3RH blend flap servo motor4Thermostatic expansion valve
5LH blend flap servo motor
The heater assembly controls the temperature and distribution of air supplied to the distribution ducts, and is similar
to the heater assembly installed in non A/C vehicles.
+ HEATING AND VENTILATION, DESCRIPTION AND OPERATION, Description. The only differences from
the heater assembly in non A/C vehicles are as follows:
lThe thermostatic expansion valve, evaporator and evaporator temperature sensor are installed at the air inlet
side of the casing.
lThree servo motors operate the control flaps instead of control cables.
lA coolant temperature sensor is installed against the heater matrix.
The servo motors are controlled by the ATC ECU. Feedback potentiometers in the servo motors provide the ATC ECU
with flap position signals.
Page 1199 of 1529
AIR CONDITIONING
82-10DESCRIPTION AND OPERATION
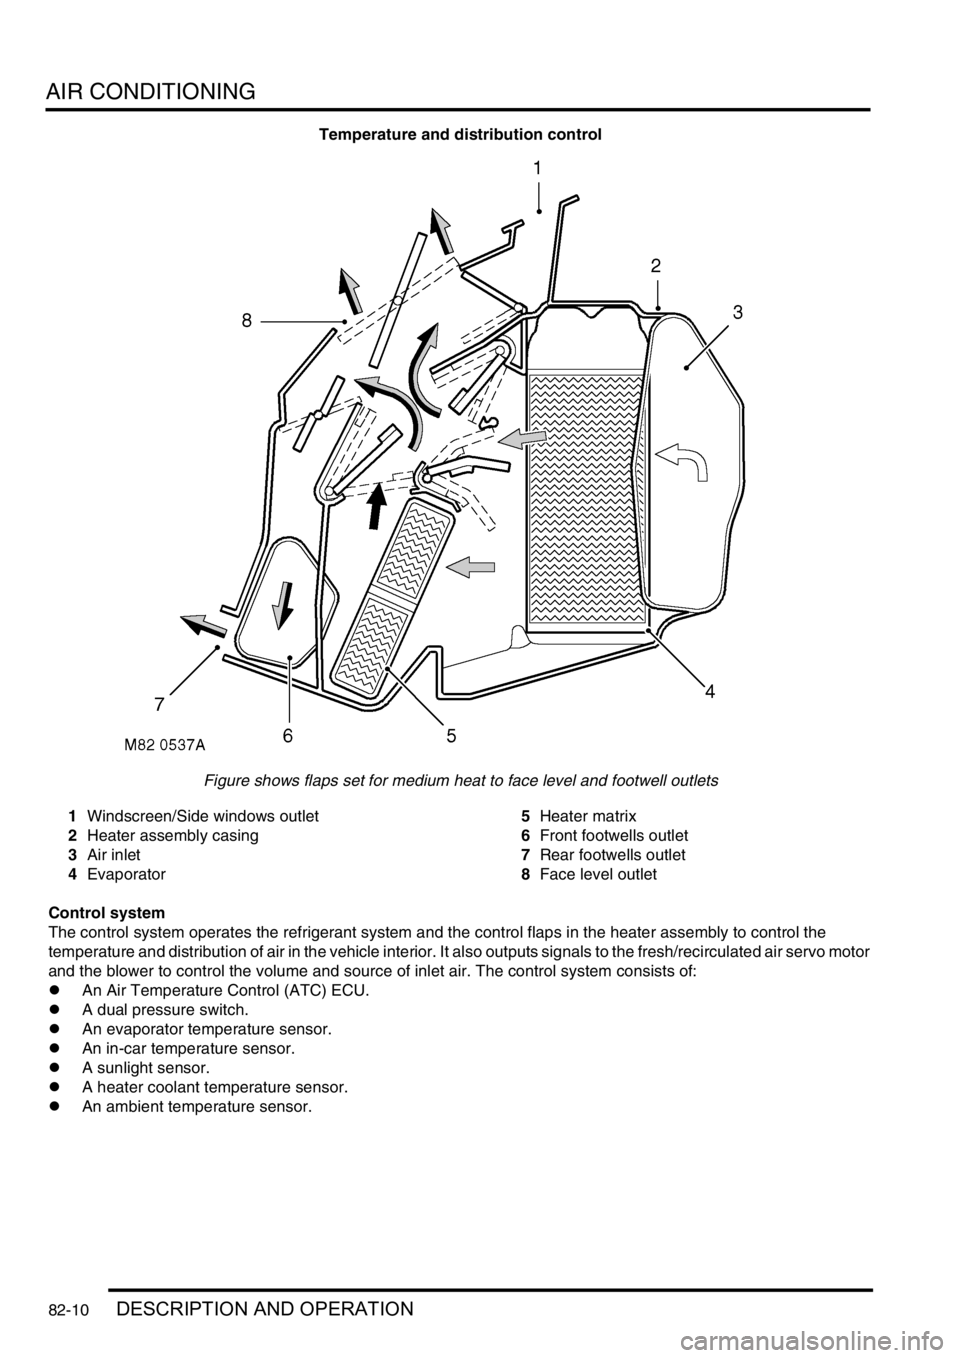
Temperature and distribution control
Figure shows flaps set for medium heat to face level and footwell outlets
1Windscreen/Side windows outlet
2Heater assembly casing
3Air inlet
4Evaporator5Heater matrix
6Front footwells outlet
7Rear footwells outlet
8Face level outlet
Control system
The control system operates the refrigerant system and the control flaps in the heater assembly to control the
temperature and distribution of air in the vehicle interior. It also outputs signals to the fresh/recirculated air servo motor
and the blower to control the volume and source of inlet air. The control system consists of:
lAn Air Temperature Control (ATC) ECU.
lA dual pressure switch.
lAn evaporator temperature sensor.
lAn in-car temperature sensor.
lA sunlight sensor.
lA heater coolant temperature sensor.
lAn ambient temperature sensor.
Page 1200 of 1529
AIR CONDITIONING
DESCRIPTION AND OPERATION 82-11
ATC ECU
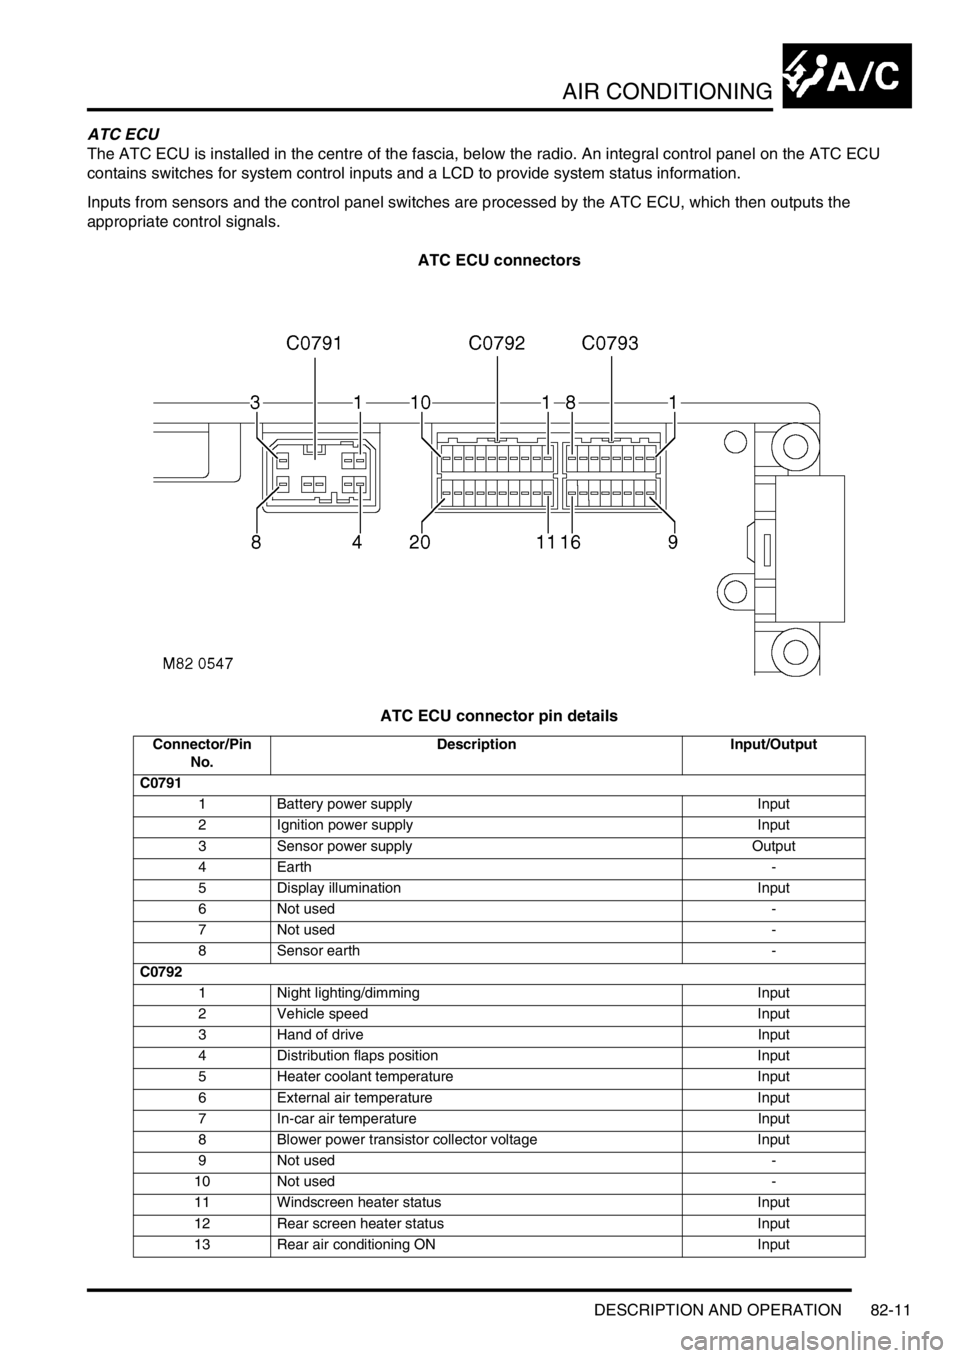
The ATC ECU is installed in the centre of the fascia, below the radio. An integral control panel on the ATC ECU
contains switches for system control inputs and a LCD to provide system status information.
Inputs from sensors and the control panel switches are processed by the ATC ECU, which then outputs the
appropriate control signals.
ATC ECU connectors
ATC ECU connector pin details
Connector/Pin
No.Description Input/Output
C0791
1 Battery power supply Input
2 Ignition power supply Input
3 Sensor power supply Output
4Earth -
5 Display illumination Input
6 Not used -
7 Not used -
8 Sensor earth -
C0792
1 Night lighting/dimming Input
2 Vehicle speed Input
3 Hand of drive Input
4 Distribution flaps position Input
5 Heater coolant temperature Input
6 External air temperature Input
7 In-car air temperature Input
8 Blower power transistor collector voltage Input
9 Not used -
10 Not used -
11 Windscreen heater status Input
12 Rear screen heater status Input
13 Rear air conditioning ON Input
Page 1201 of 1529
AIR CONDITIONING
82-12DESCRIPTION AND OPERATION
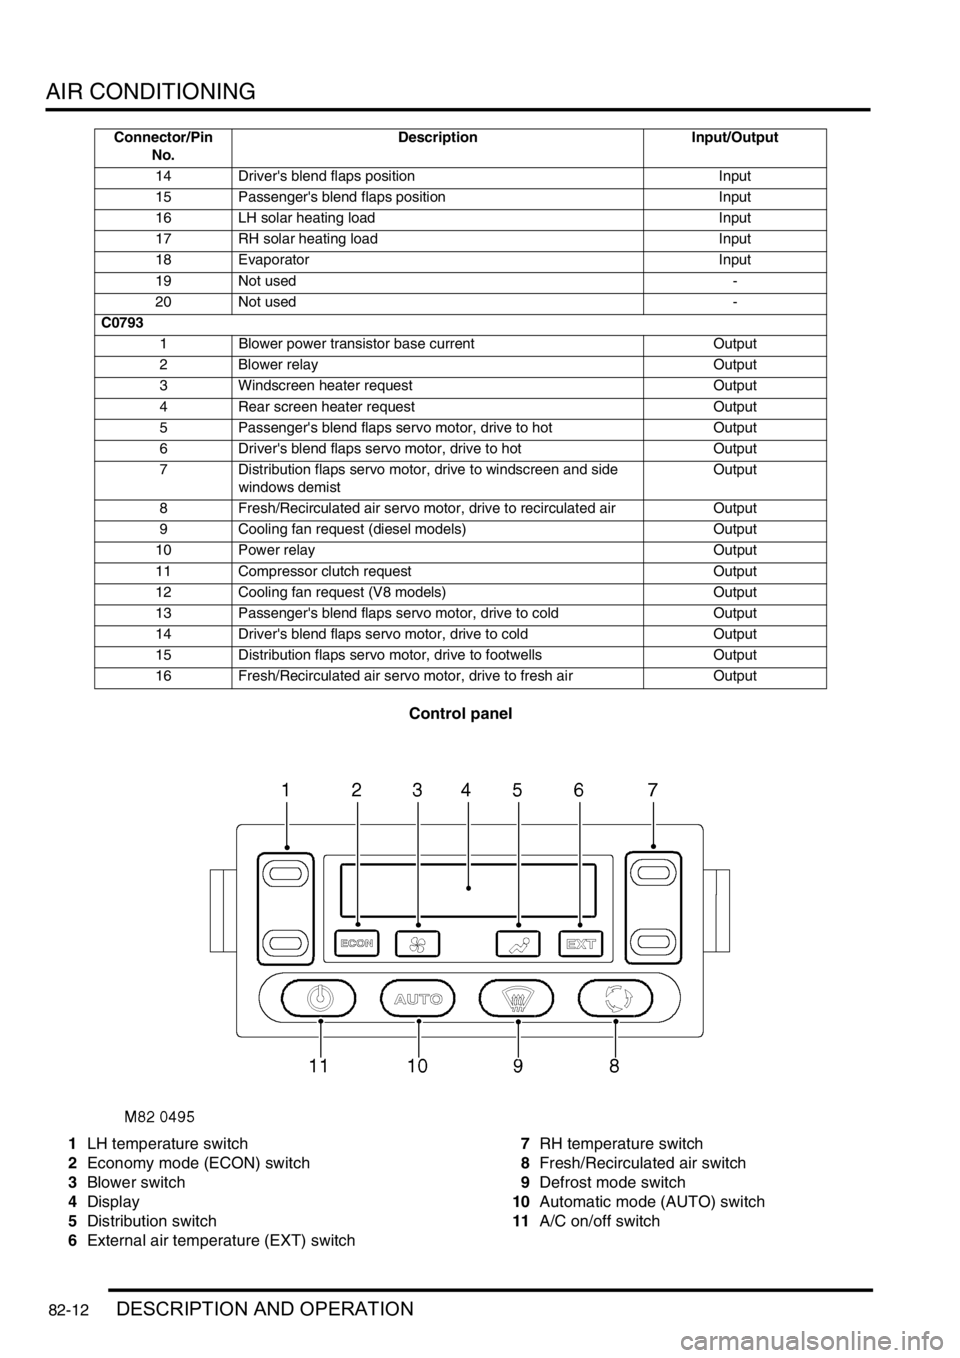
Control panel
1LH temperature switch
2Economy mode (ECON) switch
3Blower switch
4Display
5Distribution switch
6External air temperature (EXT) switch7RH temperature switch
8Fresh/Recirculated air switch
9Defrost mode switch
10Automatic mode (AUTO) switch
11A/C on/off switch
14 Driver's blend flaps position Input
15 Passenger's blend flaps position Input
16 LH solar heating load Input
17 RH solar heating load Input
18 Evaporator Input
19 Not used -
20 Not used -
C0793
1 Blower power transistor base current Output
2 Blower relay Output
3 Windscreen heater request Output
4 Rear screen heater request Output
5 Passenger's blend flaps servo motor, drive to hot Output
6 Driver's blend flaps servo motor, drive to hot Output
7 Distribution flaps servo motor, drive to windscreen and side
windows demistOutput
8 Fresh/Recirculated air servo motor, drive to recirculated air Output
9 Cooling fan request (diesel models) Output
10 Power relay Output
11 Compressor clutch request Output
12 Cooling fan request (V8 models) Output
13 Passenger's blend flaps servo motor, drive to cold Output
14 Driver's blend flaps servo motor, drive to cold Output
15 Distribution flaps servo motor, drive to footwells Output
16 Fresh/Recirculated air servo motor, drive to fresh air Output Connector/Pin
No.Description Input/Output
Page 1202 of 1529

AIR CONDITIONING
DESCRIPTION AND OPERATION 82-13
The control panel switches are all non-latching pushswitches except for the LH and RH temperature switches, which
are centre-off rocker switches. The switches have the following functions:
LH and RH temperature switches. Enabled only while the system is on:
lEach press increases or decreases the related temperature setting, in steps of 1 °C (2 °F), between 16 and 28
°C (60 and 84 °F).
lIf the decrease side of the switch is pressed when a temperature of 16 °C (60 °F) is set, the display changes to
LO (maximum cold).
lIf the increase side of the switch is pressed when a temperature of 28 °C (84 °F) is set, the display changes to
HI (maximum hot).
lIf a switch is kept depressed, step changes occur every 0.4 seconds.
A/C on/off switch. Switches the system on and off. When used to switch the system on, the system resumes the
configuration in use prior to the previous off selection.
Blower switch. Enabled only while the system is on. Provides manual control of blower speed:
lEach press changes the blower speed, in sequence, through off (only available if economy mode is selected on)
and five incremental speeds.
lIf the switch is kept depressed, after 1 second subsequent speed increments occur every 0.4 second until blower
reaches high speed. Releasing and then pressing the switch again changes blower back to off or low speed.
Distribution switch. Enabled only while the system is on. Provides manual control of air distribution:
lEach press changes the air distribution, in sequence, through footwells only, footwells and windscreen/side
windows demist, windscreen/side windows demist only, face level only, face level and footwells.
lIf the switch is kept depressed, after 1 second subsequent distribution changes occur every 0.4 seconds until
distribution reaches face level and footwells. Releasing and then pressing the switch again changes distribution
back to footwells only.
External air temperature (EXT) switch. Enabled while the system is on or off. Switches the external temperature output
on and off:
lIf the system is already on, the temperature output overrides the system outputs for approximately 7 seconds,
then the display reverts to system outputs.
lIf the system is switched on while the external temperature output is on, the system outputs override the external
temperature output.
Fresh/Recirculated air switch. Enabled only while the system is on. Provides manual control of inlet air selection.
Defrost mode switch. Starts the system in, or switches the system to and from, defrost mode.
Automatic mode (AUTO) switch. Starts the system in, or switches the system to and from, the automatic mode.
Economy mode (ECON) switch. Enabled only while the system is on. Provides manual on/off control of the refrigerant
system compressor, to reduce fuel consumption when there is no requirement for cool or dehumidified air, e.g. when
the ambient temperature is lower than the LH and RH temperature settings.
Temperature settings: The LH and RH temperature settings are reference inputs used by the control system and give
an approximation of the temperatures that will be established in the cabin. They are not necessarily actual distribution
outlet temperatures, or the temperatures at specific points in the cabin.
Audible warning: A 'beep' is emitted from the ATC ECU each time it receives a control switch input. This audible
warning can be switched off and on by pressing and holding the AUTO switch, then pressing and holding the A/C on/
off switch until the audible warning sounds (approximately 3 seconds). While switched off, the audible warning still
sounds when:
lSwitching between °F and °C on the display.
lSwitching the audible warning from off to on.
lSwitching the timed feet function on and off.
lSwitching the timed recirculated inlet air on and off.
lSwitching the latched recirculated inlet air on and off.
lWhen there is a fault warning.
lRunning the self diagnostic routine.
Page 1203 of 1529
AIR CONDITIONING
82-14DESCRIPTION AND OPERATION
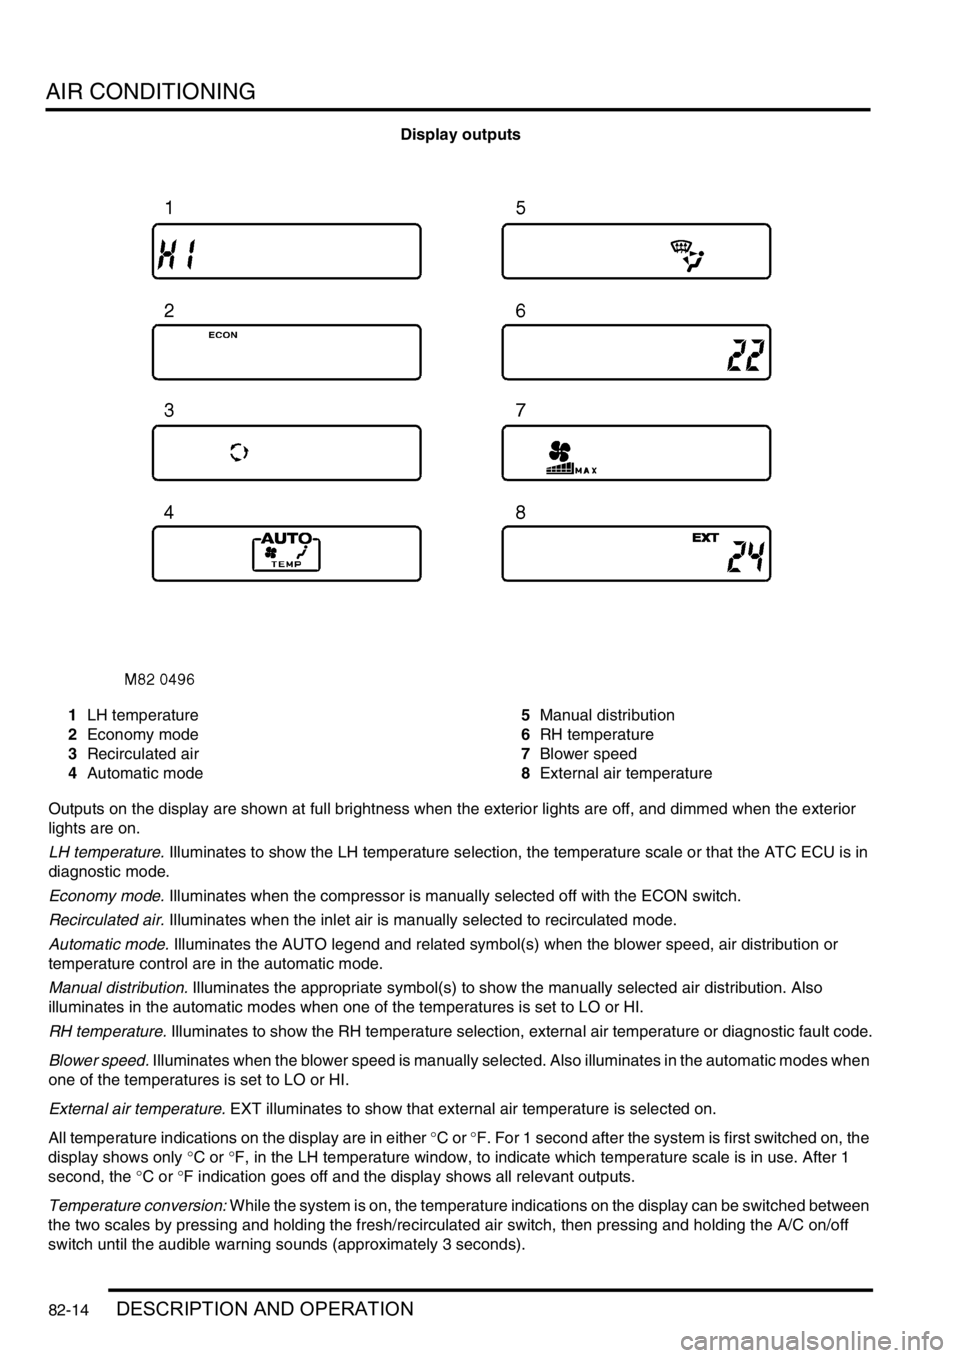
Display outputs
1LH temperature
2Economy mode
3Recirculated air
4Automatic mode5Manual distribution
6RH temperature
7Blower speed
8External air temperature
Outputs on the display are shown at full brightness when the exterior lights are off, and dimmed when the exterior
lights are on.
LH temperature. Illuminates to show the LH temperature selection, the temperature scale or that the ATC ECU is in
diagnostic mode.
Economy mode. Illuminates when the compressor is manually selected off with the ECON switch.
Recirculated air. Illuminates when the inlet air is manually selected to recirculated mode.
Automatic mode. Illuminates the AUTO legend and related symbol(s) when the blower speed, air distribution or
temperature control are in the automatic mode.
Manual distribution. Illuminates the appropriate symbol(s) to show the manually selected air distribution. Also
illuminates in the automatic modes when one of the temperatures is set to LO or HI.
RH temperature. Illuminates to show the RH temperature selection, external air temperature or diagnostic fault code.
Blower speed. Illuminates when the blower speed is manually selected. Also illuminates in the automatic modes when
one of the temperatures is set to LO or HI.
External air temperature. EXT illuminates to show that external air temperature is selected on.
All temperature indications on the display are in either °C or °F. For 1 second after the system is first switched on, the
display shows only °C or °F, in the LH temperature window, to indicate which temperature scale is in use. After 1
second, the °C or °F indication goes off and the display shows all relevant outputs.
Temperature conversion: While the system is on, the temperature indications on the display can be switched between
the two scales by pressing and holding the fresh/recirculated air switch, then pressing and holding the A/C on/off
switch until the audible warning sounds (approximately 3 seconds).