1999 LAND ROVER DISCOVERY lock
[x] Cancel search: lockPage 1069 of 1529
PANEL REPAIRS
77-2-2 REPLACEMENT PANELS
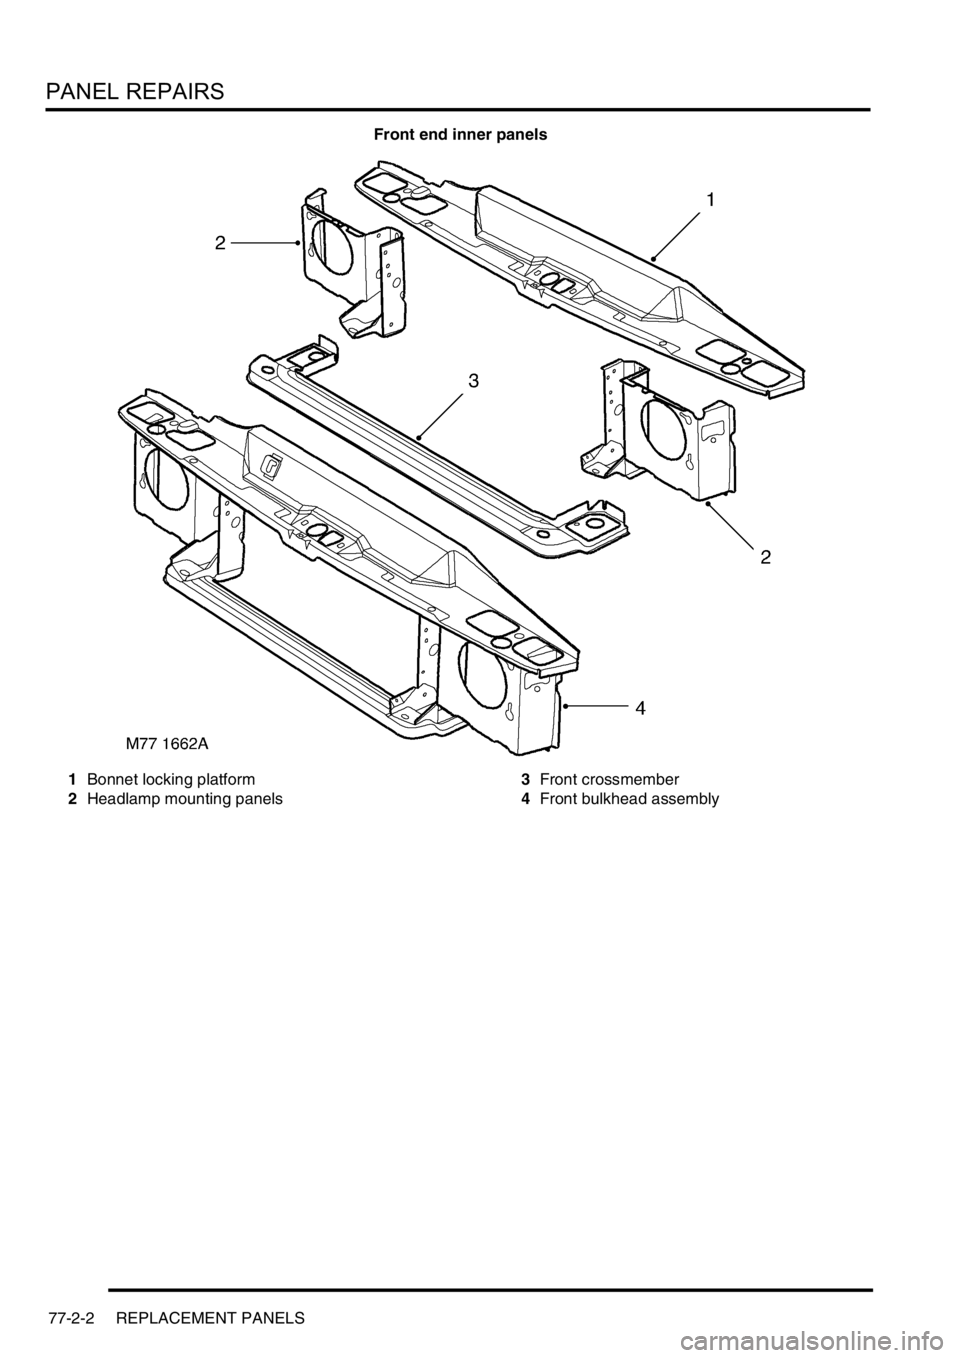
Front end inner panels
1Bonnet locking platform
2Headlamp mounting panels3Front crossmember
4Front bulkhead assembly
Page 1083 of 1529
PANEL REPAIRS
77-2-16 PROCEDURES
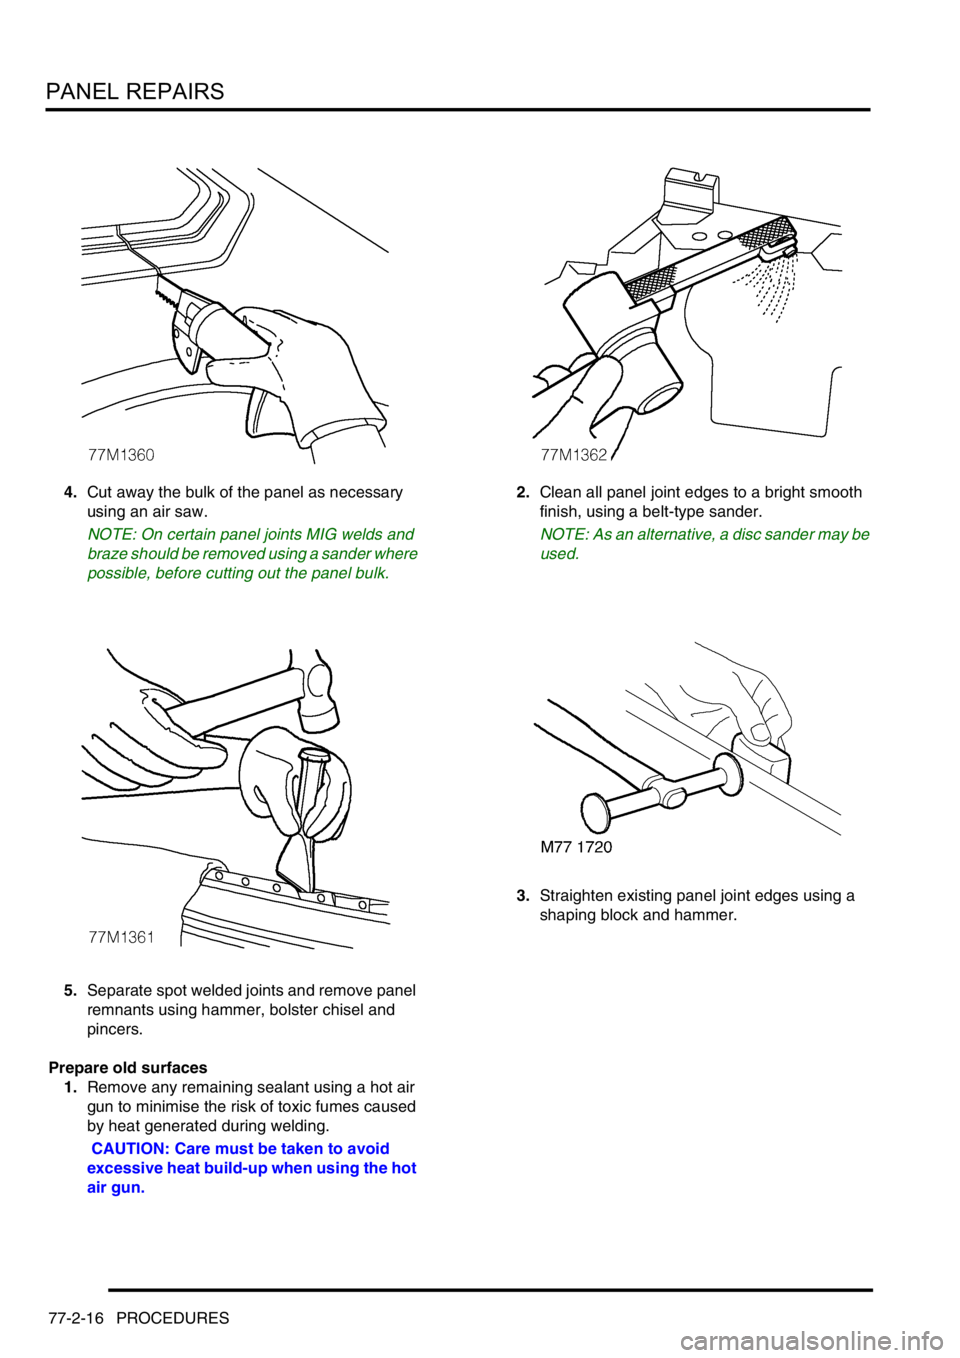
4.Cut away the bulk of the panel as necessary
using an air saw.
NOTE: On certain panel joints MIG welds and
braze should be removed using a sander where
possible, before cutting out the panel bulk.
5.Separate spot welded joints and remove panel
remnants using hammer, bolster chisel and
pincers.
Prepare old surfaces
1.Remove any remaining sealant using a hot air
gun to minimise the risk of toxic fumes caused
by heat generated during welding.
CAUTION: Care must be taken to avoid
excessive heat build-up when using the hot
air gun.2.Clean all panel joint edges to a bright smooth
finish, using a belt-type sander.
NOTE: As an alternative, a disc sander may be
used.
3.Straighten existing panel joint edges using a
shaping block and hammer.
Page 1088 of 1529
PANEL REPAIRS
REPAIRS 77-2-21
REPAIRS
Front bulkhead assembly
Remove
1.Disconnect both battery leads, negative lead
first.
2.Disconnect leads/multiplug from alternator.
3.Remove front wing.
+ EXTERIOR FITTINGS, REPAIRS,
Wing - front - up to 03MY.
4.Remove washer reservoir.
+ WIPERS AND WASHERS, REPAIRS,
Reservoir - washer - up to 03MY.
5. Models with A/C: Remove condensor.
+ AIR CONDITIONING, REPAIRS,
Condenser.
6. Diesel models: Remove gearbox fluid cooler.
7.Remove RH and LH headlamps.
+ LIGHTING, REPAIRS, Headlamp - up
to 03MY.
8.Release headlamp levelling motors and
position aside.
9.Release headlamp wiring and position aside.
10.Remove battery.
+ CHARGING AND STARTING,
REPAIRS, Battery.
11.Remove battery tray.
12.Remove air filter assembly.
+ ENGINE MANAGEMENT SYSTEM -
Td5, REPAIRS, Air filter assembly.
+ ENGINE MANAGEMENT SYSTEM -
V8, REPAIRS, Air cleaner assembly.
13.Remove 2 earth leads from LH of front
bulkhead.
14.Remove RH horn.
+ ALARM SYSTEM AND HORN,
REPAIR, Vehicle horn.
15. Models with A/C: Release and remove A/C
pipes.
16.Remove RH and LH crush cans.
17.Remove bonnet release cable.
18.Support bonnet in open position
19.Remove bonnet locking mechanism.
20.Remove VIN plate.
21.Remove 2 bolts securing front bulkhead
assembly to chassis.
22.Remove centre braces.Repair
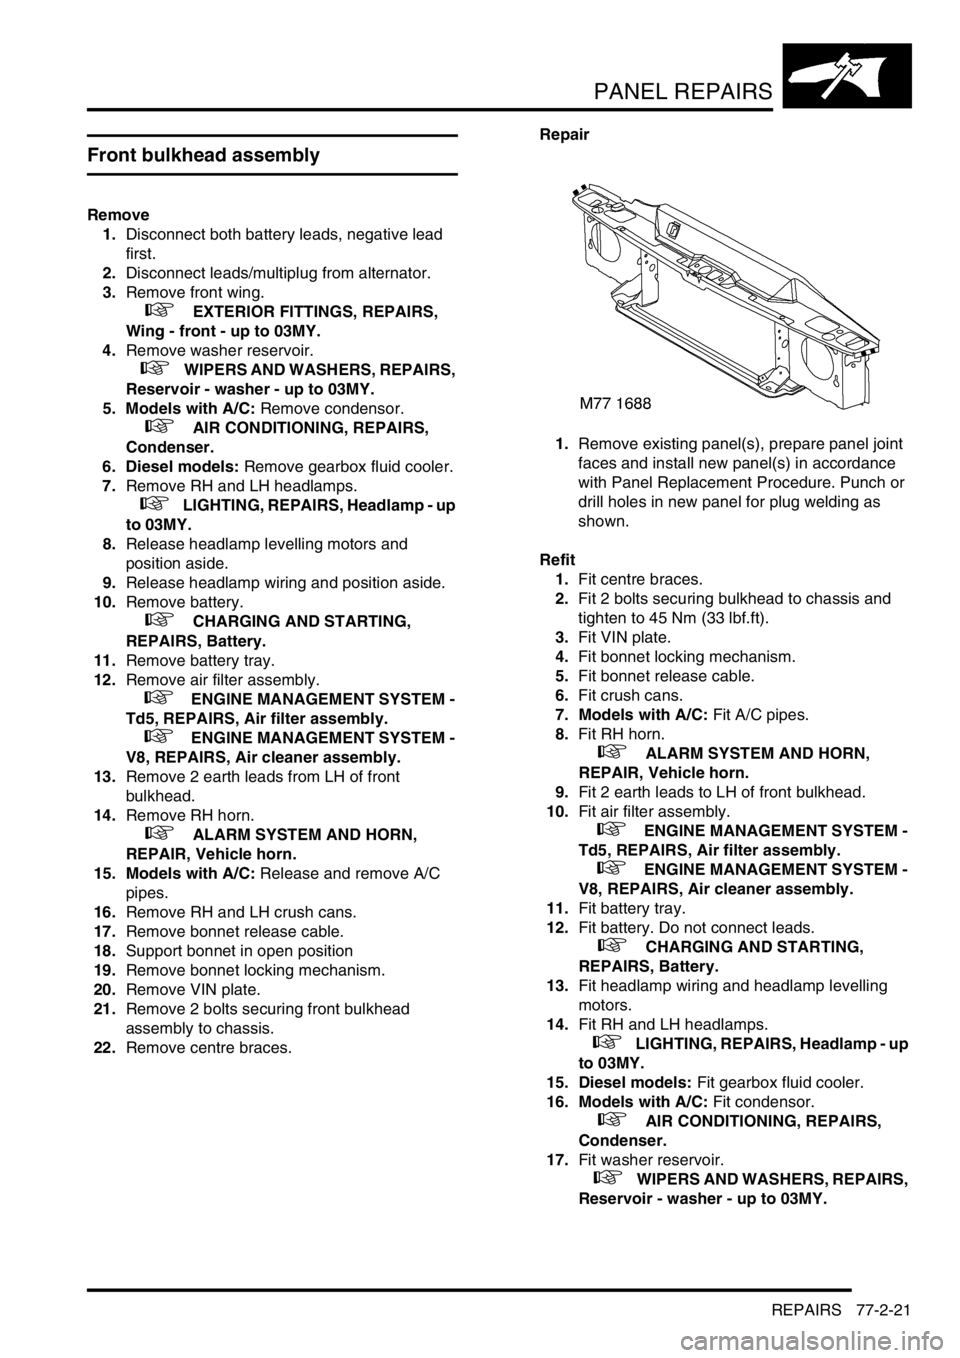
1.Remove existing panel(s), prepare panel joint
faces and install new panel(s) in accordance
with Panel Replacement Procedure. Punch or
drill holes in new panel for plug welding as
shown.
Refit
1.Fit centre braces.
2.Fit 2 bolts securing bulkhead to chassis and
tighten to 45 Nm (33 lbf.ft).
3.Fit VIN plate.
4.Fit bonnet locking mechanism.
5.Fit bonnet release cable.
6.Fit crush cans.
7. Models with A/C: Fit A/C pipes.
8.Fit RH horn.
+ ALARM SYSTEM AND HORN,
REPAIR, Vehicle horn.
9.Fit 2 earth leads to LH of front bulkhead.
10.Fit air filter assembly.
+ ENGINE MANAGEMENT SYSTEM -
Td5, REPAIRS, Air filter assembly.
+ ENGINE MANAGEMENT SYSTEM -
V8, REPAIRS, Air cleaner assembly.
11.Fit battery tray.
12.Fit battery. Do not connect leads.
+ CHARGING AND STARTING,
REPAIRS, Battery.
13.Fit headlamp wiring and headlamp levelling
motors.
14.Fit RH and LH headlamps.
+ LIGHTING, REPAIRS, Headlamp - up
to 03MY.
15. Diesel models: Fit gearbox fluid cooler.
16. Models with A/C: Fit condensor.
+ AIR CONDITIONING, REPAIRS,
Condenser.
17.Fit washer reservoir.
+ WIPERS AND WASHERS, REPAIRS,
Reservoir - washer - up to 03MY.
Page 1090 of 1529
PANEL REPAIRS
REPAIRS 77-2-23
Bonnet locking platform
Remove
1.Disconnect both battery leads, negative lead
first.
2.Disconnect leads/multiplug from alternator.
3.Remove front bumper assembly.
+ EXTERIOR FITTINGS, REPAIRS,
Bumper assembly - front.
4. Models with A/C: Remove condensor.
+ AIR CONDITIONING, REPAIRS,
Condenser.
5. Diesel models: Remove gearbox fluid cooler.
6.Remove RH and LH headlamps.
+ LIGHTING, REPAIRS, Headlamp - up
to 03MY.
7.Remove RH and LH repeater lamps.
+ LIGHTING, REPAIRS, Lamp - front
repeater - up to 03MY.
8.Release headlamp wiring and position aside.
9.Remove battery.
+ CHARGING AND STARTING,
REPAIRS, Battery.
10.Remove battery tray.
11.Remove air filter assembly.
+ ENGINE MANAGEMENT SYSTEM -
Td5, REPAIRS, Air filter assembly.
+ ENGINE MANAGEMENT SYSTEM -
V8, REPAIRS, Air cleaner assembly.
12.Remove RH horn.
+ ALARM SYSTEM AND HORN,
REPAIR, Vehicle horn.
13.Remove bonnet release cable.
14.Support bonnet in open position
15.Remove bonnet locking mechanism.
16.Remove VIN plate.
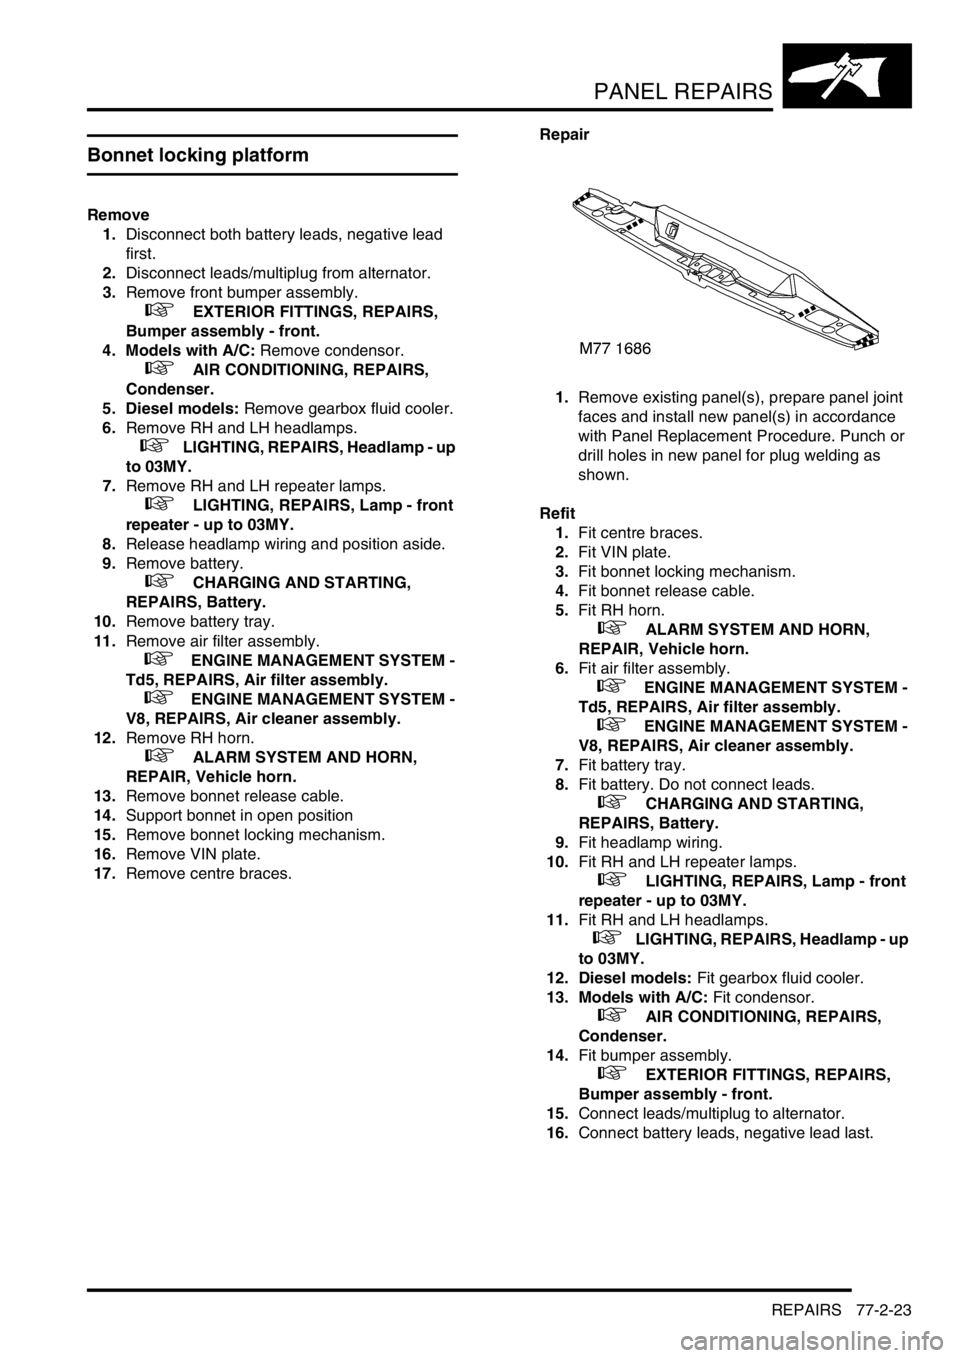
17.Remove centre braces.Repair
1.Remove existing panel(s), prepare panel joint
faces and install new panel(s) in accordance
with Panel Replacement Procedure. Punch or
drill holes in new panel for plug welding as
shown.
Refit
1.Fit centre braces.
2.Fit VIN plate.
3.Fit bonnet locking mechanism.
4.Fit bonnet release cable.
5.Fit RH horn.
+ ALARM SYSTEM AND HORN,
REPAIR, Vehicle horn.
6.Fit air filter assembly.
+ ENGINE MANAGEMENT SYSTEM -
Td5, REPAIRS, Air filter assembly.
+ ENGINE MANAGEMENT SYSTEM -
V8, REPAIRS, Air cleaner assembly.
7.Fit battery tray.
8.Fit battery. Do not connect leads.
+ CHARGING AND STARTING,
REPAIRS, Battery.
9.Fit headlamp wiring.
10.Fit RH and LH repeater lamps.
+ LIGHTING, REPAIRS, Lamp - front
repeater - up to 03MY.
11.Fit RH and LH headlamps.
+ LIGHTING, REPAIRS, Headlamp - up
to 03MY.
12. Diesel models: Fit gearbox fluid cooler.
13. Models with A/C: Fit condensor.
+ AIR CONDITIONING, REPAIRS,
Condenser.
14.Fit bumper assembly.
+ EXTERIOR FITTINGS, REPAIRS,
Bumper assembly - front.
15.Connect leads/multiplug to alternator.
16.Connect battery leads, negative lead last.
Page 1108 of 1529
PANEL REPAIRS
REPAIRS 77-2-41
Refit
1.Fit side drip rail finisher.
2.Fit wiring to 'B/C' post and sill areas.
3.Fit front and rear door door aperture seal.
4.Position carpet and secure with fixings.
5.Fit tread plates to front and rear door apertures.
6.Fit head lining.
+ INTERIOR TRIM COMPONENTS,
REPAIRS, Headlining.
7.Fit rear seat.
+ SEATS, REPAIRS, Seat - rear.
8.Fit front seat belt.
+ RESTRAINT SYSTEMS, REPAIRS,
Seat belt - front.
9. LH side: Fit CD autochanger.
+ IN CAR ENTERTAINMENT,
REPAIRS, CD autochanger.
10. RH side: Fit power amplifier.
+ IN CAR ENTERTAINMENT,
REPAIRS, Amplifier - power.
11.Fit RH or LH front seat.
+ SEATS, REPAIRS, Seat - front.
12.Fit sill finisher.
13.Fit front door striker to B/C post, fit Torx bolts
and tighten to 26 Nm (19 lbf.ft).
14.Fit rear door.
+ DOORS, REPAIRS, Door - rear.
15.Connect leads/multiplug to alternator.
16.Connect battery leads, negative lead last.
Panel body side assembly
Remove
1.Disconnect both battery leads, negative lead
first.
2.Disconnect leads/multiplug from alternator.
3.Remove loadspace side trim casing.
+ INTERIOR TRIM COMPONENTS,
REPAIRS, Trim casing - side - loadspace.
4.Remove head lining rear trim finisher.
5.Remove rear head rests, if fitted.
6.Remove body side rear glass.
+ SCREENS, REPAIRS, Glass - body
side - rear.
7.Remove rear bumper assembly.
+ EXTERIOR FITTINGS, REPAIRS,
Bumper assembly - rear - up to 03MY.
8.Remove rear bumper finisher.
9.Remove rear wheel arch liner.
+ EXTERIOR FITTINGS, REPAIRS,
Liner - wheel arch - rear.
10.Remove mud flap.
11.Remove tread plate from rear door aperture.
12.Remove rear door aperture seal.
13.Remove rear door striker from 'D' post.
14.Remove 'D' post outer trim finisher.
15.Remove wheel arch trim finisher.
16.Remove side drip rail finisher.
17. RH side: Remove tail door.
18. LH side: Remove tail door striker and setting
block from 'E' post.
19.Remove tail door tread plate.
20.Remove loadspace carpet retainer.
21.Remove tail door aperture seal.
22.Remove tail lamp.
+ LIGHTING, REPAIRS, Lamp - tail.
23. RH side: Remove fuel filler flap.
24. RH side: Remove fuel filler tube.
+ FUEL DELIVERY SYSTEM - V8,
REPAIRS, Filler tube - fuel.
25.Remove aerial amplifier.
26.Remove relevant wiring from body side area.
Page 1109 of 1529
PANEL REPAIRS
77-2-42 REPAIRS
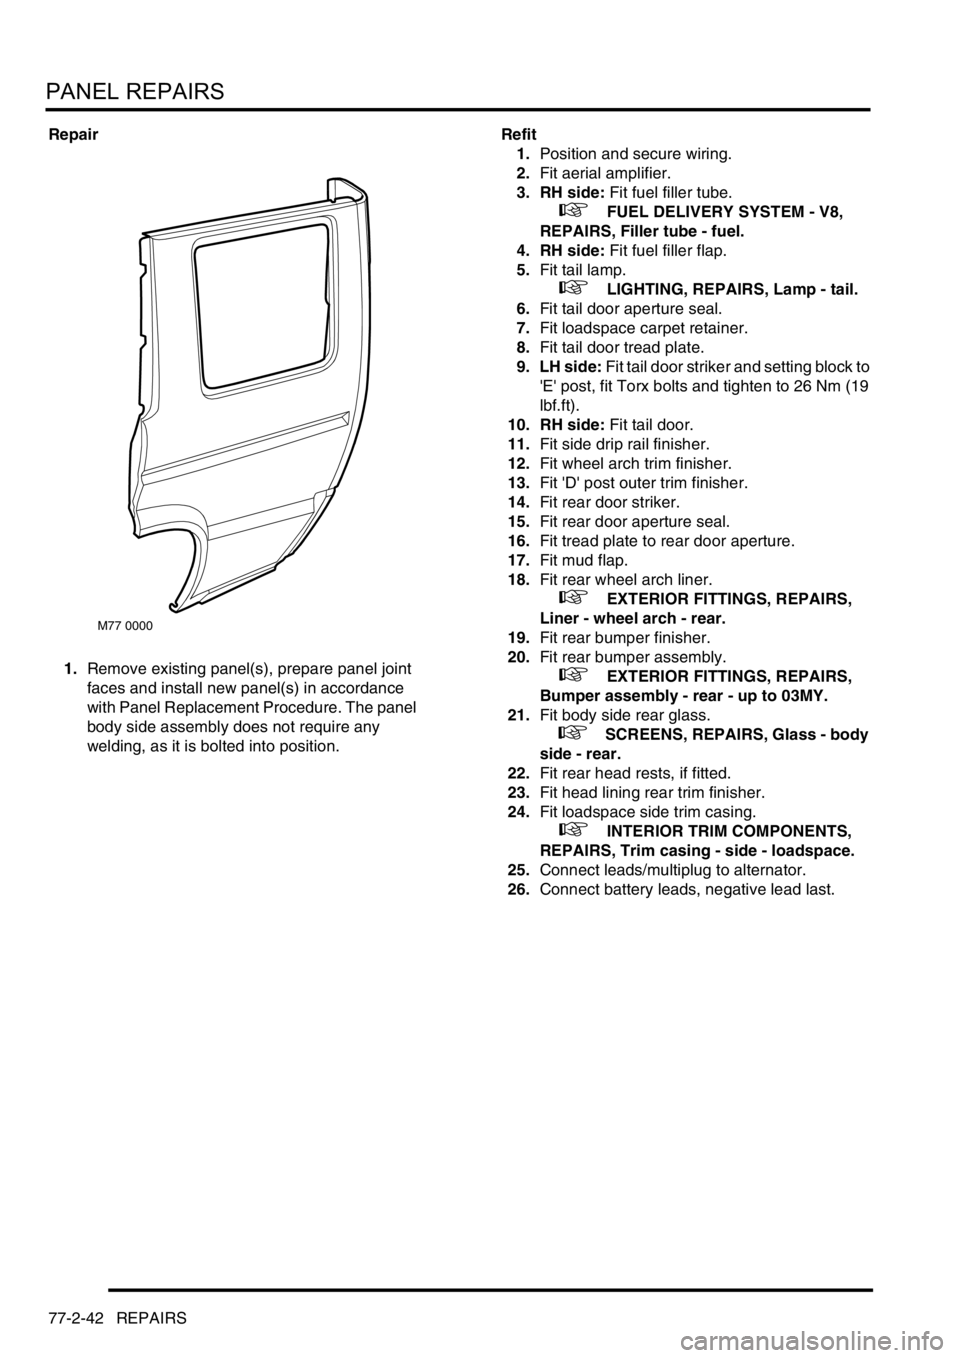
Repair
1.Remove existing panel(s), prepare panel joint
faces and install new panel(s) in accordance
with Panel Replacement Procedure. The panel
body side assembly does not require any
welding, as it is bolted into position.Refit
1.Position and secure wiring.
2.Fit aerial amplifier.
3. RH side: Fit fuel filler tube.
+ FUEL DELIVERY SYSTEM - V8,
REPAIRS, Filler tube - fuel.
4. RH side: Fit fuel filler flap.
5.Fit tail lamp.
+ LIGHTING, REPAIRS, Lamp - tail.
6.Fit tail door aperture seal.
7.Fit loadspace carpet retainer.
8.Fit tail door tread plate.
9. LH side: Fit tail door striker and setting block to
'E' post, fit Torx bolts and tighten to 26 Nm (19
lbf.ft).
10. RH side: Fit tail door.
11.Fit side drip rail finisher.
12.Fit wheel arch trim finisher.
13.Fit 'D' post outer trim finisher.
14.Fit rear door striker.
15.Fit rear door aperture seal.
16.Fit tread plate to rear door aperture.
17.Fit mud flap.
18.Fit rear wheel arch liner.
+ EXTERIOR FITTINGS, REPAIRS,
Liner - wheel arch - rear.
19.Fit rear bumper finisher.
20.Fit rear bumper assembly.
+ EXTERIOR FITTINGS, REPAIRS,
Bumper assembly - rear - up to 03MY.
21.Fit body side rear glass.
+ SCREENS, REPAIRS, Glass - body
side - rear.
22.Fit rear head rests, if fitted.
23.Fit head lining rear trim finisher.
24.Fit loadspace side trim casing.
+ INTERIOR TRIM COMPONENTS,
REPAIRS, Trim casing - side - loadspace.
25.Connect leads/multiplug to alternator.
26.Connect battery leads, negative lead last.
M77 0000
Page 1122 of 1529
PANEL REPAIRS
TIMES 77-2-55
TIME S
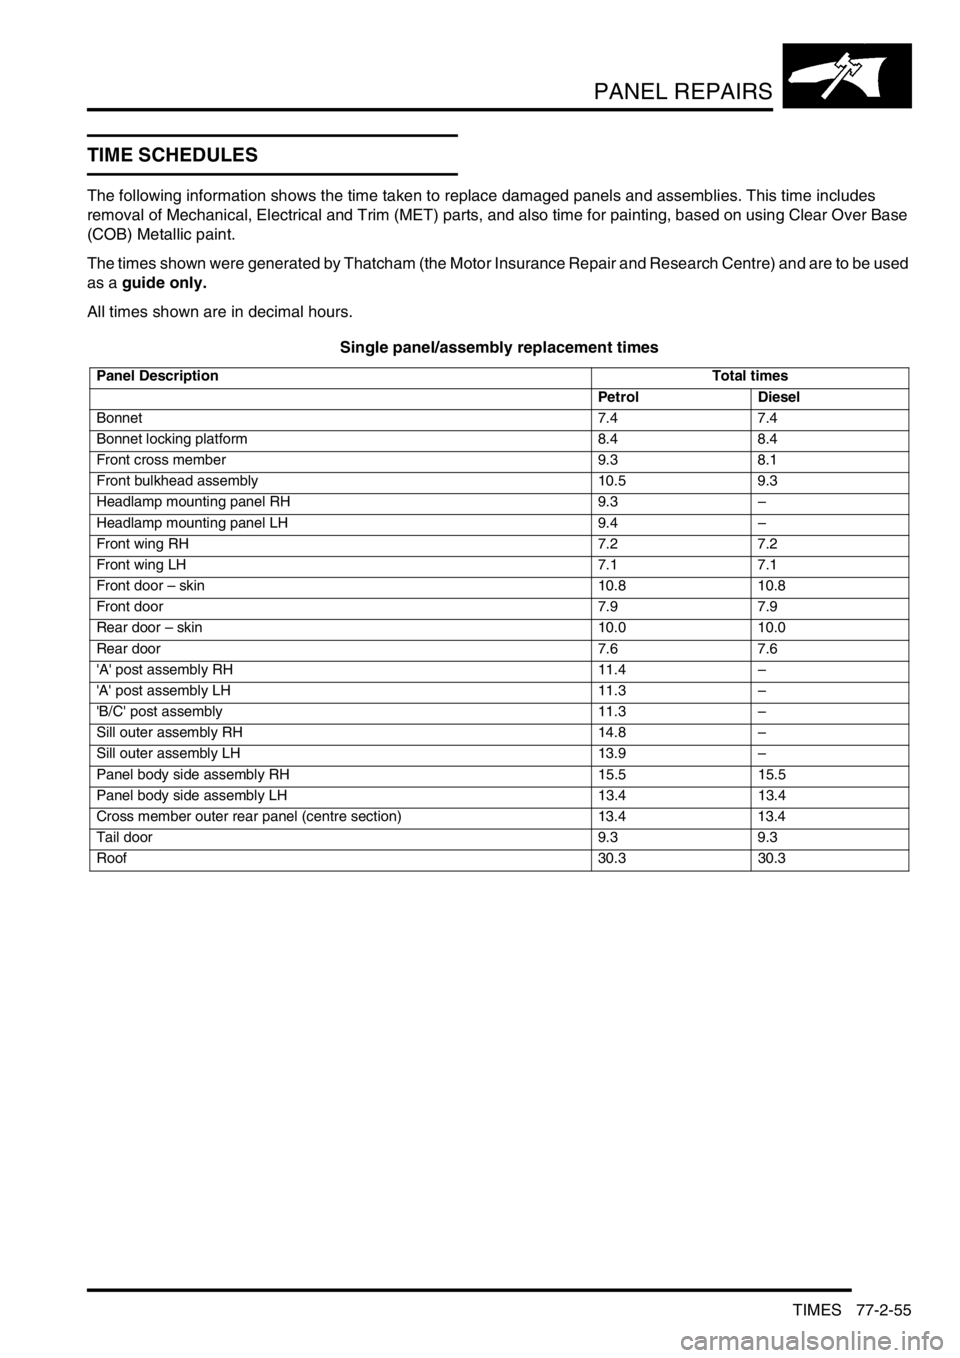
TIME SCHEDULES
The following information shows the time taken to replace damaged panels and assemblies. This time includes
removal of Mechanical, Electrical and Trim (MET) parts, and also time for painting, based on using Clear Over Base
(COB) Metallic paint.
The times shown were generated by Thatcham (the Motor Insurance Repair and Research Centre) and are to be used
as a guide only.
All times shown are in decimal hours.
Single panel/assembly replacement times
Panel DescriptionTotal times
Petrol Diesel
Bonnet 7.4 7.4
Bonnet locking platform 8.4 8.4
Front cross member 9.3 8.1
Front bulkhead assembly 10.5 9.3
Headlamp mounting panel RH 9.3–
Headlamp mounting panel LH 9.4–
Front wing RH 7.2 7.2
Front wing LH 7.1 7.1
Front door – skin 10.8 10.8
Front door 7.9 7.9
Rear door – skin 10.0 10.0
Rear door 7.6 7.6
'A' post assembly RH 11.4–
'A' post assembly LH 11.3–
'B/C' post assembly 11.3–
Sill outer assembly RH 14.8–
Sill outer assembly LH 13.9–
Panel body side assembly RH 15.5 15.5
Panel body side assembly LH 13.4 13.4
Cross member outer rear panel (centre section) 13.4 13.4
Tail door 9.3 9.3
Roof30.3 30.3
Page 1123 of 1529
PANEL REPAIRS
77-2-56 TIMES
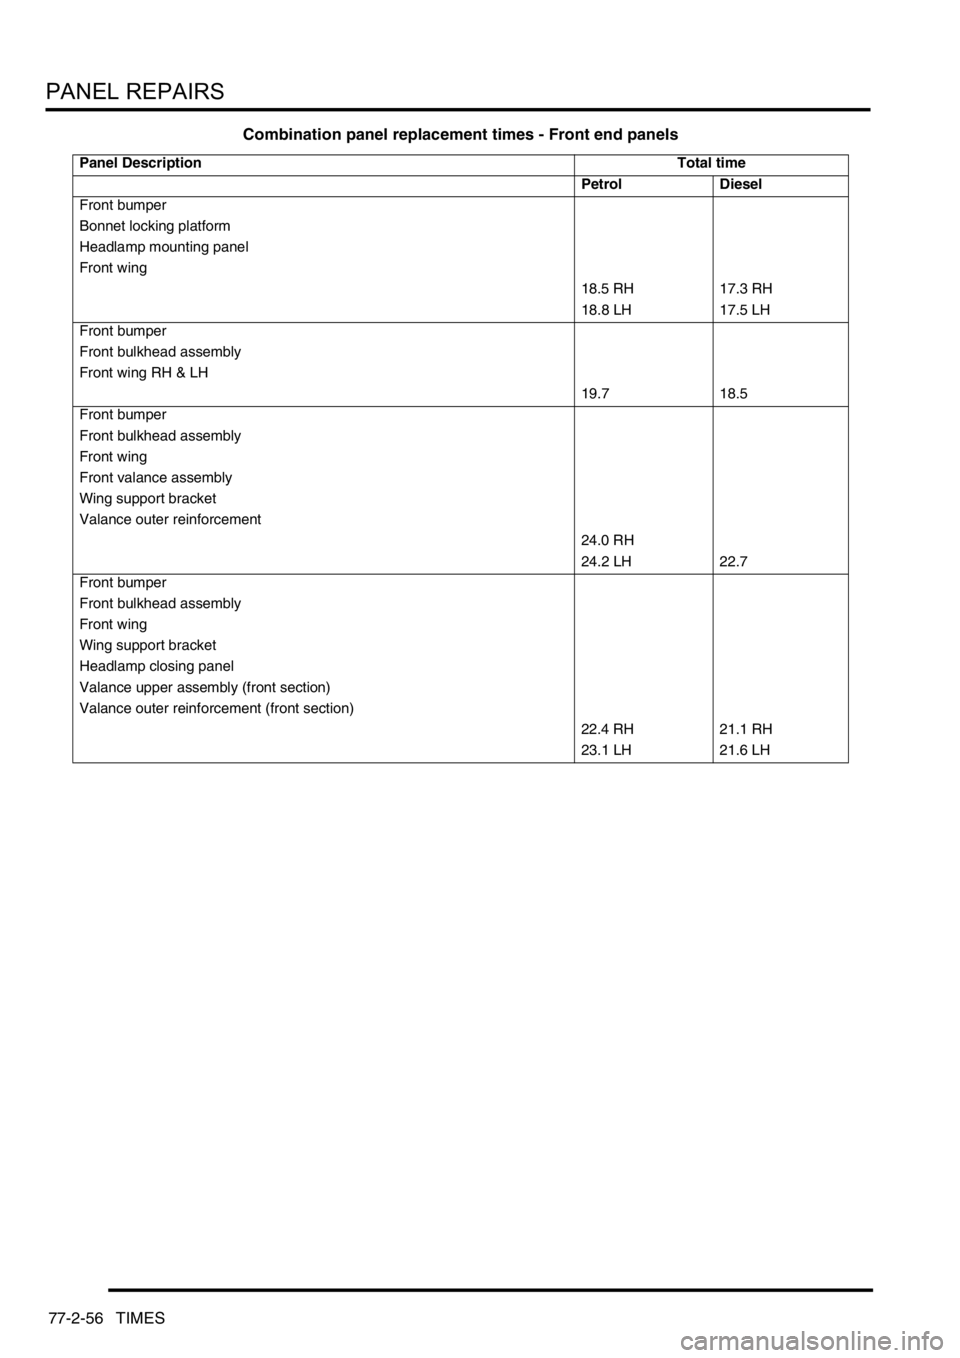
Combination panel replacement times - Front end panels
Panel DescriptionTotal time
Petrol Diesel
Front bumper
Bonnet locking platform
Headlamp mounting panel
Front wing
18.5 RH 17.3 RH
18.8 LH 17.5 LH
Front bumper
Front bulkhead assembly
Front wing RH & LH
19.7 18.5
Front bumper
Front bulkhead assembly
Front wing
Front valance assembly
Wing support bracket
Valance outer reinforcement
24.0 RH
24.2 LH 22.7
Front bumper
Front bulkhead assembly
Front wing
Wing support bracket
Headlamp closing panel
Valance upper assembly (front section)
Valance outer reinforcement (front section)
22.4 RH 21.1 RH
23.1 LH 21.6 LH