1999 LAND ROVER DISCOVERY rear entertainment
[x] Cancel search: rear entertainmentPage 1376 of 1529

IN CAR ENTERTAINMENT
DESCRIPTION AND OPERATION 86-6-9
Inputs and outputs
The radio cassette player receives a mute signal from the telephone system if a call is received, when the call finishes
the mute is removed and the system resumes play. Inputs are also received from the steering wheel control system
(mid line and high line sytems). When the system is turned on, the high line systems radio cassette player:
lsends a 'power on enable' to the power amplifier
lsends an 'enable' signal to the radio headphone amplifiers.
On the high line system the radio cassette player also sends and receives signals from the CD-autochanger and rear
headphone amplifiers (if fitted). On high line systems the radio cassette player sends audio signals to the power
amplifier.
Remote radio steering wheel controls (midline and high line systems)
The remote radio control switch is located on the LH side of the steering wheel and is secured with two screws. The
wiring from the remote radio control switch plugs in to a connector that is part of the steering wheel rotary coupler.
Operation of the remote radio control switches allow the driver to control the ICE without releasing the steering wheel.
Volume, mode and selection functions can be carried out using the steering wheel mounted control switches. Control
inputs from the remote radio control switches are sent to the radio cassette player.
C0098
1 Telephone mute Input
2 Steering wheel remote radio controls Input
3 Steering wheel remote radio controls Output
4 Permanent battery feed Input
5 System enable Output
6 Illumination Input
7 Auxilary feed Input
8 Earth Input
C0921 (high line systems)
1 Radio headphone left channel Output +
2 Radio headphone right channel Output +
3 Telephone audio Input +
4 Radio headphone left channel Output -
5 Radio headphone right channel Output -
6 Telephone audio Input -
C0922 (high line systems)
7 Radio headphone active Input
8 I-BUS communications Input/Output
9 Audio amplifier spatial imaging enable Output
10 Radio headphone LH remote control Input
11 Radio headphone RH remote control Input
12 Headphone remote controls feed Output
C1354 (high line systems)
13 CD-autochanger audio left channel Input +
14 CD-autochanger audio right channel Input +
15 CD-autochanger audio earth Output
16 CD-autochanger audio left channel Input -
17 CD-autochanger audio right channel Input -
18 Not Used
19 CD-autochanger I-BUS communications link Input/Output
20 CD-autochanger permanent feed Output
Page 1377 of 1529

IN CAR ENTERTAINMENT
86-6-10 DESCRIPTION AND OPERATION
Aerial
On base and midline ICE systems an AM/FM aerial is built-in to the side window glass on the RH side of the vehicle.
An amplifier is located on the frame above the rear side widow behind the rear quarter trim, and is secured (and
earthed) with one bolt. Coaxial leads connect the aerial to the aerial amplifier and radio cassette. Power is supplied
from the auxilary relay in the engine compartment fuse box, through a fuse in the passenger compartment fusebox to
the amplifier.
On high line ICE systems two amplified aerials are built-in to the side window glass of the vehicle. The two aerials are
an AM/FM aerial on the RH side, and an FM aerial on the LH side. The amplifier for each aerial are located on the
frame above each rear side widow behind the rear quarter trim, and are each secured (and earthed) with one bolt.
Amplified aerials improve the reception quality, the FM aerial gives improved reception in areas of poor signal
(diversity) conditions in urban areas. A Power feed from the radio cassette player is connected to the amplified aerials,
power is available when the cassette player is operating. The aerials are connected to the radio cassette player by
two coaxial cables, a small plug connects the FM only aerial, a larger plug connects the AM/FM aerial.
Power amplifier (high line system)
The amplifier is located on a bracket under the LH front seat and is secured with three screws and washers. The
amplifier receives inputs from the radio, radio cassette player or (via the radio cassette player) the CD-autochanger.
Power for the amplifier is supplied from the passenger compartment fuse box. The amplifier will power up when an
enable logic signal is sent from the radio cassette, this signal is sent by the radio cassette when it is turned on.
CD-autochanger (high line system)
A CD-autochanger is located under the RH front seat, the unit is secured to brackets in the floor with four screws and
washers. A tray is used to hold each compact disk (CD), the loaded tray is then inserted in a magazine, the magazine
holds six trays and is then inserted into the CD-autochanger. A sliding cover protects the internal components of the
CD-autochanger from dirt entry through the magazine opening. An eject button located on the front of the CD-
autochanger can be used to release the magazine from the CD-autochanger. The sliding cover has to be opened
manually before the magazine eject button is pressed. The operation of the CD-autochanger is controlled by inputs
from the radio cassette, the control inputs can be from the radio cassette buttons, the remote radio controls or the rear
radio headphone amplifiers if they are fitted. The output from the CD-autochanger are connected to the radio cassette
player. The radio cassette player sends the outputs to the power amplifier. Power is supplied to the CD-autochanger
by a feed from the radio cassette player.
Radio headphone amplifiers (high line system)
The rear mounted radio headphone amplifiers are located in the lower rear quarter trim casing and are held in position
by a clip on the side of the headphone amplifier. Mode and function buttons are located on a control panel, the mode
button allows each of the rear seat passengers to independently select from the radio, tape or CD-autochanger. The
driver and the rear seat passengers can each listen to any of the audio devices they select. However the radio
cassette setting has overall priority e.g:
lIf the radio cassette is using a radio wave band (AM or FM), the headphone user will be able to select the cassette
tracks or CD-autochanger. The user will be able to listen to same radio band that is selected on the radio
cassette, but will not be able to change the station selected.
lIf the radio cassette has CD-autochanger selected, the headphone amplifiers will allow listening to the compact
disk but will not allow track changes. The headphone user will be able to select on all of the radio bands or
cassette tracks.
lIf the radio cassette has tape selected, the headphone amplifiers will allow listening to the tape but will not allow
track changes. The headphone user will be able to select all radio bands or CD's on the CD-autochanger.
If one headphone amplifier unit has control of the tape player, CD or radio, the other headphone amplifier will be able
to listen and be able to change tape tracks or radio bands. Other buttons allow a search seek function of radio band
or compact disk track, reversal of the tape, radio station and volume adjustment depending on the current operating
mode. If one radio headphone amplifier has control of the radio, tape or CD autochanger the other radio headphone
amplifier is able to change the track or radio band selected. A headphone socket with a glow ring is located on the
control panel. When a headphone is turned on , a 'headphone-module active' signal is sent to the radio cassette
player. The design incorporates panel illumination and a glow-ring to locate the socket in low light conditions. To
control the audio output from the radio headphone amplifiers, signals are sent to and received from the radio cassette
player.
Page 1378 of 1529

IN CAR ENTERTAINMENT
DESCRIPTION AND OPERATION 86-6-11
Automatic volume control (High line system only)
An automatic base and treble volume control feature compensates for increases in interior road/transmission noise.
A road speed signal is monitored by the power amplifier, the signal is supplied by the SLABS ECU.
+ BRAKES, DESCRIPTION AND OPERATION, Description.The power amplifier boosts the levels of base
and treble as road speed increases. This system ensures that the apparent volume of sound remains constant and is
not affected by increases in the background noise in the vehicle.
Speakers
Some vehicles will not have all the speakers, the type and location of speakers fitted depends on the trim level and
ICE options specified for the vehicle.
A-post speakers LH/RH (if fitted)
The A-post speakers are located in the A-post trim on each side of the windscreen, and are each protected by a metal
grille. The speakers are held from the rear by a bayonet clip that clamps the speaker on to the A-post trim. The A-post
speakers are a high range type and have a power rating of:
lMid line system A-post speakers have a power rating of 15 watts and an impedance of 4 Ω.
lHigh line system A-post speakers have a power rating of 30 watts and an impedance of 4 Ω.
Upper front and rear door speakers LH/RH (high line system only)
The upper door speakers are located in the upper door trim, the speaker is protected by an integral metal grille. The
speaker is held in by a threaded ring that clamps the speaker from the rear onto the door trim. The upper door speaker
is a mid-range type and has a power rating of 30 watts and an impedance of 4 Ω.
Lower front door speakers LH/RH
The lower front door speaker is located in the front end of the lower (pocket) trim and is secured by three self tapping
screws. The speaker is protected by a clip on circular metal grille. The type of lower front door speakers fitted depends
on trim level and market:
lThe base and mid line systems are fitted with full-range door speakers with a power rating of 15 watts and an
impedance of 4 Ω
lThe high line system is fitted with a low-range door speaker with a power rating of 30 watts and an impedance
of 4 Ω.
Lower rear door speaker LH/RH
The lower rear door speaker is located in the lower door trim and is secured by three self tapping screws. The speaker
is protected by a clip on metal grille. The type of lower rear door speaker fitted depends on trim level and market:
lThe base and mid line systems are fitted with full-range door speakers with a power rating of 15 watts and an
impedance of 4 Ω
lThe high line system is fitted with a low-range door speaker with a power rating of 30 watts and an impedance
of 4 Ω.
Low range tail door speakers (high line system only)
The low range tail door speaker are located in a plastic casing in the lower door trim. Each of the two speakers is
secured to the casing with four self tapping screws. The casing is secured to the lower door structure with eight bolts.
The tail door trim surrounds the casing, the front of the casing is covered by a metal grill that is secured with six
screws. The low range tail door speakers have a power rating of 30 watts and has an impedance of 4 Ω.
DESCRIPTION AND OPERAT ION
Page 1383 of 1529

IN CAR ENTERTAINMENT
86-6-16 DESCRIPTION AND OPERATION
Description
General
The DVD entertainment system can be fitted by Land Rover Special Vehicles as an original equipment system on the
Adventurer model or can be supplied as an accessory for fitment by the dealer. The system can be fitted to all
Discovery Series II models.
NOTE: The DVD system cannot be fitted to vehicles fitted with a Visteon single slot CD head unit.
The fitment of the system to vehicles manufactured before 2002 model year requires a different wiring harness and
connector plugs to vehicles from 2002 model year. Full details of components required for specific vehicles is
contained in the DVD System Accessory fitting instructions (Part No. STC 61947/61946).
The system comprises a main wiring harness, a lower wiring harness, CD switch box with integral noise filter, CD
switch harness, remote control handset and an overhead console containing the Liquid Crystal Display (LCD) monitor
and Digital Versatile Disc (DVD) player.
The system can play DVD films and display them on the LCD screen. The DVD audio can be played over the vehicle
audio speaker system or on headphones connected directly to the overhead console. The system can also function
as a second CD player. Rear seat occupants can listen to a CD in the overhead console via headphones, whilst the
remaining vehicle occupants can listen to CD's played from the CD autochanger in the normal way.
Page 1384 of 1529

IN CAR ENTERTAINMENT
DESCRIPTION AND OPERATION 86-6-17
Overhead Console Unit
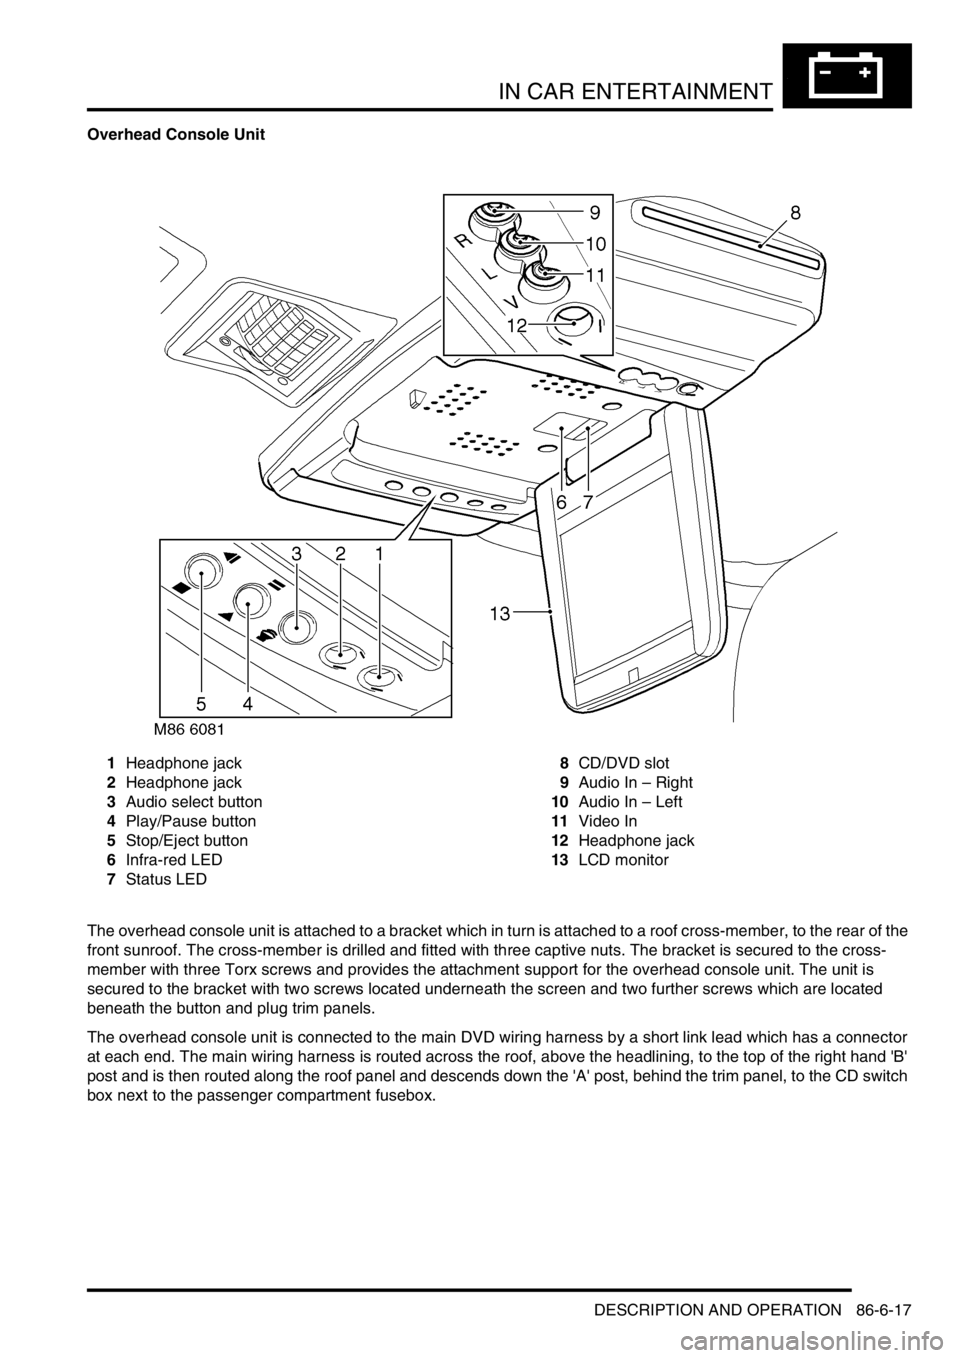
1Headphone jack
2Headphone jack
3Audio select button
4Play/Pause button
5Stop/Eject button
6Infra-red LED
7Status LED8CD/DVD slot
9Audio In – Right
10Audio In – Left
11Video In
12Headphone jack
13LCD monitor
The overhead console unit is attached to a bracket which in turn is attached to a roof cross-member, to the rear of the
front sunroof. The cross-member is drilled and fitted with three captive nuts. The bracket is secured to the cross-
member with three Torx screws and provides the attachment support for the overhead console unit. The unit is
secured to the bracket with two screws located underneath the screen and two further screws which are located
beneath the button and plug trim panels.
The overhead console unit is connected to the main DVD wiring harness by a short link lead which has a connector
at each end. The main wiring harness is routed across the roof, above the headlining, to the top of the right hand 'B'
post and is then routed along the roof panel and descends down the 'A' post, behind the trim panel, to the CD switch
box next to the passenger compartment fusebox.
Page 1387 of 1529

IN CAR ENTERTAINMENT
86-6-20 DESCRIPTION AND OPERATION
Remote Control Handset
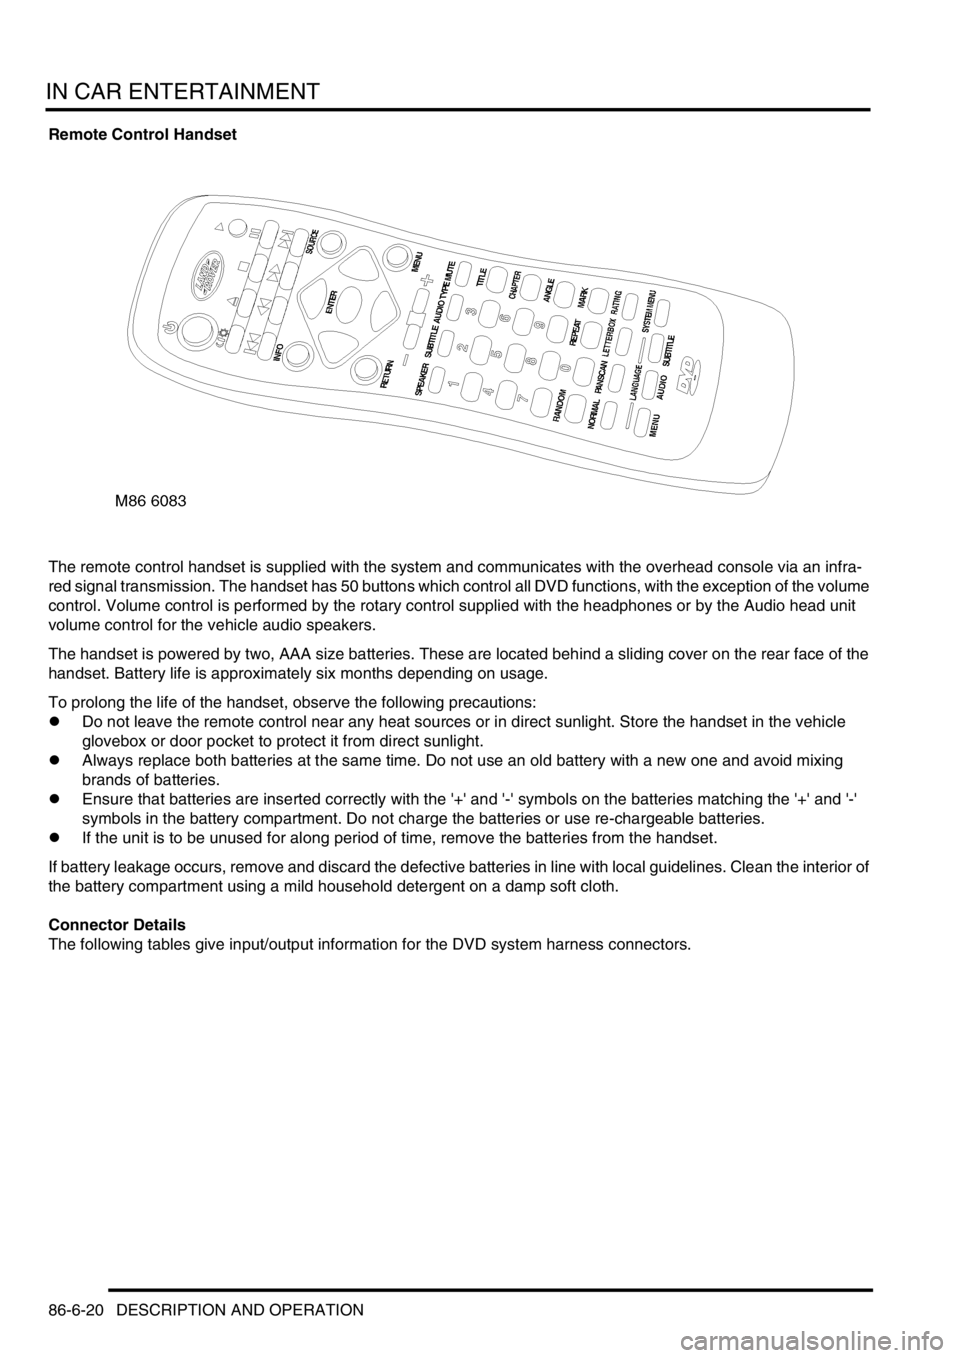
The remote control handset is supplied with the system and communicates with the overhead console via an infra-
red signal transmission. The handset has 50 buttons which control all DVD functions, with the exception of the volume
control. Volume control is performed by the rotary control supplied with the headphones or by the Audio head unit
volume control for the vehicle audio speakers.
The handset is powered by two, AAA size batteries. These are located behind a sliding cover on the rear face of the
handset. Battery life is approximately six months depending on usage.
To prolong the life of the handset, observe the following precautions:
lDo not leave the remote control near any heat sources or in direct sunlight. Store the handset in the vehicle
glovebox or door pocket to protect it from direct sunlight.
lAlways replace both batteries at the same time. Do not use an old battery with a new one and avoid mixing
brands of batteries.
lEnsure that batteries are inserted correctly with the '+' and '-' symbols on the batteries matching the '+' and '-'
symbols in the battery compartment. Do not charge the batteries or use re-chargeable batteries.
lIf the unit is to be unused for along period of time, remove the batteries from the handset.
If battery leakage occurs, remove and discard the defective batteries in line with local guidelines. Clean the interior of
the battery compartment using a mild household detergent on a damp soft cloth.
Connector Details
The following tables give input/output information for the DVD system harness connectors.
Page 1394 of 1529

IN CAR ENTERTAINMENT
DESCRIPTION AND OPERATION 86-6-27
Operation
DVD Player Functionality
The following defines the functionality of the unit. Further details of system operation can found in the DVD System
Owner's Manual, Publication Part No. LRL0482, supplied with the system.
DVD Region Selection
The DVD player is capable of playing discs from any region. The DVD can only be set to play discs of one region at
a time. A code is entered using the remote control handset to set the unit to the required region. The unit is set to the
correct region on production and therefore this will not be required by either the dealer or the customer.
If the unit region is required to be changed for any reason, Land Rover Special Vehicles must be contacted for the
required code and procedure.
NOTE: The unit can be re-configured for region up to five times. After the fifth attempt to re-configure the region, the
unit will be locked in the fifth region that was programmed. This will require the unit to be returned to the manufacturer
to be reset. The manufacturer will charge a fee for this service.
DVD Player CD Audio Function
The DVD player can play audio CD's through the vehicle audio system. This allows the user to play additional CD's
without having to remove the CD autochanger cartridge.
The overhead console LCD monitor must be open to play audio CD's.. Normal audio CD functionality such as repeat,
random and track select etc. can be accessed using the remote control handset.
The DVD player in the overhead console will also function independently of the vehicle audio system, and operate as
an additional CD player. The rear seat passengers can listen to audio CD's via the three headphone sockets on the
overhead console and via the two radio/headphone amplifier units (if fitted), while the front seat passengers
simultaneously listen to CD's played on the vehicle audio system and CD autochanger.
DVD/CD Output using the Vehicle Audio System
To play the DVD/CD audio output from the overhead console through the vehicle audio speakers, the speaker button
on the overhead console or remote control handset must be pressed. 'Speaker On' appears on the LCD monitor and
the head unit CD functionality is suspended. The audio output from the overhead console will now be played from the
vehicle speaker system. The head unit volume control, tone control, Navigation announcements and mobile phone (if
fitted) will function as normal and override the DVD output. A second press of the speaker button will switch the audio
output back to the head unit. 'Speaker Off' will be displayed on the LCD monitor.
The overhead console will remember the selected speaker condition if the overhead console is switched off by closing
the monitor, the console switched off using the handset or accessory power removed from the overhead console.
Power Up Conditions
On application of accessory power, the overhead console will perform the following:
lIf no disc is in the DVD player, the LCD monitor will display a blue screen and enter 'AUX' input mode.
When a DVD or CD is inserted in the DVD player, the system will change to DVD input mode. The disc will
attempt to play but may be limited by the disc media. Some discs will play automatically, some will display a menu
and others require the user to start playback.
lIf a disc was in the DVD player and the system was in 'Play', 'Pause', 'FF' or 'Rew' when powered down, playback
will start when power is re-applied.
lIf a disc was in the DVD player and the system was in 'Stop' when powered down, the system will enter DVD
mode and a blue screen will be displayed on the LCD monitor.
lSpeaker selection will remain in the same state as when the accessory power was removed.
Engine Cranking
If the unit is playing a DVD or CD when the ignition switch is moved to position III (engine crank), the system will stop
playing while the engine is cranking. Playback will resume at the point the playback was stopped when the ignition
switch is returned to position I or II.
Page 1399 of 1529

IN CAR ENTERTAINMENT
86-6-32 REPAIRS
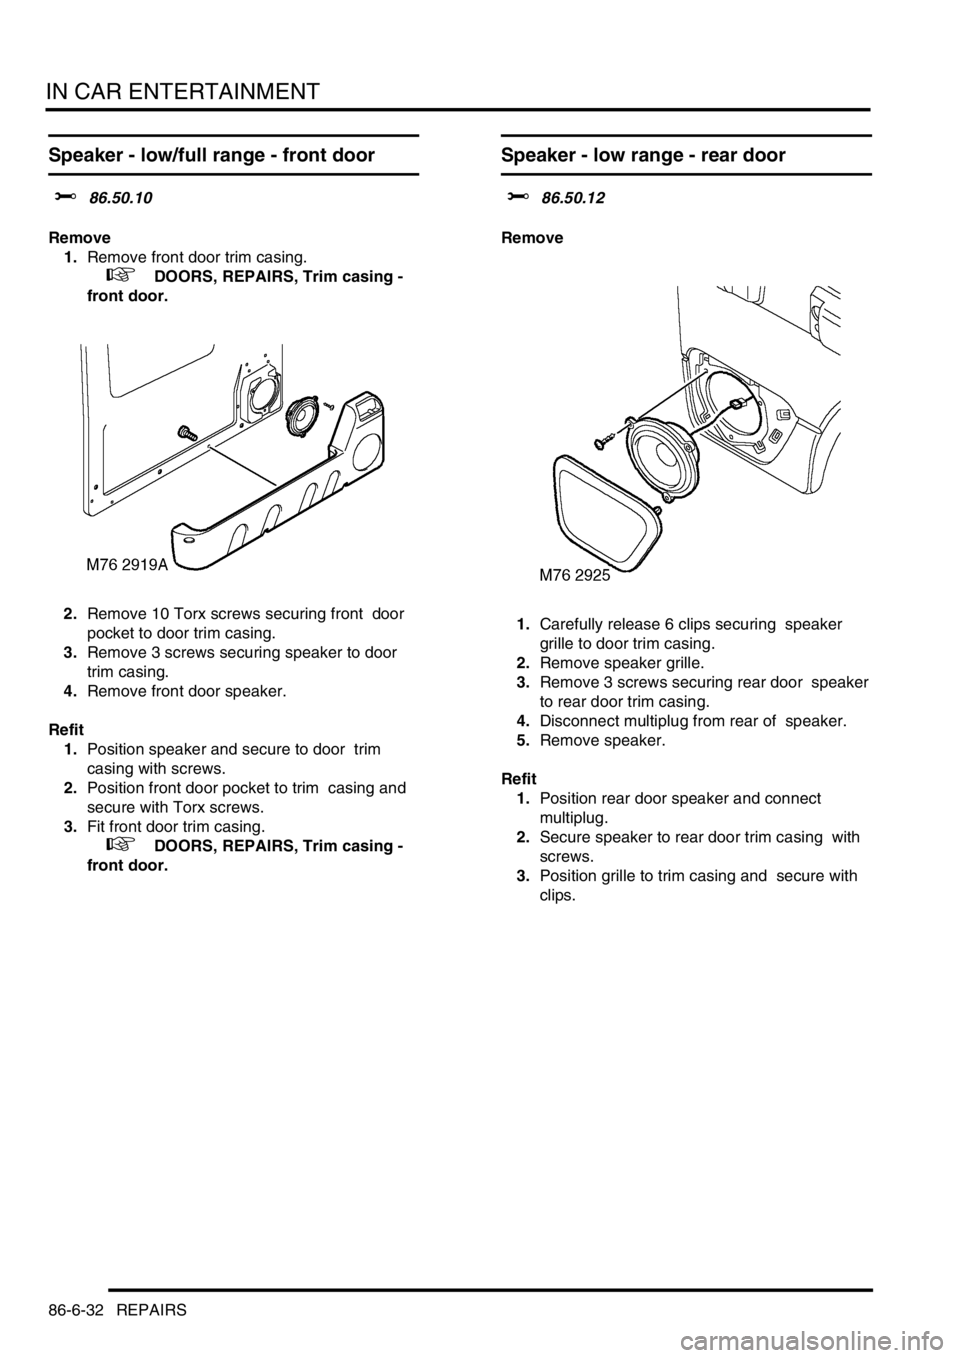
Speaker - low/full range - front door
$% 86.50.10
Remove
1.Remove front door trim casing.
+ DOORS, REPAIRS, Trim casing -
front door.
2.Remove 10 Torx screws securing front door
pocket to door trim casing.
3.Remove 3 screws securing speaker to door
trim casing.
4.Remove front door speaker.
Refit
1.Position speaker and secure to door trim
casing with screws.
2.Position front door pocket to trim casing and
secure with Torx screws.
3.Fit front door trim casing.
+ DOORS, REPAIRS, Trim casing -
front door.
Speaker - low range - rear door
$% 86.50.12
Remove
1.Carefully release 6 clips securing speaker
grille to door trim casing.
2.Remove speaker grille.
3.Remove 3 screws securing rear door speaker
to rear door trim casing.
4.Disconnect multiplug from rear of speaker.
5.Remove speaker.
Refit
1.Position rear door speaker and connect
multiplug.
2.Secure speaker to rear door trim casing with
screws.
3.Position grille to trim casing and secure with
clips.