1999 LAND ROVER DISCOVERY steering
[x] Cancel search: steeringPage 1261 of 1529

WIPERS AND WASHERS
84-26 REPAIRS
Switch - wiper and washer - windscreen
$% 84.15.34
WARNING: It is imperative that before any work
is undertaken on the SRS system the appropriate
information is read thoroughly.
Remove
1.Remove rotary coupler.
+ RESTRAINT SYSTEMS, REPAIRS,
Rotary coupler.
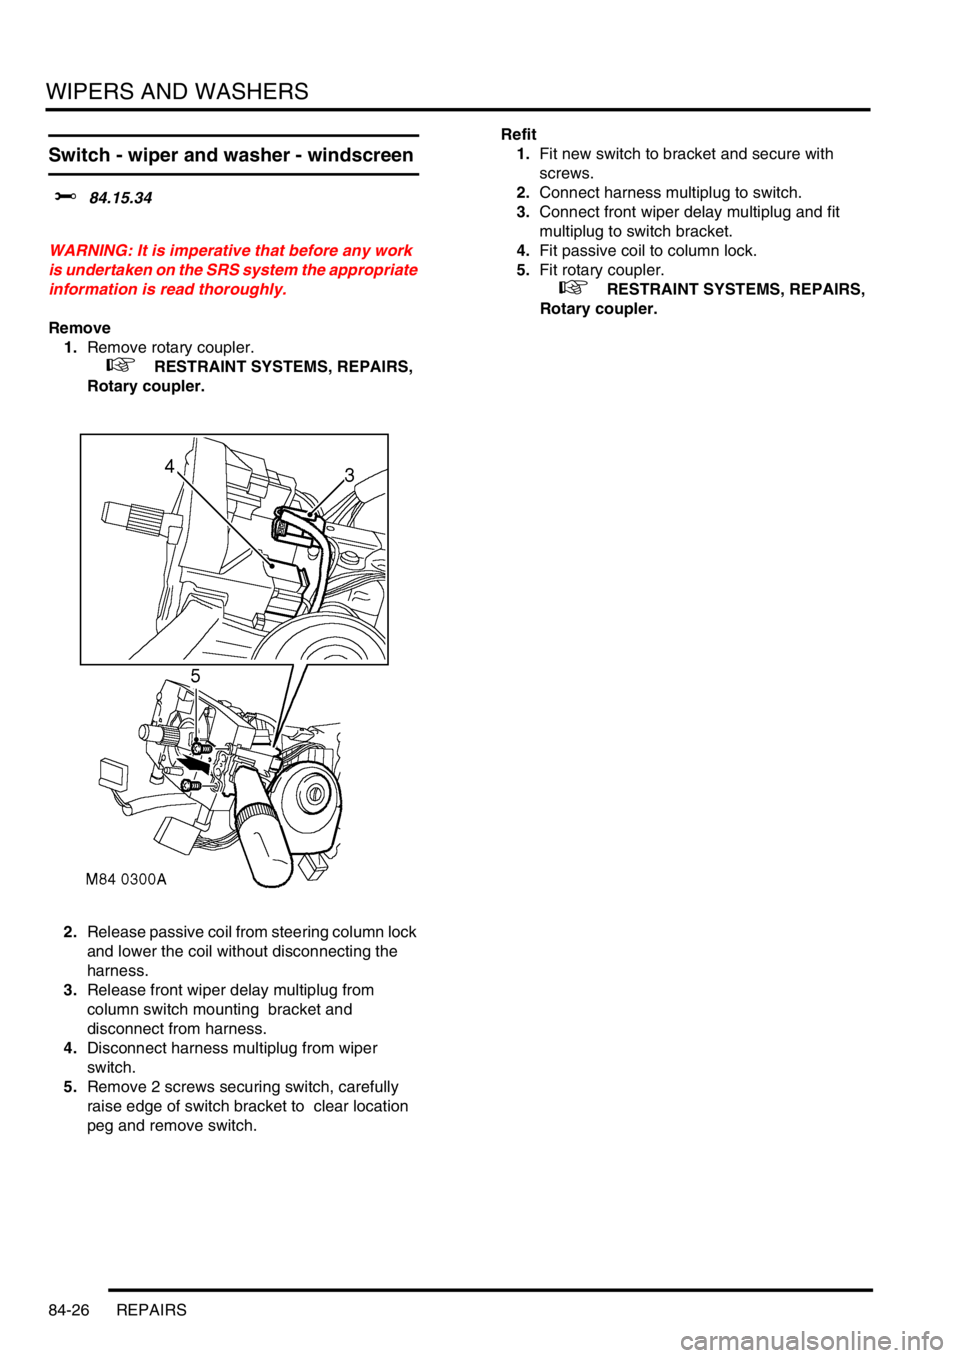
2.Release passive coil from steering column lock
and lower the coil without disconnecting the
harness.
3.Release front wiper delay multiplug from
column switch mounting bracket and
disconnect from harness.
4.Disconnect harness multiplug from wiper
switch.
5.Remove 2 screws securing switch, carefully
raise edge of switch bracket to clear location
peg and remove switch. Refit
1.Fit new switch to bracket and secure with
screws.
2.Connect harness multiplug to switch.
3.Connect front wiper delay multiplug and fit
multiplug to switch bracket.
4.Fit passive coil to column lock.
5.Fit rotary coupler.
+ RESTRAINT SYSTEMS, REPAIRS,
Rotary coupler.
Page 1288 of 1529

BODY CONTROL UNIT
DESCRIPTION AND OPERATION 86-3-1
BODY CONTROL UNIT DESCRIPTION AND OPERAT ION
Description
General
The Body Control Unit (BCU) is located behind the passenger glovebox and is connected to the main harness by four
connectors on its bottom edge and an additional connector located on the side of the BCU casing. Mounting the BCU
behind the fascia makes it reasonably inaccessible for intruders to disable the anti-theft system.
The BCU uses solid-state microprocessor control to perform logical operations and timing functions for a variety of
the vehicle's electrically operated systems, these include:
lDoor locking.
lAnti-theft alarm and immobilisation system.
lExterior lighting including direction indicators and hazard warning lamps.
lCourtesy lighting.
lWipers and washers.
lElectric windows and sunroof.
lHeated windows.
The BCU also communicates with several other electronically controlled systems such as the EAT ECU and SLABS
ECU and also has a datalink between the Intelligent Driver Module (IDM) and the instrument pack. The datalink is a
low speed bus capable of transmitting and receiving messages at a data rate of 10,400 bits per second. Additional
inputs and outputs to peripheral devices are included which are necessary for determining vehicle status for particular
logical operations e.g. crank, ignition key inserted, fuel flap enable etc.
The BCU receives its power supply from the engine compartment fuse box, and is protected by a 10 A fuse.
The BCU communicates with the IDM to provide the control signals to perform power switching operations in
conjunction with dedicated relays.
IDM
The IDM is integrated into the passenger compartment fuse box, which is mounted behind the fascia below the
steering column. There are no harnesses between the fuse box and the IDM. The IDM performs the power switching
operations for several of the vehicle's electrical systems.
The IDM communicates with the BCU and the instrument pack via a serial interface. If the BCU or the IDM is replaced,
the communications link between the two units has to be re-established. This can be done either by switching on the
ignition and leaving it on for five minutes, or by using TestBook. The vehicle immobilisation will remain active until the
communications link between the BCU and IDM has been re-established.
Transit mode
To prevent excessive battery drain during transit to overseas markets, the vehicle is placed in a transit mode. The
following functions are disabled when the vehicle is in transit mode:
lVolumetric sensors.
lPassive immobilisation.
lImmobilisation of the vehicle by use of door lock.
lIgnition key interlock.
lElectric seat enable time-out with driver's door open.
Page 1301 of 1529

BODY CONTROL UNIT
86-3-14 DESCRIPTION AND OPERATION
Central Door Locking (CDL)
The BCU carries out the logic control operation for CDL. A CDL switch is mounted on the fascia panel and has two
inputs to the BCU, one for lock and one for unlock.
Door locking and unlocking can be performed using the remote transmitter in the keys and the receiver unit located
above the vehicle's headlining, behind the rear sunroof aperture. The receiver detects the signals sent from the
remote transmitter and sends a decoded signal to the BCU for processing.
Four methods of door locking are available:
lRemote handset locking.
lVehicle key locking.
lCDL switch locking.
lSpeed related locking.
Two security levels of door locking are available, CDL and Superlocking. The anti-theft alarm system works in
conjunction with the CDL system.
Electric windows and sunroof
The BCU controls the logical operations and the timing periods for the electric front windows. The rear windows are
hard-wired and the two electric sunroofs are controlled by a dedicated ECU which is enabled by the BCU.
The front windows are electrically operated using two rocker switches located in the centre console. Electric motors
are located in each of the front doors.
The rear windows are enabled by the IDM controlling the operation of the rear window relay located in the passenger
compartment fuse box.
Wipers and washers
The wiper and washer functions are controlled by the BCU and the IDM.
The front wipers and washers are operated from the switch stalk located on the right hand side of the steering column
and only operate when the ignition switch is in position I or II. The front wipers are operated by a motor located below
the windscreen plenum.
+ WIPERS AND WASHERS, DESCRIPTION AND OPERATION, Description.
The BCU controls the wiper motor frequency of operation via the IDM when intermittent wipe or wash is selected. The
front intermittent wipe option features five different intermittent delay periods. The shortest delay period is 3 seconds
and this is increased by 2 second increments up to a maximum delay of 11 seconds. The desired delay period for the
front wipers is set by the position of the rotary switch located on the wiper column stalk.
The rear wiper switch is located on the instrument pack cowl and is latched when pressed. The rear wiper electric
motor is located in the tail door. The rear wiper operation is controlled according to a programmed strategy via the
BCU and the IDM. The BCU also checks for a signal from either the reverse lamp switch located in the vehicle gearbox
(manual gearbox models) or the gear position switch (automatic gearbox models) for operating the rear wipers when
the vehicle is in reverse. The rear wiper and washer only operate when the ignition switch is in position II.
The front and rear washer pumps and the headlamp powerwash (where fitted) are also controlled through the BCU.
The washers are operated from electric pumps attached to the washer reservoir located in the left hand wheel arch.
The front wash switch is located on the wiper column stalk and is pulled towards the steering wheel to select the
washer function. When the front washers are operated, the wipers are also activated for three full cycles. The rear
wash switch is located on the instrument pack cowl. The BCU programme can be configured in one of two modes of
operation:
lNo wiper operation when the wash switch is pressed.
lWiper action after an initial delay of 400 ms.
Headlamp wash is activated by the BCU via the IDM and operates when the headlamps are on and the front washers
function is selected.
Page 1302 of 1529

BODY CONTROL UNIT
DESCRIPTION AND OPERATION 86-3-15
Electric seats
The BCU controls the logical operation of the electrically operated front seats. Two modes of operation are available:
+ SEATS, DESCRIPTION AND OPERATION, Description - electric seats.
lElectric seat adjustment is enabled if the ignition is on or the driver's door is opened for a short time period.
lElectric seat adjustment is enabled if the ignition is on and the driver's door is closed.
The seats are operated by four electric motors which control the seat cushion rear up/ down, the seat cushion front
up/ down, seat cushion forward/ rearward and seat squab recline. The electrically powered lumbar adjustment in each
seat is operated by a single motorised air pump and a solenoid located on the seat squab frame. The air pump inflates
a cushion in the seat squab and the solenoid operates a valve to deflate the cushion. The seat squab and cushion
may also contain heater elements to provide heated seat operation.
The switches for electrically operated seats are located either side of the centre console.
Direction indicators and hazard warning lamps
The direction indicator lamps are operated from a three position direction indicator switch on the left hand, steering
column stalk. The BCU only allows the lamps to work as direction indicators when the ignition switch is in position II.
The BCU also controls the lamps to operate as hazard warning lamps and as a visual warning for the anti-theft system,
in which cases all lamps flash simultaneously irrespective of the ignition switch position.
System control of the direction indicators and hazard warning lamps is provided by the BCU operating with the IDM
and two electronic relays located in the passenger compartment fuse box. The IDM and relays are integral parts of
the passenger compartment fuse box and cannot be serviced individually. The serial data bus is used for
communication of status and operation requests between the BCU, IDM and instrument pack.
The hazard warning lamps are operated from a latching pushbutton switch located on the fascia.
All direction indicator/ hazard warning lamp bulbs are rated at 5 Watts.
Headlamps
The BCU contains a feature which allow the vehicle headlamps to be turned on when the remote transmitter is
pressed (courtesy headlamps).
For markets with daylight running lamps, the BCU controls the logical operation of the daylight running lamps. Options
are daylight running lamps are on if the main beam headlamps are off, or the daylight running lamps are on with main
and dipped beam off and the gearbox not in Park.
Front fog lamps
For markets with front fog lamps fitted, the BCU controls the operation of the front fog lamps. Options can be selected
so that the fog lamps will operate with or without the headlamps on main beam.
Instrument pack
The BCU communicates with the instrument pack via a serial data bus.
+ INSTRUMENTS, DESCRIPTION AND OPERATION, Description.
lThe instrument pack provides the BCU and IDM with details of vehicle speed.
lSignals are provided from the IDM to the instrument pack and BCU when the direction indicator lamps are active.
lFor certain markets, the BCU provides a signal to the instrument pack for indicating when the transfer box is in
neutral.
lThe IDM can signal the instrument pack to illuminate a trailer warning lamp. This operates when the IDM senses
that the current drawn by the indicator circuit exceeds a preset threshold.
lThe odometer reading displayed on the instrument pack LCD screen is also stored in non volatile memory in the
BCU. Whenever the ignition is turned from position I to position II, the instrument pack and the BCU compare
their stored values.
lThe gear selector position is displayed on the instrument pack LCD screen under the direction of the BCU.
Starting
The starting system comprises a starter motor and solenoid located at the rear right hand side of the engine. A starter
relay controlled by the BCU is used to supply battery power for starter solenoid operation. The starter motor receives
its feed directly from the battery.
Page 1336 of 1529

ALARM SYSTEM AND HORN
DESCRIPTION AND OPERATION 86-4-13
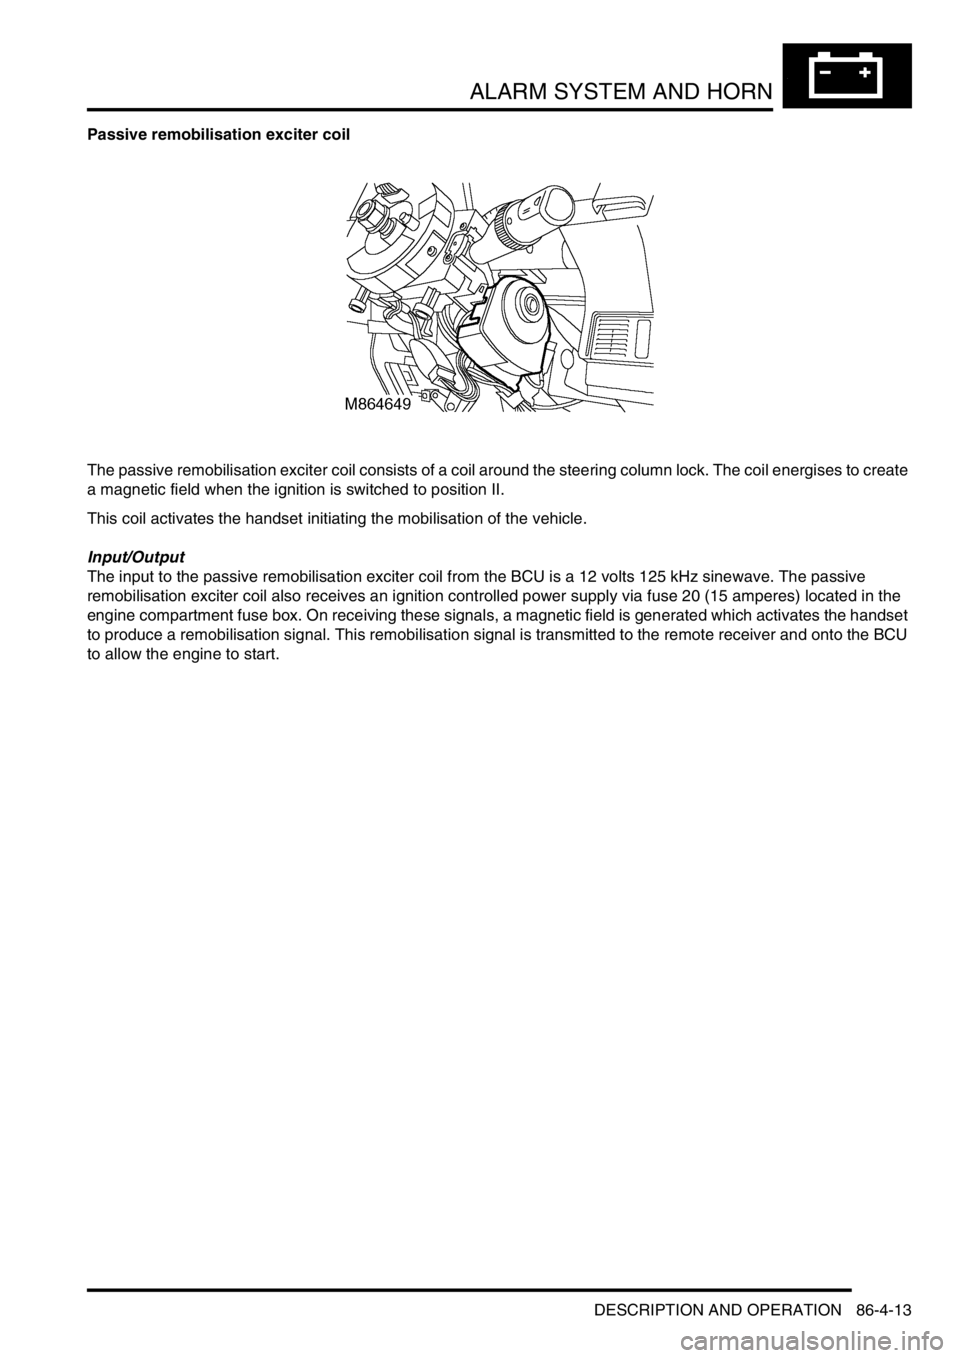
Passive remobilisation exciter coil
The passive remobilisation exciter coil consists of a coil around the steering column lock. The coil energises to create
a magnetic field when the ignition is switched to position II.
This coil activates the handset initiating the mobilisation of the vehicle.
Input/Output
The input to the passive remobilisation exciter coil from the BCU is a 12 volts 125 kHz sinewave. The passive
remobilisation exciter coil also receives an ignition controlled power supply via fuse 20 (15 amperes) located in the
engine compartment fuse box. On receiving these signals, a magnetic field is generated which activates the handset
to produce a remobilisation signal. This remobilisation signal is transmitted to the remote receiver and onto the BCU
to allow the engine to start.
Page 1348 of 1529

ALARM SYSTEM AND HORN
REPAIR 86-4-25
REPAIR
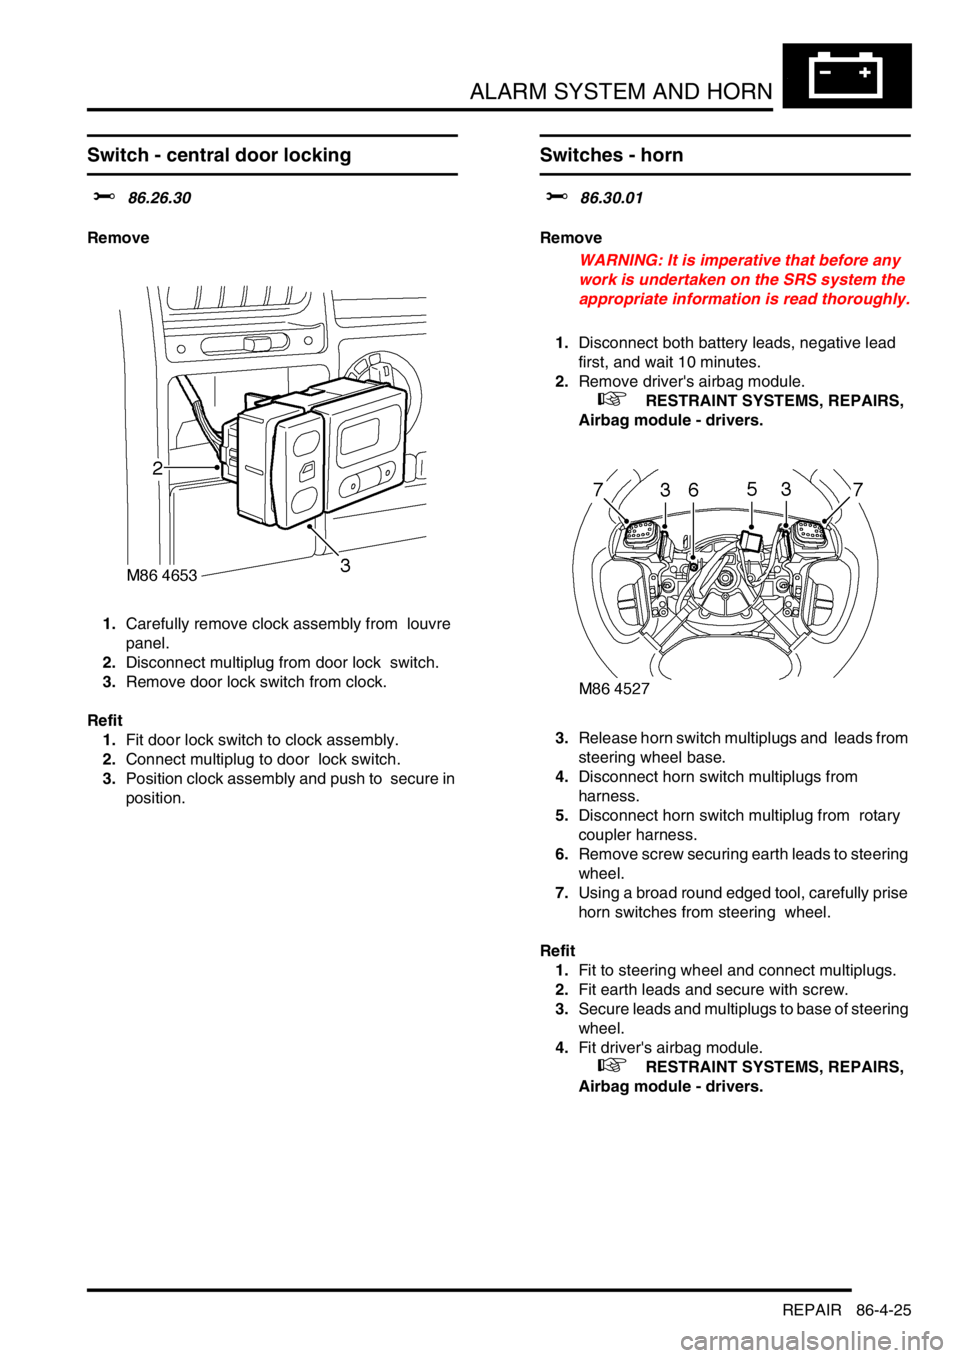
Switch - central door locking
$% 86.26.30
Remove
1.Carefully remove clock assembly from louvre
panel.
2.Disconnect multiplug from door lock switch.
3.Remove door lock switch from clock.
Refit
1.Fit door lock switch to clock assembly.
2.Connect multiplug to door lock switch.
3.Position clock assembly and push to secure in
position.
Switches - horn
$% 86.30.01
Remove
WARNING: It is imperative that before any
work is undertaken on the SRS system the
appropriate information is read thoroughly.
1.Disconnect both battery leads, negative lead
first, and wait 10 minutes.
2.Remove driver's airbag module.
+ RESTRAINT SYSTEMS, REPAIRS,
Airbag module - drivers.
3.Release horn switch multiplugs and leads from
steering wheel base.
4.Disconnect horn switch multiplugs from
harness.
5.Disconnect horn switch multiplug from rotary
coupler harness.
6.Remove screw securing earth leads to steering
wheel.
7.Using a broad round edged tool, carefully prise
horn switches from steering wheel.
Refit
1.Fit to steering wheel and connect multiplugs.
2.Fit earth leads and secure with screw.
3.Secure leads and multiplugs to base of steering
wheel.
4.Fit driver's airbag module.
+ RESTRAINT SYSTEMS, REPAIRS,
Airbag module - drivers.
Page 1352 of 1529

ALARM SYSTEM AND HORN
REPAIR 86-4-29
Coil - passive immobilisation
$% 86.77.35
Remove
1.Remove steering column nacelle.
+ STEERING, REPAIRS, Nacelle -
steering column.
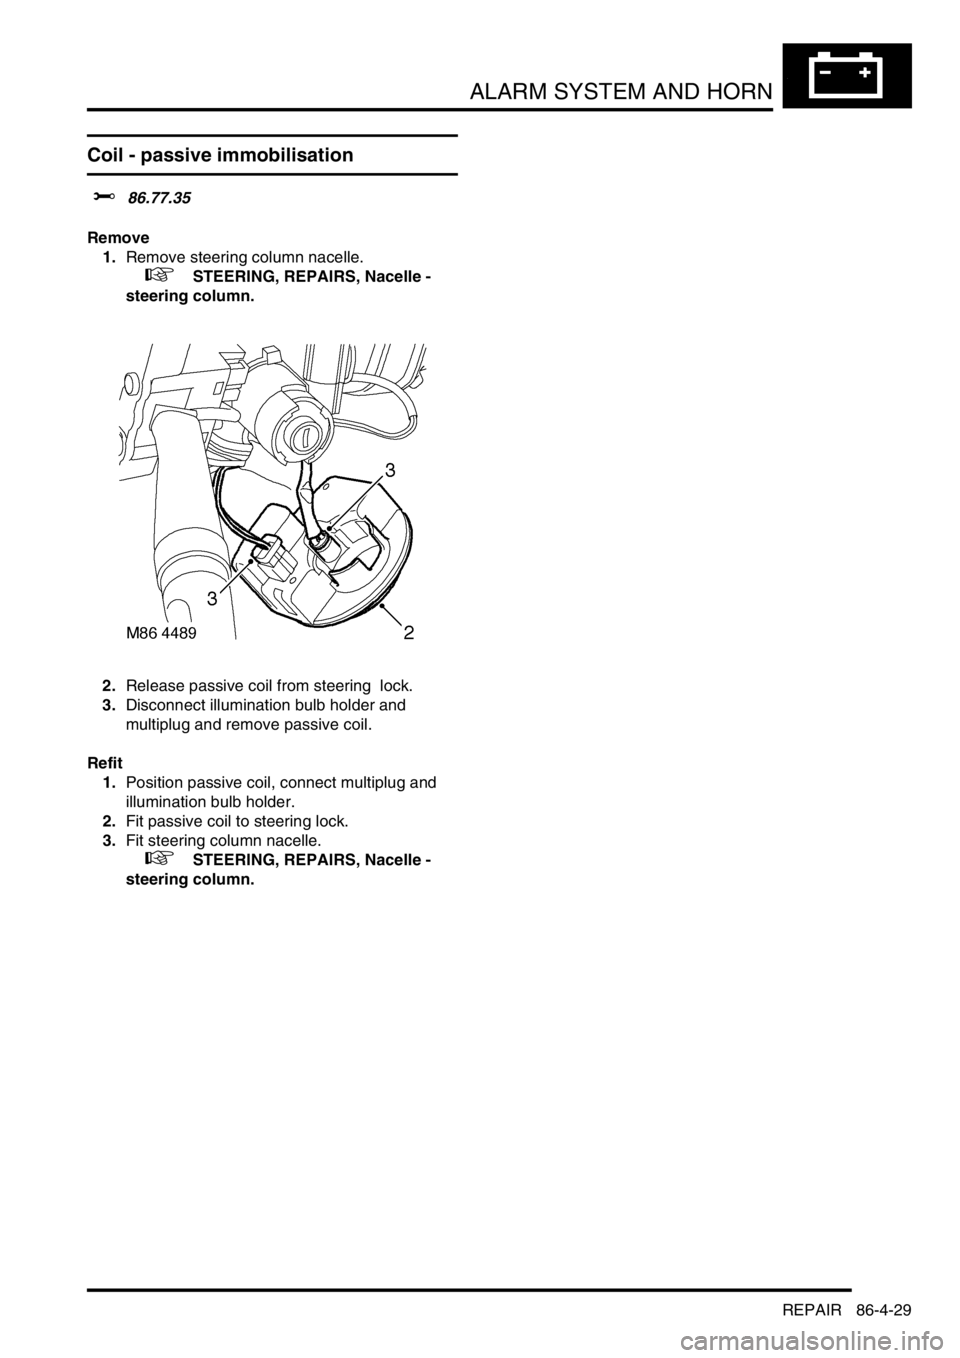
2.Release passive coil from steering lock.
3.Disconnect illumination bulb holder and
multiplug and remove passive coil.
Refit
1.Position passive coil, connect multiplug and
illumination bulb holder.
2.Fit passive coil to steering lock.
3.Fit steering column nacelle.
+ STEERING, REPAIRS, Nacelle -
steering column.
Page 1371 of 1529

IN CAR ENTERTAINMENT
86-6-4 DESCRIPTION AND OPERATION
Description
General
The in car entertainment (ICE) system allows the driver and passengers to listen to audio output from the speakers
or optional headphones inside the vehicle. Buttons or knobs on the radio cassette allow changes of levels or
selections during the various modes of operation. The system can be controlled from the fascia mounted radio
cassette, or optional remote control switches on the left hand side of the steering wheel. High line systems may also
have rear headphone amplifiers that have some control of the system via the radio cassette player.
One or two amplified aerials located in the rear side windows send radio signals to the radio cassette player. On high
line systems a power amplifier and a CD-autochanger may be located under the front seats. Speakers are located in
the lower door panels, additional speakers may be located in upper door trim, the A-post and the tail door. A display
screen shows the user the current system status.
The ICE supplied varies with trim level and market. Vehicles may not have all of the speakers, amplified aerials, CD-
autochanger, rear headphone amplifiers or power amplifier.
Base system radio cassette
The base radio cassette has buttons for LD (loudness) AM, FM, EJECT (tape), Reverse, Base/Balance, treble, MAN
forward and reverse. The base radio cassette is located in the center of the fascia and contains the radio and tape
player, four clips (accessible through holes in the front of the unit) secure the unit in the fascia. To remove the unit
the four clips must be released with a special tool. The base system can be controlled from the fascia mounted radio
cassette. A logic control circuit in the radio cassette player controls the operation in the various control modes.
The radio cassette has a display screen, the information shown can be the current radio frequency, tape operating,
bass or loudness settings. Power for the illumination on the radio cassette is supplied from the passenger
compartment fuse box. A main fuse is also located in the connector socket area on the back of the radio cassette.
Security code function
A combination of buttons on the radio cassette are used to input and change security codes. Security codes make the
unit unusable if the unit is disconnected from the vehicle without deactivating the security code. The radio cassette
has an internal memory chip that stores the code information, if the power is removed from the unit the chip will
activate the security code feature. For this reason the security code feature must be deactivated before the unit is
removed or the vehicles battery is disconnected.
Audio functions
The radio cassette has buttons for the following audio functions: LD (loudness), bass/balance, fader, treble and
volume.
Cassette functions
The radio cassette has buttons for the following cassette functions: eject, forward, reverse and tape reversal.
Multi function buttons
The function of presets 1-6 and the MAN button depends on current mode of operation and allows selection of radio
band, radio on, tape track and search/seek functions. The MAN button is mode dependent, when pressed the button
allows manual operation or alternate mode selections such as manual tuning.
Internal memory
An internal memory chip stores the station presets and security code, power is supplied internally to the chip via a
permanent power feed, supplied from the passenger compartment fuse box.