1999 LAND ROVER DISCOVERY steering
[x] Cancel search: steeringPage 1432 of 1529

HARNESSES
REPAIRS 86-7-27
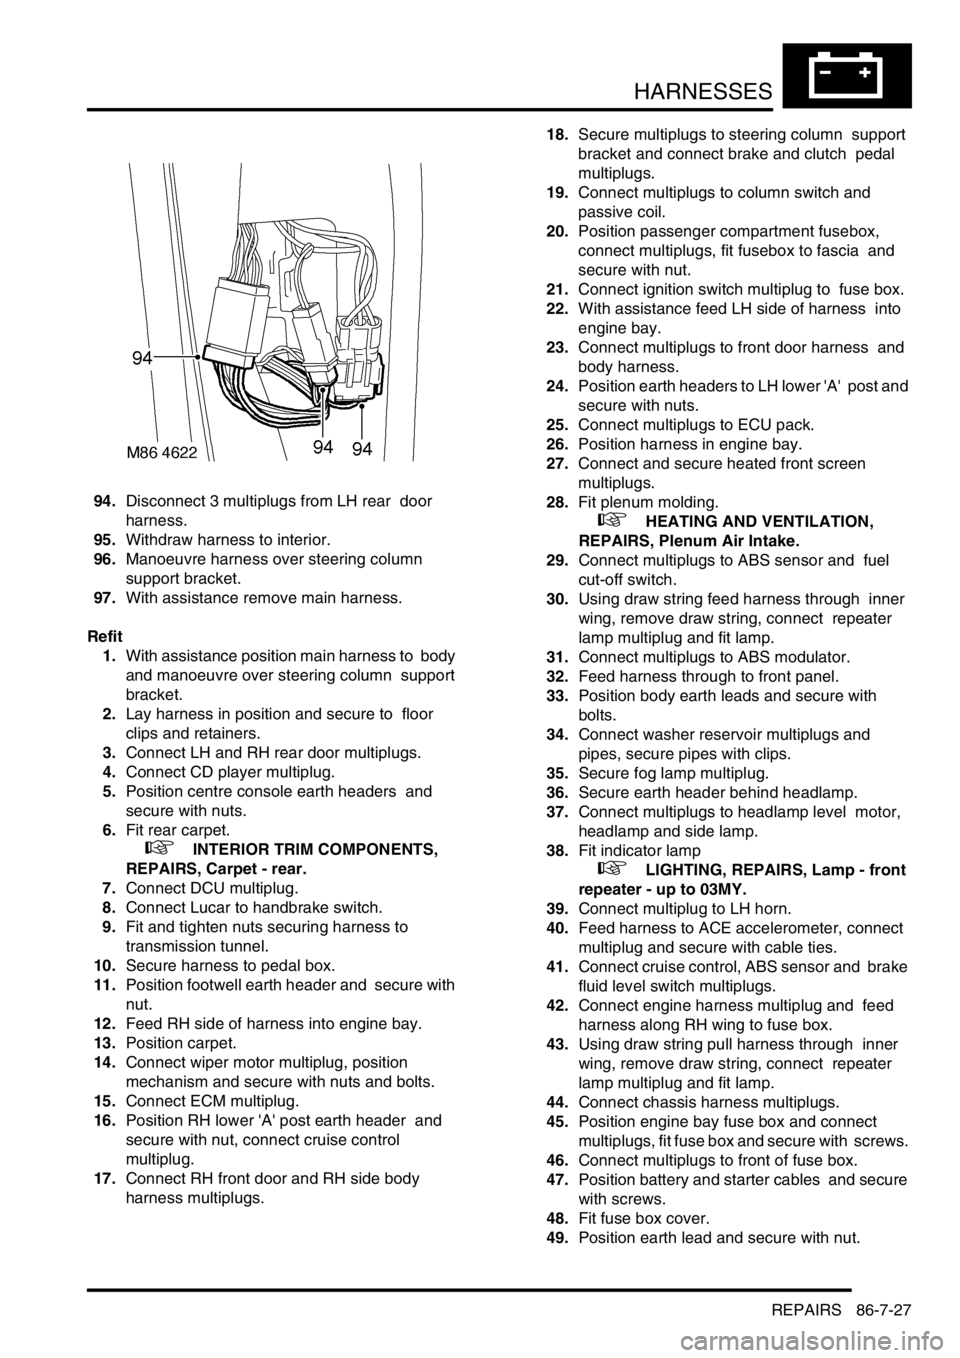
94.Disconnect 3 multiplugs from LH rear door
harness.
95.Withdraw harness to interior.
96.Manoeuvre harness over steering column
support bracket.
97.With assistance remove main harness.
Refit
1.With assistance position main harness to body
and manoeuvre over steering column support
bracket.
2.Lay harness in position and secure to floor
clips and retainers.
3.Connect LH and RH rear door multiplugs.
4.Connect CD player multiplug.
5.Position centre console earth headers and
secure with nuts.
6.Fit rear carpet.
+ INTERIOR TRIM COMPONENTS,
REPAIRS, Carpet - rear.
7.Connect DCU multiplug.
8.Connect Lucar to handbrake switch.
9.Fit and tighten nuts securing harness to
transmission tunnel.
10.Secure harness to pedal box.
11.Position footwell earth header and secure with
nut.
12.Feed RH side of harness into engine bay.
13.Position carpet.
14.Connect wiper motor multiplug, position
mechanism and secure with nuts and bolts.
15.Connect ECM multiplug.
16.Position RH lower 'A' post earth header and
secure with nut, connect cruise control
multiplug.
17.Connect RH front door and RH side body
harness multiplugs. 18.Secure multiplugs to steering column support
bracket and connect brake and clutch pedal
multiplugs.
19.Connect multiplugs to column switch and
passive coil.
20.Position passenger compartment fusebox,
connect multiplugs, fit fusebox to fascia and
secure with nut.
21.Connect ignition switch multiplug to fuse box.
22.With assistance feed LH side of harness into
engine bay.
23.Connect multiplugs to front door harness and
body harness.
24.Position earth headers to LH lower 'A' post and
secure with nuts.
25.Connect multiplugs to ECU pack.
26.Position harness in engine bay.
27.Connect and secure heated front screen
multiplugs.
28.Fit plenum molding.
+ HEATING AND VENTILATION,
REPAIRS, Plenum Air Intake.
29.Connect multiplugs to ABS sensor and fuel
cut-off switch.
30.Using draw string feed harness through inner
wing, remove draw string, connect repeater
lamp multiplug and fit lamp.
31.Connect multiplugs to ABS modulator.
32.Feed harness through to front panel.
33.Position body earth leads and secure with
bolts.
34.Connect washer reservoir multiplugs and
pipes, secure pipes with clips.
35.Secure fog lamp multiplug.
36.Secure earth header behind headlamp.
37.Connect multiplugs to headlamp level motor,
headlamp and side lamp.
38.Fit indicator lamp
+ LIGHTING, REPAIRS, Lamp - front
repeater - up to 03MY.
39.Connect multiplug to LH horn.
40.Feed harness to ACE accelerometer, connect
multiplug and secure with cable ties.
41.Connect cruise control, ABS sensor and brake
fluid level switch multiplugs.
42.Connect engine harness multiplug and feed
harness along RH wing to fuse box.
43.Using draw string pull harness through inner
wing, remove draw string, connect repeater
lamp multiplug and fit lamp.
44.Connect chassis harness multiplugs.
45.Position engine bay fuse box and connect
multiplugs, fit fuse box and secure with screws.
46.Connect multiplugs to front of fuse box.
47.Position battery and starter cables and secure
with screws.
48.Fit fuse box cover.
49.Position earth lead and secure with nut.
Page 1454 of 1529

NAVIGATION SYSTEM
DESCRIPTION AND OPERATION 87-1
NAVIGATION SYST EM DESCRIPTION AND OPERAT ION
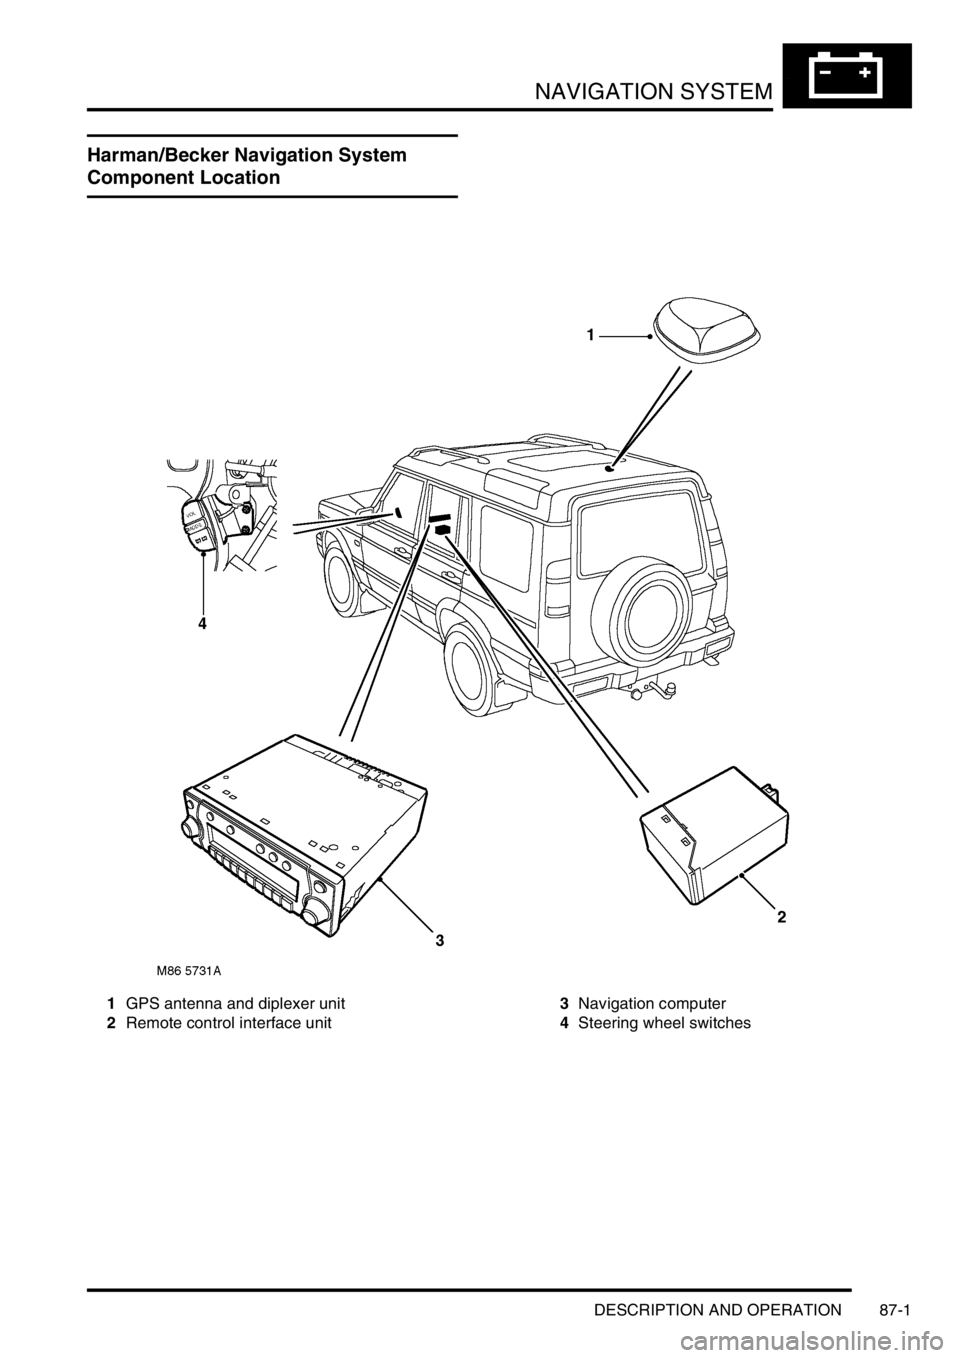
Harman/Becker Navigation System
Component Location
1GPS antenna and diplexer unit
2Remote control interface unit3Navigation computer
4Steering wheel switches
Page 1455 of 1529

NAVIGATION SYSTEM
87-2 DESCRIPTION AND OPERATION
Description
General
The navigation system provides audio and visual route guidance to help the driver reach a selected destination. The
system is an optional fit consisting of a Traffic Pro navigation computer and antenna, manufactured by Harman/
Becker Automotive Systems, which are fitted in place of the In Car Entertainment (ICE) head unit and antenna.
Compact Disc (CD) and radio functions are incorporated into the navigation computer.
The navigation system allows the driver to choose between the shortest and fastest routes between the vehicle's
current position and a selected destination, and to select a stopover point in the journey and a route that avoids
motorways, ferries and toll roads. Directions to Points Of Interest (POI) e.g. airports, hospitals, petrol stations etc,
either local, national or in another country, can also be selected. A traffic jam function enables the driver to request
diversion instructions, around an obstructed part of the selected route, during the journey. A Traffic Management
Control (TMC) function, currently only available in some European countries, monitors traffic broadcasts and
automatically selects an alternative route during the journey if the original route is effected by a traffic jam, accident
or road works etc.
The position of the vehicle is determined by the navigation computer using a combination of vehicle sensor inputs and
radio signals from the 24 Global Positioning System (GPS) satellites orbiting the earth. The position of the vehicle is
then plotted on a digitised map, loaded into the navigation computer from a CD-ROM, to determine the journey route
and provide the route guidance.
The GPS satellite signals are used for initial determination of the vehicle's position and periodic position updates. The
vehicle sensor inputs are used to monitor the vehicle's direction of travel and distance travelled between position
updates from the GPS satellite signals. The vehicle sensor inputs consist of:
lA vehicle speed signal from the ABS ECU, to monitor the distance travelled and for automatic volume control.
lA reverse gear signal from the selector and inhibitor switch of the automatic gearbox, or reverse gear switch of
the manual gearbox, to enable the navigation computer to differentiate between forward and rearward movement
of the vehicle.
lA gyro in the navigation computer, to monitor changes of direction, i.e. steering inputs.
The signal from each GPS satellite contains information about satellite position, almanac data and time (almanac data
is the current status of the satellite). Signals from between five and 11 of the GPS satellites can be received at a given
point on the earth's surface at any one time. The number and quality of separate GPS satellite signals received also
varies with vehicle location. In hilly or tree lined areas, built up areas with tall buildings, multi-storey car parks,
garages, tunnels, bridges and during heavy rain/thunderstorms, signal reception of some or all of the GPS satellites
will be poor or non existent.
A minimum of three separate GPS satellite signals are required for the navigation computer to calculate a three
dimensional (3D) positional fix. When only two signals are being received, the navigation computer will calculate a
less accurate two dimensional (2D) positional fix. The more widely dispersed that the GPS satellites are, the more
accurate the positional fix. The navigation computer can store information from a maximum of 12 GPS satellites at
any one time. When more than three signals are stored, the navigation computer selects the three most widely
dispersed signals for the position calculation.
GPS Antenna and diplexer unit
The GPS antenna is installed at the rear of the roof on the centreline. A diplexer unit on the underside of the GPS
antenna amplifies the radio signals received from the GPS satellites and transmits them through separate dedicated
co-axial cable to the navigation computer for processing.
Page 1462 of 1529

NAVIGATION SYSTEM
DESCRIPTION AND OPERATION 87-9
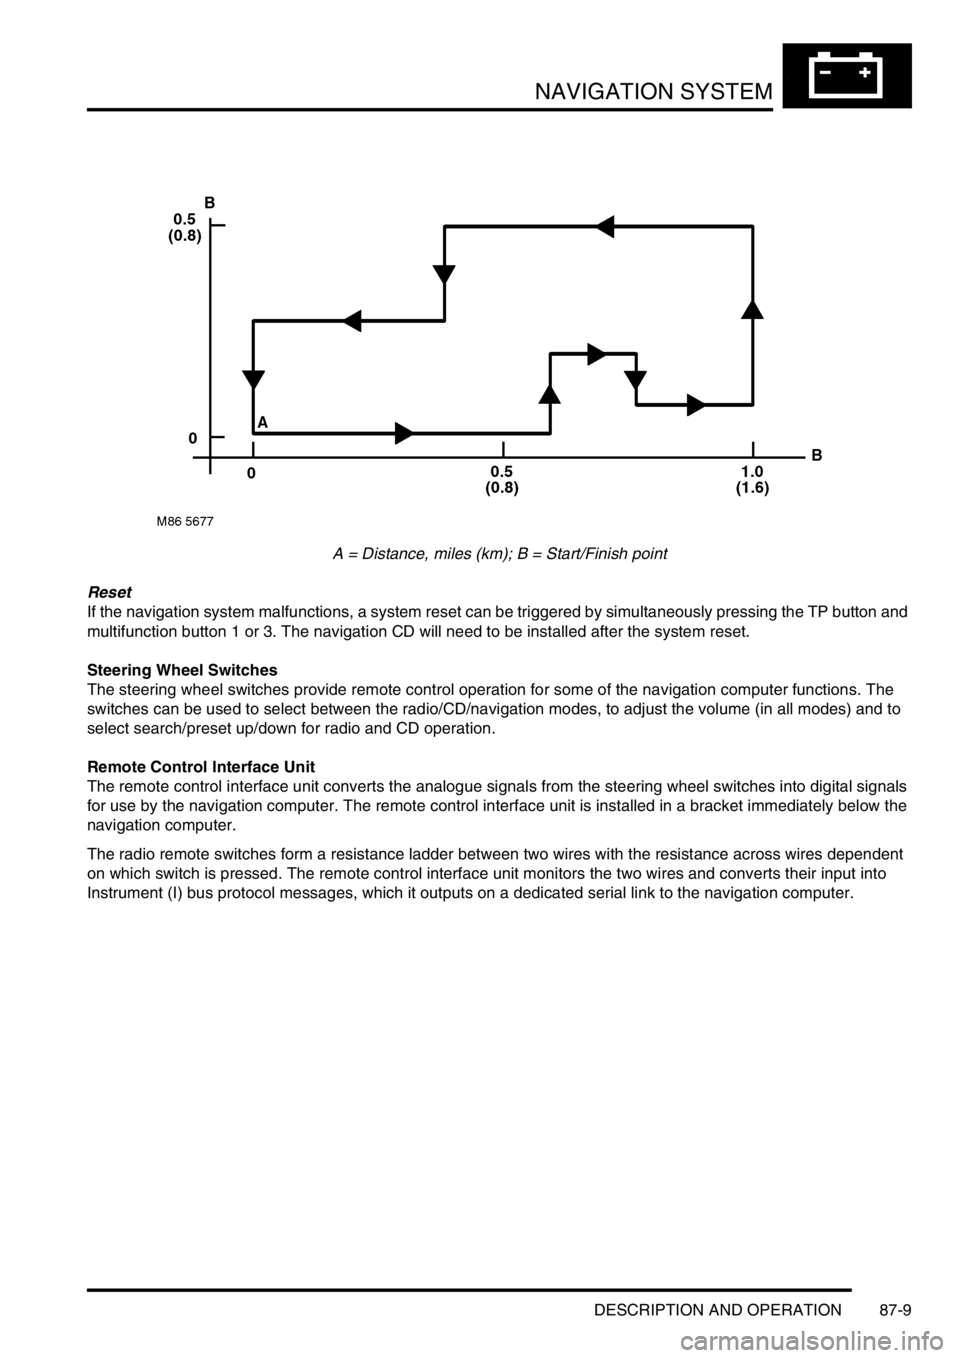
A = Distance, miles (km); B = Start/Finish point
Reset
If the navigation system malfunctions, a system reset can be triggered by simultaneously pressing the TP button and
multifunction button 1 or 3. The navigation CD will need to be installed after the system reset.
Steering Wheel Switches
The steering wheel switches provide remote control operation for some of the navigation computer functions. The
switches can be used to select between the radio/CD/navigation modes, to adjust the volume (in all modes) and to
select search/preset up/down for radio and CD operation.
Remote Control Interface Unit
The remote control interface unit converts the analogue signals from the steering wheel switches into digital signals
for use by the navigation computer. The remote control interface unit is installed in a bracket immediately below the
navigation computer.
The radio remote switches form a resistance ladder between two wires with the resistance across wires dependent
on which switch is pressed. The remote control interface unit monitors the two wires and converts their input into
Instrument (I) bus protocol messages, which it outputs on a dedicated serial link to the navigation computer.
Page 1528 of 1529

INSTRUMENTS
REPAIRS 88-45
REPAIRS
Clock
$% 88.15.07
Remove
1.Carefully remove clock assembly from fascia.
2.Disconnect multiplugs from clock and door
locking switches.
3.Remove door locking switch from clock
assembly and remove clock assembly.
Refit
1.Fit door lock switch to clock assembly and
connect multiplugs.
2.Position and push to secure clock assembly to
fascia.
Instrument pack
$% 88.30.38
Remove
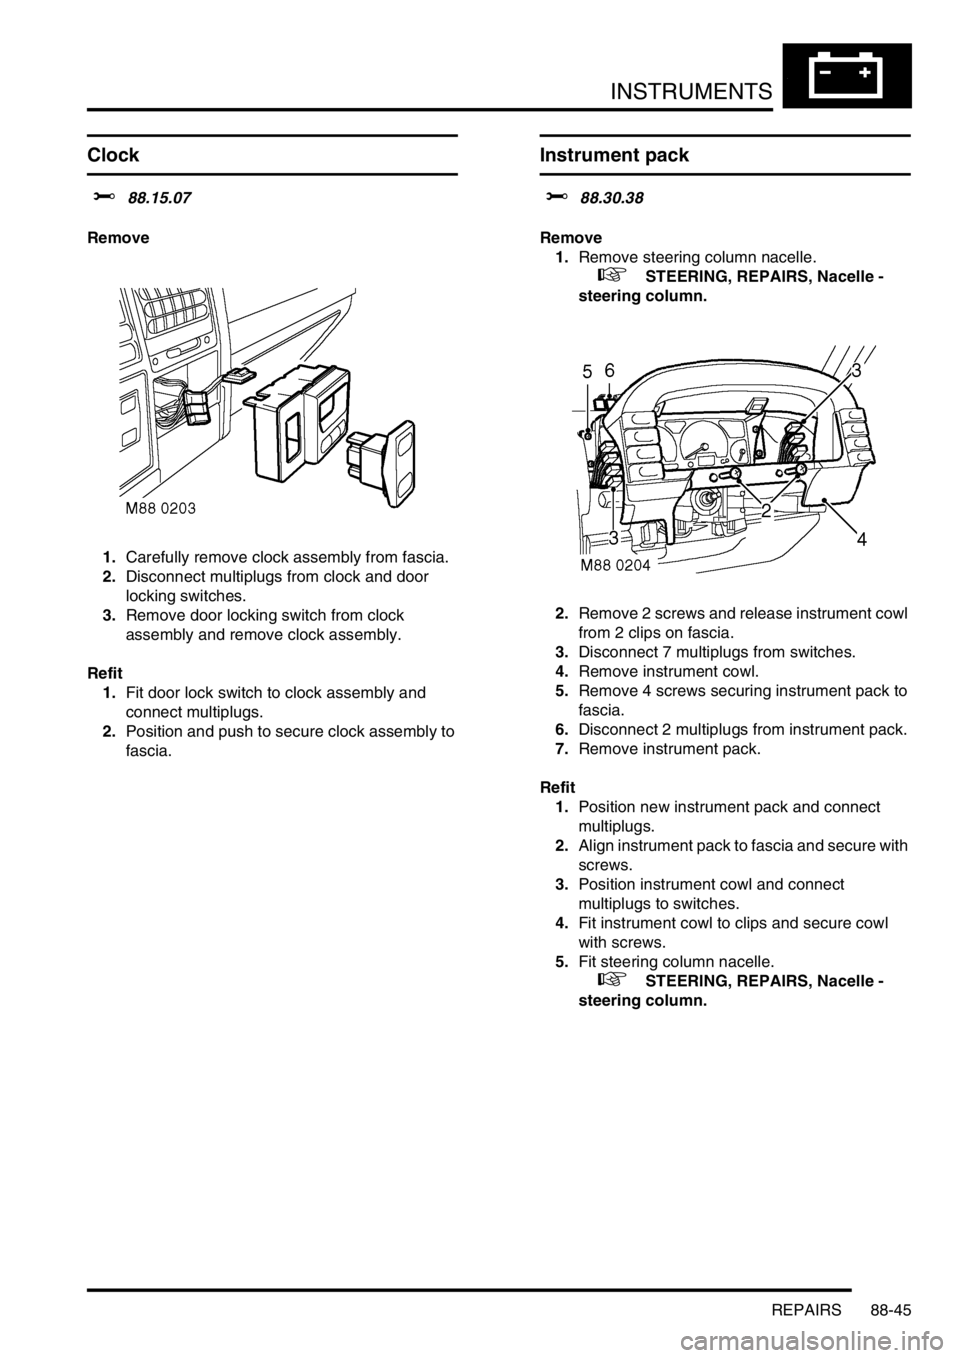
1.Remove steering column nacelle.
+ STEERING, REPAIRS, Nacelle -
steering column.
2.Remove 2 screws and release instrument cowl
from 2 clips on fascia.
3.Disconnect 7 multiplugs from switches.
4.Remove instrument cowl.
5.Remove 4 screws securing instrument pack to
fascia.
6.Disconnect 2 multiplugs from instrument pack.
7.Remove instrument pack.
Refit
1.Position new instrument pack and connect
multiplugs.
2.Align instrument pack to fascia and secure with
screws.
3.Position instrument cowl and connect
multiplugs to switches.
4.Fit instrument cowl to clips and secure cowl
with screws.
5.Fit steering column nacelle.
+ STEERING, REPAIRS, Nacelle -
steering column.