1999 LAND ROVER DISCOVERY display
[x] Cancel search: displayPage 31 of 1529

CONTENTS
28 CONTENTS
DRIVING AIDS .......................................................................................... 86-8-1
DESCRIPTION AND OPERATION
Park Distance Control – Component Location................................................................................ 86-8-1
Park Distance Control – Control Diagram....................................................................................... 86-8-2
Description ...................................................................................................................................... 86-8-4
Operation ........................................................................................................................................ 86-8-11
REPAIRS
Control unit (ECU) - park distance control (PDC) ........................................................................... 86-8-13
Sounder - parking aid rear ............................................................................................................. 86-8-14
Sensor - parking aid - rear - inner ................................................................................................... 86-8-15
Sensor - parking aid - rear - outer .................................................................................................. 86-8-16
NAVIGATION SYSTEM ............................................................................ 87-1
DESCRIPTION AND OPERATION
Harman/Becker Navigation System Component Location.............................................................. 87-1
Description ...................................................................................................................................... 87-2
DESCRIPTION AND OPERATION
CARiN III Navigation and Trafficmaster System Component Location........................................... 87-12
Description ...................................................................................................................................... 87-14
Operation ........................................................................................................................................ 87-20
REPAIRS
Interface electronic control unit (ECU) - remote control ................................................................. 87-29
Display unit .................................................................................................................................... 87-30
INSTRUMENTS ......................................................................................... 88-1
DESCRIPTION AND OPERATION
Instrument pack .............................................................................................................................. 88-1
Instrument component location - Engine compartment / underneath vehicle ................................. 88-2
Instrument component location - Passenger compartment ............................................................ 88-3
Instrument block diagram ............................................................................................................... 88-4
Description ...................................................................................................................................... 88-5
Interior rear view mirror with compass (where fitted) ..................................................................... 88-42
REPAIRS
Clock ............................................................................................................................................... 88-45
Instrument pack ............................................................................................................................ 88-45
Page 35 of 1529

INTRODUCTION
01-4
λLambda
lc Low compression
LCD Liquid Crystal Display
LED Light Emitting Diode
LH Left-Hand
LHD Left-Hand Drive
LVS Liquid Vapour Separator
mMetre
µMicro
MAF Mass Air Flow
MAP Manifold Absolute Pressure
MFU Multi-Function Unit
MFL Multi-Function Logic
max. Maximum
MEMS Modular Engine Management
System
MIL Malfunction Indicator Lamp
min. Minimum
MPa MegaPascal
- Minus (tolerance)
' Minute (angle)
mm Millimetre
mph Miles per hour
MPi Multi-Point injection
MY Model Year
NAS North American Specification
(-) Negative (electrical)
Nm Newton metre
No. Number
NO
2Nitrogen Dioxide
NO
xOxides of Nitrogen
NTC Negative Temperature
Coefficient
OBD On Board Diagnostics
o.dia. Outside diameter
ORM Off-road Mode
ΩOhm
PAS Power Assisted Steering
PCV Positive Crankcase Ventilation
PDC Parking Distance Control
% Percentage
+ Plus (tolerance) or Positive
(electrical)
±Plus or minus (tolerance)
PTC Positive Temperature Coefficient
PTFE Polytetrafluorethylene
PWM Pulse Width Modulation
rRadius
:Ratio
ref Reference
RES Rover Engineering Standards
rev/min Revolutions per minute
RF Radio Frequency
RH Right-Hand
RHD Right-Hand Drive
ROM Read Only Memory
RON Research Octane Number
ROV Roll Over ValveROW Rest Of World
SAE Society of Automotive Engineers
" Second (angle)
SLABS Self Levelling and Anti-Lock
Brake System
SLS Self Levelling Suspension
SOHC Single Overhead Camshaft
sp.gr Specific gravity
SRS Supplementary Restraint System
std. Standard
synchro Synchronizer or synchromesh
TDC Top Dead Centre
TMAP Temperature, Manifold Absolute
Pressure
TP Throttle Position
TPS Throttle Position Sensor
TV Torsional Vibration
TXV Thermostatic Expansion Valve
UK United Kingdom
US United States
V Volt
Var. Variable
VIN Vehicle Identification Number
VIS Variable Intake System
VRS Variable Reluctance Sensor
VSS Vehicle Speed Signal
WWatt
Page 57 of 1529

GENERAL INFORMATION
03-22
Rotary coupler
Always follow the Repair procedure for fitting the
rotary coupler.
Comply with all safety and installation procedures to
ensure the system functions correctly. Observe the
following precautions:
lDo not install a rotary coupler if it is suspected to
be defective.
lDo not attempt to service, modify or repair a
rotary coupler.
lDo not cut, splice or modify the wires attached
to yellow SRS connector and lead.
lAlways ensure the rotary coupler connectors
are mated correctly and securely fastened.
lAlways ensure the battery is disconnected
before working on the rotary coupler.
lAlways ensure the rotary coupler is removed
and installed in its centered position and with the
front road wheels in the straight ahead position.
lIf a new rotary coupler is being installed, ensure
the locking tab holding the coupler's rotational
position is not broken; units with a broken
locking tab should not be used.
Warning labels
Warning symbols are displayed at various positions
in the vehicle (either in a suitable prominent position
such as driver and passenger side glass, or attached
to the component itself) to indicate SRS items which
must be treated with particular care. Exact positions
of SRS warning labels may vary dependent on
legislation and market trends.
WARNING: It is imperative that before any work
is undertaken on the SRS system the appropriate
information is read thoroughly.Side window label
aThe need for caution when working in close
proximity to SRS components.
bRefer to the publication where the procedures,
instructions and advice can be found (usually
the Workshop Manual) for working on the SRS
system.
cDo not use rear facing child seats in the front
passenger seat if the vehicle is fitted with a
passenger airbag.
Rotary coupler label
aRefer to the Workshop Manual for detailed
instructions
bEnsure wheels are in the straight ahead
position before removal and refitting
cPart number/Bar code. The code must be
recorded and quoted for ordering purposes
Page 83 of 1529

GENERAL DATA
04-20
Wheels and tyres
CAUTION: When towing, the additional load imposed may cause the tyre maximum load rating to be
exceeded. This is permissible provided the load rating is not exceeded by more than 15% and that road
speeds are limited to 62 mph (100 km/h) and tyres pressures are increased by at least 3 lbf/in
2 (0.2 bar).
NOTE: The tyre size is displayed on the outer wall of each tyre.
Normal operating conditions: carrying up to 4 passengers and luggage.
Wheel size:
⇒ Steel 7J x 16
⇒ Alloy 7J x 16
8J x 16
8J x 18
Tyre size
⇒ With 7J x 16 wheels 235/70 R16 Wrangler HP 105H
235/70 R16 Michelin XPC * 105H
⇒ With 8J x 16 wheels 255/65 R16 Wrangler HP 109H
255/65 R16 Michelin XPC * 109H
⇒ With 8J x 18 wheels 255/55 R18 Wrangler HP 109H
Tyre Pressures
All tyres - normal operating conditions Front Up to 03MY - 1.9 Bar (28 lbf.in
2)
From 03MY - 2.1 Bar (30 lbf.in2)
Rear 2.6 Bar (38 lbf.in
2)
All tyres - vehicle at GVW Front Up to 03MY - 1.9 Bar (28 lbf.in
2)
From 03MY - 2.1 Bar (30 lbf.in2)
Rear 3.2 Bar (46 lbf.in
2)
Page 1200 of 1529

AIR CONDITIONING
DESCRIPTION AND OPERATION 82-11
ATC ECU
The ATC ECU is installed in the centre of the fascia, below the radio. An integral control panel on the ATC ECU
contains switches for system control inputs and a LCD to provide system status information.
Inputs from sensors and the control panel switches are processed by the ATC ECU, which then outputs the
appropriate control signals.
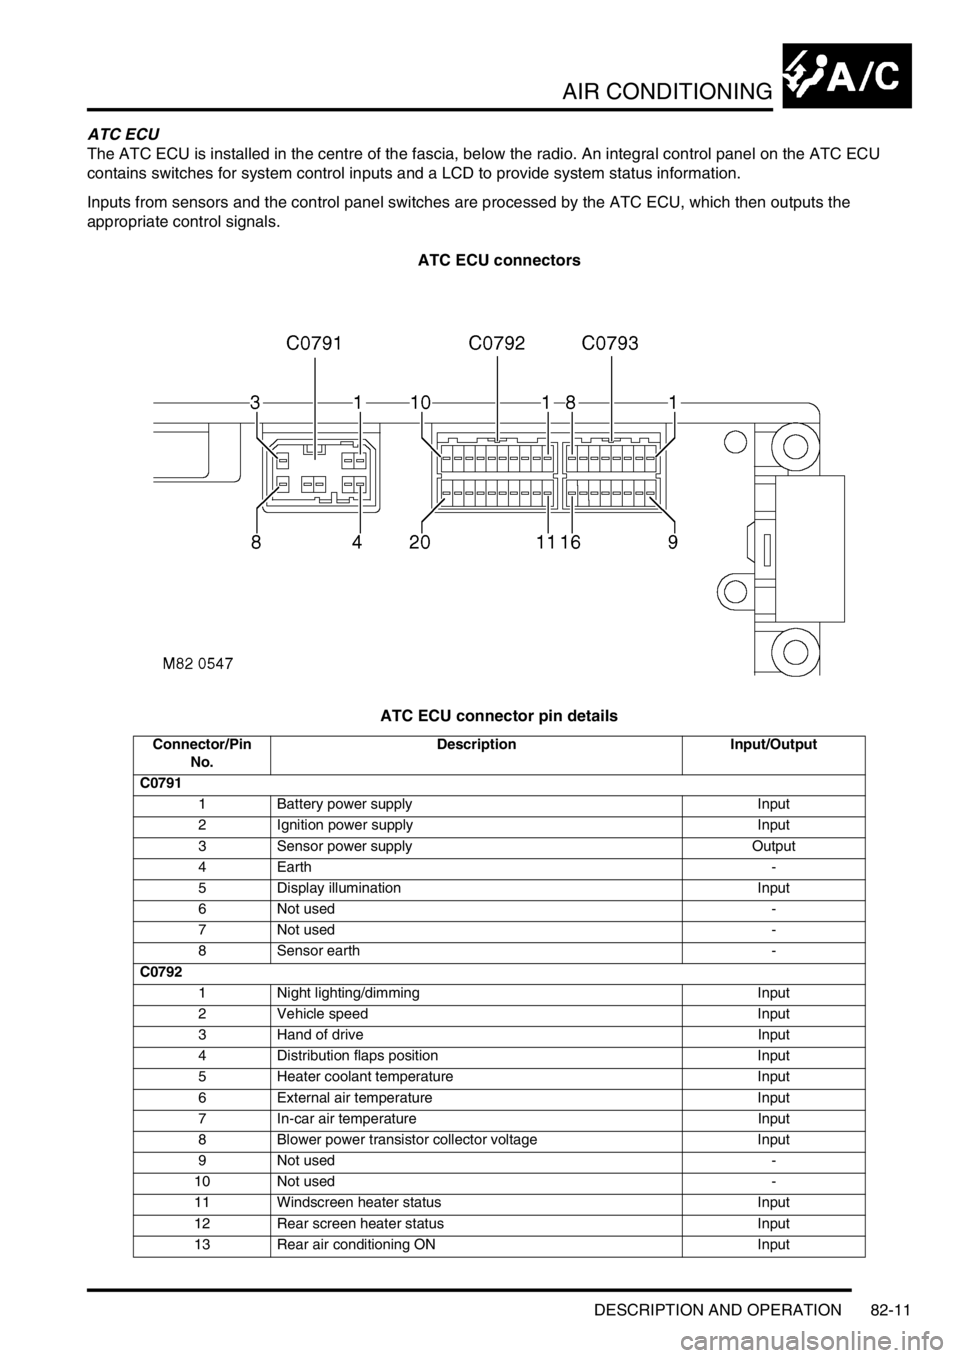
ATC ECU connectors
ATC ECU connector pin details
Connector/Pin
No.Description Input/Output
C0791
1 Battery power supply Input
2 Ignition power supply Input
3 Sensor power supply Output
4Earth -
5 Display illumination Input
6 Not used -
7 Not used -
8 Sensor earth -
C0792
1 Night lighting/dimming Input
2 Vehicle speed Input
3 Hand of drive Input
4 Distribution flaps position Input
5 Heater coolant temperature Input
6 External air temperature Input
7 In-car air temperature Input
8 Blower power transistor collector voltage Input
9 Not used -
10 Not used -
11 Windscreen heater status Input
12 Rear screen heater status Input
13 Rear air conditioning ON Input
Page 1201 of 1529

AIR CONDITIONING
82-12DESCRIPTION AND OPERATION
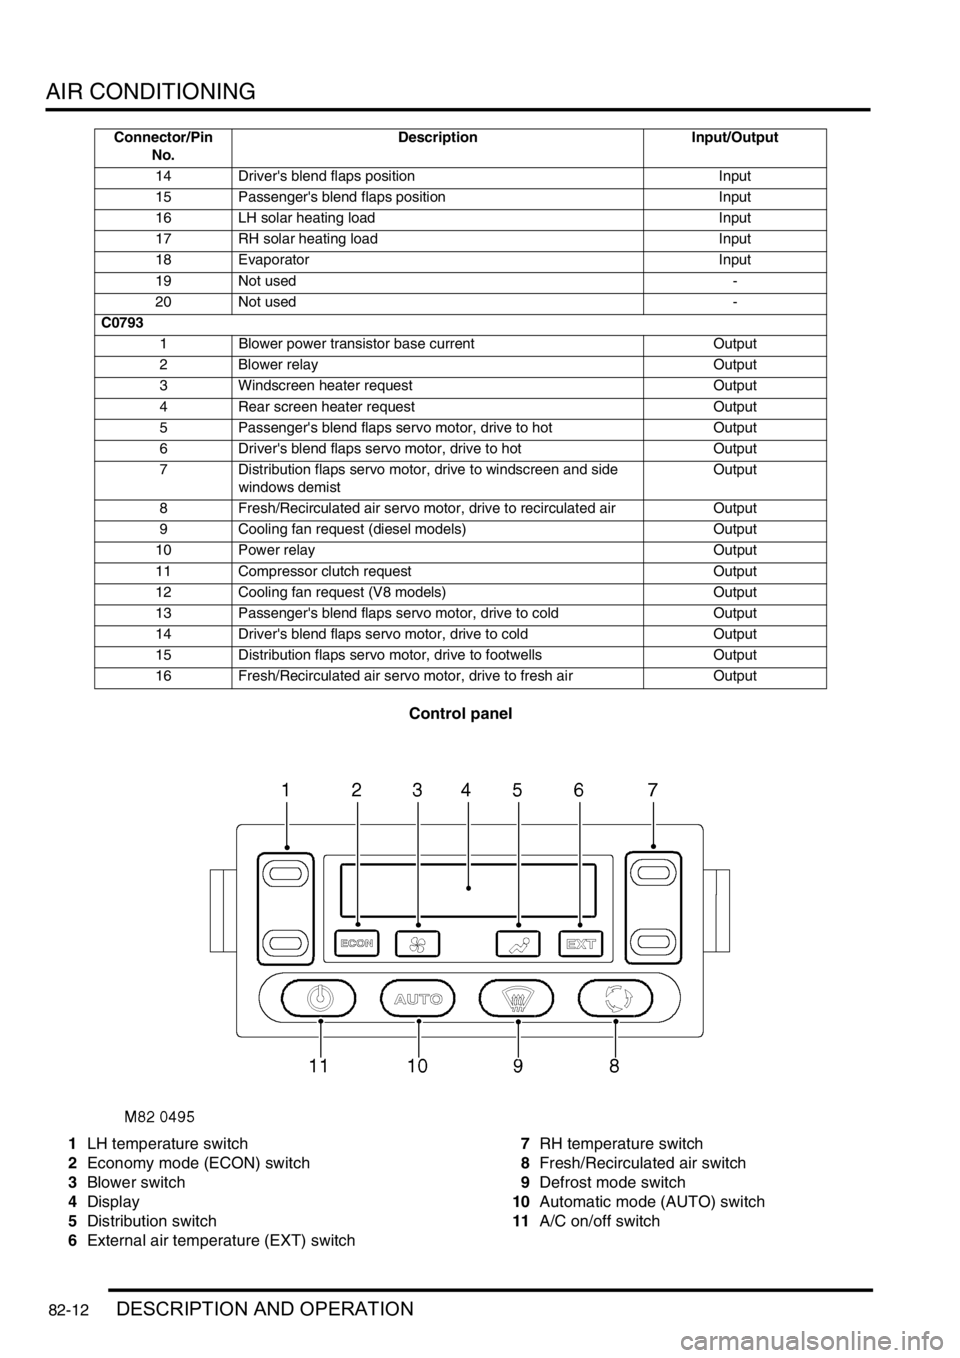
Control panel
1LH temperature switch
2Economy mode (ECON) switch
3Blower switch
4Display
5Distribution switch
6External air temperature (EXT) switch7RH temperature switch
8Fresh/Recirculated air switch
9Defrost mode switch
10Automatic mode (AUTO) switch
11A/C on/off switch
14 Driver's blend flaps position Input
15 Passenger's blend flaps position Input
16 LH solar heating load Input
17 RH solar heating load Input
18 Evaporator Input
19 Not used -
20 Not used -
C0793
1 Blower power transistor base current Output
2 Blower relay Output
3 Windscreen heater request Output
4 Rear screen heater request Output
5 Passenger's blend flaps servo motor, drive to hot Output
6 Driver's blend flaps servo motor, drive to hot Output
7 Distribution flaps servo motor, drive to windscreen and side
windows demistOutput
8 Fresh/Recirculated air servo motor, drive to recirculated air Output
9 Cooling fan request (diesel models) Output
10 Power relay Output
11 Compressor clutch request Output
12 Cooling fan request (V8 models) Output
13 Passenger's blend flaps servo motor, drive to cold Output
14 Driver's blend flaps servo motor, drive to cold Output
15 Distribution flaps servo motor, drive to footwells Output
16 Fresh/Recirculated air servo motor, drive to fresh air Output Connector/Pin
No.Description Input/Output
Page 1202 of 1529

AIR CONDITIONING
DESCRIPTION AND OPERATION 82-13
The control panel switches are all non-latching pushswitches except for the LH and RH temperature switches, which
are centre-off rocker switches. The switches have the following functions:
LH and RH temperature switches. Enabled only while the system is on:
lEach press increases or decreases the related temperature setting, in steps of 1 °C (2 °F), between 16 and 28
°C (60 and 84 °F).
lIf the decrease side of the switch is pressed when a temperature of 16 °C (60 °F) is set, the display changes to
LO (maximum cold).
lIf the increase side of the switch is pressed when a temperature of 28 °C (84 °F) is set, the display changes to
HI (maximum hot).
lIf a switch is kept depressed, step changes occur every 0.4 seconds.
A/C on/off switch. Switches the system on and off. When used to switch the system on, the system resumes the
configuration in use prior to the previous off selection.
Blower switch. Enabled only while the system is on. Provides manual control of blower speed:
lEach press changes the blower speed, in sequence, through off (only available if economy mode is selected on)
and five incremental speeds.
lIf the switch is kept depressed, after 1 second subsequent speed increments occur every 0.4 second until blower
reaches high speed. Releasing and then pressing the switch again changes blower back to off or low speed.
Distribution switch. Enabled only while the system is on. Provides manual control of air distribution:
lEach press changes the air distribution, in sequence, through footwells only, footwells and windscreen/side
windows demist, windscreen/side windows demist only, face level only, face level and footwells.
lIf the switch is kept depressed, after 1 second subsequent distribution changes occur every 0.4 seconds until
distribution reaches face level and footwells. Releasing and then pressing the switch again changes distribution
back to footwells only.
External air temperature (EXT) switch. Enabled while the system is on or off. Switches the external temperature output
on and off:
lIf the system is already on, the temperature output overrides the system outputs for approximately 7 seconds,
then the display reverts to system outputs.
lIf the system is switched on while the external temperature output is on, the system outputs override the external
temperature output.
Fresh/Recirculated air switch. Enabled only while the system is on. Provides manual control of inlet air selection.
Defrost mode switch. Starts the system in, or switches the system to and from, defrost mode.
Automatic mode (AUTO) switch. Starts the system in, or switches the system to and from, the automatic mode.
Economy mode (ECON) switch. Enabled only while the system is on. Provides manual on/off control of the refrigerant
system compressor, to reduce fuel consumption when there is no requirement for cool or dehumidified air, e.g. when
the ambient temperature is lower than the LH and RH temperature settings.
Temperature settings: The LH and RH temperature settings are reference inputs used by the control system and give
an approximation of the temperatures that will be established in the cabin. They are not necessarily actual distribution
outlet temperatures, or the temperatures at specific points in the cabin.
Audible warning: A 'beep' is emitted from the ATC ECU each time it receives a control switch input. This audible
warning can be switched off and on by pressing and holding the AUTO switch, then pressing and holding the A/C on/
off switch until the audible warning sounds (approximately 3 seconds). While switched off, the audible warning still
sounds when:
lSwitching between °F and °C on the display.
lSwitching the audible warning from off to on.
lSwitching the timed feet function on and off.
lSwitching the timed recirculated inlet air on and off.
lSwitching the latched recirculated inlet air on and off.
lWhen there is a fault warning.
lRunning the self diagnostic routine.
Page 1203 of 1529

AIR CONDITIONING
82-14DESCRIPTION AND OPERATION
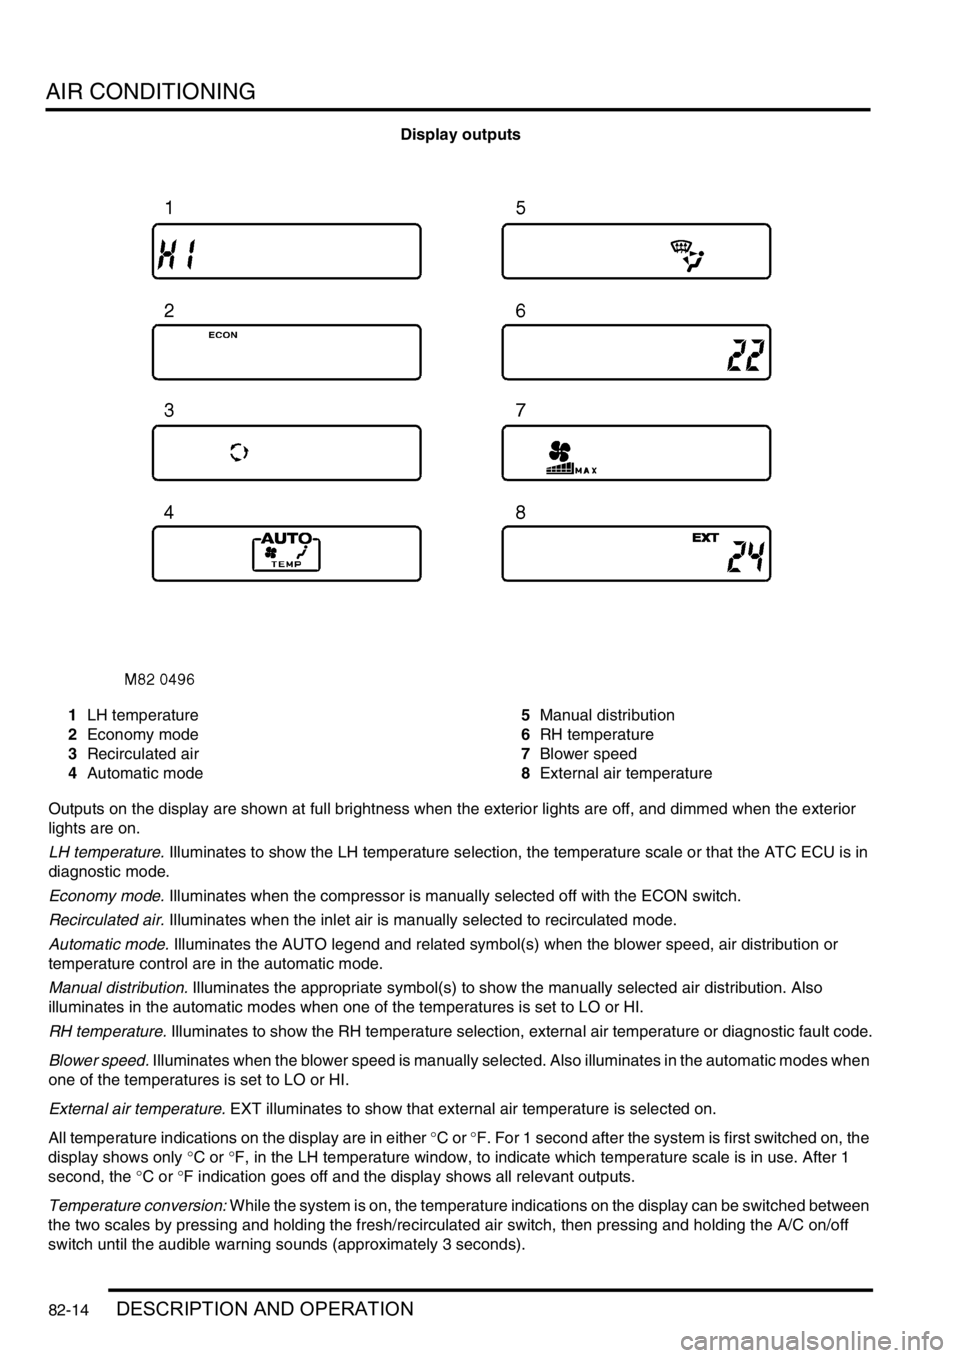
Display outputs
1LH temperature
2Economy mode
3Recirculated air
4Automatic mode5Manual distribution
6RH temperature
7Blower speed
8External air temperature
Outputs on the display are shown at full brightness when the exterior lights are off, and dimmed when the exterior
lights are on.
LH temperature. Illuminates to show the LH temperature selection, the temperature scale or that the ATC ECU is in
diagnostic mode.
Economy mode. Illuminates when the compressor is manually selected off with the ECON switch.
Recirculated air. Illuminates when the inlet air is manually selected to recirculated mode.
Automatic mode. Illuminates the AUTO legend and related symbol(s) when the blower speed, air distribution or
temperature control are in the automatic mode.
Manual distribution. Illuminates the appropriate symbol(s) to show the manually selected air distribution. Also
illuminates in the automatic modes when one of the temperatures is set to LO or HI.
RH temperature. Illuminates to show the RH temperature selection, external air temperature or diagnostic fault code.
Blower speed. Illuminates when the blower speed is manually selected. Also illuminates in the automatic modes when
one of the temperatures is set to LO or HI.
External air temperature. EXT illuminates to show that external air temperature is selected on.
All temperature indications on the display are in either °C or °F. For 1 second after the system is first switched on, the
display shows only °C or °F, in the LH temperature window, to indicate which temperature scale is in use. After 1
second, the °C or °F indication goes off and the display shows all relevant outputs.
Temperature conversion: While the system is on, the temperature indications on the display can be switched between
the two scales by pressing and holding the fresh/recirculated air switch, then pressing and holding the A/C on/off
switch until the audible warning sounds (approximately 3 seconds).