Page 1227 of 1529
AIR CONDITIONING
82-38REPAIRS
Evaporator, evaporator thermistor and
thermal expansion valve (TXV)
$% 82.25.20
Remove
1.Remove heater assembly.
+ HEATING AND VENTILATION,
REPAIRS, Heater assembly - models with
air conditioning.
2.Remove bulkhead and evaporator pipe seals.
3.Disconnect multiplug from evaporator
thermistor. 4.Remove 2 screws securing temperature control
servos to evaporator casing.
5.Remove 2 screws securing coolant pipe
support bracket to casing.
6.Remove screws securing coolant pipe saddle
clamp to casing and remove saddle.
7.Remove heater matrix.
8.Remove 5 screws securing casings.
Page 1229 of 1529

AIR CONDITIONING
82-40REPAIRS
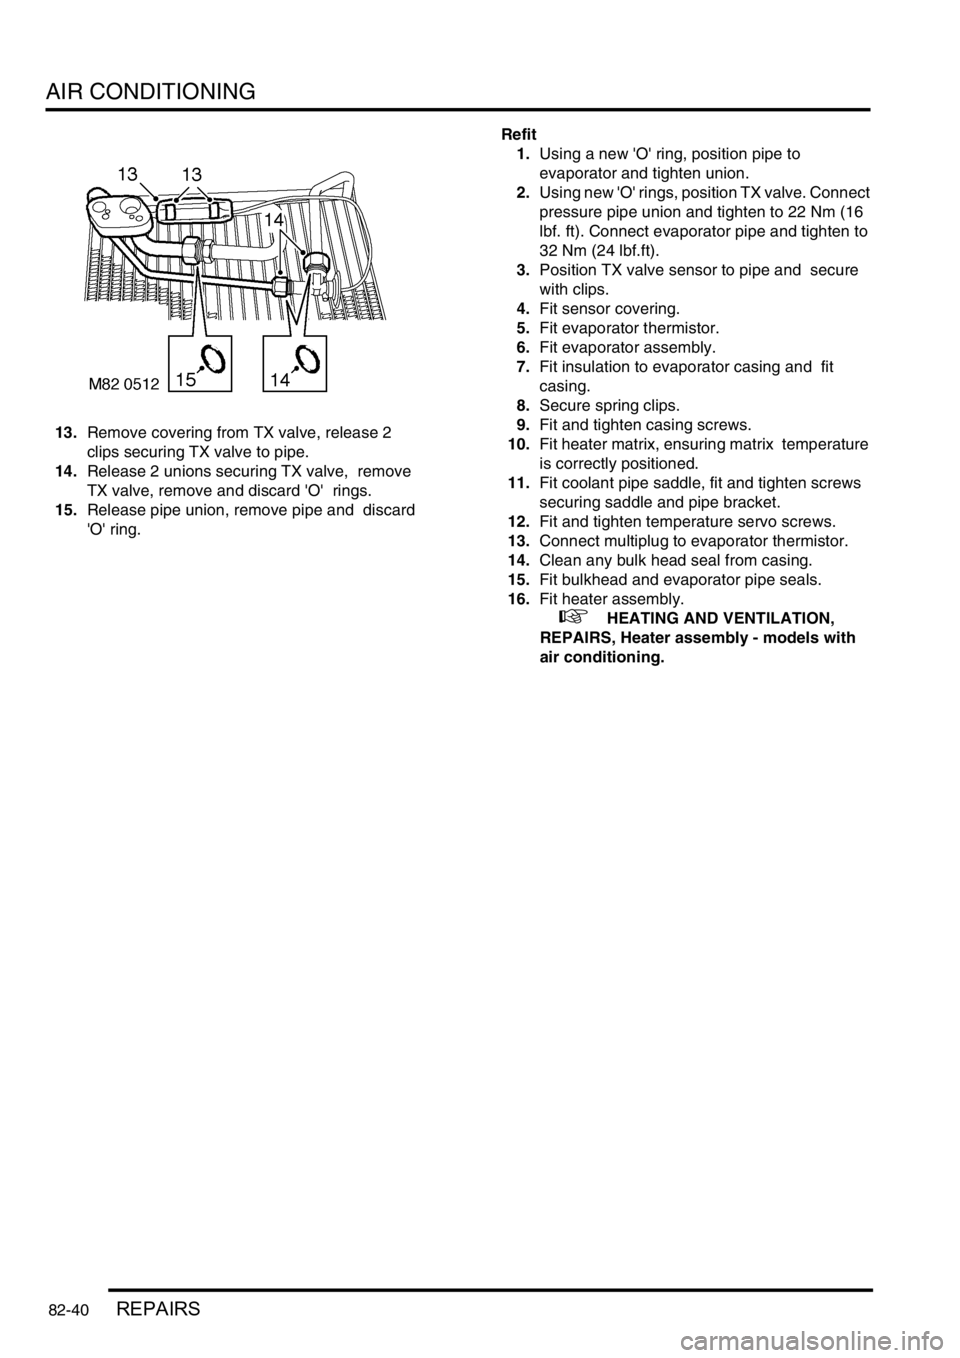
13.Remove covering from TX valve, release 2
clips securing TX valve to pipe.
14.Release 2 unions securing TX valve, remove
TX valve, remove and discard 'O' rings.
15.Release pipe union, remove pipe and discard
'O' ring. Refit
1.Using a new 'O' ring, position pipe to
evaporator and tighten union.
2.Using new 'O' rings, position TX valve. Connect
pressure pipe union and tighten to 22 Nm (16
lbf. ft). Connect evaporator pipe and tighten to
32 Nm (24 lbf.ft).
3.Position TX valve sensor to pipe and secure
with clips.
4.Fit sensor covering.
5.Fit evaporator thermistor.
6.Fit evaporator assembly.
7.Fit insulation to evaporator casing and fit
casing.
8.Secure spring clips.
9.Fit and tighten casing screws.
10.Fit heater matrix, ensuring matrix temperature
is correctly positioned.
11.Fit coolant pipe saddle, fit and tighten screws
securing saddle and pipe bracket.
12.Fit and tighten temperature servo screws.
13.Connect multiplug to evaporator thermistor.
14.Clean any bulk head seal from casing.
15.Fit bulkhead and evaporator pipe seals.
16.Fit heater assembly.
+ HEATING AND VENTILATION,
REPAIRS, Heater assembly - models with
air conditioning.
Page 1270 of 1529
CHARGING AND STARTING
REPAIRS 86-1-5
Battery carrier
$% 86.15.11
Remove
1.Remove battery.
+ CHARGING AND STARTING,
REPAIRS, Battery.
2.Release strap and remove jack.
3.Release coolant hose from clip.
4. Diesel models: Remove screw securing ECM,
release ECM and position aside.
5.Remove 7 bolts securing battery carrier.
6.Remove battery carrier.
NOTE: Do not carry out further dismantling if
component is removed for access only.
7.Remove jack retaining strap, speed nut and
clip.Refit
1.Fit jack retaining strap, speed nut and clip.
2.Fit battery carrier, fit bolts and tighten to 28 Nm
(21 lbf.ft).
3. Diesel models: Fit ECM and secure with
screw.
4.Secure coolant hose.
5.Fit and secure jack.
6.Fit battery.
+ CHARGING AND STARTING,
REPAIRS, Battery.
Page 1414 of 1529
HARNESSES
REPAIRS 86-7-9
6.Disconnect air conditioning compressor
multiplug.
7.Remove 2 nuts securing alternator cables and
release cables. 8.Disconnect coolant temperature sensor
multiplug.
9.Release 2 harness clips from coolant rail.
10.Remove nut securing engine harness positive
lead to battery, release lead and position
aside.
Page 1417 of 1529

HARNESSES
86-7-12 REPAIRS
Refit
1.Position engine harness around engine.
2.Connect oil pressure switch and camshaft
sensor multiplugs.
3.Fit and tighten bolt securing harness to LH side
of engine.
4.Connect both knock sensor multiplugs.
5.Connect battery cable and solenoid cable to
starter motor.
6.Position starter heat shield and secure with
bolt.
7.Clean exhaust flange mating faces, using a
new gasket align exhaust fit nuts and tighten to
60 Nm (44 lbf.ft).
8.Remove stand(s) and lower vehicle.
9.Position harness into footwell and secure
grommet.
10.Connect ECM multiplugs.
11.Position toe board and secure with trim fixings.
12.Connect engine harness to main harness
multiplug and secure earth lead.
13.Connect EVAP solenoid multiplug.
14.Connect both fuse box multiplugs.
15.Position starter lead to fuse box and secure
screw.
16.Fit fuse box cover.
17.Position battery positive lead to battery and
secure nut.
18.Secure harness to coolant rail.
19.Position alternator cables and tighten terminal
B+ to 18 Nm (13 lbf.ft) and terminal D+ to 5 Nm
(3.7 lbf.ft)
20.Connect coolant temperature sensor multiplug.
21.Connect A/C compressor multiplug.
22.Secure harness clip to rear of LH cylinder head.
23.Connect CKP sensor multiplug.
24.Secure injector harness and connect injector
multiplugs.
25.Connect coil multiplugs.
26.Connect and secure HS
2O sensor multiplug
27.Fit upper inlet manifold.
+ MANIFOLDS AND EXHAUST
SYSTEMS - V8, REPAIRS, Gasket - inlet
manifold - upper - Without Secondary Air
Injection.
28.Connect battery earth lead.
Harness - engine - diesel
$% 86.70.17
Remove
1.Remove engine acoustic cover.
2.Remove battery carrier.
+ CHARGING AND STARTING,
REPAIRS, Battery carrier.
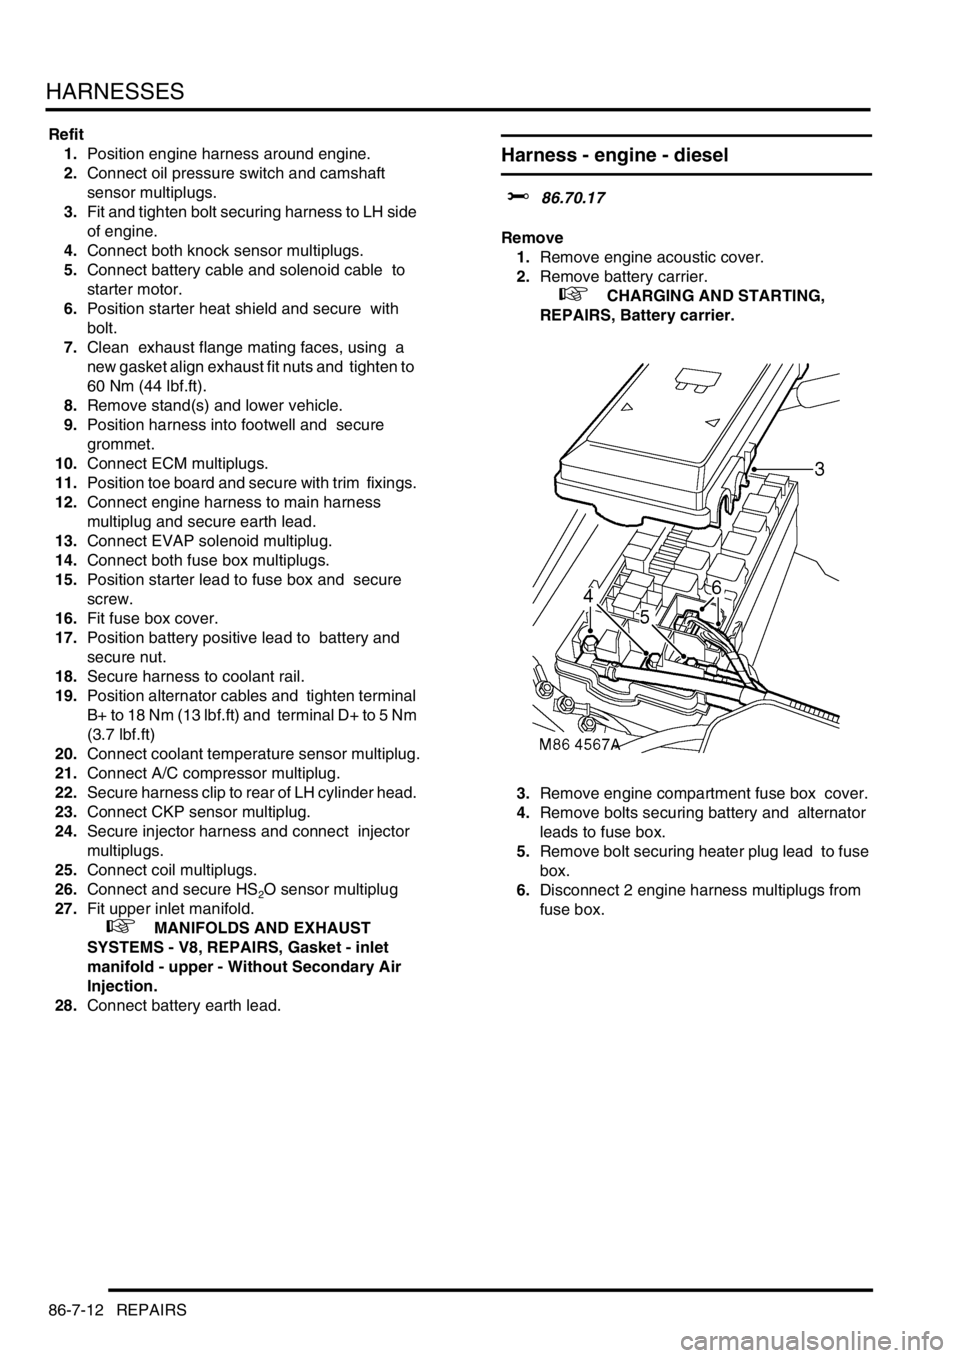
3.Remove engine compartment fuse box cover.
4.Remove bolts securing battery and alternator
leads to fuse box.
5.Remove bolt securing heater plug lead to fuse
box.
6.Disconnect 2 engine harness multiplugs from
fuse box.
Page 1419 of 1529
HARNESSES
86-7-14 REPAIRS
13.Disconnect multiplug from fuel temperature
sensor.
14.Release harness clip from coolant pipe. 15.Disconnect multiplug from MAP sensor.
16.Disconnect 4 glow plug connectors.
17.Release nut securing battery lead to alternator
and disconnect multiplug from alternator.
18.Disconnect injector multiplug.
19.Remove 2 bolts securing harness to front of
cylinder head.
20.Disconnect multiplug from ECT sensor.
Page 1420 of 1529

HARNESSES
REPAIRS 86-7-15
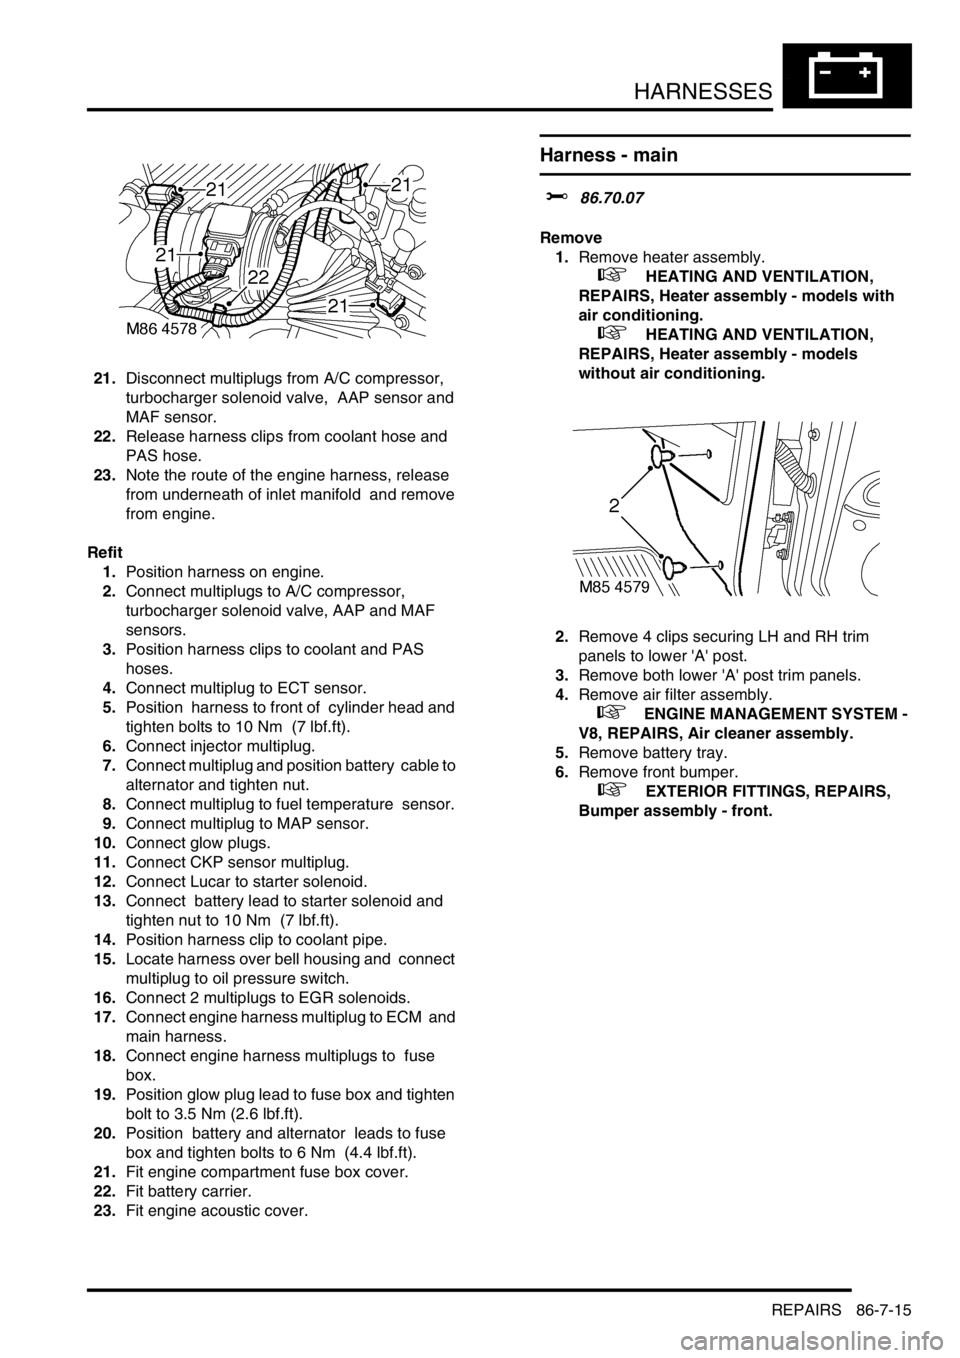
21.Disconnect multiplugs from A/C compressor,
turbocharger solenoid valve, AAP sensor and
MAF sensor.
22.Release harness clips from coolant hose and
PAS hose.
23.Note the route of the engine harness, release
from underneath of inlet manifold and remove
from engine.
Refit
1.Position harness on engine.
2.Connect multiplugs to A/C compressor,
turbocharger solenoid valve, AAP and MAF
sensors.
3.Position harness clips to coolant and PAS
hoses.
4.Connect multiplug to ECT sensor.
5.Position harness to front of cylinder head and
tighten bolts to 10 Nm (7 lbf.ft).
6.Connect injector multiplug.
7.Connect multiplug and position battery cable to
alternator and tighten nut.
8.Connect multiplug to fuel temperature sensor.
9.Connect multiplug to MAP sensor.
10.Connect glow plugs.
11.Connect CKP sensor multiplug.
12.Connect Lucar to starter solenoid.
13.Connect battery lead to starter solenoid and
tighten nut to 10 Nm (7 lbf.ft).
14.Position harness clip to coolant pipe.
15.Locate harness over bell housing and connect
multiplug to oil pressure switch.
16.Connect 2 multiplugs to EGR solenoids.
17.Connect engine harness multiplug to ECM and
main harness.
18.Connect engine harness multiplugs to fuse
box.
19.Position glow plug lead to fuse box and tighten
bolt to 3.5 Nm (2.6 lbf.ft).
20.Position battery and alternator leads to fuse
box and tighten bolts to 6 Nm (4.4 lbf.ft).
21.Fit engine compartment fuse box cover.
22.Fit battery carrier.
23.Fit engine acoustic cover.
Harness - main
$% 86.70.07
Remove
1.Remove heater assembly.
+ HEATING AND VENTILATION,
REPAIRS, Heater assembly - models with
air conditioning.
+ HEATING AND VENTILATION,
REPAIRS, Heater assembly - models
without air conditioning.
2.Remove 4 clips securing LH and RH trim
panels to lower 'A' post.
3.Remove both lower 'A' post trim panels.
4.Remove air filter assembly.
+ ENGINE MANAGEMENT SYSTEM -
V8, REPAIRS, Air cleaner assembly.
5.Remove battery tray.
6.Remove front bumper.
+ EXTERIOR FITTINGS, REPAIRS,
Bumper assembly - front.
Page 1484 of 1529

INSTRUMENTS
DESCRIPTION AND OPERATION 88-1
INS TRUMENTS DESCRIPTION AND OPERAT ION
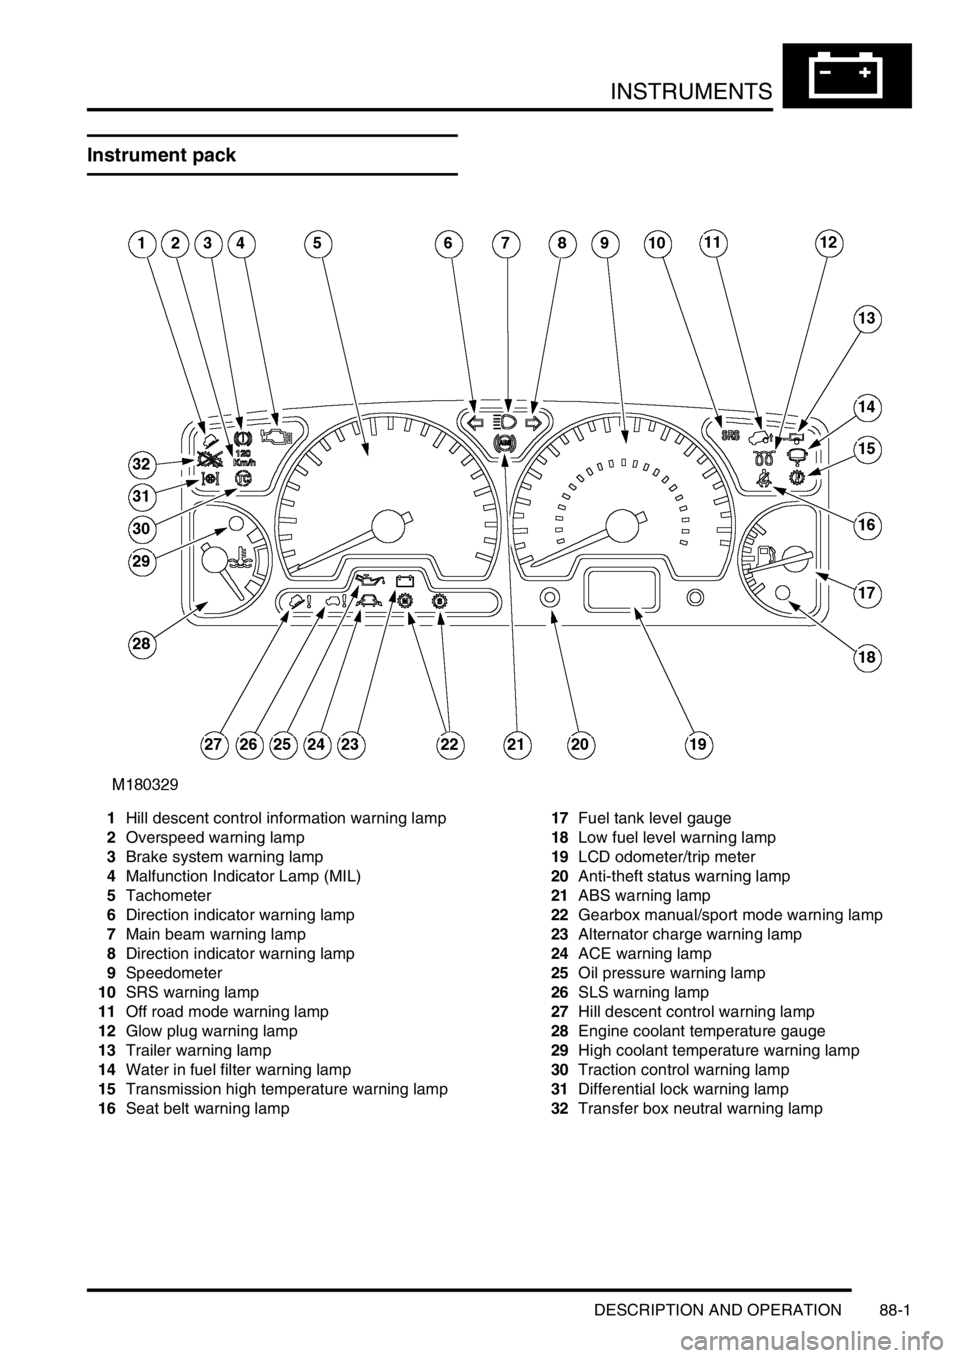
Instrument pack
1Hill descent control information warning lamp
2Overspeed warning lamp
3Brake system warning lamp
4Malfunction Indicator Lamp (MIL)
5Tachometer
6Direction indicator warning lamp
7Main beam warning lamp
8Direction indicator warning lamp
9Speedometer
10SRS warning lamp
11Off road mode warning lamp
12Glow plug warning lamp
13Trailer warning lamp
14Water in fuel filter warning lamp
15Transmission high temperature warning lamp
16Seat belt warning lamp17Fuel tank level gauge
18Low fuel level warning lamp
19LCD odometer/trip meter
20Anti-theft status warning lamp
21ABS warning lamp
22Gearbox manual/sport mode warning lamp
23Alternator charge warning lamp
24ACE warning lamp
25Oil pressure warning lamp
26SLS warning lamp
27Hill descent control warning lamp
28Engine coolant temperature gauge
29High coolant temperature warning lamp
30Traction control warning lamp
31Differential lock warning lamp
32Transfer box neutral warning lamp