1999 LAND ROVER DISCOVERY coolant
[x] Cancel search: coolantPage 1198 of 1529

AIR CONDITIONING
DESCRIPTION AND OPERATION 82-9
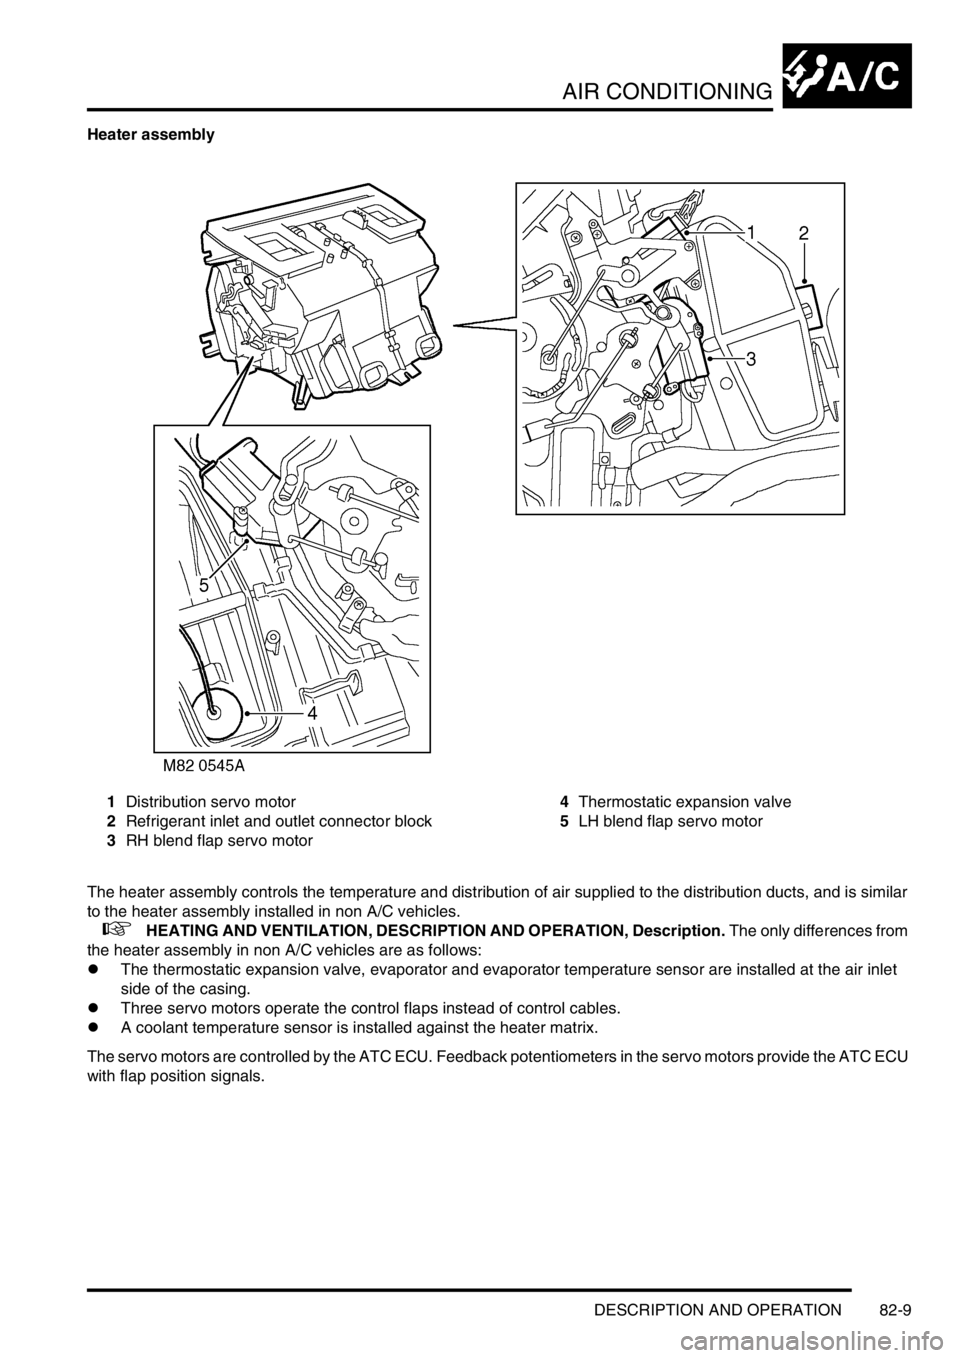
Heater assembly
1Distribution servo motor
2Refrigerant inlet and outlet connector block
3RH blend flap servo motor4Thermostatic expansion valve
5LH blend flap servo motor
The heater assembly controls the temperature and distribution of air supplied to the distribution ducts, and is similar
to the heater assembly installed in non A/C vehicles.
+ HEATING AND VENTILATION, DESCRIPTION AND OPERATION, Description. The only differences from
the heater assembly in non A/C vehicles are as follows:
lThe thermostatic expansion valve, evaporator and evaporator temperature sensor are installed at the air inlet
side of the casing.
lThree servo motors operate the control flaps instead of control cables.
lA coolant temperature sensor is installed against the heater matrix.
The servo motors are controlled by the ATC ECU. Feedback potentiometers in the servo motors provide the ATC ECU
with flap position signals.
Page 1199 of 1529

AIR CONDITIONING
82-10DESCRIPTION AND OPERATION
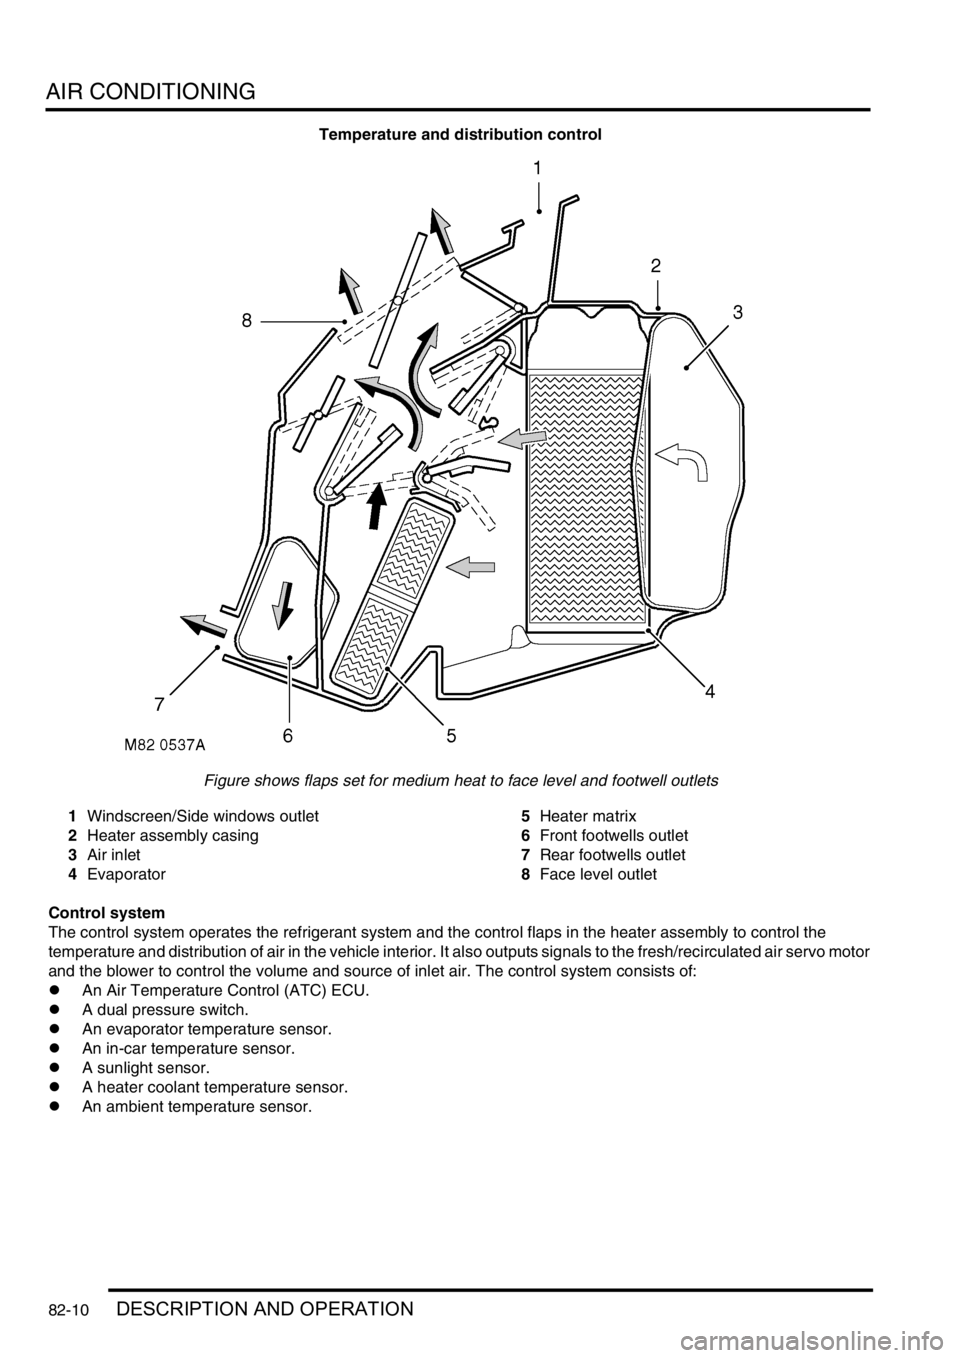
Temperature and distribution control
Figure shows flaps set for medium heat to face level and footwell outlets
1Windscreen/Side windows outlet
2Heater assembly casing
3Air inlet
4Evaporator5Heater matrix
6Front footwells outlet
7Rear footwells outlet
8Face level outlet
Control system
The control system operates the refrigerant system and the control flaps in the heater assembly to control the
temperature and distribution of air in the vehicle interior. It also outputs signals to the fresh/recirculated air servo motor
and the blower to control the volume and source of inlet air. The control system consists of:
lAn Air Temperature Control (ATC) ECU.
lA dual pressure switch.
lAn evaporator temperature sensor.
lAn in-car temperature sensor.
lA sunlight sensor.
lA heater coolant temperature sensor.
lAn ambient temperature sensor.
Page 1200 of 1529

AIR CONDITIONING
DESCRIPTION AND OPERATION 82-11
ATC ECU
The ATC ECU is installed in the centre of the fascia, below the radio. An integral control panel on the ATC ECU
contains switches for system control inputs and a LCD to provide system status information.
Inputs from sensors and the control panel switches are processed by the ATC ECU, which then outputs the
appropriate control signals.
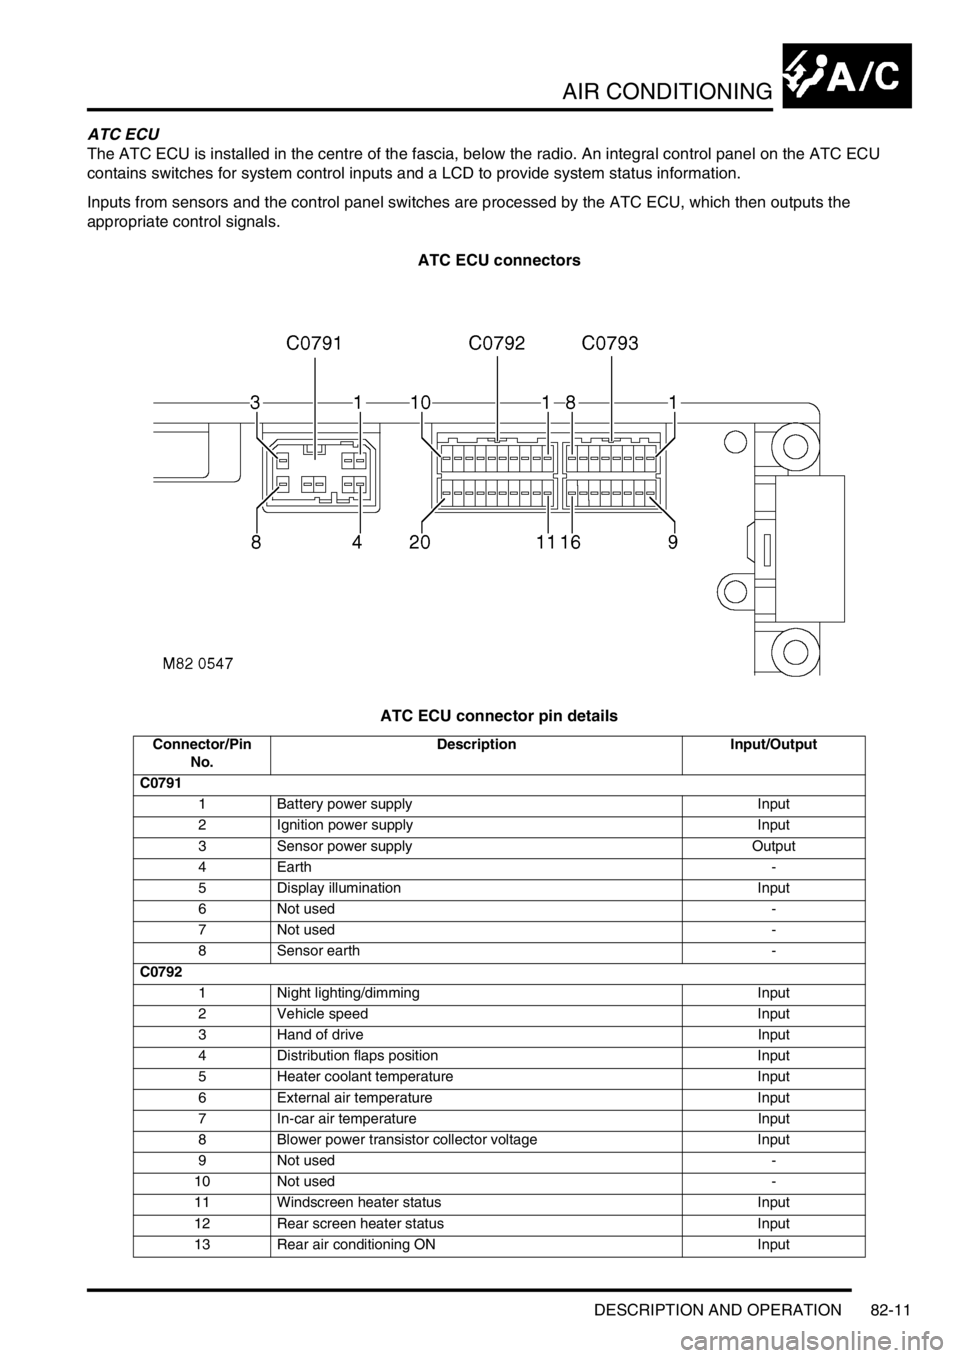
ATC ECU connectors
ATC ECU connector pin details
Connector/Pin
No.Description Input/Output
C0791
1 Battery power supply Input
2 Ignition power supply Input
3 Sensor power supply Output
4Earth -
5 Display illumination Input
6 Not used -
7 Not used -
8 Sensor earth -
C0792
1 Night lighting/dimming Input
2 Vehicle speed Input
3 Hand of drive Input
4 Distribution flaps position Input
5 Heater coolant temperature Input
6 External air temperature Input
7 In-car air temperature Input
8 Blower power transistor collector voltage Input
9 Not used -
10 Not used -
11 Windscreen heater status Input
12 Rear screen heater status Input
13 Rear air conditioning ON Input
Page 1204 of 1529

AIR CONDITIONING
DESCRIPTION AND OPERATION 82-15
Dual pressure switch
The dual pressure switch protects the refrigerant system from extremes of pressure. The normally closed switch is
installed in the top of the receiver drier. If minimum or maximum pressure limits are exceeded the switch contacts
open, causing the compressor clutch to be disengaged. The minimum pressure limit protects the compressor, by
preventing operation of the system unless there is a minimum refrigerant pressure (and thus refrigerant and
lubricating oil) in the system. The maximum pressure limit keeps the refrigerant system within a safe operating
pressure.
Dual pressure switch nominal operating pressures
Evaporator temperature sensor
The evaporator temperature sensor is an encapsulated thermistor that provides the ATC ECU with an input of the
evaporator air outlet temperature. The evaporator temperature sensor is installed in a clip which locates in the
evaporator matrix in the heater assembly. The ATC ECU uses the input to prevent the formation of ice on the
evaporator.
In-car temperature sensor
The in-car temperature sensor is an encapsulated thermistor that provides the ATC ECU with an input of cabin air
temperature. The sensor is integrated into the inlet of an electric fan, which is installed behind a grille in the fascia
outboard of the steering column. The fan runs continuously, while the ignition is on, to draw air through the grille and
across the sensor.
Sunlight sensor
The sunlight sensor consists of two diodes that provide the ATC ECU with inputs of light intensity, one as sensed
coming from the left of the vehicle and one as sensed coming from the right. The inputs are used as a measure of the
solar heating effect on vehicle occupants. The sensor is installed in the centre of the fascia upper surface.
Heater coolant temperature sensor
The heater coolant temperature sensor is an encapsulated thermistor that provides the ATC ECU with an input related
to heater matrix coolant temperature. The sensor is installed in the casing of the heater assembly and presses against
the end tank of the heater matrix.
Ambient temperature sensor
The ambient temperature sensor is an encapsulated thermistor that provides the ATC ECU with an input of external
air temperature. The sensor is attached to the cooling fan mounting bracket in front of the condenser.
Limit Opening pressure, bar (lbf.in2) Closing pressure, bar (lbf.in2)
Minimum 2.0 (29.0), pressure decreasing 2.3 (33.4), pressure increasing
Maximum 32 (464), pressure increasing 26 (377), pressure decreasing
Page 1205 of 1529

AIR CONDITIONING
82-16DESCRIPTION AND OPERATION
Operation
General
While the system is on, the ATC ECU operates the refrigerant system and the inlet air, blower speed, air temperature
and air distribution functions to produce the conditions requested on the control panel. When the system is first
switched on, the ATC ECU resumes the control outputs in use when the system was last switched off. If conditions
have changed, or a different mode is selected to switch the system on, the control outputs are then changed to
produce the required new settings.
The system operates in automatic, economy and defrost modes, with manual overrides of the inlet air source, blower
speed and air distribution. The air temperature is automatically controlled in all operating modes.
In the automatic mode, the ATC ECU operates the system to warm-up or cool down the cabin to establish and
maintain the temperature selections on the control panel, while directing the air to those outlets most comfortable for
the occupant(s). If a difference between the LH and RH temperature selections causes a conflict of the required inlet
air source, blower speed or air distribution settings, priority is given to achieving the temperature requested on the
driver's side of the control panel.
The ATC ECU enters the economy mode when the refrigerant compressor is selected off while the system is in the
automatic mode, which reduces the load on the engine. Economy mode operation is similar to the automatic mode,
but without the ability to cool the cabin if the ambient temperature is higher than the temperature selections made on
the control panel, or to dehumidify the air in the cabin.
In the defrost mode, the ATC ECU sets the inlet air source to fresh air, the blower to maximum speed, the air
distribution to windscreen and side windows, and outputs signals to the BCU to operate the rear window heater and
(where fitted) the windscreen heater. The BCU starts or, if the heaters are already on, resets the heater timers and
energises the rear window and windscreen heaters for a complete on cycle.
Air temperature control
To determine the amount of heat or cooling required by the cabin, the ATC ECU uses the sensor inputs and the
temperatures selected on the control panel to calculate target air outlet temperatures for the driver's and the front
passenger's side of the heater assembly. The ATC ECU then signals the servo motors controlling the respective blend
flaps in the heater assembly to move to the flaps to the appropriate position. The target temperatures are constantly
updated and, in the automatic mode, also used in further calculations to determine the inlet air source, the blower
speed and the air distribution.
Inlet air control
The inlet air source is automatically controlled while the system is off or on. While the system is on, the inlet air source
can also be manually controlled to give timed recirculated air or latched recirculated air.
While the system is off, the ATC ECU uses vehicle speed to determine the inlet air source. With the vehicle at rest,
the inlet air source is set to recirculated air. When vehicle speed reaches 17.5 mph (28 km/h), the inlet air source
changes to fresh air. The inlet air source then remains at fresh air until the vehicle speed decreases to 5 mph (8 km/
h), when it returns to recirculated air.
While the system is on, the ATC ECU uses the LH and RH temperature selections, vehicle speed, ambient air
temperature and coolant temperature to determine the inlet air source. In the automatic mode:
lIf one temperature selection is set to LO and one is set to a specific temperature or HI, the inlet air is set to
recirculated air.
lIf one temperature selection is set to HI and one is set to a specific temperature or HI, the inlet air is set to fresh
air.
lWhen specific LH and RH temperature selections are set, the inlet air source remains at fresh air except when
the air distribution function is set to face level only or face level and footwell outlets. If the air distribution function
is set to face level only or face level and footwell outlets, at 56 mph (90 km/h) the inlet air source changes to
recirculated air (to exclude ram effect, which becomes excessive at speed). When the vehicle speed decreases
to 37.5 mph (60 km/h), the inlet air source returns to fresh air.
In the defrost mode, the inlet air source is set to fresh air except at low ambient air and coolant temperatures. If, within
5 minutes of the ignition being switched on, the vehicle speed is less than 5 mph (8 km/h) while the external air
temperature is −16 °C (3 °F) or less and the heater coolant temperature is −10 °C (14 °F) or less, then the inlet air
source is automatically set to the timed recirculated air mode. The timed recirculated air mode is cancelled
immediately the vehicle speed reaches 8 km/h or more .
Page 1206 of 1529

AIR CONDITIONING
DESCRIPTION AND OPERATION 82-17
Timed recirculated air
The timed recirculated air mode sets the inlet air source to recirculated air for 5 ± 1 minutes, after which it automatically
reverts to fresh air. Timed recirculated air can be manually selected:
lIn the automatic mode, by pressing the fresh/recirculated air switch for 1.5 seconds or more; the audible warning
sounds twice.
lIn the economy or defrost modes, by pressing the fresh/recirculated air switch for less than 1.5 seconds; the
audible warning sounds once.
Latched recirculated air
The inlet air source can be latched to recirculated air:
lIn the automatic mode, by pressing the fresh/recirculated air switch for less than 1.5 seconds; the audible
warning sounds once.
lIn the economy or defrost modes, by pressing the fresh/recirculated air switch for 1.5 seconds or more; the
audible warning sounds twice.
Blower control
The ATC ECU operates a blower relay, power transistor and power relay to run the blower at one of 31 stepped
speeds. All speed steps are available in the automatic modes of blower control. In the manual mode, speed steps 3,
10, 16, 22 and 31 are used to provide slow, three intermediate and fast blower speeds. The ATC ECU energises the
blower relay and modulates the power transistor to operate the blower for speed steps 1 to 30. For speed step 31, the
ATC ECU energises the power relay, which switches the earth side of the blower motor direct to earth, bypassing the
power transistor.
In the automatic, economy and defrost modes, blower speed is corrected for vehicle speed to compensate for the
increase in ram effect on the inlet air as the vehicle speed increases. Correction begins at approximately 50 km/h,
when blower speed is progressively decreased as vehicle speed increases, until a maximum decrease of 13 steps
occurs at 123 km/h. Similarly, blower speed increases as vehicle speed decreases down to approximately 50 km/h.
In the automatic and economy modes, if the LH or RH temperature is set to LO or HI, the blower runs at maximum
speed with correction only for vehicle speed. If both the LH and RH outlet air temperatures are set to a specific
temperature, blower speed corrections are added to compensate for the heater coolant temperature, external air
temperature, and the solar load acting on the vehicle:
lDuring warm-up, the blower speed is set to 3 while the heater coolant temperature is below approximately 20 °C
(68 °F). From approximately 20 °C (68 °F), the blower speed is progressively increased as the coolant
temperature increases, until maximum speed is set at approximately 50 °C (122 °F).
lDuring cool down, blower speed is set to 3, for 5 seconds after the system is switched on. Over the following 6
seconds, the blower speed is progressively increased up to maximum speed.
lAs the temperature in the cabin approaches the selected temperatures, blower speed is progressively reduced
until, once the selected temperatures have been established, blower speed stabilises at approximately 6.
lSolar heating correction is employed when air distribution is set to face level or to face and footwells. The
correction progressively increases the blower speed, up to a maximum of 9 steps, with increasing values of solar
heating.
Page 1208 of 1529

AIR CONDITIONING
DESCRIPTION AND OPERATION 82-19
Diagnostics
The ATC ECU performs a diagnostic check each time the ignition is switched on. To avoid nuisance fault indications
at low light levels, the sunlight sensor is omitted from the diagnostic check. If a fault is detected, the audible warning
sounds three times and the AUTO window on the control panel display flashes for 20 seconds. The ATC ECU then
reverts to normal control but uses a default value or strategy for the detected fault. Faults are identified by performing
a manual diagnostic check of the system.
A manual diagnostic check includes a check of the sunlight sensor, and is initiated by pressing and holding the AUTO
switch and the air distribution switch, then turning the ignition switch from off to on. The audible warning sounds once
and the indications on the control panel display illuminate. FC is shown in the LH temperature window and the results
of the check are shown as a two digit fault code in the RH temperature window. If a fault is detected, the audible
warning sounds three times and the AUTO window on the display flashes on and off for 20 seconds. If more than one
fault is detected, the fault codes cycle in numerical order, at 1 Hz. The audible warning sounds as each fault code is
shown. In low light conditions, to avoid false sunlight sensor fault indications, the sunlight sensor should be illuminated
with a strong light source.
Diagnostic fault codes and fault descriptions
Code Component Fault Default value/strategy
00 - No fault found -
11 In-car temperature sensor Open or short circuit 25°C (77°F)
12 Ambient temperature sensor Open or short circuit 10°C (50°F)
Cooling fan permanently on
Display shows "- -" if external air
temperature selected
13 Thermistor Open or short circuit 0°C (32°F)
14 Heater coolant temperature sensor Open or short circuit 70°C (158°F)
21 Sunlight sensor, left output Open or short circuit No solar heating correction
22 Sunlight sensor, right output Open or short circuit No solar heating correction
31 LH temperature servo motor Open or short circuit
Motor or flap mechanism seizedServo motor locked in position
32 RH temperature servo motor Open or short circuit
Motor or flap mechanism seizedServo motor locked in position
33 Distribution servo motor Open or short circuit
Motor or flap mechanism seizedServo motor locked in position
Page 1218 of 1529

AIR CONDITIONING
REPAIRS 82-29
REPAIRS
Compressor - diesel
$% 82.10.20
Remove
1.Remove engine acoustic cover.
2.Depressurise air conditioning system.
+ AIR CONDITIONING, REFRIGERANT
RECOVERY, RECYCLING AND
RECHARGING, Refrigerant recovery,
recycling and recharging.
3.Remove auxiliary drive belt.
+ CHARGING AND STARTING,
REPAIRS, Belt - auxiliary drive.
4.Drain cooling system.
+ COOLING SYSTEM - Td5,
ADJUSTMENTS, Drain and refill.
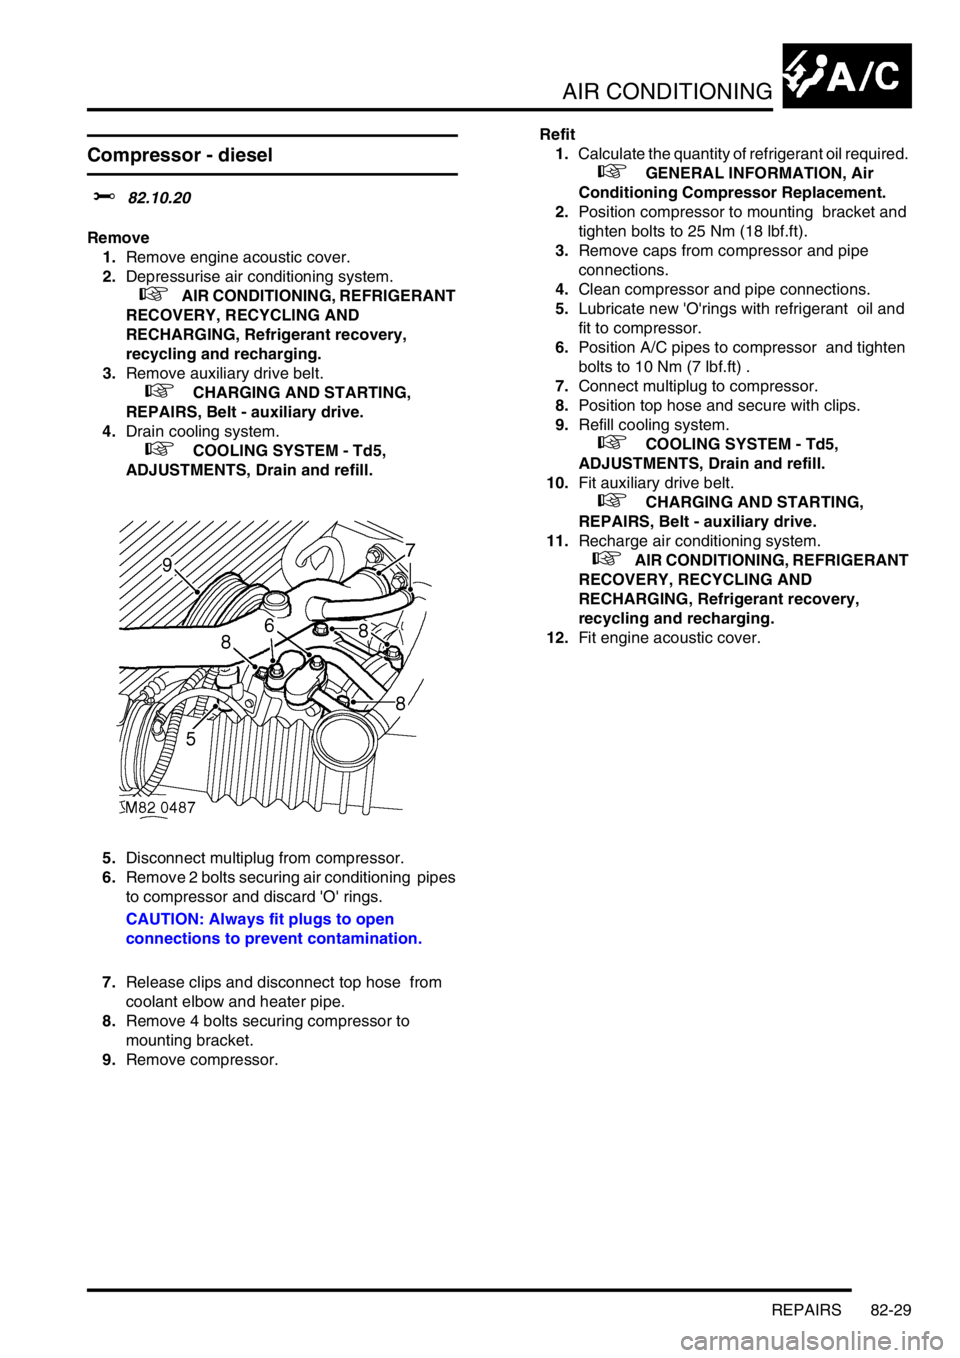
5.Disconnect multiplug from compressor.
6.Remove 2 bolts securing air conditioning pipes
to compressor and discard 'O' rings.
CAUTION: Always fit plugs to open
connections to prevent contamination.
7.Release clips and disconnect top hose from
coolant elbow and heater pipe.
8.Remove 4 bolts securing compressor to
mounting bracket.
9.Remove compressor.Refit
1.Calculate the quantity of refrigerant oil required.
+ GENERAL INFORMATION, Air
Conditioning Compressor Replacement.
2.Position compressor to mounting bracket and
tighten bolts to 25 Nm (18 lbf.ft).
3.Remove caps from compressor and pipe
connections.
4.Clean compressor and pipe connections.
5.Lubricate new 'O'rings with refrigerant oil and
fit to compressor.
6.Position A/C pipes to compressor and tighten
bolts to 10 Nm (7 lbf.ft) .
7.Connect multiplug to compressor.
8.Position top hose and secure with clips.
9.Refill cooling system.
+ COOLING SYSTEM - Td5,
ADJUSTMENTS, Drain and refill.
10.Fit auxiliary drive belt.
+ CHARGING AND STARTING,
REPAIRS, Belt - auxiliary drive.
11.Recharge air conditioning system.
+ AIR CONDITIONING, REFRIGERANT
RECOVERY, RECYCLING AND
RECHARGING, Refrigerant recovery,
recycling and recharging.
12.Fit engine acoustic cover.